
Tag: Amazon Seller

  • Amazon’s 2026 Image Compliance Checks: What Actually Triggers Suppression (And How to Fix It Before It Costs You)

    Amazon’s 2026 Image Compliance Checks: What Actually Triggers Suppression (And How to Fix It Before It Costs You)

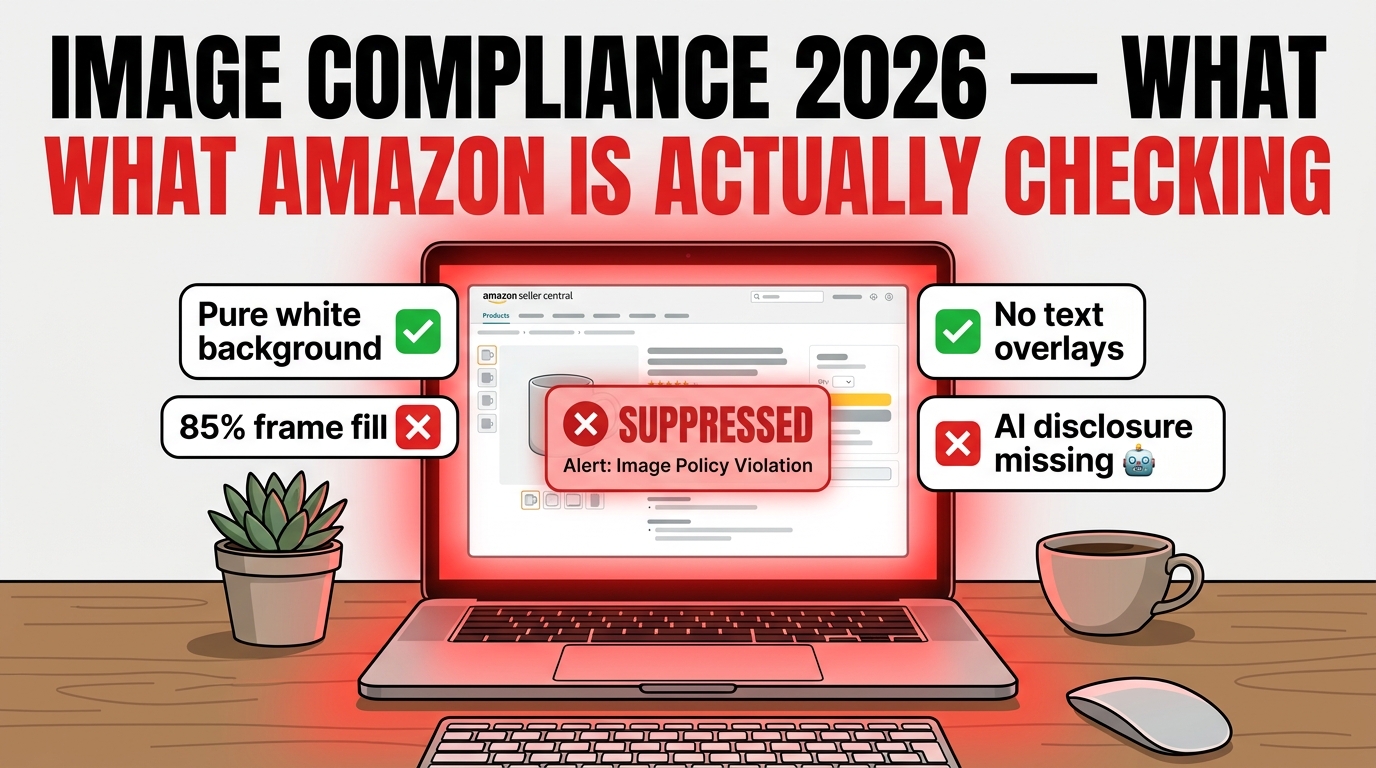
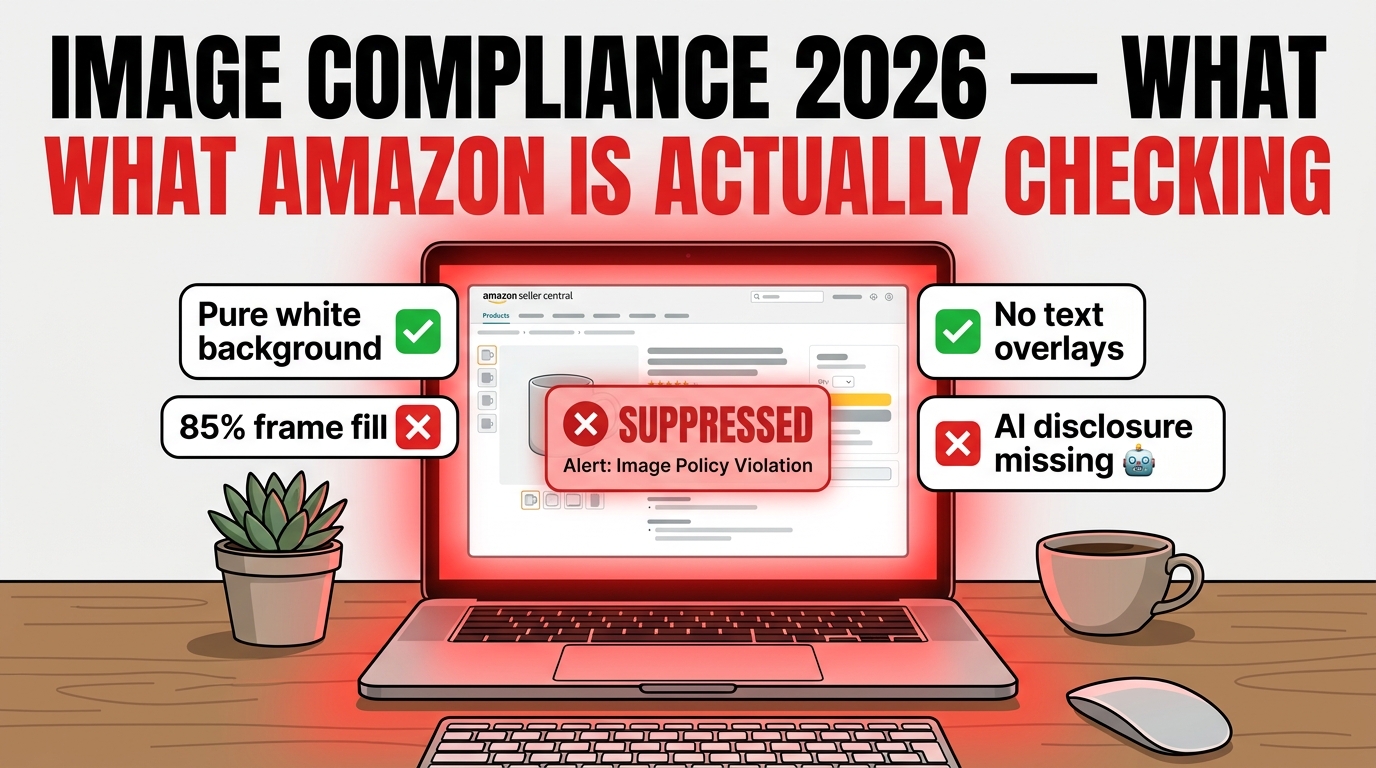
    Amazon image compliance 2026 — laptop showing Seller Central suppression warning with compliance checklist items

    One morning your listing is ranking. By afternoon it’s gone. No email. No policy violation notice in Account Health. Just — gone. You check Seller Central and find the word Suppressed sitting next to your best-selling ASIN, and the only clue is a vague reference to “image quality standards.”

    This is the reality of Amazon’s 2026 image compliance environment. The checks are faster, the enforcement is more automated, and the consequences cascade further into your catalog health than most sellers realize. What used to be a straightforward set of pixel rules has become a layered compliance system — one that now includes AI-generated content disclosure requirements, stricter background purity enforcement, and a tighter link between image status and your overall listing quality score.

    The challenge isn’t that the rules are secret. Amazon publishes most of them. The challenge is understanding which violations get caught automatically and which require human review, how long suppression actually lasts before it starts doing structural damage to your ranking, and where sellers consistently stumble despite thinking they’ve checked every box.

    This guide works through all of it — the technical pipeline behind Amazon’s checks, the specific violations most likely to trigger suppression in 2026, the new AI disclosure rules that came into effect in July 2026, category-specific differences, the real suppression-to-recovery timeline, and a practical audit workflow you can run on your catalog before Amazon finds the problem first.

    How Amazon’s Image Compliance System Actually Works

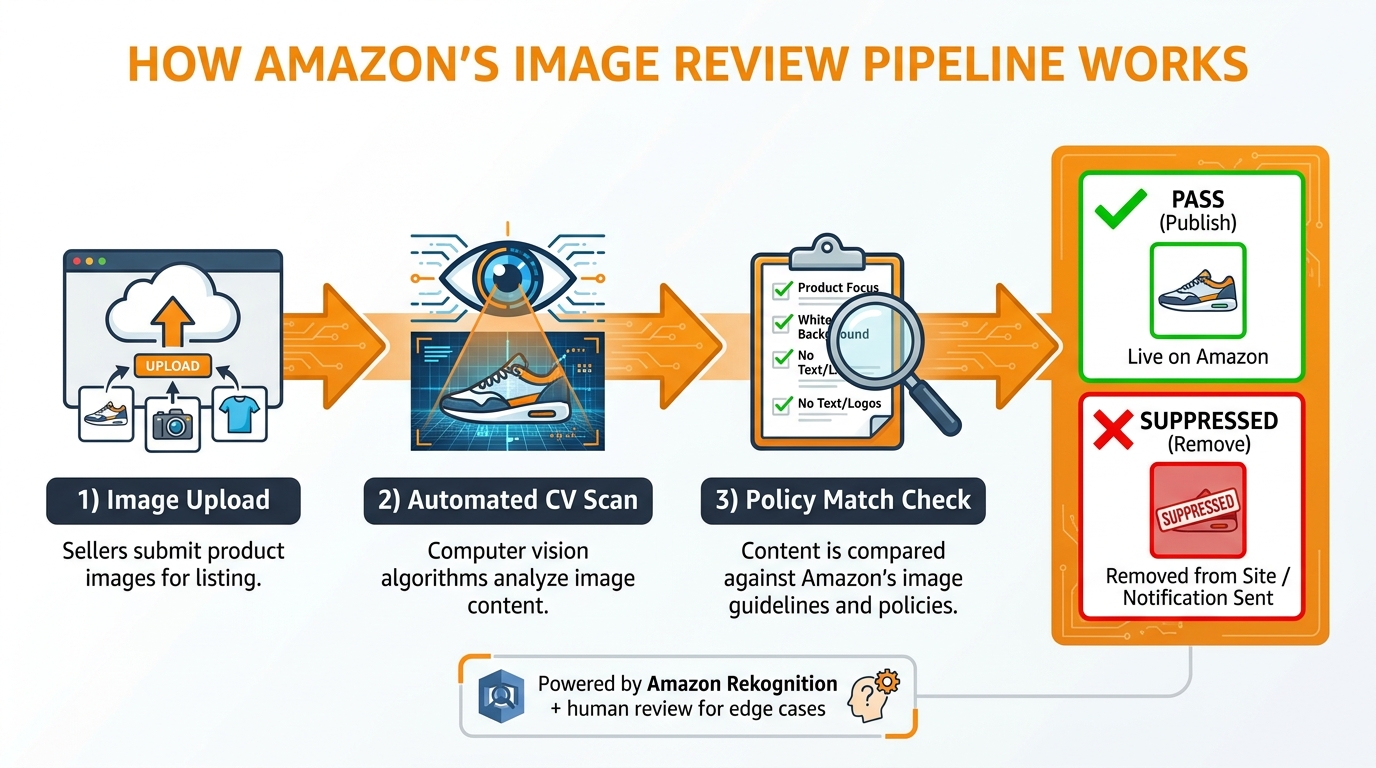
    Flowchart showing Amazon's automated image compliance pipeline: upload, CV scan, policy match, pass or suppressed

    Most sellers imagine Amazon’s image review as something like a human reviewer glancing at their photos. The reality is far more automated, and far faster than that.

    Amazon’s image compliance pipeline operates as a multi-stage automated system. When a seller uploads an image to Seller Central — whether through the Manage Inventory interface, a flat file feed, or a third-party integration — the file enters an automated review queue almost immediately. The system checks the image against a structured set of technical requirements and policy rules before the asset is accepted into the catalog. Images that fail hard technical requirements, such as an unsupported file format or a file that exceeds the size ceiling, are blocked from upload entirely. Images that pass technical intake but may violate policy rules proceed into a secondary compliance layer.

    The Role of Computer Vision

    Amazon’s image moderation infrastructure is built on computer vision tooling closely related to the services available through Amazon Web Services (AWS). Amazon Rekognition, AWS’s image and video analysis service, provides the underlying capability for detecting objects, scenes, unsafe content, and image attributes at scale. Amazon applies a similar stack to Seller Central image review — using automated models to analyze uploaded images for compliance signals: background color purity, the presence of text or graphic overlays, watermarks, logos, and whether the product occupies sufficient frame space.

    These models don’t review images the way a human would. They analyze pixel data, detect color values, identify regions of the frame that are occupied by the product versus empty or background space, and flag anomalies against a compliance ruleset. The process is largely instantaneous for standard checks. Edge cases — images where the automated system can’t make a confident determination — are escalated to human review, which is where timelines extend from minutes to days.

    The Two-Layer Enforcement Model

    It helps to think of Amazon’s enforcement model as having two distinct layers. The first is pre-upload validation: technical format checks that happen the moment a file is submitted. This layer catches issues like wrong file types, files that are too small in pixel dimensions, or filename formats that don’t match Amazon’s identifier-based naming convention. These rejections happen before your image ever appears in the catalog.

    The second layer is post-upload compliance review: the more consequential checks that examine whether an accepted image actually meets policy standards. A listing can appear live for hours or days before this layer catches a violation, which is why sellers are often blindsided. The image uploaded fine, the listing went live, and then the automated compliance pass — which may run on a scheduled cycle rather than real-time — flags the image and triggers suppression.

    This second-layer timing is one of the most commonly misunderstood aspects of how Amazon enforces image standards. Compliance isn’t a single gate at upload. It’s an ongoing check that can surface violations in images that have existed in your catalog for months.

    The Main Image Rules That Trigger Automatic Suppression

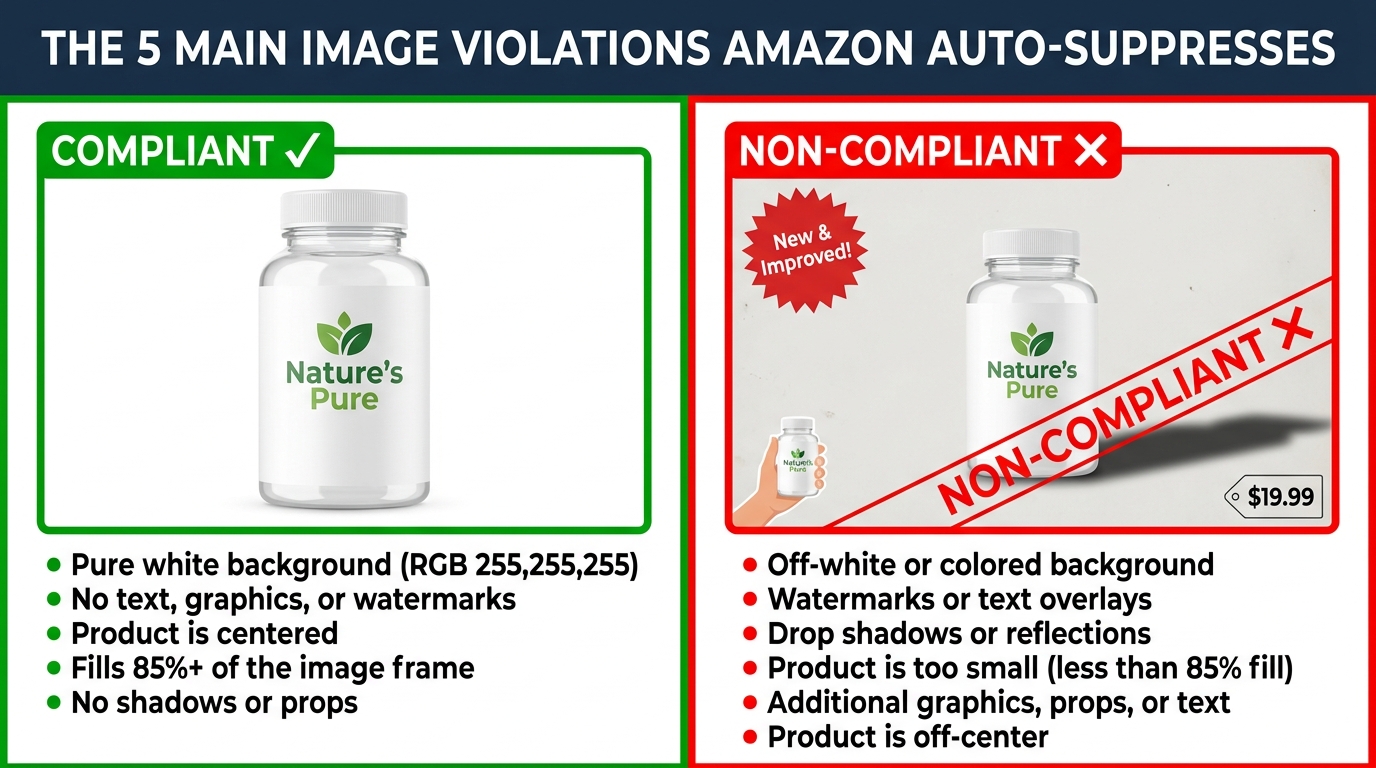
    Split-screen comparison of compliant vs non-compliant Amazon main product images highlighting the 5 main violations

    The main product image — the first image shoppers see in search results and at the top of the detail page — carries the strictest compliance requirements of any image type in Amazon’s catalog. Most suppression events in 2026 trace back to main image violations, and the majority of those violations cluster around five recurring failure modes.

    1. Background Purity: Pure White or Nothing

    Amazon’s product image requirements are unambiguous on this point: the main image background must be pure white, defined as RGB (255, 255, 255). Not off-white. Not eggshell. Not a very-light gray that looks white on a laptop screen. Pure white — the exact hex value #FFFFFF.

    This is the single most common source of automated suppression in 2026. Off-white or slightly gray backgrounds often enter catalogs through photographers shooting on white seamless paper that picks up color from studio lighting, or through background removal tools that replace the original background with a near-white rather than a true white. The images look correct to the human eye, but Amazon’s automated checks read the RGB values precisely. A background that registers as RGB (250, 250, 250) or (245, 245, 248) fails the standard, even though it’s visually indistinguishable from compliant white in most display environments.

    Drop shadows that extend to the edges of the image create a similar problem. A subtle shadow below a product — one that fades out before reaching the edge — is generally acceptable. A shadow gradient that bleeds into the background and pulls it away from pure white is not. The same applies to vignettes, subtle gradients, and edge blurring effects used by some photography workflows to create depth.

    2. Frame Fill: The 85% Minimum

    Amazon’s guidelines state that the product should occupy approximately 85% of the image frame. In practice, this means the product needs to be close-cropped and large within the image canvas. A product image where the item sits small in the center of a large white expanse will fail. This rule exists partly for visual consistency across search results and partly because the zoom function on product detail pages requires sufficient pixel density around the product itself to function effectively.

    Frame fill violations commonly occur when sellers use images originally produced for other channels — websites, print catalogs, trade show materials — that were composed with generous white space around the product. Resizing the image without recomposing it doesn’t solve the problem; the product-to-frame ratio stays the same regardless of pixel dimensions.

    3. Text, Logos, Watermarks, and Graphics

    Main images must show the product, and only the product. No text overlays. No brand logos. No promotional badges — not “New Arrival,” not “Best Value,” not an award badge from a trade publication. No watermarks, including copyright watermarks. No borders, frames, or decorative graphic elements.

    This rule is well-known but still routinely violated, most often by sellers who inherit images from manufacturers or brand partners whose standard creative assets include a logo watermark or a brand name superimposed in a corner. The violation isn’t intentional, but Amazon’s automated system doesn’t distinguish between deliberate and inadvertent. The flag fires the same either way.

    4. Resolution and Pixel Dimensions

    Amazon requires images to be at least 500 pixels on the longest side, but sellers operating at this floor are taking unnecessary risk. For a listing to support Amazon’s built-in product zoom feature — which has a measurable positive effect on conversion — images should be at least 1,000 pixels on the longest side, and ideally 2,000 pixels or higher. Images below the zoom threshold won’t be suppressed, but they will underperform. Images that fall below the absolute minimum are blocked at upload.

    Amazon also enforces an upper ceiling of 10,000 pixels on the longest side. Files exceeding this aren’t a common problem, but some high-end photography and brand asset workflows produce extremely large files that need resizing before upload.

    5. Image Accuracy and Product Misrepresentation

    Amazon’s guidelines require that the main image shows the actual product being sold, as it would be received by a customer. This means no props that aren’t included in the purchase, no lifestyle context that makes a single product appear to be a bundle, and no rendering or illustration used in place of an actual product photo — unless the category specifically permits it (electronics and some home goods categories allow high-quality renders for main images).

    The misrepresentation check is more complex than a pixel-level scan. It involves cross-referencing the visual content of the image with the listing’s product type, category, and ASIN attributes. This is one of the areas where human review plays a more significant role, particularly when the automated system flags a potential mismatch but can’t make a confident determination from image analysis alone.

    The New AI-Generated Image Disclosure Requirement (July 2026)

    Amazon July 2026 AI synthetic performer disclosure requirement showing the contains-synthetic-performer metadata tag requirement

    The most significant new compliance requirement of 2026 has nothing to do with background color or pixel dimensions. In July 2026, Amazon announced a new disclosure requirement for product images, videos, and A+ Content that feature photorealistic AI-generated people. This requirement represents a structural shift in how image compliance intersects with creative production — and most sellers using AI imagery tools haven’t accounted for it yet.

    What the Policy Actually Requires

    Amazon’s July 2026 guidance, which was reported widely and tied to New York’s synthetic-performer disclosure law that took effect in June 2026, requires third-party sellers to add a specific metadata keyword to qualifying image and video files before upload. The required keyword is: contains-synthetic-performer.

    This tag must be embedded in the file’s IPTC/XMP metadata in the dc:subject field — not added as a listing text field, not included in the product description, but embedded directly in the image file’s metadata before the file is uploaded to Seller Central. Amazon says it will surface a disclosure indicator to shoppers on qualifying listings where the tag is present and validated.

    The requirement applies to any image or video that contains a photorealistic AI-generated person. This includes lifestyle product images featuring AI-generated human models, A+ Content module images featuring AI-generated people, and product videos that include synthetic human performers.

    What the Policy Does Not Cover

    The boundaries of this requirement are as important as the requirement itself. Amazon has confirmed the disclosure rule does not apply to:

    • Real people whose images have been edited with AI — if a real human model was photographed and their image was subsequently retouched or modified using AI tools, the contains-synthetic-performer tag is not required.
    • Fictional characters — animated characters, illustrated figures, and non-photorealistic digital art don’t qualify as synthetic performers under this framework.
    • Images with no people — product-only images, lifestyle shots without human models, and images featuring only hands or product-adjacent props (without a recognizable human figure) are not in scope.
    • TV, video game, or movie characters — content already governed by other IP and disclosure frameworks is carved out of this requirement.

    The Operational Compliance Challenge

    The compliance burden here is genuinely new for most catalog and creative teams. Embedding metadata in image files before upload isn’t part of a typical product photography or image processing workflow. Most photo editing software — Adobe Photoshop, Lightroom, Capture One — supports IPTC/XMP metadata editing, but doing it consistently across a large catalog of assets requires either a manual per-file process or an automated tagging step built into the pre-upload workflow.

    For sellers using AI image generation tools to create lifestyle imagery with human models — a practice that expanded dramatically as these tools became more accessible in 2024 and 2025 — this requirement means auditing the existing catalog for qualifying assets and retrofitting metadata tags before enforcement catches up with non-compliant files. Amazon has not published a hard enforcement start date for penalties against non-compliant assets at time of writing, but the metadata disclosure requirement is active, and enforcement cadence typically follows a policy announcement within 60 to 90 days.

    Category-Specific Rules: Where the Baseline Doesn’t Apply

    Amazon’s core image requirements provide a baseline that applies across the marketplace, but several major categories operate under supplemental rules that differ meaningfully from the standard. Understanding where your category diverges from the baseline is critical — what works for listing a kitchen gadget won’t necessarily work for listing an apparel item or a supplement.

    Apparel and Footwear

    Apparel is the most significant category departure from the standard white-background rule. For most clothing items, Amazon actually requires or strongly prefers that the main image feature a live model wearing the garment, or alternatively a ghost mannequin shot (an invisible mannequin technique that shows the garment’s fit and shape without a visible model). Flat-lay photography — the product laid out on a flat surface — is generally acceptable for some accessory and basic apparel categories but is less preferred and may underperform in search results for fashion-forward or fit-sensitive categories.

    The purpose is practical: apparel shoppers make purchase decisions based on fit and drape, and a model or ghost mannequin image communicates fit information that a flat product image simply cannot. Amazon’s image compliance checks for apparel therefore include an additional assessment of whether the presentation appropriately represents how the garment would be worn.

    Jewelry

    Jewelry main images typically follow a stricter product-only standard — no model, no lifestyle context, no props. The product itself, centered on a pure white background, filling the frame at the correct ratio. Jewelry categories benefit from high-resolution images even more than most product types because the zoom function matters significantly to shoppers evaluating texture, finish, and detail at the level a physical examination would provide. Images below 2,000 pixels on the longest side leave conversion on the table in this category even when they clear the compliance minimum.

    Beauty and Personal Care

    Beauty categories follow the standard white-background rules for main images, but face particularly strict scrutiny on one dimension that’s distinct from other categories: image-to-product accuracy. Amazon’s compliance checks in beauty cross-reference visible label claims on the product in the image with the claims made in the listing. If the product packaging visible in the image conflicts with listing attributes — different size, different formulation claim, different featured ingredient — this can trigger a suppression or a more serious policy review.

    Beauty sellers who use “hero” product images that were photographed for a previous packaging version and not updated after a reformulation or rebrand face meaningful suppression risk under this cross-referencing check. The image doesn’t need to look wrong; it needs to accurately represent the specific product being sold today.

    Dietary Supplements and Health Products

    Dietary supplement images are reviewed with an additional layer of scrutiny tied to Amazon’s broader regulated products compliance framework. Images of supplement products that feature visible label text with structure/function claims — statements about what the product does for the body — are cross-referenced with the listing’s product description and bullet points. Discrepancies can trigger compliance holds. Amazon also applies automated checks for label readability and accuracy in this category, making it one of the few product types where the text visible within the product image (on the label) is part of the compliance check, not just the decorative elements around the image.

    Secondary Images and A+ Content: Different Standards, Distinct Risks

    Main image requirements get the most attention from sellers and compliance guides, but the secondary image slots and A+ Content modules operate under their own distinct rule sets — and violations in these areas carry real consequences even though they don’t immediately suppress a listing the way a main image violation does.

    Secondary Images: More Flexibility, Same Scrutiny

    Secondary images — the additional product photos displayed in the image carousel on a detail page — have significantly more flexibility than main images. Lifestyle photography, in-use shots, size comparison images, product detail close-ups, and infographic-style images with text overlays are all permitted in secondary slots. Props that aren’t included in the purchase are allowed. Background colors other than white are permitted. This creative latitude is where sellers can show product context, demonstrate use cases, and communicate the features a pure product shot can’t convey.

    However, secondary images aren’t a compliance-free zone. They must still accurately represent the product. They cannot include false or misleading claims — price claims, performance guarantees, unsubstantiated comparative statements, or regulatory claims that Amazon’s policies prohibit. Lifestyle images must not depict scenarios that imply the product does something it doesn’t.

    The minimum technical requirements for secondary images include: supported formats (JPEG is recommended; PNG and TIFF are accepted), a minimum of 1,000 pixels on the longest side for zoom functionality, and sRGB color space. Secondary images don’t require a white background, but they do require that the product being sold is clearly identifiable in the image.

    A+ Content: Stricter Technical Rules, Unique Content Requirement

    A+ Content images have their own technical specification that differs from the standard listing image requirements. Amazon’s A+ Content guidelines require:

    • Static images only — no animated GIFs, no moving elements
    • Supported formats: JPEG, PNG, or BMP
    • Color space: RGB only — CMYK files are not supported and will fail on upload
    • File size: under 2 MB per image
    • Minimum resolution: 72 dpi
    • No watermarks, QR codes, hyperlinks, or animated elements
    • No pricing or promotional claims embedded in images

    One compliance requirement that catches sellers and agencies off guard: A+ Content images and text must be unique to A+. Amazon’s guidelines state that you should not reuse images already present in the standard product image gallery within A+ Content modules. This is both a content quality requirement and a compliance issue — A+ is intended to add value beyond the standard listing, not replicate it.

    The CMYK color space issue is particularly common when A+ Content is designed by an agency or design team that works primarily with print materials. Print workflows default to CMYK; digital workflows default to RGB. An asset that looks identical on a design monitor can fail on upload purely due to the embedded color profile, with no visual indication that anything is wrong until the upload error appears.

    The Real Suppression-to-Recovery Timeline

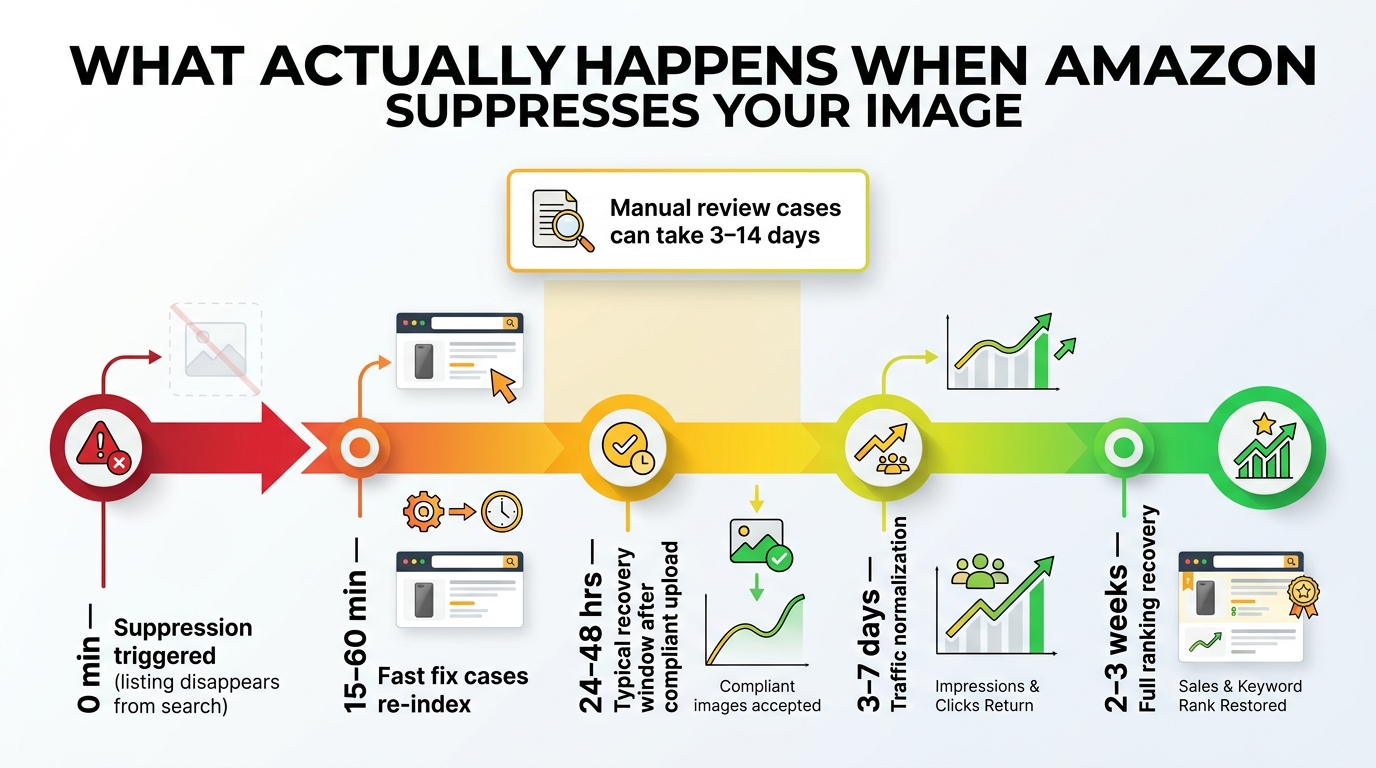
    Timeline showing Amazon image suppression recovery from 0 minutes suppression through 2-3 weeks full ranking recovery

    Understanding the mechanics of suppression is one thing. Understanding how long it actually takes to recover — and what the recovery looks like in terms of real sales and ranking impact — is something sellers often underestimate until they’ve lived through it.

    The Suppression Event

    When Amazon’s automated compliance system flags a main image violation, suppression can be near-immediate. Seller reports from 2026 describe listings disappearing from search results within minutes of a compliance flag firing — sometimes during a peak sales period with no advance warning. The listing technically still exists in the catalog, but it’s been removed from search and browse indexing, which means it generates zero organic traffic until the violation is resolved.

    Amazon does not reliably send proactive notification of image suppression at the moment it occurs. Sellers who monitor their Account Health dashboard or use third-party listing management tools that poll Seller Central status will catch it faster. Sellers who check their account weekly might not notice for days — by which point they’ve lost significant revenue and the suppression may have begun affecting ranking signals.

    The Recovery Window

    Recovery timelines vary based on the type of violation and whether the case involves automated or manual review. Seller experience and 2026 guidance consistently points to three distinct scenarios:

    Fast-track recovery (15 minutes to 24 hours): Straightforward technical violations — background color, frame fill, resolution — that can be resolved by uploading a compliant replacement image. Once a valid compliant image is in the system, Amazon’s review cycle typically re-evaluates and restores the listing’s search eligibility within this window. Some sellers report restoration in under an hour for simple fixes.

    Standard recovery (24 to 72 hours): The most common outcome for most image compliance violations. After uploading a corrected image, sellers should expect to wait one to three days for Amazon to process the change, update the listing status, and allow re-indexing to propagate through search. During this window, the listing remains suppressed even though the compliant image has been submitted.

    Extended review (3 to 14 days or more): Cases that involve Amazon’s manual review process — typically triggered by content violations, suspected misrepresentation, AI disclosure issues, or repeat violations on the same ASIN — take significantly longer. These cases may require escalation through Seller Support, and the outcome isn’t always restoration without additional documentation or account-level review.

    Traffic and Ranking Recovery Lag

    Here’s the part most guides don’t cover: even after a listing is reinstated — the suppression cleared, the image accepted, the ASIN back in search results — the ranking and traffic don’t recover immediately. Data from seller experience and 2026 field reports suggests that traffic normalization takes three to seven days after reinstatement. Full ranking recovery, particularly for ASINs that were suppressed during a high-sales period or for long enough to accumulate a negative sales velocity signal, can take two to three weeks.

    This recovery lag matters because it shapes how sellers should think about the cost of suppression. The direct revenue loss during the suppressed period is the visible cost. The indirect cost — the slower organic recovery, the paid traffic required to compensate while ranking rebuilds, the potential loss of category rank position to competitors who filled the gap — is often larger than the direct loss and much harder to recover from quickly.

    How Image Violations Interact With Catalog Health

    In earlier years, image compliance was largely treated as a listing-level issue: a problem with an individual ASIN that was resolved when the image was fixed. In 2026, the relationship between image violations and broader catalog health metrics is more complex and consequential.

    The Listing Quality Dashboard Connection

    Amazon’s Listing Quality Dashboard has become an increasingly central tool for sellers managing large catalogs. The dashboard scores ASINs on attribute completeness, content quality, and compliance status. ASINs with image violations feed into this scoring in a way that wasn’t consistently present in earlier versions of the dashboard. A catalog with multiple suppressed or non-compliant images will see its aggregate listing quality score decline, which can affect how Amazon treats the catalog’s organic performance more broadly.

    Field data from July 2026 indicates that ASINs falling below a 65% attribute completeness score — a threshold that image violations contribute to — lost an average of 4.2 organic positions over a 21-day period. In regulated and competitive categories, the threshold for Buy Box suppression based on listing quality concerns appeared around the 60% mark. These numbers underscore that image compliance isn’t just about individual listing status — it’s about how your catalog signals quality and trustworthiness to Amazon’s ranking and eligibility systems.

    Account Health Rating (AHR): The Indirect Effect

    Image compliance violations don’t directly lower your Account Health Rating in the same way that policy violations, late shipment rates, or order defect rates do. AHR is driven by a distinct set of performance metrics. However, the relationship is indirect rather than absent. Repeat image violations on the same ASIN, particularly if they involve suspected misrepresentation or prohibited content rather than purely technical issues, can escalate from a listing-level suppression to a policy warning that does register in Account Health.

    More practically: a suppressed listing reduces sales velocity on affected ASINs, which can cascade into revenue-per-session metrics, conversion rate signals, and category rank position — all factors that influence how Amazon’s systems allocate organic visibility across the catalog. The account health impact is indirect but real, especially for sellers where suppressed ASINs represent a meaningful share of catalog revenue.

    Building an Operational Image Compliance Audit Workflow

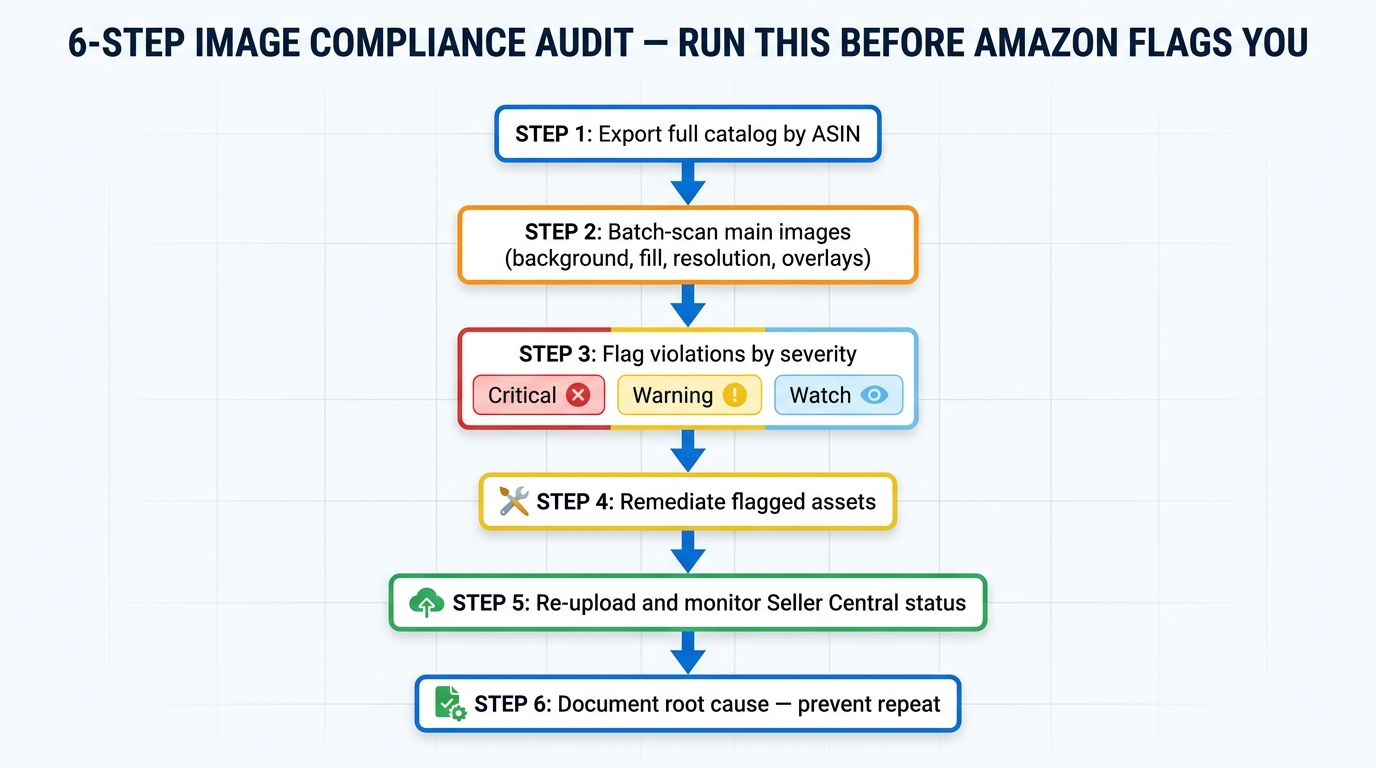
    6-step Amazon image compliance audit workflow flowchart showing export, scan, flag, remediate, re-upload, and document steps

    The difference between sellers who get hit repeatedly by image suppression and those who don’t usually comes down to process — specifically, whether they have a proactive audit workflow or a reactive one. The following six-step process represents the operational standard for managing image compliance at catalog scale in 2026.

    Step 1: Export and Organize Your Catalog by ASIN

    Start with a full catalog export from Seller Central. Use the Inventory Report or the Listing Quality Report to pull your complete ASIN list with current status. Organize assets by ASIN, with each ASIN’s image URLs captured and mapped to image slot position (main image, image 2, image 3, etc.). For large catalogs, this is best handled with a spreadsheet or catalog management tool rather than manually browsing Seller Central.

    At this stage, flag any ASINs already showing a “Suppressed” or “Inactive” status for immediate priority remediation. These are the fires burning now. The rest of the audit is about finding the smoke before it ignites.

    Step 2: Batch-Scan Main Images for Technical Violations

    Run each main image through a systematic compliance check. The specific checks to prioritize are:

    • Background RGB value — Is it exactly (255, 255, 255)? Tools like Adobe Photoshop’s eyedropper, online color analyzers, or bulk image processing scripts can check this across hundreds of images efficiently.
    • Frame fill estimation — Does the product occupy approximately 85% or more of the frame? This can be checked visually in batches or with automated tools that measure non-background pixel area.
    • Resolution — Is the longest side at least 1,000 pixels (ideally 2,000+)?
    • Text and overlay detection — Are any text elements, logos, watermarks, or graphic elements present in the image?
    • Shadow and gradient audit — Do any shadows or gradients extend to the image edge, pulling the background away from pure white?

    In 2026, a growing number of sellers are using AI-assisted batch image auditing tools — either standalone software or custom scripts built around computer vision APIs — to run these checks at scale without manual image-by-image review. For catalogs under a hundred ASINs, manual review is feasible. For catalogs of several hundred to thousands of SKUs, automated scanning is the only practical approach.

    Step 3: Flag Violations by Severity

    Not all compliance issues carry the same urgency. Categorize flagged issues into three tiers:

    • Critical — Violations that will trigger or are already triggering automated suppression: non-white backgrounds, text/logo overlays on main image, missing AI disclosure metadata on qualifying assets. These need immediate remediation, measured in hours not days.
    • Warning — Violations that may not trigger immediate suppression but create risk: low resolution, borderline frame fill, shadows near the image edge. These need remediation within the current week.
    • Watch — Borderline cases or secondary image issues that don’t meet the threshold for likely suppression but represent quality concerns. Schedule for next review cycle.

    Step 4: Remediate Flagged Assets

    Remediation approach depends on the violation type. Background corrections — converting near-white backgrounds to true white — are straightforward in image editing software and can be batched efficiently. Frame fill issues require recomposing or recropping images, which may need a brief photography or editing session for products where the existing image simply doesn’t contain enough product-fill data to crop correctly without degrading quality.

    Text and overlay removal requires clean editing to preserve the underlying product image, particularly for images where the original photo file without the overlay may not be available. Watermark removal from inherited manufacturer images sometimes requires going back to the manufacturer for clean originals.

    For AI-generated people disclosure: embed the contains-synthetic-performer tag in IPTC/XMP metadata using image editing software or a metadata management tool before re-upload. This is a non-destructive process that doesn’t alter the visual content of the image.

    Step 5: Re-Upload and Monitor Status

    Re-upload corrected images through Seller Central — either individually through the Manage Inventory image editor or in bulk via flat file. After upload, monitor the listing status in Seller Central over the following 24 to 72 hours. A listing that was suppressed due to an image violation should show a status change once Amazon’s system processes the compliant replacement. If the status doesn’t change within 72 hours of uploading a compliant image, escalate through Seller Support with documentation showing the corrected image and the violation that was addressed.

    Step 6: Document Root Cause and Prevent Recurrence

    This step is the one most sellers skip, and it’s why they face the same violations repeatedly. For each remediated violation, document the root cause: where did this image come from? What process or source produced a non-compliant asset? What change is needed to prevent the same issue from recurring in future catalog additions?

    Common root causes include photography vendors who produce near-white rather than true-white backgrounds, design teams working in CMYK for A+ Content, manufacturer-provided images with embedded watermarks, and image generation workflows that produce AI people imagery without a metadata tagging step. Solving the root cause at the source prevents the same compliance review cycle from repeating every quarter.

    The Compliance Mistakes That Fly Under the Radar

    Beyond the high-profile, well-documented violations, a set of subtler compliance mistakes consistently surfaces in seller catalog audits — the kind that don’t trigger immediate suppression but create vulnerability as Amazon’s automated checks become more sophisticated over time.

    The “Looks White to Me” Trap

    Display calibration and ambient lighting conditions mean that an image appearing perfectly white on one monitor looks slightly gray on a calibrated display or in a direct color-value check. Design teams working on uncalibrated monitors or in environments with warm ambient lighting are particularly prone to this. The only reliable check is reading the actual RGB values of the background — not looking at it. Build the RGB check into your standard image QA process and remove reliance on visual judgment for background color.

    Inherited Catalog Images from Brands or Wholesale Suppliers

    Sellers who list products from multiple brands or who operate as wholesale resellers frequently rely on manufacturer-provided or brand-provided images rather than producing their own. These images were not produced for Amazon. They were produced for brand websites, print catalogs, trade shows, or retail display. They routinely have branded watermarks, color backgrounds, insufficient frame fill, or embedded logos. The listing compliance responsibility sits with the seller regardless of image source — and the catalog review cycle doesn’t care who took the photo.

    Seasonal and Promotional Overlays on Main Images

    Holiday promotional images — a product image with a “Great Gift!” badge or a “Limited Edition” holiday banner — are common in the weeks leading up to peak sales periods, particularly Q4. Sellers applying these overlays to main images are in direct violation of the no-text-on-main-image rule. Amazon’s automated checks don’t make exceptions for promotional seasons, and the suppression risk during the highest-revenue period of the year is particularly damaging. Promotional context belongs in A+ Content and Enhanced Brand Content, not the main image.

    Images Updated Elsewhere But Not on Amazon

    Sellers who maintain product imagery across multiple channels — their own website, retail partners, online marketplaces — sometimes update images on those other channels without updating Amazon separately. This most commonly happens when a product undergoes a packaging update: the new packaging goes live on the brand website, but the Amazon listing still shows the old packaging. Over time, this creates a growing gap between what Amazon shows and what the customer receives — a gap that Amazon’s cross-referencing checks are increasingly capable of detecting in regulated categories.

    A+ Content Duplicate Images

    Uploading the same images from the standard listing gallery directly into A+ Content modules is a compliance violation under Amazon’s uniqueness requirement — and it undermines the conversion purpose of A+ Content simultaneously. Build A+ assets as purpose-built module images, not repurposed versions of images already in the image carousel.

    A Practical Compliance Checklist: Run This Before Amazon Does

    The following checklist consolidates the compliance requirements covered in this guide into an actionable reference. Run this against your catalog on a regular cadence — quarterly at minimum, monthly for high-velocity or rapidly-growing catalogs.

    Main Image Checklist

    • ☐ Background is pure white: RGB (255, 255, 255) — verified by color value check, not visual inspection
    • ☐ Product fills approximately 85% or more of the image frame
    • ☐ No text, logos, watermarks, or graphic overlays present
    • ☐ No borders, vignettes, or shadows reaching the image edge
    • ☐ Longest side is at least 1,000 pixels (2,000+ recommended for zoom support)
    • ☐ Image accurately represents the product as currently sold — no outdated packaging
    • ☐ File format is JPEG, PNG, TIFF, or non-animated GIF
    • ☐ File is named with the product identifier (ASIN, UPC, or EAN) followed by the variant code
    • ☐ For categories requiring model presentation (apparel): model or ghost mannequin present

    AI Disclosure Checklist

    • ☐ Does the image contain a photorealistic AI-generated person? If yes:
    • ☐ Has the contains-synthetic-performer keyword been embedded in the file’s IPTC/XMP dc:subject metadata field before upload?
    • ☐ Has the A+ Content or video asset been similarly tagged if applicable?
    • ☐ Real people edited with AI, fictional characters, and images without people: confirm these are NOT tagged (incorrect tagging creates its own compliance signal)

    Secondary Images and A+ Content Checklist

    • ☐ A+ Content images are in JPEG, PNG, or BMP format — not CMYK, not animated GIF
    • ☐ A+ files are under 2 MB each
    • ☐ A+ images are unique to A+ — not duplicated from the standard image carousel
    • ☐ No QR codes, hyperlinks, or pricing/promotional claims embedded in A+ images
    • ☐ Secondary images don’t include unsubstantiated performance claims or prohibited regulatory statements
    • ☐ Secondary images accurately represent the product (no bundle implication for single-unit listings)

    Conclusion: Compliance as a Proactive Discipline, Not a Reactive Fix

    Amazon’s 2026 image compliance environment is more automated, more integrated with catalog health scoring, and more consequential than most sellers have historically treated it. A listing that goes dark due to a background color check failing is a solvable problem. A catalog where multiple ASINs have accumulated image compliance risk, where suppression events have quietly accumulated ranking damage over weeks, and where new creative workflows are producing AI-generated imagery without proper disclosure metadata — that’s a structural problem that doesn’t resolve itself when you fix one image.

    The July 2026 AI synthetic performer disclosure requirement is the clearest signal that Amazon’s image compliance framework is no longer just about technical image quality. It now intersects with regulatory law, content authenticity, and buyer transparency in ways that require creative teams, catalog managers, and compliance functions to coordinate in ways they previously haven’t had to.

    The sellers who are least affected by image compliance enforcement are the ones who treat it as a proactive, recurring operational discipline rather than a problem they address after Seller Central flags them. That means scheduled catalog audits, documented image quality standards for every creative source in the workflow, root-cause remediation for violations rather than just fixing the symptom, and a clear internal process for new content types — including AI-generated imagery — that builds compliance into the creation step rather than bolting it on at the end.

    Suppression will happen. Amazon’s systems catch things that human QA processes miss. The goal isn’t to eliminate every possible compliance event — it’s to catch them yourself first, fix them faster when they do occur, and prevent the same root causes from generating the same violations repeatedly across your catalog.

    The core principle is straightforward: compliance isn’t what you do when Amazon catches you. It’s what you build into the workflow so that Amazon’s check is a confirmation, not a surprise.

  • Amazon’s 2026 Image Rules: The Compliance Audit Every Seller Needs Before Their Next Suppression Notice

    Amazon’s 2026 Image Rules: The Compliance Audit Every Seller Needs Before Their Next Suppression Notice

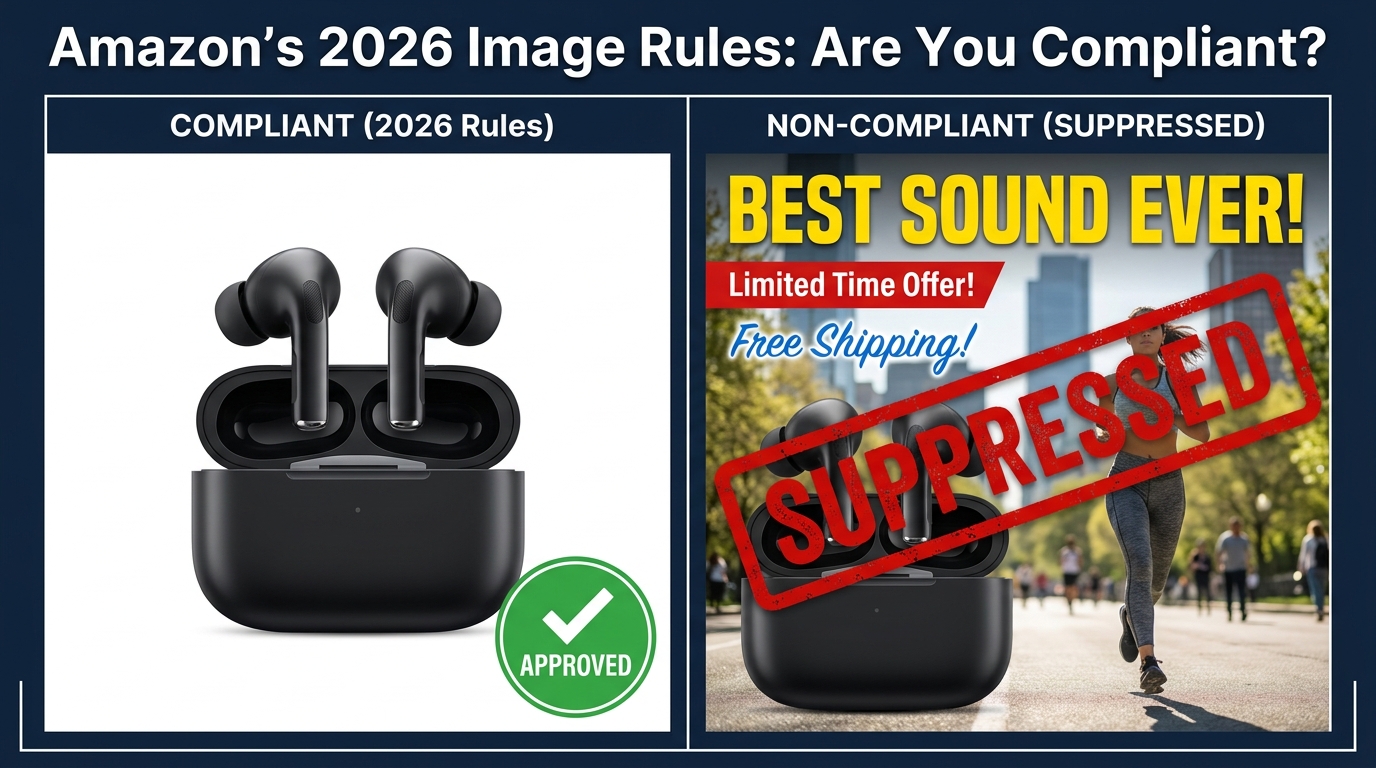
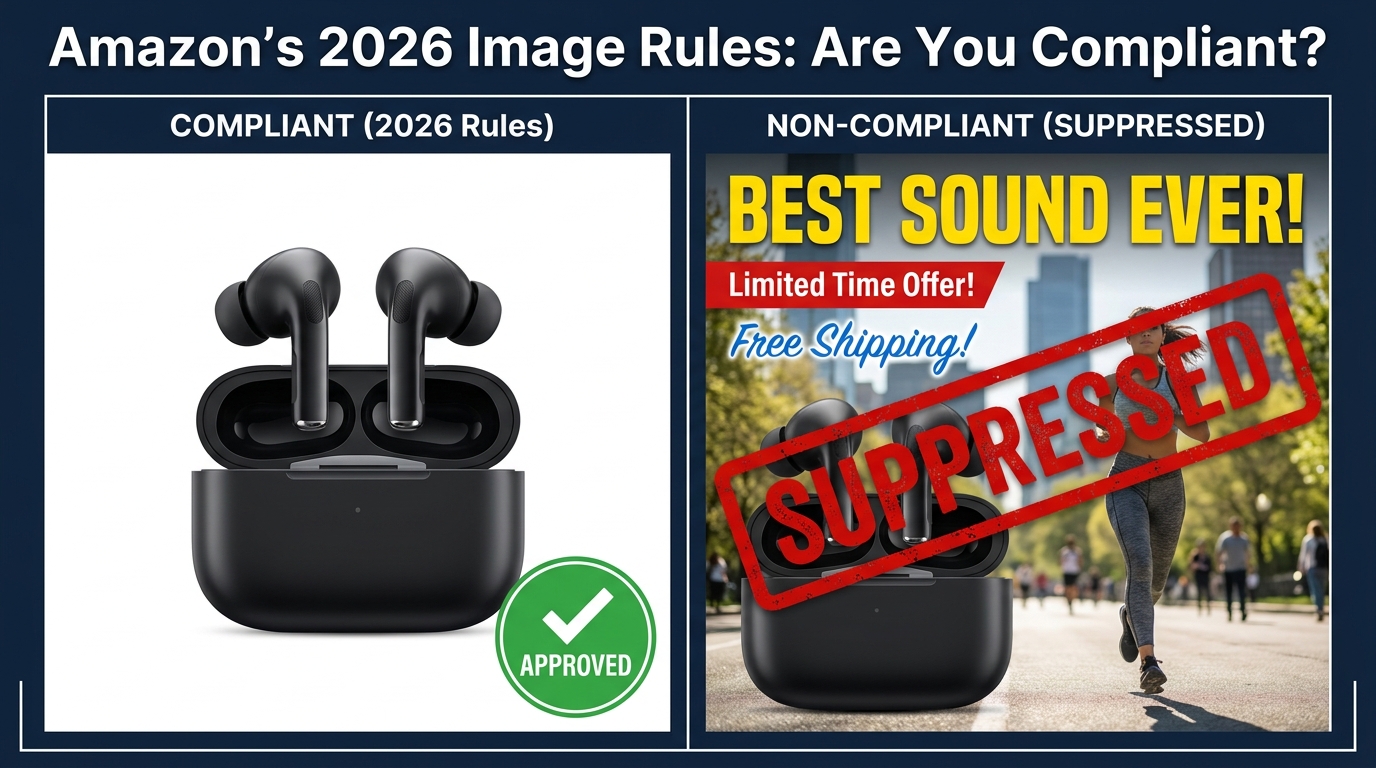
    Amazon 2026 image compliance split-screen: compliant vs suppressed listing comparison

    There’s a strange asymmetry at the heart of Amazon’s image policy. The official documentation is, in many places, years old. The pixel minimums listed in Seller Central haven’t changed. The list of banned content — nudity, offensive material, misleading claims — reads much the same as it did in 2022. Yet sellers are watching their listings disappear from search faster and more frequently than ever before.

    In the first quarter of 2026 alone, third-party estimates suggest Amazon removed more than 3.1 million listings due to image policy violations. That’s not a rounding error. That’s an enforcement posture that has quietly shifted while the rulebook remained largely the same on paper.

    The problem most sellers have is that they’re reading the documentation. They see “500 pixels minimum” and they think they’re fine. They see “pure white background” and they assume their off-white, slightly shadowed hero image will pass. They’ve never heard of the contains-synthetic-performer metadata requirement that became mandatory in mid-2026. They don’t know that category-specific rules for apparel, shoes, and jewelry operate under entirely different standards than the general product guidelines they’ve been referencing.

    This post is not a recap of the rules you already know. It’s a working audit guide — built specifically around the gap between what Amazon’s documentation says and what its enforcement systems actually catch. By the end, you’ll have a clear picture of your real compliance risk, a methodology for fixing it catalog-wide, and a workflow that holds up as enforcement continues to tighten through the rest of 2026 and into 2027.

    The Official Rule Set in Plain English — What Amazon Actually Requires in 2026

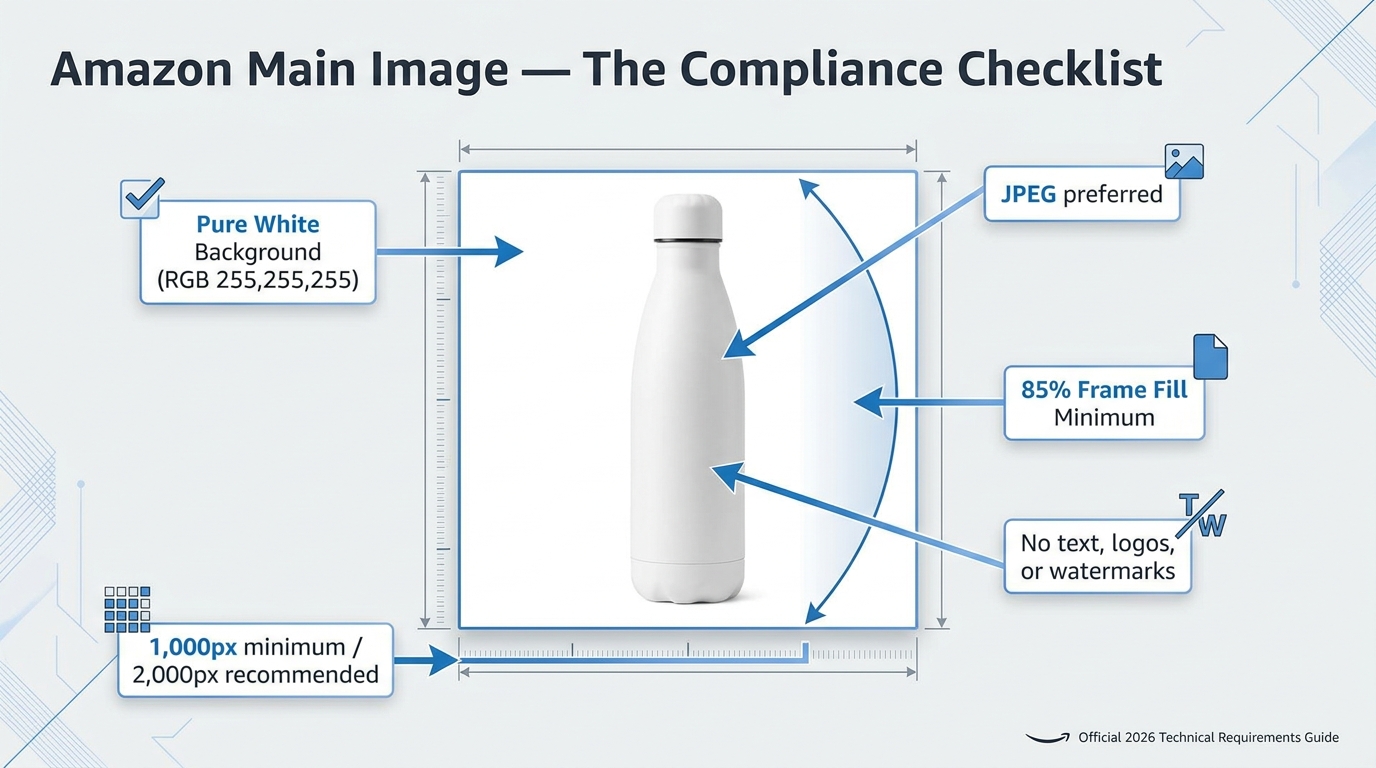
    Amazon 2026 main image compliance checklist infographic showing technical requirements with annotation arrows

    Let’s start with the foundation. Amazon’s official image requirements exist in multiple help documents, and the core technical standards haven’t changed dramatically — but that’s exactly why sellers get caught out. The baseline specs are well-known. The enforcement of those specs has become significantly more aggressive.

    Technical Specifications

    File formats: Amazon accepts JPEG (.jpg/.jpeg), TIFF (.tif/.tiff), PNG (.png), and non-animated GIF (.gif). JPEG remains the recommended format for all product images because it delivers the best combination of file size, color accuracy, and rendering speed on Amazon’s image delivery network.

    Resolution: The official documented minimum is 500 pixels on the longest side. However, the practical standard sellers need to work to is considerably higher. Amazon’s zoom feature — which activates automatically when an image reaches 1,000 pixels on the longest side — is considered a baseline expectation by Amazon’s own seller guidance teams. The widely accepted best practice in 2026 is 2,000 × 2,000 pixels for all main images, which gives you comfortable zoom headroom and ensures your images aren’t auto-downsampled in ways that damage color accuracy.

    Maximum file dimensions: Amazon caps images at 10,000 pixels on the longest side. Exceeding this doesn’t cause suppression but does trigger automatic resizing, which can introduce compression artifacts depending on the source file quality.

    File naming: Amazon requires a specific naming convention — product identifier followed by file extension, with no spaces, dashes, or special characters. A correctly named file looks like this: B000999999.jpg. Uploading files with incorrect naming conventions doesn’t always trigger an error, but it can cause images to fail to associate correctly with the right ASIN, particularly during bulk catalog uploads.

    Main Image Rules

    The main image — the one that appears in search results and at the top of the listing — is where the strictest rules apply and where the vast majority of suppressions originate. Amazon’s requirements for the main image are:

    • Pure white background only. The specification is RGB 255, 255, 255. Not off-white. Not light gray. Not a background that looks white on your monitor but registers as slightly warm or cool when analyzed by image-processing software. Pure white.
    • Product must fill approximately 85% of the image frame. A product that floats in a sea of white, filling only 50% or 60% of the frame, is non-compliant. The product needs to be dominant, centered, and well-cropped.
    • No text, graphics, or watermarks. Brand logos, promotional text, sale callouts, size guides, website URLs — none of these are permitted on the main image under any circumstances.
    • No included accessories or props unless they ship with the product. If you show a charging cable in the main image but it doesn’t ship in the box, that’s a policy violation. If you show the product next to a decorative vase that isn’t part of the purchase, that’s a violation.
    • No lifestyle context. The main image must show the product against the white background, not in use, not in a room setting, not worn on a model (with category-specific exceptions covered in a later section).
    • No packaging shown as the main image unless the packaging is itself the product. Showing a cereal box front is fine. Showing a product inside its box as the primary image, when the listing is for the product itself, is not.
    • Accurate color representation. The image must accurately show the color of the product the customer will receive. Auto-enhanced photography that significantly shifts product color is a violation and a return driver.

    Secondary Image Rules

    Amazon allows up to eight additional images beyond the main image. These operate under considerably more flexible rules — which we’ll cover in detail in the section on secondary images and A+ content. The key distinction is that the strict pure-white, no-text requirements apply specifically and exclusively to the main image.

    What Actually Triggers Suppression in 2026 — The Real Enforcement Map

    Understanding the official rules is step one. Understanding how enforcement actually works in 2026 is step two — and it’s the step most sellers skip entirely.

    Amazon uses a combination of automated image-quality checks and human review to enforce its image policy. The automated layer has become substantially more capable over the past 18 months, with machine learning models now able to detect non-white backgrounds, text overlays, and frame-fill violations at scale — across the entire catalog, not just new listings.

    This is the shift sellers aren’t accounting for. Historically, enforcement was heaviest at upload time. A listing got through review once, and it largely stayed compliant unless a competitor flagged it or a human reviewer happened to land on the page. In 2026, that assumption no longer holds. Amazon’s automated systems are running ongoing sweeps of existing catalog images, not just reviewing new submissions.

    The Most Common Suppression Triggers

    Non-white backgrounds remain the single most common trigger. This includes images with subtle drop shadows that fall outside the pure white threshold, images shot on white seamless paper that has yellowed or shifted under lighting, and images that use a near-white background (RGB 250, 250, 250) rather than true white. The automated detection systems are sensitive enough to catch these.

    Text, logos, or watermarks on the main image. This catches a surprisingly large number of sellers who add branding elements “just to the corner” of their main image, or who include a website URL along the bottom edge. Amazon’s detection systems treat these as violations regardless of size or placement.

    Insufficient product frame fill. Images where the product occupies less than roughly 80–85% of the frame are increasingly being flagged. This is particularly common for sellers who repurpose catalog images originally shot for print or other e-commerce platforms, where different aspect ratio conventions apply.

    Misleading product representation. If your main image shows a product that is clearly a different variant than what the listing is for — a red item shown on a listing for the blue variant, for example — Amazon’s systems can catch this, and it’s a policy violation regardless of whether it happens by error or intent.

    AI-generated synthetic human models without proper disclosure. This is a newer and increasingly enforced category that deserves its own section.

    How Fast Does Suppression Happen?

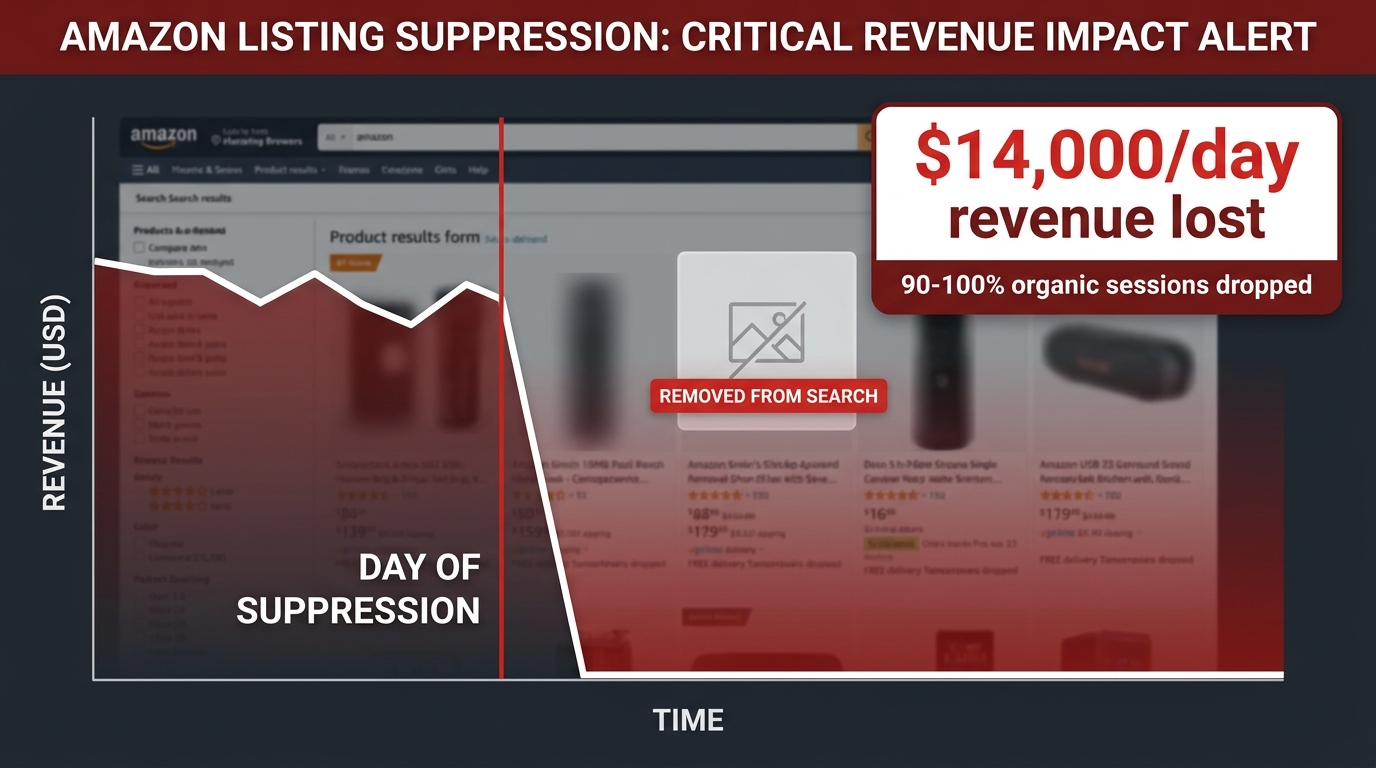
    Seller reports and industry data from 2026 consistently point to suppression timelines that are faster than sellers expect. Once a listing is flagged, search visibility typically drops within 12–24 hours. Organic session data can fall by 90 to 100% during the suppression period. Ad campaigns continue to run — and spend — but with sharply reduced visibility, meaning sellers are often burning ad budget on a listing that isn’t showing up in organic results.

    The recovery process adds another layer of time cost. Uploading a corrected image, waiting for Amazon to process it, and waiting for the listing to reappear in search results typically takes 24 to 72 hours in straightforward cases, and can take significantly longer if the listing goes into manual review or if the suppression is categorized as a more serious policy violation.

    The AI Disclosure Requirement — What the contains-synthetic-performer Rule Actually Means

    Amazon 2026 AI image disclosure rule showing contains-synthetic-performer metadata requirement and shopper-facing badge

    This is the biggest structural change to Amazon’s image policy in 2026, and the one that the fewest sellers have implemented correctly. The rule itself is not particularly complex — but it has meaningful technical implications for how sellers produce and upload images.

    What the Rule Requires

    Effective in mid-2026, Amazon requires third-party sellers to disclose when a product image, A+ content module, or product video contains a photorealistic AI-generated person. The rule does not apply to all AI-generated images — only to those containing synthetic human representations that could be mistaken for photographs of real people.

    The disclosure mechanism operates at the file metadata level. Sellers must embed the exact keyword string contains-synthetic-performer in the image file’s IPTC or XMP metadata fields before uploading to Seller Central. Amazon reads this metadata and, where applicable, surfaces a shopper-facing indicator on the listing page — a small label visible to buyers that signals AI-generated human content is present.

    For A+ Content specifically, Amazon provides a second path: a built-in “AI-generated people” checkbox within A+ Content Manager that sellers can use at the content level, removing the need to pre-embed metadata in individual image files. For all other listing assets — product images, product videos, Brand Stories, and Store content — pre-upload metadata tagging is the only available mechanism.

    What Specifically Triggers the Requirement

    The requirement applies to photorealistic AI-generated humans. This is a narrower category than it might sound, and Amazon has clarified several exclusions:

    • Real people whose images have been AI-edited (for background removal, color correction, or retouching) are not subject to the disclosure requirement.
    • Clearly stylized, illustrated, or cartoon AI-generated people are not subject to the requirement.
    • TV, video game, or movie characters are excluded from the disclosure rule.
    • AI-generated product images with no human presence — which covers the vast majority of standard product photography — are not affected.

    Where the rule most clearly applies is in apparel, beauty, home goods, and lifestyle categories where sellers have begun using AI-generated human models to show products on “real-looking” people without the cost of traditional model shoots. If the result is photorealistic — if a typical shopper looking at the image would believe it’s a photograph of a real person wearing the product — the disclosure is required.

    The Legislative Background

    The rule is directly connected to New York State’s synthetic performer disclosure law, which took effect in June 2026. New York’s law requires disclosure when AI-generated synthetic humans are used in commercial media in a way that could mislead consumers about whether they’re seeing a real person. Amazon’s policy implementation maps onto this requirement and applies it platform-wide, not just to sellers operating in New York.

    This is significant because it establishes a precedent. Amazon is now translating external regulatory requirements directly into seller-facing technical specifications. It’s reasonable to expect that as similar legislation passes in other jurisdictions — which is widely anticipated — Amazon’s disclosure requirements will expand accordingly.

    How to Implement the Metadata Tag

    Embedding IPTC/XMP metadata in image files is not a workflow most sellers have in place today. The process requires:

    1. Identifying which images in your catalog contain photorealistic AI-generated people.
    2. Opening each identified image file in a metadata-capable tool. Adobe Lightroom, Bridge, ExifTool (free, command-line), and several online metadata editors all support IPTC/XMP editing.
    3. Adding contains-synthetic-performer to the image’s subject keywords or description fields in the XMP metadata.
    4. Saving the file and re-uploading to Seller Central.

    For sellers managing large catalogs with AI-generated lifestyle imagery, building a metadata tagging step into the image production workflow — before files are finalized and uploaded — is substantially more efficient than retroactive tagging of existing assets.

    Category-Specific Rules That Sellers Routinely Overlook

    The general image guidelines apply across most product categories. But Amazon maintains category-specific style guides for a number of major verticals, and the rules in these guides can differ substantially from the general documentation. Selling in these categories and using the general rules as your compliance benchmark is a recipe for suppression.

    Apparel and Clothing

    Apparel is the category with the largest delta between general rules and category-specific requirements. The most important distinction: unlike almost every other category, apparel main images are expected to show the product on a model for most subcategories. A flat lay or ghost mannequin may be acceptable in certain subcategories, but for the majority of adult clothing, a model-worn image on a white background is the standard Amazon’s systems and reviewers expect.

    The exceptions are narrow and specific. Children’s and baby undergarments, leotards, and some swimwear must be shown without a model on the main image. Accessories — hats, scarves, bags — must not be photographed on models in the main image; they should be shown as standalone products.

    For sellers who have been using the general “product on white background” rule for clothing listings, this is a meaningful compliance gap. Model-on-white is a higher production cost, but it’s the standard the category requires.

    Footwear

    Amazon’s footwear category guidelines specify that the main image should show a single shoe (not a pair) at a specific angle — typically a three-quarter view from the front-right side. This convention exists because it shows the most visual detail of the shoe’s design in a single image. Sellers who upload pair shots, flat-lay images, or front-on views may find their listings generate more suppression notices than the general product rules would suggest.

    Jewelry and Watches

    Jewelry main images should show the product on a white background as a standalone item with no model, no hands, and no props. The product must be clean, well-lit, and show all surfaces clearly. Watches follow similar rules but with the addition that the dial should be set to show a clear time — industry convention is 10:10 — to maximize the visual clarity of the dial and hands.

    Rings are typically shown at a slight angle that shows both the band and the setting. Necklaces and bracelets are usually shown laid flat or draped in a way that shows the full piece. Earrings are typically shown as a pair in the main image (an exception to the single-item convention in footwear).

    Books, Music, and Video Media

    For media products, Amazon requires that the main image shows 100% of the cover art or disc art. The cover must fill the entire frame. The product should not be shown tilted, shadowed, propped up on a surface, or shown with any environmental context. This is one of the few categories where a full-frame, edge-to-edge presentation is the explicit requirement rather than the ~85% fill standard.

    Grocery and Health & Beauty

    Products in these categories often have specific requirements around label visibility. The main image should show the product with its primary label facing front and clearly legible. For supplements and health products specifically, Amazon increasingly cross-references the product imagery against the claims made in the listing copy — if your images show a product label that makes a health claim your listing copy doesn’t support (or vice versa), this can trigger a review.

    Secondary Images, A+ Content, and the Rules That Actually Differ

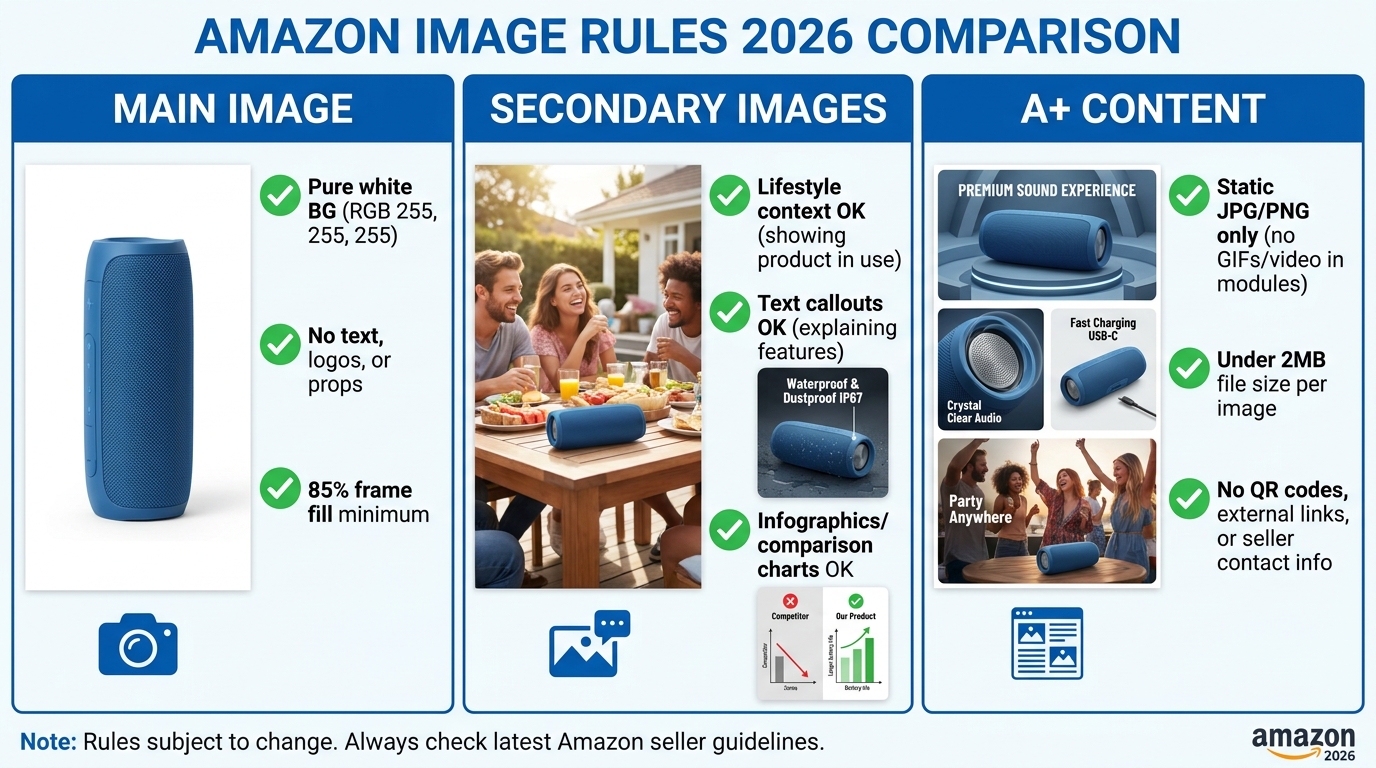
    Three-column comparison infographic showing Amazon main image vs secondary image vs A+ content rules for 2026

    One of the most common misconceptions sellers carry into their image strategy is that all Amazon images are governed by the same rules. They are not. The main image, the secondary gallery images, and A+ content each operate under distinct standards — and conflating them leads to both unnecessary compliance anxiety and genuine missed opportunities.

    Secondary Gallery Images (Images 2–9)

    Amazon allows up to eight additional images beyond the main image, giving you a total of nine slots in your product gallery. These secondary images operate under significantly more flexible creative rules:

    Lifestyle photography is explicitly allowed. You can show your product in use — in a kitchen, on a hiking trail, in the hands of a person — without violating policy. Real-world context helps buyers visualize the product in their own lives, and Amazon’s guidelines actively support this type of imagery in secondary slots.

    Text callouts and infographic overlays are permitted. You can annotate your secondary images with feature callouts, dimension diagrams, comparison charts, size guides, and benefit statements. This is the space to do the educational work that the main image cannot.

    Multiple products can appear together if the intent is to show scale, compatibility, or product family context — as long as the image accurately represents what the customer will receive and is not misleading about the offer.

    Props and environmental elements are allowed to support the product story. A cutting board shown alongside a kitchen knife, a phone stand shown on a desk — these contextual elements are fine in secondary images.

    The caveat is that Amazon’s quality standards still apply to secondary images. Images must be clear, professionally produced, and accurately represent the product. Blurry, poorly lit, or pixelated secondary images may not directly trigger suppression, but they do affect listing quality scores — and Amazon has been more aggressively promoting higher-quality listings in search results.

    A+ Content Image Requirements

    A+ Content — available to brand-registered sellers — is governed by its own distinct set of technical requirements, and they are stricter in some specific ways:

    • File formats: Only JPG, PNG, and BMP are accepted. TIFF and GIF are not supported in A+ modules.
    • Color profile: Images must be in RGB. CMYK files — common when images are prepared for print as well as digital — will be rejected.
    • File size: Each image must be under 2 MB.
    • Resolution: A minimum of 72 DPI is required, though most professional images comfortably exceed this.
    • No animated GIFs. A+ content supports only static images.
    • No watermarks, QR codes, or hyperlinks embedded in images.
    • No external redirect URLs or anything that could take a shopper off Amazon’s platform.
    • No CMYK or multi-channel color profiles.

    Each A+ module also has specific dimension requirements. Common dimensions include 970 × 300 pixels for full-width banner modules, 970 × 600 pixels for larger feature modules, and 300 × 300 pixels for comparison grid thumbnails. Submitting images that don’t match the module’s required dimensions results in automatic rejection or distorted rendering.

    One practical issue that catches many brand-registered sellers: A+ content image text must be readable on mobile screens. Amazon’s A+ Preview tool lets you see how modules render on mobile before submitting, and it’s worth checking — text that looks perfectly legible on a desktop monitor frequently becomes unreadable at mobile viewport sizes.

    The Full-Slot Strategy

    A frequently overlooked compliance-and-conversion issue: using all available image slots. Listings with fewer than five or six images consistently underperform in both search ranking and conversion compared to listings that fully utilize the available gallery slots. Amazon’s internal guidance encourages sellers to view each image slot as a conversion asset, and its algorithms appear to weight listing completeness as a quality signal.

    If your listing has empty image slots, you’re leaving both compliance (quality score) and commercial value on the table simultaneously.

    The Revenue Math of Getting Image Compliance Wrong

    Revenue impact chart showing sharp drop on day of Amazon listing suppression with $14,000/day loss callout

    Image compliance failures have a direct, quantifiable revenue cost. Understanding this math helps prioritize both the urgency of the audit process and the level of investment in compliant image production.

    The Scale of Enforcement in 2026

    Amazon removed more than 3.1 million listings in a single quarter of 2026 for image policy violations — a figure drawn from Marketplace Pulse data cited by multiple seller analytics platforms. Another estimate from an independent tracking service puts the number at approximately 2.3 million affected listings in a single month. Even accounting for the range of estimates, the scale is large enough to make clear that image violations are not an edge case or a risk that primarily affects poorly managed catalogs.

    These suppressions span categories and seller sizes. Large brands with mature catalogs have been affected alongside small independent sellers. The enforcement pattern in 2026 does not appear to heavily favor or disfavor any particular seller tier.

    Per-ASIN Revenue Impact

    Seller-reported case data from 2026 puts the daily revenue loss from image suppression in the following ranges:

    • Single ASIN suppressions: approximately $800 to $2,500 per day for mid-velocity sellers.
    • Multi-ASIN suppressions (10–40 affected listings): reported daily losses in the range of $5,000 to $14,000.
    • Catalog-wide suppression events (50+ ASINs): one seller forum case estimated $50,000 to $55,000 in total sales lost during a suppression event affecting 800+ listings before remediation was complete.

    These figures are self-reported and should be treated as representative rather than precise benchmarks. But the directional reality they reflect is consistent: even a small number of suppressed listings on high-velocity products can create revenue losses that dwarf the cost of fixing the images in the first place.

    The Ad Spend Bleed

    One aspect of suppression that many sellers underestimate is the advertising cost component. When a listing is suppressed from organic search, active Sponsored Product and Sponsored Brand campaigns linked to that ASIN don’t automatically pause. The campaign continues to spend — but on a listing that isn’t appearing in organic results and may have degraded placement in paid results as well.

    The result is that suppression doesn’t just cut revenue. It can simultaneously cut revenue while continuing to drain ad budget, widening the financial impact of the suppression event beyond the sales loss alone.

    The Ranking Recovery Cost

    Beyond the immediate suppression window, there’s an additional cost that’s harder to quantify: ranking recovery. Amazon’s algorithm registers the period of suppression as a low-performance window for the ASIN. Depending on the competitive pressure in the category and the duration of the suppression event, recovering to pre-suppression organic ranking positions can take weeks to months of sustained performance after the listing is reinstated.

    A listing that was suppressed for four days and lost 1,000 organic sessions during that window doesn’t automatically return to its prior ranking position when the suppression lifts. The algorithm’s view of the ASIN’s recent performance history now includes the suppression window, and recovering that ground requires active investment in both organic performance and advertising.

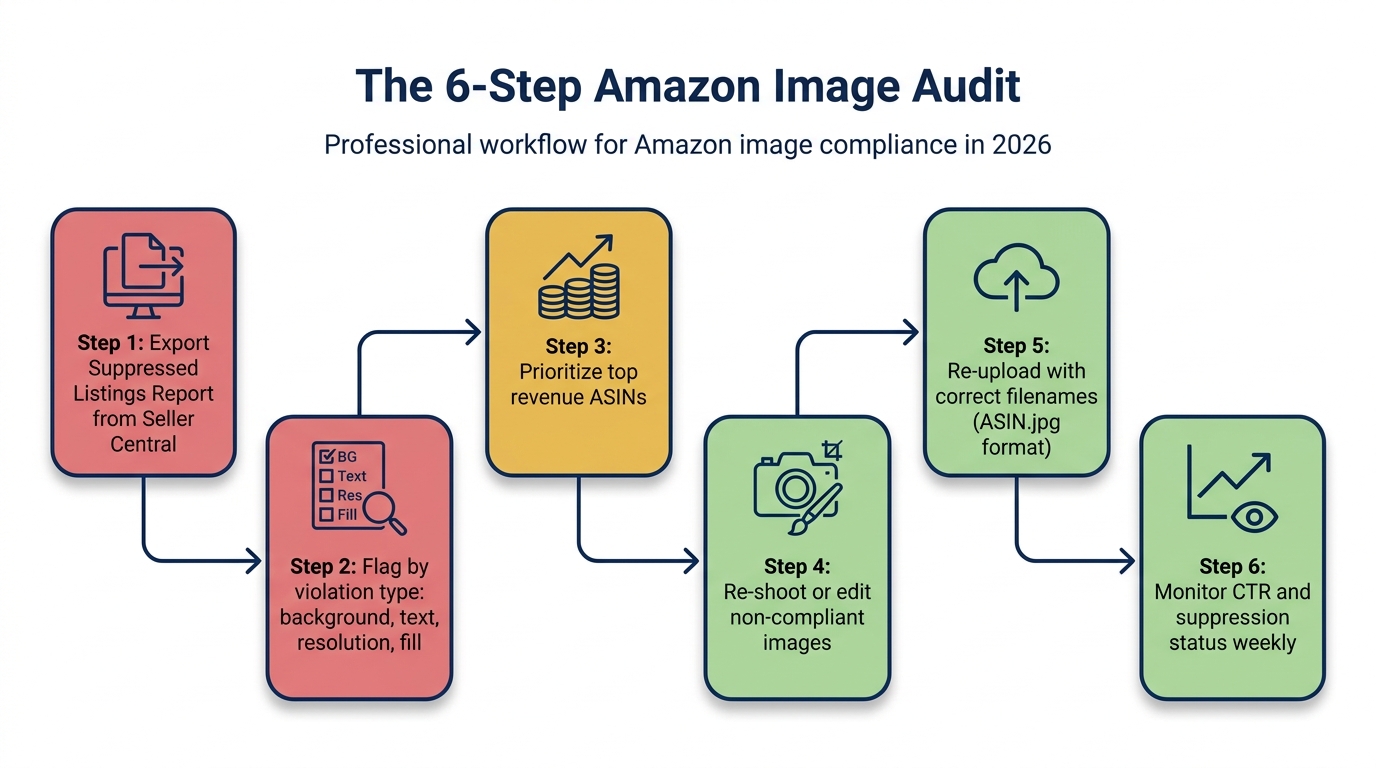
    How to Run a Full Catalog Image Audit in Under a Week

    Six-step Amazon image compliance audit workflow flowchart showing steps from suppression report export to weekly monitoring

    For sellers with large catalogs, the idea of auditing every image can feel paralyzing. The approach below is designed to make the audit tractable within a five-day working window, prioritizing by risk and revenue impact rather than attempting a wholesale catalog review from day one.

    Day 1: Pull the Suppression Report and Identify Active Violations

    Start in Seller Central. Navigate to Inventory → Manage All Inventory → Suppressed. This view shows you every ASIN that Amazon has already flagged and removed from search. Export this list.

    For each suppressed ASIN, the suppression report will typically include a reason code or a category label. Common image-related suppression codes include:

    • Main image background not white
    • Image contains text, logo, or graphic
    • Image too small or low resolution
    • Missing main image

    Sort the suppressed list by revenue (use your sales velocity data to rank ASINs) and flag all image-related suppressions in a working spreadsheet. These are your Day 1 and Day 2 priorities.

    Day 2: Triage and Prioritize by Revenue Impact

    Work from your suppressed ASIN list sorted by revenue. Assign each ASIN to one of three buckets:

    • Bucket A (Fix immediately): Top 20% of ASINs by revenue, currently suppressed. These are the listings you fix first, today.
    • Bucket B (Fix this week): All remaining suppressed ASINs and any active listings flagged by the Listing Quality report as at-risk for image quality.
    • Bucket C (Audit and update in the next 30 days): Active listings that aren’t currently suppressed but have image issues that could trigger future enforcement sweeps.

    Day 3: Systematic Image Review

    For Bucket A and B ASINs, do a direct visual review of every main image. Check each image against these five criteria:

    1. Is the background pure white (not off-white, not light gray)?
    2. Does the product fill at least 85% of the frame?
    3. Are there any text overlays, logos, watermarks, or brand marks on the image?
    4. Does the product shown match the specific variant this listing is for?
    5. Is the image at least 1,000 pixels on the longest side (2,000 × 2,000 preferred)?

    Also check: does the listing have any AI-generated human models in any image slot? If yes, add it to a separate tagging queue for the contains-synthetic-performer metadata process.

    Day 4: Remediation

    For images that need background correction, tools like Adobe Photoshop’s Select Subject plus a white fill layer, or dedicated background removal services like Remove.bg, can handle the bulk of simple white-background fixes without requiring a full reshoot. For images that are simply too small, upscaling tools (Adobe Super Resolution, Topaz Gigapixel) can bring undersized images into compliance without a reshoot — though genuine high-resolution originals will always outperform upscaled versions.

    For images that require a reshoot — because the product framing is wrong, because the product variant shown doesn’t match, or because the overall quality is poor — schedule those shoots before completing the remediation pass. Don’t re-upload partially fixed images; a listing with a questionable but not-yet-flagged image is better left live until a fully compliant replacement is ready.

    Rename all fixed files using the correct ASIN-based naming convention before upload: ASIN.jpg.

    Day 5: Re-upload, Monitor, and Build the Ongoing Tracking System

    Upload your corrected images through Seller Central’s standard image management interface, or in batch via flat file for larger catalogs. After uploading, allow 12 to 24 hours for images to process before checking suppression status.

    Set up a weekly monitoring process. The Listing Quality dashboard in Seller Central refreshes regularly and surfaces new issues as they’re identified. Building a recurring weekly check of suppression status — specifically for your top 50 revenue ASINs — into your standard operational cadence is one of the highest-ROI catalog management habits you can develop.

    Building a Suppression-Proof Image Workflow for 2026 and Beyond

    A catalog audit is a one-time fix. A sustainable image workflow is what prevents the audit from becoming an annual emergency. The goal here is to make compliance a property of the production process rather than something you achieve and then maintain reactively.

    Implement a Pre-Upload QC Checklist

    Every image — whether produced internally, by a photographer, or by a creative agency — should pass through a standardized compliance checklist before it enters your upload queue. The checklist doesn’t need to be complex; a Google Sheet or Notion table with five to eight binary yes/no questions for each image slot is sufficient.

    The pre-upload checklist should cover:

    • Main image background confirmed pure white?
    • Product fill confirmed at 85%+?
    • No text, logos, or watermarks on main image?
    • Resolution at or above 2,000 × 2,000?
    • File named with correct ASIN convention?
    • Any AI-generated humans present in any image slot? (If yes, metadata tagged?)
    • All nine image slots populated?
    • Category-specific rules checked?

    Making this checklist mandatory for every new listing and every image update — not just new ASINs — closes the compliance gap at source rather than chasing it downstream.

    Build the AI Metadata Tag Into Your Production Workflow

    If any part of your image production uses AI tools to generate or modify human figures, the contains-synthetic-performer tagging step needs to be a built-in part of the final production stage, not an afterthought. The practical approach is to build metadata tagging into your image export or delivery stage.

    For teams using Adobe Creative Cloud, the metadata can be embedded in Bridge or Lightroom as part of a batch output preset. For teams using external agencies or freelancers, the contract or brief for any AI-generated creative work should explicitly require the delivery of tagged files — or the delivery of files that clearly document which images require tagging before upload.

    Establish a Category Compliance Library

    If your catalog spans multiple Amazon categories, maintain a single reference document that lists the category-specific image rules for each vertical you sell in. Update this document when Amazon publishes new style guides or when seller community reports surface new enforcement patterns.

    Category-specific rules change more frequently than the general guidelines, and Amazon doesn’t always publicize changes loudly. Following relevant seller forums (Seller Central community, relevant subreddits, third-party seller groups) and setting up Google Alerts for terms like “Amazon image requirements [category name]” provides early warning of new category-specific enforcement trends before they result in suppression notices.

    Treat Image Quality as a Competitive Asset, Not Just a Compliance Requirement

    There’s a useful reframe here that goes beyond the defensive concern of avoiding suppression. Amazon’s A9/A10 algorithm uses engagement signals — click-through rate from search results is one of the most significant — as a ranking input. Your main image is the primary driver of CTR. A fully compliant, well-framed, high-resolution main image that clearly shows the product isn’t just a compliance requirement; it’s an organic ranking lever.

    Sellers who treat the 2026 image compliance update as an opportunity to upgrade their visual assets — rather than purely a remediation exercise — consistently report improved CTR, better conversion rates, and stronger ranking velocity after the update is complete. The compliance floor and the quality ceiling are closer together than most sellers realize.

    The One Check Most Sellers Haven’t Done Yet

    Before closing out this audit guide, there’s a specific check worth calling out independently because the data suggests it’s being missed even by sellers who believe they’re compliant.

    Amazon has the ability to replace listing images under certain conditions. If Amazon’s systems determine that your main image is non-compliant and you haven’t replaced it within a defined window, Amazon may substitute an image from another part of the listing — a secondary image, a brand store asset, or in some cases an image sourced from another data provider — as the new main image. This replacement image may or may not meet main-image requirements, and it may not accurately represent your specific product variant.

    The practical consequence: your listing might not be suppressed, but it might be running with an Amazon-substituted main image you didn’t choose and may not have checked recently. Go to each of your live listings directly (not through Seller Central’s image management view) and visually confirm that the main image currently showing to shoppers is the one you intend it to be.

    This check takes approximately two minutes per ASIN on your priority list. It’s the most actionable single step you can take today.

    Conclusion: Compliance Is an Ongoing Operational Practice, Not a One-Time Fix

    Amazon’s 2026 image rules don’t represent a single sweeping policy overhaul. They represent the continuation of a multi-year trajectory toward stricter, faster, more automated enforcement of standards that have largely existed in documentation for years. The sellers who are getting caught aren’t primarily the ones who never read the rules — they’re the ones who read the rules once, implemented them once, and assumed the work was done.

    The addition of the contains-synthetic-performer disclosure requirement is the clearest signal of what’s coming next. Amazon is now codifying external regulatory requirements directly into technical seller specifications — which means the compliance landscape will continue to evolve as AI-related legislation advances globally. What’s required today is a metadata tag on photorealistic AI-generated people. Future iterations will almost certainly extend disclosure requirements further.

    The sellers who come out of 2026 in the strongest position are the ones who treat image compliance as an operational system rather than a project. That means a pre-upload QC checklist, a weekly suppression monitoring cadence, a current reference library of category-specific rules, and a clear workflow for any AI-generated or AI-edited creative.

    The cost of building and maintaining that system is a fraction of what a single multi-ASIN suppression event can cost in a single week. The math is straightforward. The operational change to act on it is what separates the sellers who will stay visible in Amazon’s search results from those who will keep getting surprised by suppression notices.

    Quick-Reference Action Checklist

    1. ✅ Export the Suppressed Listings report from Seller Central today.
    2. ✅ Sort suppressed ASINs by revenue and create a prioritized fix list.
    3. ✅ Review all main images for white background, 85%+ fill, no text/logos, and 2,000px resolution.
    4. ✅ Check every listing for AI-generated human models — if present, implement contains-synthetic-performer metadata tagging before re-upload.
    5. ✅ Verify you’re working to category-specific rules (apparel, shoes, jewelry, media) not just general guidelines.
    6. ✅ Confirm all A+ Content images are JPG/PNG/BMP in RGB, under 2 MB, with no QR codes or hyperlinks.
    7. ✅ Manually check each priority listing live in search to confirm the main image showing is the one you intended.
    8. ✅ Build a pre-upload compliance checklist and make it standard practice for every new listing and image update.
    9. ✅ Set up a weekly review cadence for your Listing Quality dashboard and top-revenue ASIN suppression status.
  • The Seller’s Scientific Method: How to Run Image A/B Tests in Manage Your Experiments That Actually Mean Something

    The Seller’s Scientific Method: How to Run Image A/B Tests in Manage Your Experiments That Actually Mean Something

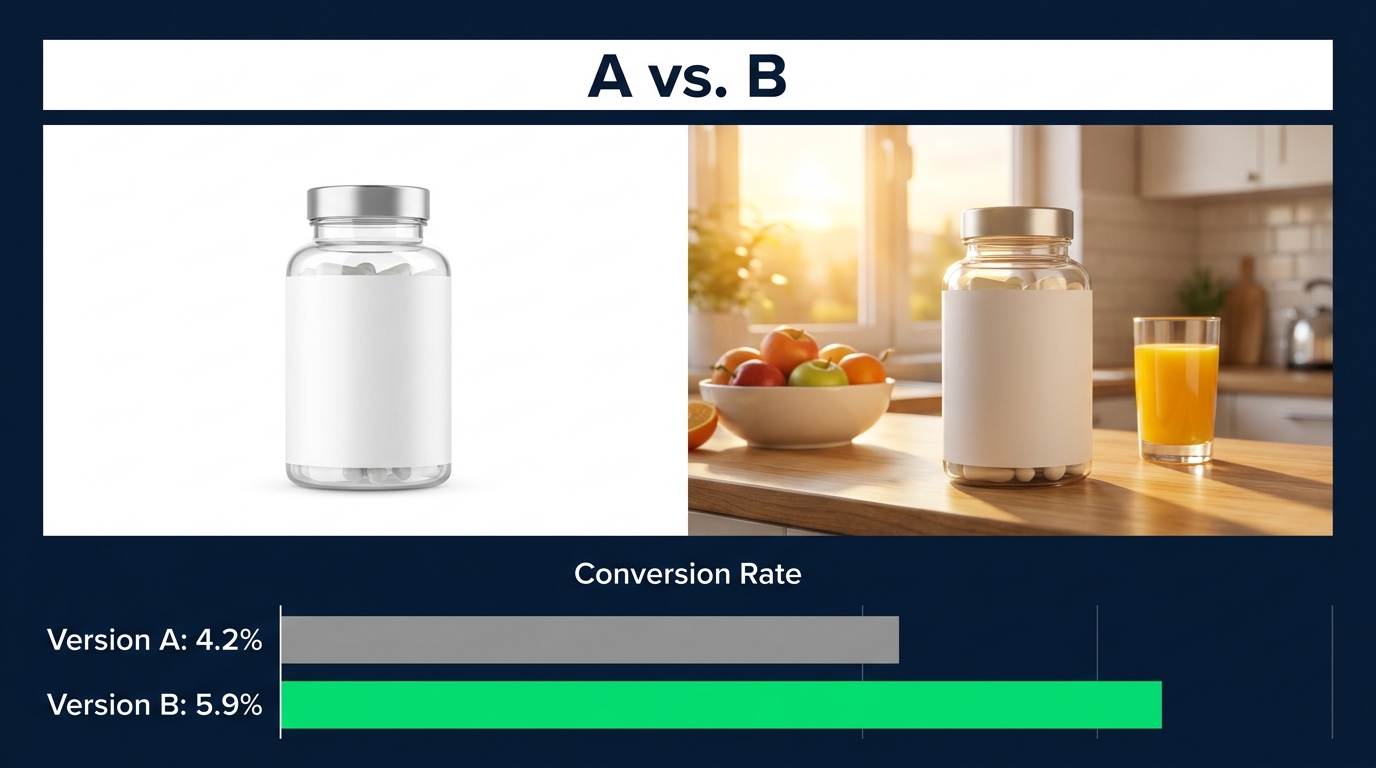
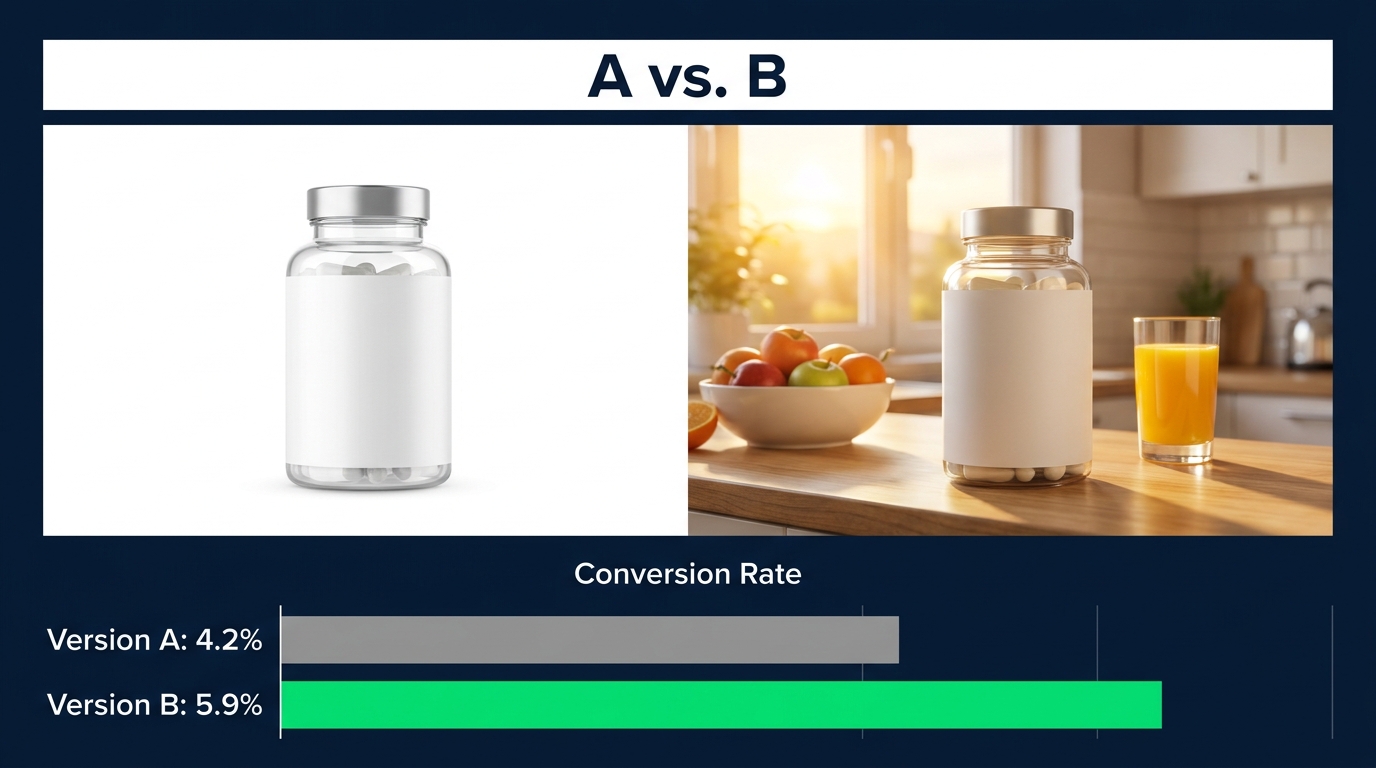
    Split-screen Amazon product image A/B test showing Version A white-background vs Version B lifestyle photo with conversion rate comparison bar chart

    Most Amazon sellers who run image experiments through Manage Your Experiments believe they’re doing science. They pick two photos, set a duration, watch the dashboard, and declare a winner. What they’re actually doing, in the vast majority of cases, is running an expensive opinion poll dressed up in data clothing.

    The difference between a test that produces a reliable, actionable insight and one that produces noise you act on anyway comes down to a handful of decisions made before the experiment launches. Hypothesis structure, variable isolation, traffic thresholds, duration discipline, and result interpretation — get those right, and a single image test can deliver a 10–25% conversion lift that holds. Get them wrong, and you’ll publish a “winner” that quietly underperforms for the next twelve months while you wonder what happened.

    This post is not a basic walkthrough of the Manage Your Experiments interface. It’s a discipline guide for using it correctly. We’re going to cover how the tool actually works under the hood, what eligibility really means in practice, how to design experiments that isolate signal from noise, how to read results without fooling yourself, and how to build a testing cadence that compounds over time. By the end, you’ll have a framework for turning image testing from a one-off tactic into a permanent, measurable competitive advantage.

    What Manage Your Experiments Actually Does Under the Hood

    Infographic showing Amazon Manage Your Experiments dashboard anatomy with 50/50 traffic split, conversion rate metrics, and statistical significance progress bar

    Understanding how the tool operates mechanically changes how you design and interpret tests. Manage Your Experiments (MYE) is Amazon’s native content experimentation platform, available exclusively to Brand Registry brand owners through Seller Central. When you launch an experiment, Amazon splits your eligible ASIN’s shopper traffic approximately 50/50 between two versions of a listing element — in the case of image tests, that means Version A shoppers see your current main image, and Version B shoppers see your challenger image.

    This split is applied at the session level, not the account or device level, meaning individual shoppers are randomly assigned to one variant for their session. Amazon does not publicly document the exact randomization algorithm, but expert consensus is that the split is consistent enough to be reliable across high-traffic ASINs over the recommended duration window.

    The Metrics MYE Reports

    The results dashboard surfaces the following metrics per variant: sample size (unique shoppers who saw each version), conversion rate, units ordered, total sales revenue, and units sold per visitor. For image tests specifically, click-through rate from search results is arguably the most critical upstream metric — a stronger main image drives more clicks, which flows into the rest of the funnel. However, CTR as a standalone metric in MYE is less prominently reported than conversion rate, which measures what happens after the shopper lands on the detail page.

    This is an important nuance. A main image change that lifts CTR but doesn’t lift conversion may still be a net positive from a traffic-acquisition standpoint, particularly if your organic rank benefits from improved click velocity. But MYE’s primary lens is conversion rate and units sold. Keep that in mind when framing your success criteria before you launch.

    How Statistical Significance Is Determined

    Amazon reports a probability score — essentially a confidence level that one version is genuinely outperforming the other, rather than the difference being random variation. The tool’s internal threshold for flagging a winner appears to sit around 66–70% confidence, which is substantially lower than the 90–95% confidence standard used in rigorous statistical practice. This matters enormously. Amazon may signal a result as meaningful while the actual evidence would not meet the standard applied in an academic or enterprise CRO context.

    If you’re treating the tool’s built-in significance flag as gospel, you’re operating on a lower evidentiary threshold than you probably realize. Experienced sellers add their own filter: they look for probability scores above 90% before acting on a result, and they treat anything below that as directional — interesting information that warrants a follow-up test, not a publishing decision.

    MYE also offers a “Run to Significance” setting, where Amazon automatically ends the test once it judges enough data has been collected. This is convenient, but it puts the significance threshold decision in Amazon’s hands rather than yours. More on that later.

    Eligibility Reality Check: Who Can Actually Run These Tests

    Before designing your first experiment, you need to confirm you’re eligible — and eligibility is more restrictive than Amazon’s marketing language implies. The two hard requirements are Brand Registry enrollment and sufficient ASIN traffic. Meeting one without the other means no experiments.

    Brand Registry Requirements

    You must be the brand owner enrolled in Amazon Brand Registry with an active registered trademark in the marketplace where you want to experiment. Generic resellers, wholesale accounts, and arbitrage sellers are categorically excluded. The brand owner designation must be tied to the selling account running the experiment — you cannot run experiments on behalf of a brand through an unaffiliated account. A Professional selling plan is also required; individual plan accounts cannot access MYE.

    If you manage multiple brands or brand entities, each requires its own Brand Registry enrollment. Experiments are brand-specific and cannot be run across brands in the same account without separate enrollments.

    Traffic Thresholds: The Number Amazon Won’t Officially State

    Amazon does not publish a precise minimum traffic threshold for MYE eligibility, but the practical consensus among sellers and tools teams in 2026 is approximately 1,000 detail page views in the last 30 days as the floor. Some sellers report eligibility at slightly lower volumes; others report ineligibility well above that number depending on category and order velocity.

    The reason traffic matters isn’t just eligibility — it’s result reliability. An ASIN with 500 monthly sessions will take significantly longer to accumulate the sample size needed for a statistically valid result, often far exceeding Amazon’s maximum experiment duration. The tool will technically run the experiment, but the result will be inconclusive. In practice, ASINs with fewer than 1,000–1,500 monthly detail page views should not be prioritized for MYE image testing. Your effort is better spent on traffic acquisition first.

    What Happens When You’re Not Eligible

    If an ASIN doesn’t appear in your MYE experiment setup, it’s almost always a traffic issue rather than a product category restriction. The solution isn’t to try to force the experiment — it’s to run sponsored ads to build sufficient organic and paid session volume, then revisit eligibility in 60–90 days. Running experiments on artificially traffic-boosted ASINs introduces its own confounds (paid traffic behaves differently than organic), so the target should be consistent organic session velocity before you test.

    Building a Real Hypothesis Before You Touch Seller Central

    Scientific hypothesis framework diagram showing IF-THEN-BECAUSE structure for Amazon product image A/B testing

    The single most common reason image tests produce ambiguous results is that they begin with a vague question rather than a falsifiable hypothesis. “Let’s see if the lifestyle photo does better” is not a hypothesis. It’s a guess. A real hypothesis specifies what you’re changing, what you expect to happen, why you expect it, and how you’ll measure it.

    The IF-THEN-BECAUSE Framework

    The most practical hypothesis structure for image testing follows a three-part format:

    • IF we change [specific image element] from [Version A description] to [Version B description]
    • THEN we expect [specific metric] to [increase/decrease] by [approximate magnitude]
    • BECAUSE [the mechanism — why this change should produce this effect]

    For example: “If we change the main hero image from a white-background studio shot to a lifestyle image showing the product in use in a kitchen, then we expect click-through rate and conversion rate to increase by 10–20%, because shoppers searching for this type of product respond to contextual use-case imagery that helps them visualize the product in their own environment.”

    That’s a testable, documented hypothesis. You’ve committed to a mechanism, a metric, and an approximate magnitude before seeing any data. This matters because it prevents you from retroactively reframing results to fit whatever the data shows.

    One Variable Per Experiment, Without Exception

    The temptation to “improve” a challenger image by also adjusting the background, changing the angle, and updating the props is constant — and must be resisted. Every element you change in Version B beyond the one variable you’re testing becomes a potential explanation for any difference in results. If you change three things and Version B wins by 15%, you don’t know which of the three things drove the lift. You can’t replicate it. You can’t learn from it. You’ve wasted 8–10 weeks of live traffic.

    The practical rule: Version B should differ from Version A in exactly one meaningful way. If you’re testing white background versus lifestyle context, every other element — product size in frame, lighting quality, image resolution, angle — should be as consistent as possible. This is harder than it sounds. It requires briefing your photographer or AI image tool with precision, and it requires reviewing the two variants side by side with a checklist before launching.

    Defining Success Before You Start

    You should also define your minimum meaningful effect size — the smallest lift that would make publishing the winning variant worthwhile — before the experiment runs. This prevents the common mistake of declaring a 1.5% conversion lift as a meaningful win when the test-to-action cost (photography, setup time, opportunity cost) required a 5% lift to justify the effort. Document it. Lock it in. Don’t move it.

    Which Image Variables to Test First — and In What Order

    Image Testing Priority Pyramid showing main hero image at top with high CTR impact down through secondary images, infographic callouts, and lifestyle shots

    Not all image variables carry equal weight, and testing them in the wrong order wastes testing cycles. The priority sequence should follow the shopper’s decision path — from the first impression in search results to the deeper-dive content on the detail page.

    Tier 1: The Main Hero Image

    The main image is the highest-leverage test you can run, and it should almost always be first. It’s the only image shoppers see in search results, on category browse pages, and in sponsored ad placements. A stronger main image lifts CTR from every entry point, and CTR feeds into organic ranking velocity. The downstream effect of a better main image compounds far beyond the conversion rate lift measured in MYE alone.

    The most productive main image tests in 2026 fall into these categories:

    • Background context: Pure white background vs. a subtle environmental context (kitchen counter, desk surface, outdoor terrain — appropriate to the product’s use case)
    • Product scale: Full product visible vs. cropped to show detail; product filling 75% of frame vs. 85% of frame
    • Product orientation: Front-facing vs. slight 3/4 angle to show dimensionality
    • Packaging vs. product: Showing the retail packaging vs. the bare product — relevant for supplement, cosmetic, and food categories
    • Use-in-hand vs. standalone: Product held by a hand or in use vs. floating on its own

    Documented results from main image tests vary widely depending on the quality of the original image, but typical conversion lifts range from 8–25%, with well-designed tests on weak originals occasionally reaching 30% or more. A case study from the UK marketplace showed a main image change lifting conversion from 21% to 24% — a 14% relative improvement — driving a 35.5% month-over-month sales increase and a 67% net profit gain on that ASIN.

    Tier 2: Secondary Images and Their Role in Conversion

    Once your main image is optimized, secondary images (image slots 2–7) become the primary lever for the on-page conversion rate — what happens after the shopper arrives. Secondary images serve a different function than the main image: they answer questions, overcome objections, demonstrate scale and use, and build purchase confidence.

    Testable secondary image variables include:

    • Feature infographic vs. lifestyle photo in position 2 — does the shopper want to see features annotated on the product, or do they want to see it in use?
    • Size/scale comparison image (product next to a common object) vs. a dimensions diagram
    • Social proof image (star rating callout, review count banner) vs. a materials/ingredients breakdown
    • Before/after or use-case sequence vs. a single use-case lifestyle shot

    Secondary image tests tend to produce smaller lift magnitudes than main image tests — typically 5–15% conversion improvement — but they’re still highly valuable, particularly for complex products where shoppers need information before converting.

    Tier 3: A+ Content Images

    MYE also allows testing of A+ Content, which includes the module-based enhanced content images below the fold. These tests are best run after main and secondary image optimization is complete, since A+ content is seen by fewer shoppers (those who scroll far enough to reach it) and has a lower per-impression impact than above-the-fold elements. However, for high-involvement purchase decisions — electronics, furniture, fitness equipment, health products — A+ content images can meaningfully influence the final conversion decision and are worth testing systematically.

    Sample Size, Duration, and the Traffic Threshold You Cannot Ignore

    Graph showing statistical confidence building over experiment weeks with danger zone in weeks 1-4 and safe decision zone in weeks 7-10 for Amazon A/B testing

    The duration and sample size question is where most seller-run experiments fail silently. The test completes, a result appears on the dashboard, and a decision is made — but the data underlying that decision was never sufficient to produce a reliable result in the first place.

    Why 8–10 Weeks Is the Standard

    Amazon’s own guidance for MYE experiment duration is 8–10 weeks for most tests. This is not arbitrary. Several statistical realities make shorter durations unreliable for most Amazon ASINs:

    Day-of-week variance: Amazon shopper behavior varies systematically by day of the week. Weekend browsers behave differently from weekday buyers. A test that runs for only 2–3 weeks may have disproportionate exposure to certain days depending on when it launched, skewing results. A full 8-week run captures approximately 8 complete weekly cycles, washing out day-of-week noise.

    Novelty effects: A new image variant may receive an initial boost (or drag) from algorithm freshness effects. Running long enough allows novelty to dissipate and genuine performance to emerge.

    Sample size accumulation: Statistical reliability requires a minimum sample size per variant. The rule of thumb for Amazon image tests is approximately 1,000 sessions per variant per week. An ASIN generating 2,000 total weekly sessions (1,000 per variant) needs a full 8–10 weeks to accumulate 8,000–10,000 sessions per variant — a robust sample for conversion rate testing. Lower-traffic ASINs need proportionally longer, but since Amazon caps experiment duration, low-traffic tests may end before reaching adequate sample size.

    The “Run to Significance” Setting: Convenient, But Not Risk-Free

    Amazon’s “Run to Significance” option automatically ends the experiment when it judges sufficient data has been collected. This is useful for sellers who don’t want to monitor duration manually, but it comes with one significant caveat: Amazon’s internal significance threshold is lower than best-practice standards. The tool may end a test and call a winner at 66–70% confidence, which means there’s a 30–34% probability the declared winner is actually a false positive.

    For sellers running high-stakes tests on their primary revenue ASINs, the recommendation is to set a fixed 8–10 week duration rather than relying on “Run to Significance,” and to apply your own 90%+ confidence filter when reviewing results. For lower-stakes exploratory tests, “Run to Significance” is an acceptable shortcut.

    What Happens When Your ASIN Doesn’t Have Enough Traffic

    If your ASIN generates fewer than 1,000 sessions per week, you have a few options. First, you can drive additional paid traffic during the test period through Sponsored Products campaigns — but this introduces a confound, since paid traffic converts differently than organic traffic. The results from a traffic-boosted test should be interpreted with caution and validated post-publication. Second, you can wait until the ASIN has built more organic velocity before testing. Third, you can run the test knowing that the result will be directional rather than definitive, and plan a follow-up confirmatory test once traffic has grown. The worst option is to run the test, see any result, and treat it as ground truth regardless of sample size.

    Reading MYE Results Without Fooling Yourself

    Dashboard showing three common Amazon MYE result misinterpretations: the peeking problem, seasonality confound, and projected impact trap

    The results dashboard in MYE is designed to be readable by sellers with no statistical training. That’s both its strength and its primary failure point. The simplification required to make results accessible also strips away the nuance needed to interpret them correctly.

    The Peeking Problem: Why Early Results Are Almost Always Wrong

    The most destructive habit in experiment management is checking results while the test is running and acting on what you see. Early data in any A/B test is inherently volatile. With small accumulated sample sizes, random variation produces dramatic-looking differences that smooth out as more data accumulates. Version B might appear to be winning by 20% at week 2 and be statistically indistinguishable from Version A by week 6.

    The statistical term for the distortion caused by monitoring and potentially stopping tests early is “peeking,” and it’s one of the most well-documented sources of false positives in experimentation science. Amazon’s own documentation warns against ending tests early, but the visual of an apparent “winner” on the dashboard is compelling enough that many sellers can’t resist.

    The practical discipline: set your experiment, lock your review date for the day it completes, and do not look at interim results with intent to act on them. Check that the experiment is running (not paused), and that’s the extent of your mid-experiment engagement.

    The Confidence Score: What Each Level Actually Tells You

    When reviewing results, the confidence score (probability that one version is better) should be your first filter, applied before you consider any of the headline metrics:

    • Below 70%: No meaningful signal. The result is effectively a coin flip. Do not publish based on this result. Either extend the test or treat it as inconclusive.
    • 70–89%: Directional signal only. One version appears to be performing better, but the evidence isn’t strong enough for a high-confidence publishing decision. Consider this informative for future hypothesis design, not actionable as a standalone result.
    • 90–95%+: Reliable enough to act on for most business decisions. Publish the winner with reasonable confidence that the lift is real. Validate performance in the 4–6 weeks post-publication.
    • 95%+: Strong evidence. Act on this result with confidence. Document it as a high-quality data point for your testing knowledge base.

    Which Metrics to Prioritize in Image Tests

    Not all metrics reported in MYE carry equal weight for image experiments. Here’s how to prioritize them:

    Primary: Units ordered and conversion rate. These are the most direct measures of whether your image change influenced purchase behavior. Units ordered accounts for volume differences; conversion rate accounts for traffic differences between variants.

    Secondary: Sales revenue. Revenue is useful for understanding dollar impact, but it can be skewed by price variation, promotional discounts applied during the test period, or add-on item purchases. Weight it less heavily than units ordered.

    Tertiary: Units per visitor. This metric captures whether a single session tends to result in a multi-unit purchase, which is relevant for consumable and bundled products but less meaningful for single-unit durables.

    Return rate and review velocity are not directly reported in MYE but should be monitored in your broader analytics for the 60 days following a winning image publication. A new image that increases conversions but also increases return rates (because the product doesn’t match what the image implied) is a net negative that MYE’s dashboard won’t flag.

    The “Projected One-Year Impact” Number: What It Means and What It Doesn’t

    When an experiment completes with a clear winner, MYE displays a “Projected one-year impact” figure — a Most Likely, Best Case, and Worst Case estimate of how much additional annual revenue and units you’d gain by publishing the winning version. This number is frequently misunderstood, and that misunderstanding leads to poor business decisions.

    How the Number Is Calculated

    The projected one-year impact is not a demand forecast. It’s a mechanical extrapolation: Amazon takes the average daily difference in units sold between the winning and losing variant during the test period, multiplies it by 365, and presents that as the annual impact under various scenarios. There is no seasonality modeling, no accounting for pricing changes, no adjustment for competitive dynamics, and no consideration of whether the test-period traffic is representative of annual traffic patterns.

    If your test ran during Q4 — when most categories see peak demand — the extrapolation will wildly overestimate annual impact. If it ran during a slow period, it will underestimate. The number is directionally useful as an order-of-magnitude sense check, but it should never be used for financial planning, board presentations, or resource allocation decisions without significant manual adjustment.

    Applying the Number Correctly

    The right way to use the projected impact figure: treat it as a rough signal for prioritizing which winning variants to publish first when you have multiple concluded tests waiting for action. A test showing a projected impact of $180,000 should generally be published before one showing $12,000, all else being equal. The relative ranking of tests by projected impact is more meaningful than any individual number’s absolute value.

    Also note: the Best Case scenario in MYE’s projected impact display tends to assume conditions that are rarely sustained. Use the Most Likely figure, apply your own seasonality discount or premium based on when the test ran, and treat the result as a directional indicator rather than a precise forecast.

    Confounds That Corrupt Your Experiment — and How to Avoid Them

    Even a well-designed experiment can produce unreliable results if external factors create asymmetric conditions for the two variants during the test period. These confounds are the second most common reason image tests fail to deliver usable insights.

    Pricing Changes Mid-Test

    Any price change applied to your ASIN during an active experiment contaminates the results. Price is the most powerful conversion lever on Amazon — a 10% price reduction will almost always produce a conversion lift that dwarfs any image-driven effect. If you change price mid-test, stop the experiment, discard the data, and restart once price has stabilized for at least two weeks.

    Similarly, coupons, deals, and lightning deal activations during the test period introduce conversion spikes that are impossible to disentangle from image effects. Schedule experiments to avoid planned promotional periods, and if an unplanned promotion runs during your experiment window, note it explicitly and discount the result accordingly.

    Inventory and Buy Box Disruptions

    Going out of stock for even a day during a test period corrupts the data for the variant that was running when the stockout hit. Likewise, losing the Buy Box to a competitor for any portion of the test window means a fraction of your “sessions” during that period saw a different purchasing experience than usual. Monitor inventory and Buy Box ownership daily during active experiments and pause the experiment immediately if either condition occurs.

    Seasonal Demand Shifts

    Avoid starting image tests within 3 weeks of major shopping events (Prime Day, Black Friday, Cyber Monday, back-to-school peaks, holiday ramp-up). The traffic composition, intent level, and conversion propensity of shoppers during these periods is substantially different from typical weeks. If an experiment straddles a seasonal event, the data from those weeks should be weighted down when interpreting results — or the experiment should simply be extended to ensure an equal amount of non-peak data on both sides of the event.

    Concurrent Listing Changes

    This is the most commonly violated discipline in real-world testing. During an active image experiment, do not change your title, bullet points, description, A+ content, back-end keywords, pricing, or any other listing element. Any concurrent change creates a new confound that prevents you from attributing result differences to the image variable under test. If you need to make a critical listing change during an active experiment, pause the experiment first, make the change, allow the listing to stabilize for one week, then restart — resetting the clock.

    What to Do After a Winner: The Iteration Roadmap

    Post-experiment iteration roadmap showing five milestones from publishing winner through validating lift, documenting learnings, forming next hypothesis, and testing next ASIN

    Declaring a winner and hitting publish is the halfway point of a useful experiment, not the finish line. The real value of systematic image testing accrues over multiple test iterations, as each experiment generates learnings that sharpen the next hypothesis and raise the hit rate of future tests.

    Step 1: Publish and Validate

    When you have a high-confidence winner (90%+ confidence score, positive result on units ordered), publish the winning variant immediately. Then monitor real-world performance for the next 4–6 weeks without running another image experiment on the same ASIN. Look at: conversion rate in your Business Reports, session-to-order ratio, return rate, and any change in organic ranking position. If the published winner produces the expected lift in organic data, the result is validated. If performance reverts or deteriorates, you may be seeing a novelty effect wearing off, or the test result may have been a false positive — both of which are actionable learnings.

    Step 2: Document the Why

    The most underused practice in seller-run experimentation is documentation. After publishing a winner, write down: what you tested, what the hypothesis was, what the result was (including the confidence score and magnitude), and your interpretation of why the winner performed better. This doesn’t need to be elaborate — a shared spreadsheet with six fields per test is sufficient. Over time, this knowledge base becomes one of your brand’s most valuable assets: a proprietary library of what works for your specific customers in your specific category.

    Patterns emerge from documented experiments that aren’t visible from individual tests. You may find that lifestyle images consistently outperform white-background shots in your category, but only when the lifestyle context matches your primary customer’s age demographic. You may find that infographic-style images with text callouts lift conversion for male shoppers but underperform for female shoppers browsing the same ASIN. These insights require multiple tests and good documentation to surface.

    Step 3: Form the Next Hypothesis

    A completed test — win or loss — always generates a next question. If lifestyle beat white-background, the next question is: which lifestyle context works best? Indoor vs. outdoor? Solo use vs. group use? Morning vs. evening context? If the challenger lost, ask why: was the image quality technically inferior? Did the lifestyle context not match the customer’s self-image? Did the product look smaller or less premium in context?

    Each answered hypothesis narrows the search space for future tests. Within 3–4 image test cycles on a single high-traffic ASIN, you’ll typically find that your original main image was leaving somewhere between 15% and 40% of conversion performance on the table — and that the gains from systematic testing accumulate to a meaningfully different business outcome than you started with.

    Research indicates that sellers who run deliberate, well-structured image tests over 12 months on their core ASINs see cumulative conversion improvements of 30–80% relative to where they started. That’s not a single test result — it’s the compounded effect of sequential hypothesis-driven experiments, each building on the last.

    Step 4: Expand to the Next ASIN or Element

    Once your primary ASIN’s main image is optimized and you’ve documented the learnings, the playbook branches in two directions. First, apply what you’ve learned about image type preferences to your next highest-traffic ASINs — often the winning insight from ASIN 1 translates well enough to ASIN 2 and 3 that you can launch with a higher-confidence hypothesis and see faster results. Second, move to the next listing element on your primary ASIN: secondary images, then A+ content, then title. Each element has its own optimization ceiling, and working through them systematically compounds the total listing performance improvement.

    Building a Testing Cadence Across Your Catalog

    Individual tests are tactical. A testing cadence is strategic. The brands that make image testing a genuine competitive advantage aren’t running one experiment per quarter — they’re running three to six simultaneous experiments across their catalog, with a structured pipeline of hypotheses queued up, and a review rhythm that keeps the organization learning continuously.

    Building the Experiment Pipeline

    A practical cadence for a mid-sized brand with 20–50 active ASINs looks like this: at any given time, 3–5 ASINs are in active experiments. Another 5–8 ASINs are in the hypothesis development phase (images being designed or ordered). Another 3–5 ASINs are in the post-experiment validation window. The rest are either ineligible (insufficient traffic) or in a maintenance phase where they’ve been tested and optimized to a sufficient degree.

    This means roughly one new experiment launching per week, one concluding per week, and continuous data flowing into your testing knowledge base. At that cadence, a brand with 30 eligible ASINs can run 4–5 complete test cycles per year on its primary products — enough to produce a substantial cumulative optimization effect.

    Prioritizing Which ASINs to Test First

    Not all ASINs deserve equal testing attention. Prioritize using a simple matrix:

    1. Revenue contribution: ASINs that generate the most revenue have the highest upside from conversion improvement. A 15% lift on a $500,000/year ASIN is worth more than a 15% lift on a $20,000/year ASIN.
    2. Traffic volume: High-traffic ASINs generate reliable results faster, reducing the cost of experimentation in time and opportunity cost.
    3. Current conversion rate: An ASIN converting at 8% when the category average is 12% is a high-priority target — there’s a clear gap suggesting the current image may be underperforming relative to opportunity.
    4. Image quality baseline: ASINs with visibly dated, technically poor, or unoptimized main images have the most headroom for improvement and tend to produce the strongest test wins.

    When to Stop Testing a Specific Variable

    Testing has diminishing returns. After 3–4 rounds of main image testing on a single ASIN where results have been inconclusive or where marginal differences are shrinking, it’s reasonable to conclude that the current main image is near its optimization ceiling for this variable type and shift testing attention to other elements or other ASINs. The signal that you’ve reached this point: multiple consecutive tests showing no statistically significant difference between variants that are meaningfully different from each other.

    This is actually a useful result. Knowing that your main image is well-optimized for your category allows you to invest creative resources elsewhere with confidence that you’re not leaving easy wins behind.

    Integrating MYE Data with Your Broader Analytics Stack

    MYE results are most valuable when cross-referenced with data from Brand Analytics, your advertising console, and third-party tools that track organic ranking and search visibility. A main image that lifts MYE-measured conversion rate should also produce measurable downstream effects: improved organic ranking (as higher click-through signals to Amazon’s algorithm), lower ACoS on Sponsored Products (as the same ad spend converts at a higher rate on the improved listing), and improved return on ad spend overall.

    If a winning MYE experiment doesn’t produce observable downstream improvements in these broader metrics within 60 days of publication, treat the result with additional skepticism. Either the lift was a false positive, or other factors (pricing, competition, seasonality) are suppressing the gains. Either way, that’s a signal to investigate further rather than simply accepting the MYE result at face value.

    Making Scientific Testing a Permanent Competitive Edge

    Image testing through Manage Your Experiments is one of the few areas of Amazon seller optimization where disciplined process and rigorous methodology produce substantially better outcomes than intuition alone. The tool is available to every eligible brand. The traffic is already flowing. The data is already being generated. The only question is whether you capture it systematically or let it pass unused.

    The brands that win with image testing don’t have better creative instincts than everyone else — though strong creative judgment helps. They win because they’ve built a process that converts every test, win or loss, into a piece of organizational knowledge that makes the next test faster, better-calibrated, and more likely to produce a meaningful result. Over time, that compounding effect creates a catalog that’s demonstrably better optimized than competitors who are still changing images based on opinion and gut feel.

    The core discipline is straightforward, even if execution requires consistency:

    • Write a falsifiable hypothesis before every test
    • Change one variable per experiment, no exceptions
    • Run every test for a minimum of 8 weeks with adequate traffic
    • Apply a 90%+ confidence filter before acting on any result
    • Document wins, losses, and the reasoning behind each
    • Never change other listing elements during an active experiment
    • Validate real-world performance for 4–6 weeks after publishing a winner
    • Use each result to sharpen the next hypothesis, not just to justify a publishing decision

    Run that process consistently across your catalog for twelve months, and the cumulative effect — 30–80% improvement in conversion rate on optimized ASINs, stronger organic ranking driven by improved click signals, lower cost per acquisition across paid campaigns — will be visible in your P&L in ways that no single test could achieve on its own.

    The test is not the strategy. The testing system is the strategy.