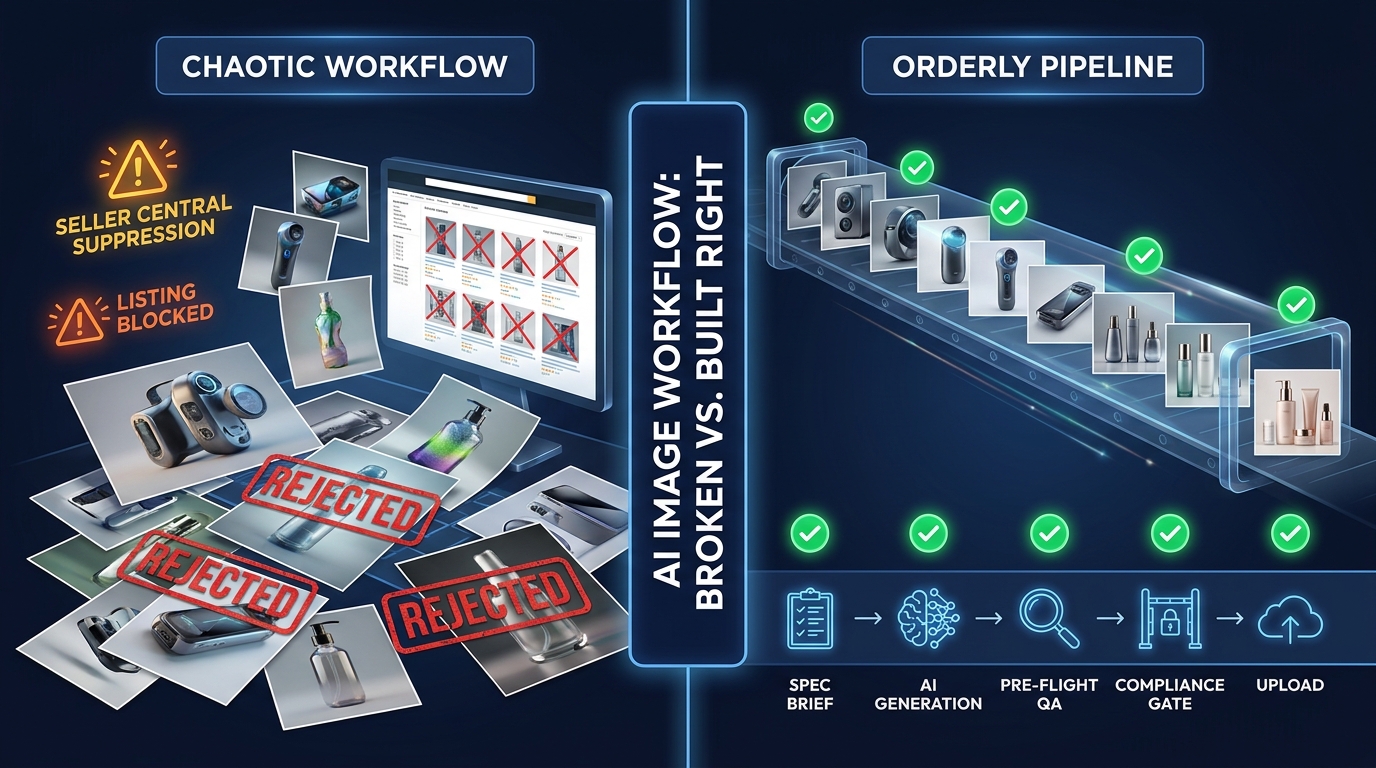

Here is where most AI image workflows for Amazon break down: not at the generation step, but at the gate. Sellers pour time and budget into AI tooling, craft elaborate prompts, generate hundreds of product images, and then watch those assets get flagged, suppressed, or silently penalized the moment they hit Seller Central’s automated review system.
The failure is rarely about image quality in any aesthetic sense. The images often look great. The problem is structural — there was no compliance architecture built into the workflow before the first image was ever generated.
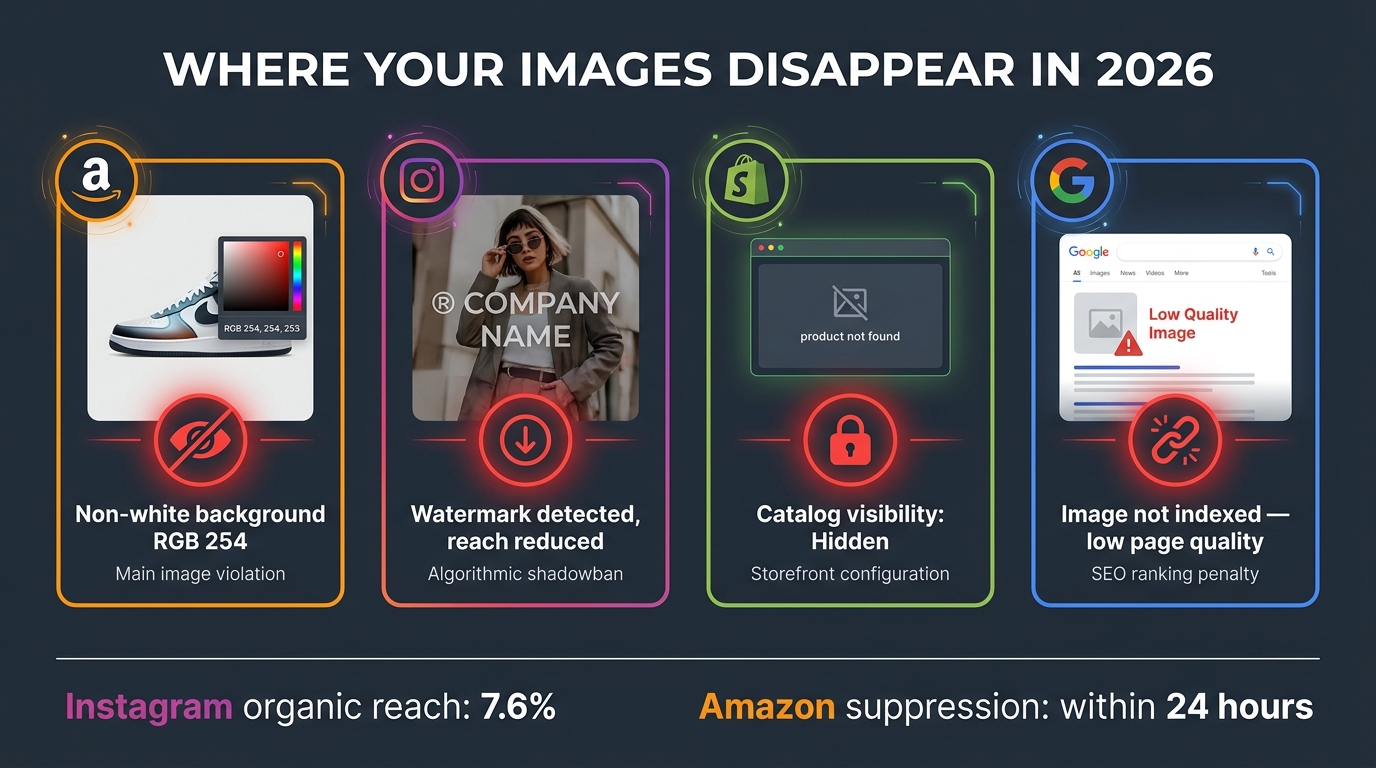
Amazon’s Spring 2026 Visual ID Standard 3.0 update, which took full enforcement effect on April 15, 2026, turned what used to be a relatively forgiving manual-review environment into a machine-scored gauntlet. Amazon’s automated image validation system now evaluates assets across more than 127 distinct quality and policy parameters before a listing goes live. Non-compliance doesn’t just mean a flagged image anymore — it means search suppression, which means sales drop to near zero until the problem is fixed and reinstated.
This post is not about what Amazon’s image rules say. It’s about how to engineer an AI image workflow so that compliance is baked in at every stage — not checked at the end. There’s a meaningful difference between a workflow that produces compliant images most of the time and one that cannot produce non-compliant images because the guardrails are structural, not aspirational.
The operators who get this right are protecting catalog revenue, scaling image production without proportional headcount increases, and running far fewer emergency reinstatement appeals. Here’s how they do it.
Why Image Compliance Is Now an Ops Problem, Not a Creative Problem
For years, Amazon image compliance was treated as a creative brief problem. Give the designer the rules, tell them to follow the white-background requirements, and trust the upload to go through. When rejections happened, they were handled as one-off tickets — fix this image, re-upload, move on.
That model does not survive contact with the 2026 enforcement environment. Amazon’s Visual ID Standard 3.0, published on March 3, 2026, and enforced from April 15, represents a qualitative shift in how the platform evaluates listing images. It’s no longer primarily a human moderation workflow. It is a machine-scored system, running automated checks that flag violations faster than any manual review queue could and triggering search suppression — not just image rejection — as the penalty for non-compliance.
What Changed With Visual ID Standard 3.0
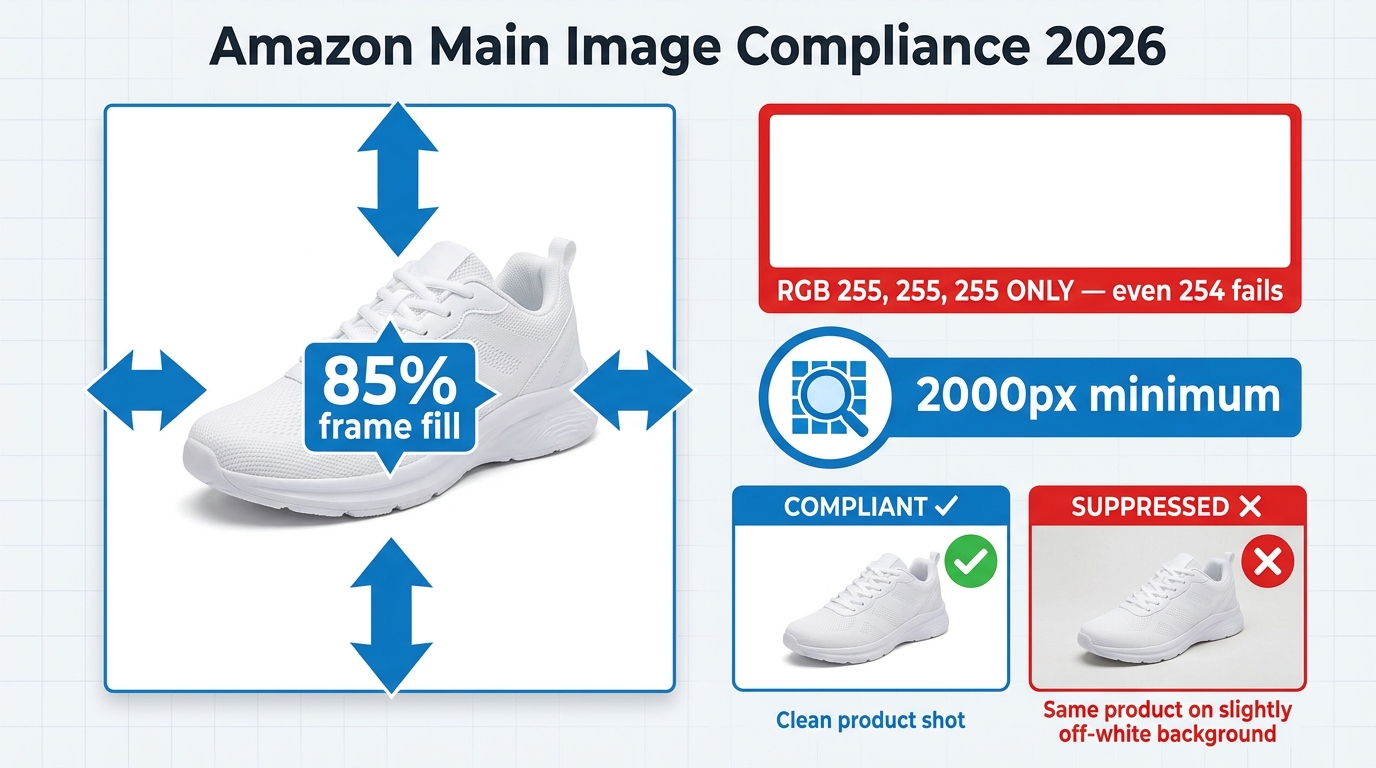
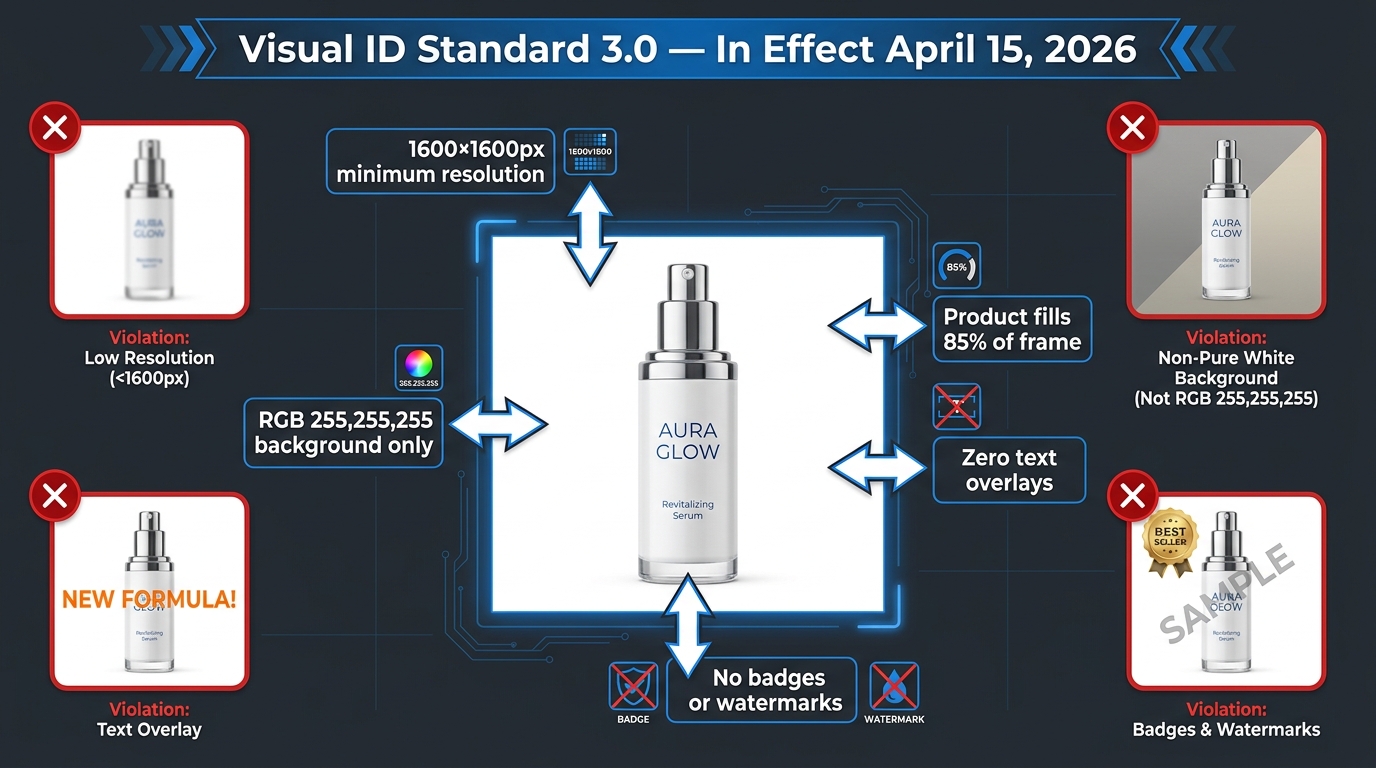
The most immediate technical change is the resolution floor. Minimum primary image resolution moved from 1,000 × 1,000 pixels to 1,600 × 1,600 pixels for all primary images across all categories. The practical implication: any AI generation workflow outputting at lower resolution, or any legacy image in a catalog that hasn’t been refreshed, is now automatically out of compliance.
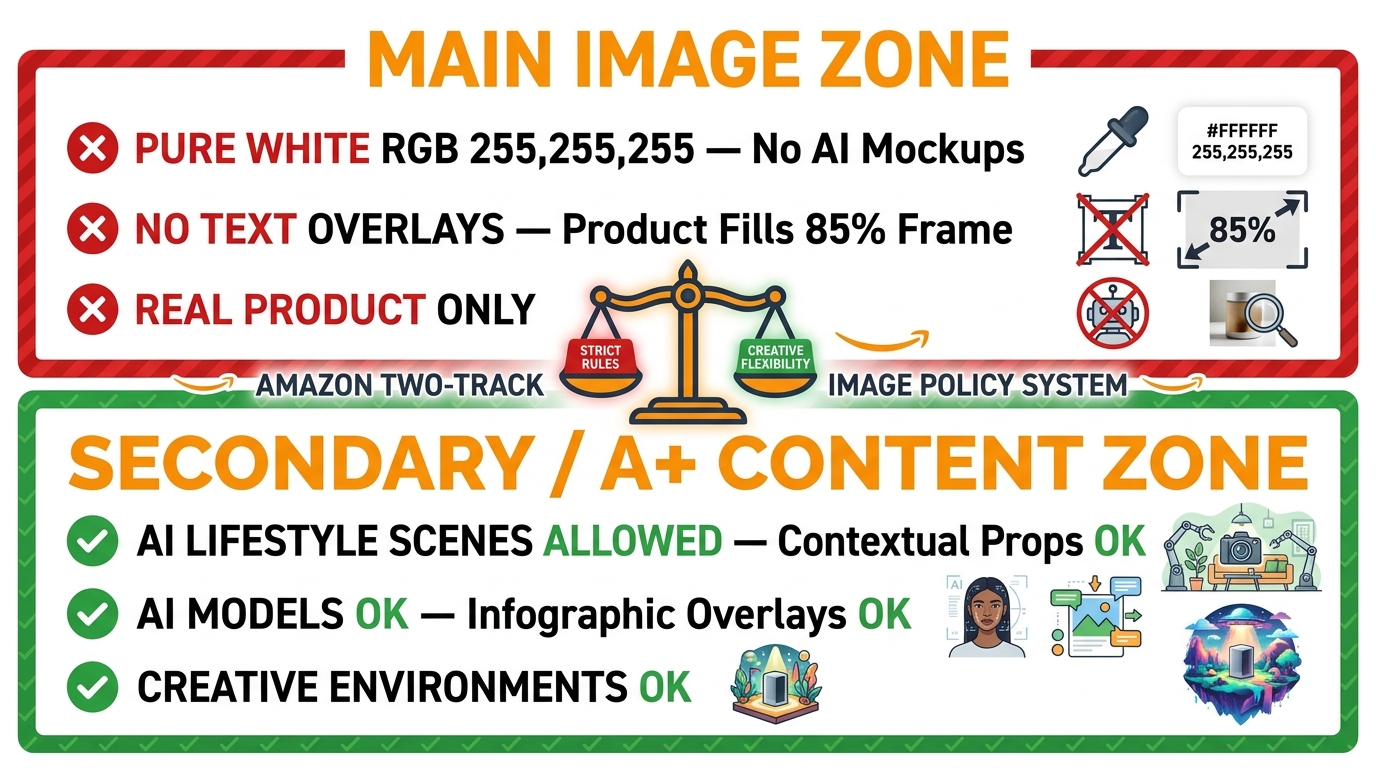
Beyond resolution, the update codified stricter enforcement of background purity standards. The primary image must have a background of exactly RGB 255,255,255 — pure white with no gradient, shadow bleed, or off-white variation. Amazon’s automated system evaluates this at the pixel level, not by eyeball. An image that looks white to a human reviewer may fail the automated check if even a small portion of the background registers outside that exact RGB value.
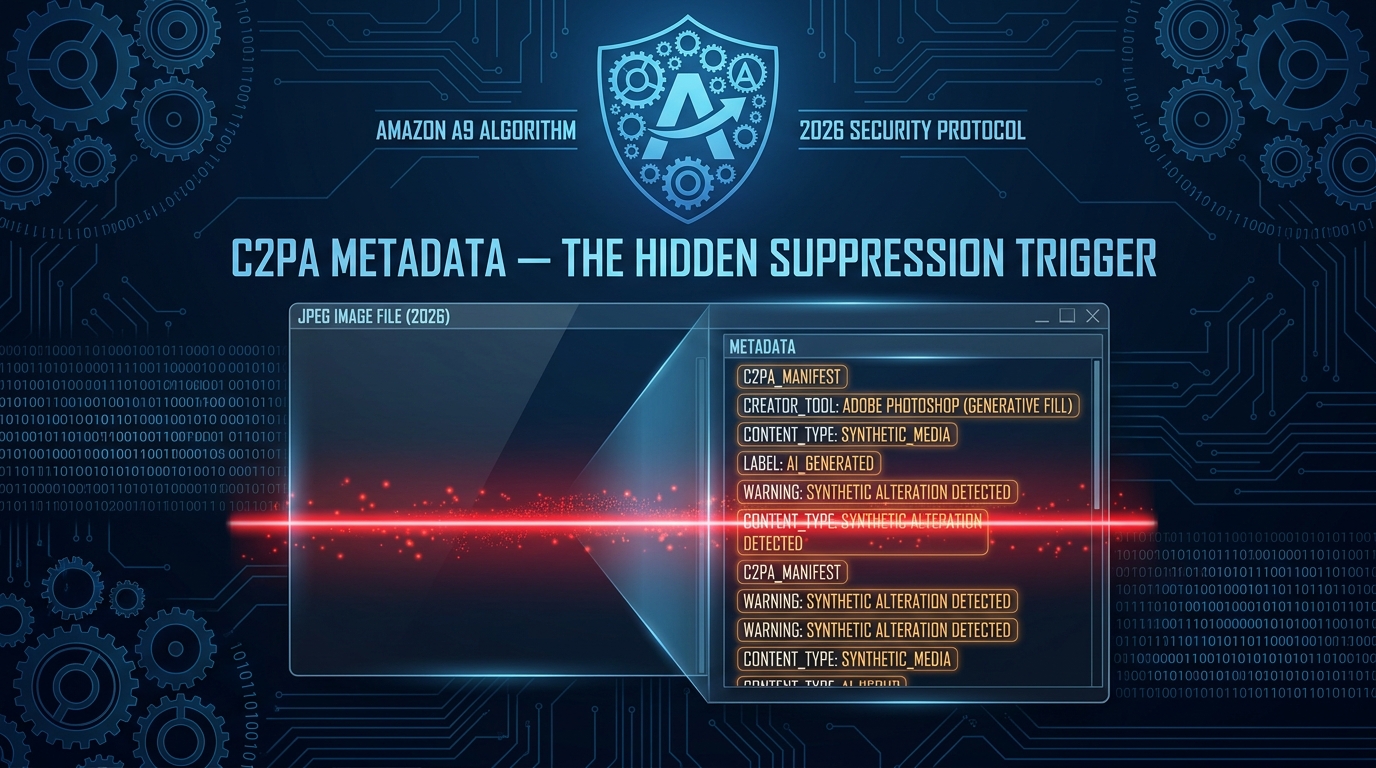
The update also introduced explicit requirements around AI-generated image disclosure and provenance metadata, aligning with Amazon’s broader 2026 push toward transparency in AI-generated content. Sellers using AI to produce or substantially alter product images are now required to flag that in metadata, and Amazon’s systems cross-reference whether submitted images match the physical product as represented on the detail page.
Why This Becomes an Ops Problem
When compliance enforcement was manual and sporadic, creative teams could manage it ad hoc. When it’s automated, continuous, and directly tied to search visibility, it becomes an operations problem. Every image in a catalog is now on a recurring evaluation cycle. A listing that passed review six months ago may be flagged under the new standards today, with no proactive notification to the seller — just a suppressed listing discovered when someone notices a traffic drop.
Sellers with large catalogs — hundreds or thousands of ASINs — cannot manage this reactively. The operational risk is too high. A single batch upload that pushes non-compliant images across fifty ASINs can suppress an entire product line in hours. That’s not a creative mistake. That’s an operations failure.
The answer is to stop treating image compliance as a downstream quality check and start treating it as an upstream workflow requirement — the same way engineering teams treat code quality: built-in checks, gates that block bad output before it ships, and documented standards that the whole team operates within.
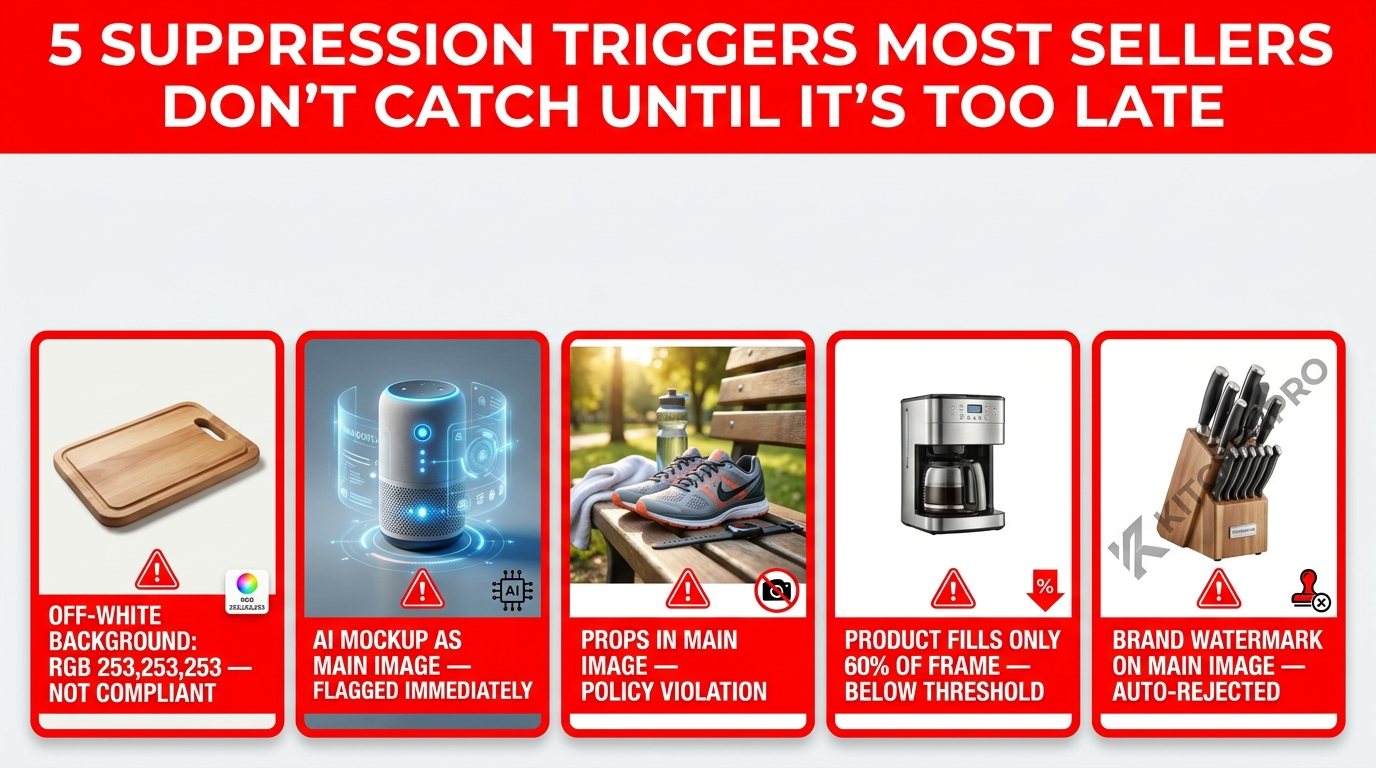
The Six Root Causes Behind AI Image Failures on Amazon
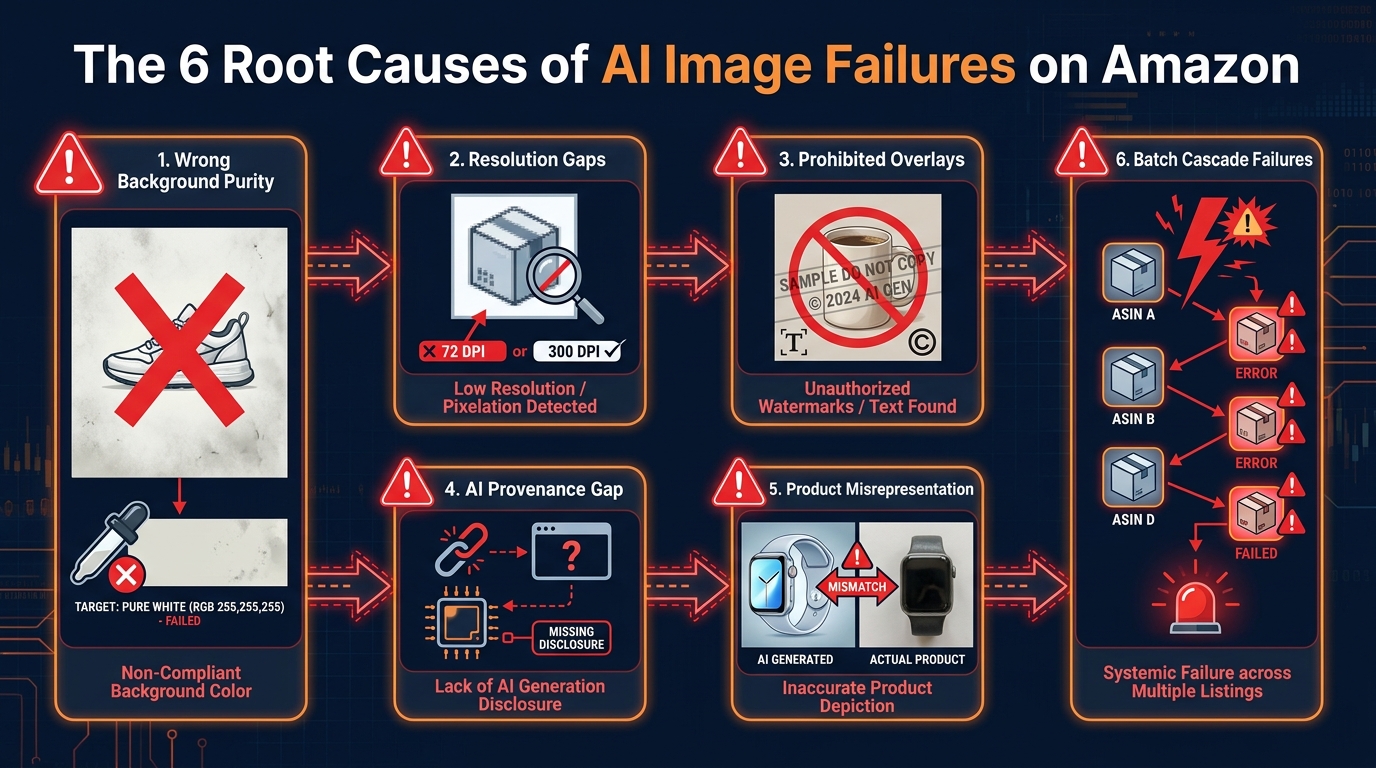
Before you can build a workflow that prevents failures, you need to understand exactly where failures happen. Most sellers conflate “image compliance problems” into a single bucket, but there are six distinct root causes, each requiring a different fix.
1. Background Purity Failures
This is the most common single cause of primary image rejection. AI image generators — even the best current models — do not reliably produce perfect RGB 255,255,255 backgrounds without explicit constraints. Stable Diffusion and Midjourney, in particular, frequently generate near-white backgrounds that read as cream, light gray, or warm white to the automated checker. The visual difference is imperceptible to the human eye. The automated rejection is immediate.
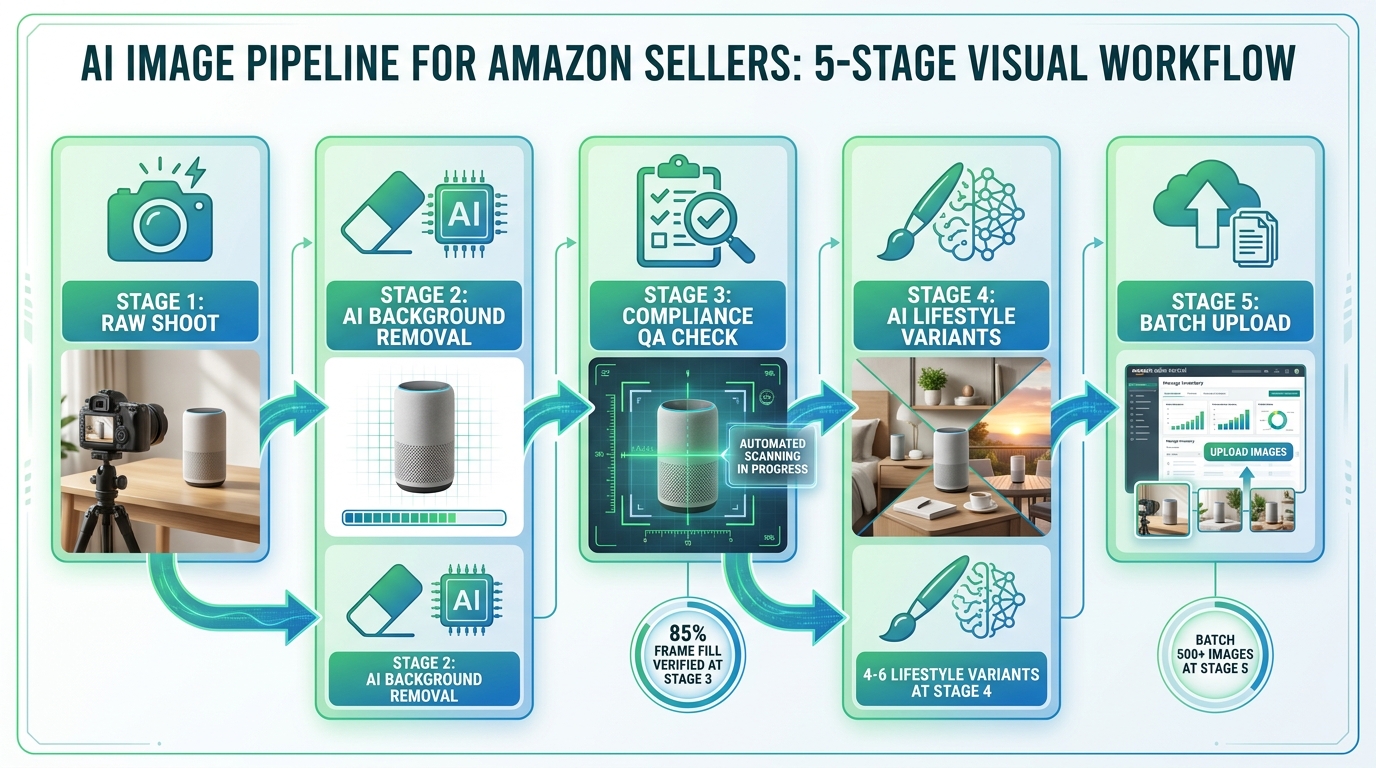
The root cause here is usually a missing post-processing step, not a bad prompt. Even a well-prompted AI image should go through a background replacement step using a dedicated tool (Adobe Firefly’s background removal, Remove.bg, or a custom masking script) to guarantee the exact RGB value before the image enters the compliance gate.
2. Resolution and Aspect-Ratio Gaps
Many AI image generation tools default to output resolutions that do not meet the 1,600 × 1,600 pixel minimum. DALL-E 3, for example, outputs at 1,024 × 1,024 by default. Upscaling after generation introduces compression artifacts that can themselves trigger quality score penalties. The fix is to either use models that natively output at the required resolution or build upscaling — using tools like Topaz Gigapixel AI or Magnific — into the pipeline before the QA step, not as an afterthought.
Aspect ratio is a related but separate issue. Amazon requires a 1:1 square format for primary images. Some AI tools default to 16:9 or portrait ratios. A cropping step needs to be automated into the workflow, not left to individual operators to remember on each run.
3. Prohibited Overlays and Metadata Artifacts
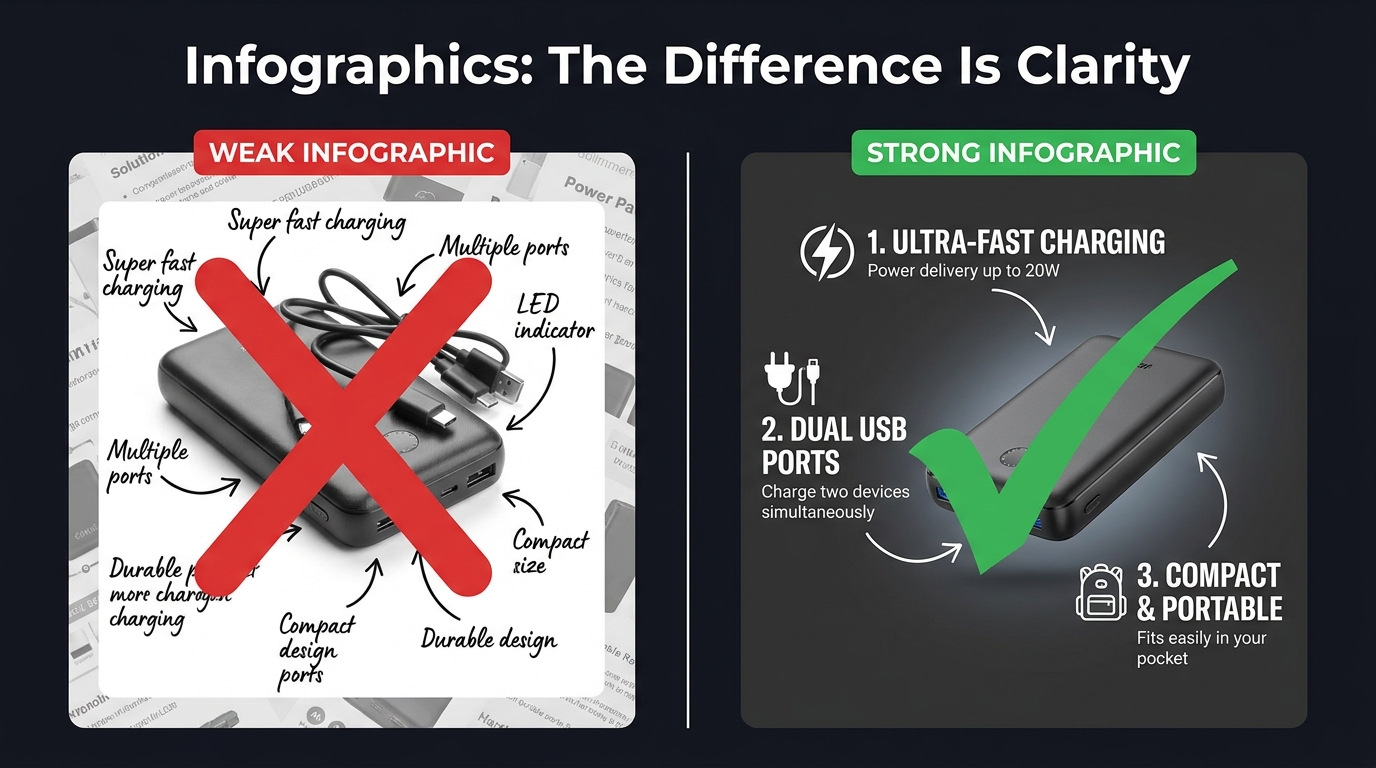
Text, watermarks, logos, price callouts, badges (“Best Seller,” “New,” “Sale”), and marketing copy of any kind are prohibited on primary images. This seems obvious, but AI tools — especially those trained on e-commerce imagery — will sometimes hallucinate promotional text or overlay patterns because that’s what product images in their training data contain. A prompt that doesn’t explicitly exclude these elements will occasionally produce them.
Secondary images have more flexibility, but even there, certain overlay types trigger automated flags. Any image that emerged from a generative AI model should go through an explicit overlay-detection check as part of QA — either human review or an automated text-detection pass using tools like Google Vision API or AWS Rekognition.
4. AI Provenance Disclosure Failures
This is the newest and most misunderstood failure mode. Amazon’s 2026 guidelines require that images substantially generated or modified by AI be identified as such in the listing metadata. Many sellers either don’t know this requirement exists or don’t have a workflow step that captures and attaches the required disclosure flag. The image might look perfectly compliant by every other standard, but the missing provenance metadata alone can cause the listing to be flagged during audit cycles.
5. Product Misrepresentation
AI image generation introduces a misrepresentation risk that traditional photography does not: the generated image may not accurately reflect the physical product that arrives in the customer’s hands. Color variants, dimensions, packaging details, and material textures can all drift during generation. Amazon’s systems cross-reference detail page claims against image content, and customer return data can trigger reviews of listings where the product doesn’t match its images. This is both a compliance risk and a brand risk.
6. Batch Upload Cascade Failures
This is the failure mode that causes the most acute revenue damage. A seller with a catalog of 200+ ASINs runs a batch upload of freshly generated images. One overlooked parameter — background purity, for example — is wrong across the entire batch. Within hours, dozens of listings are suppressed simultaneously. There was no single point of failure; the failure was structural, built into the batch before it shipped.
Cascade failures happen when there is no per-image compliance gate before batch upload. Fixing them requires both the immediate work of reinstating suppressed listings and the systemic work of identifying why the pre-upload check didn’t catch the issue.
Building the Compliance Gate Before the Generation Step
The most effective AI image workflows build compliance architecture upstream — before a single image is generated. This sounds counterintuitive. Most teams think of compliance as something you check after production. The highest-performing catalog operations invert this: if the brief is right, the image is mostly right before the prompt is written.
The Requirement Brief: Your Compliance Contract
Every image production run — regardless of whether it’s AI-generated or photography-based — should begin with a written Requirement Brief. This is not a creative brief. It is a compliance contract that translates Amazon’s policy requirements into specific, measurable parameters that both the human operator and the AI generation system must meet.
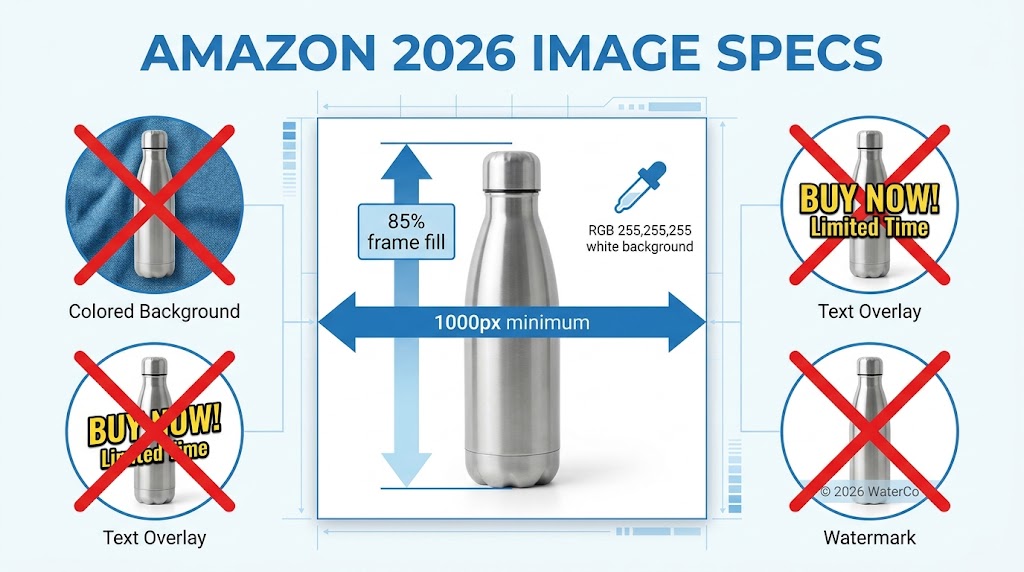
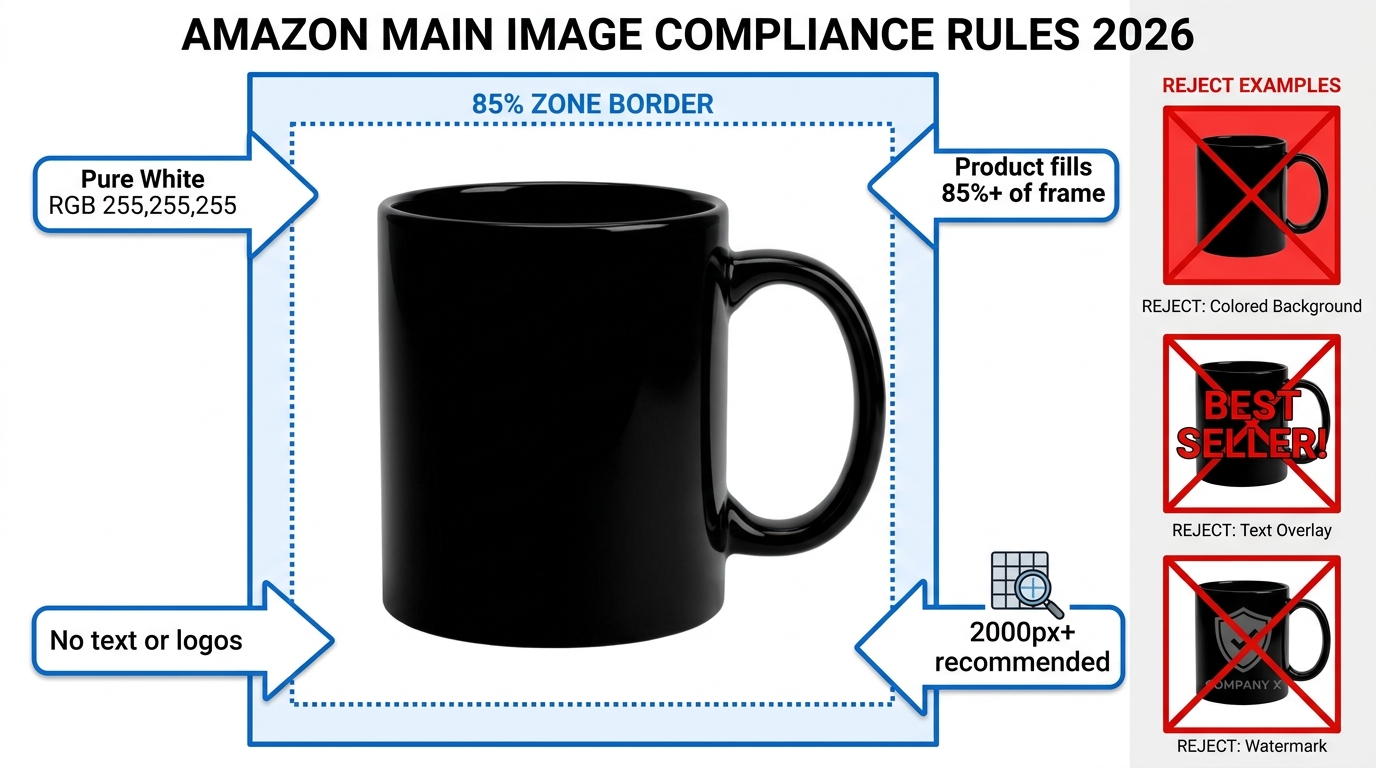
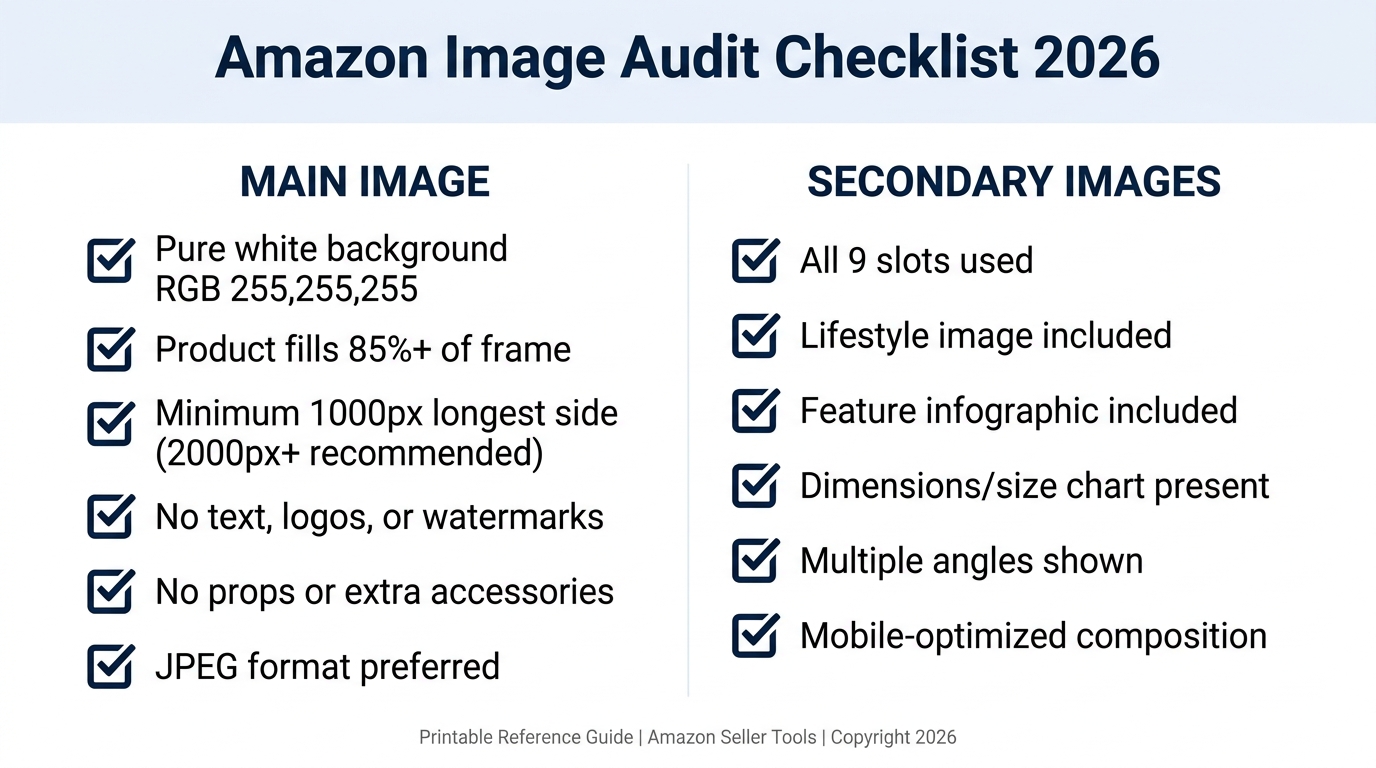
A minimum Requirement Brief for Amazon main images in 2026 includes:
- Output resolution: 1,600 × 1,600 pixels minimum, 2,000 × 2,000 pixels recommended
- Background specification: RGB 255,255,255 — to be verified post-generation, not assumed
- Aspect ratio: 1:1 square, no exceptions for primary images
- Product fill requirement: Product must occupy approximately 85% of the image frame
- Prohibited elements: No text, no watermarks, no props that aren’t part of the product, no hands, no human models (category-dependent)
- AI provenance flag: Required for all AI-generated or AI-substantially-edited images
- File format: JPEG, TIFF, PNG, or GIF — JPEG preferred for primary images
- Accuracy standard: Image must represent the specific ASIN, including correct color variant, packaging, and visible features
Category-Specific Rules Matrix
Amazon’s image requirements are not uniform across all categories. Apparel, jewelry, grocery, electronics, and hazardous materials each have category-specific requirements that overlay the standard rules. Before any production run begins, the category-specific rules for every ASIN in scope should be documented in a rules matrix — a simple table that maps each ASIN or category to its specific restrictions. This matrix becomes the reference document for anyone working in the pipeline, including AI operators writing prompts.
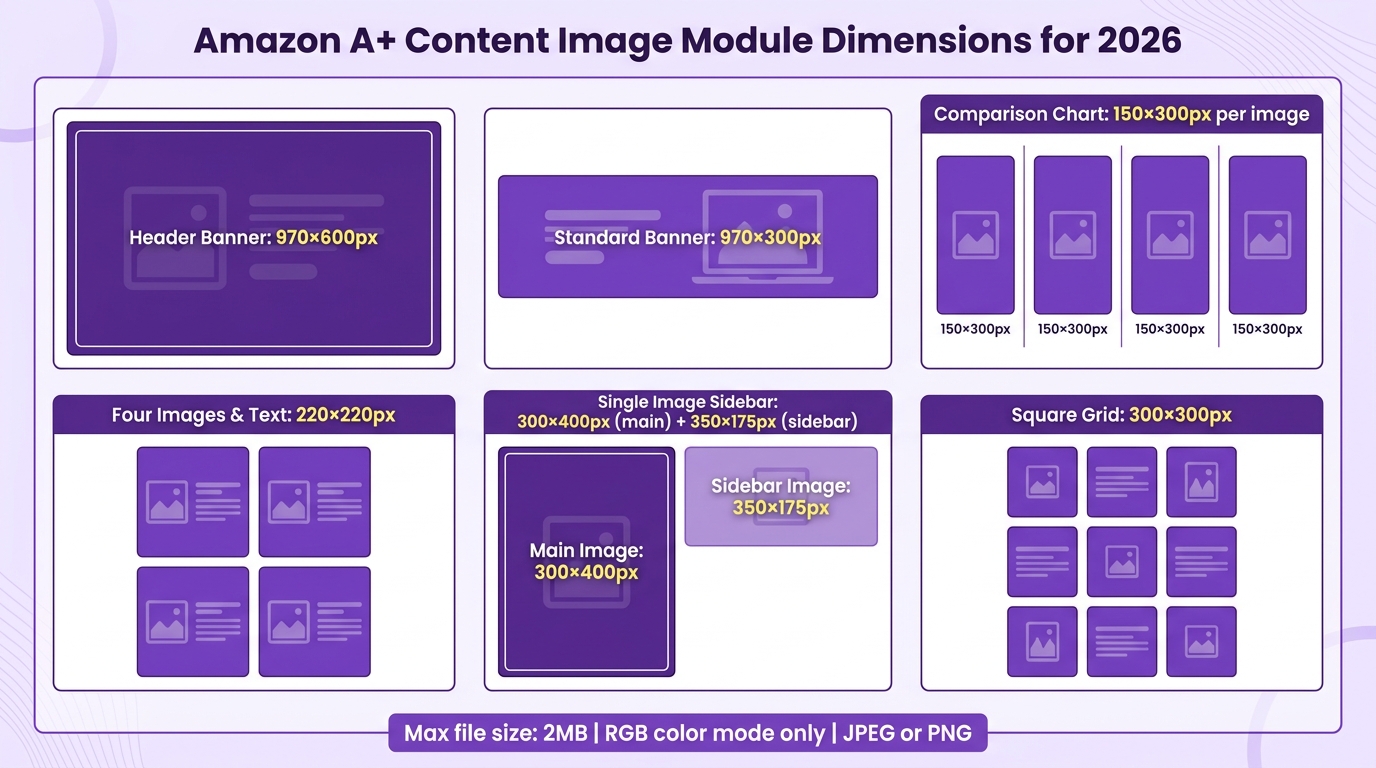
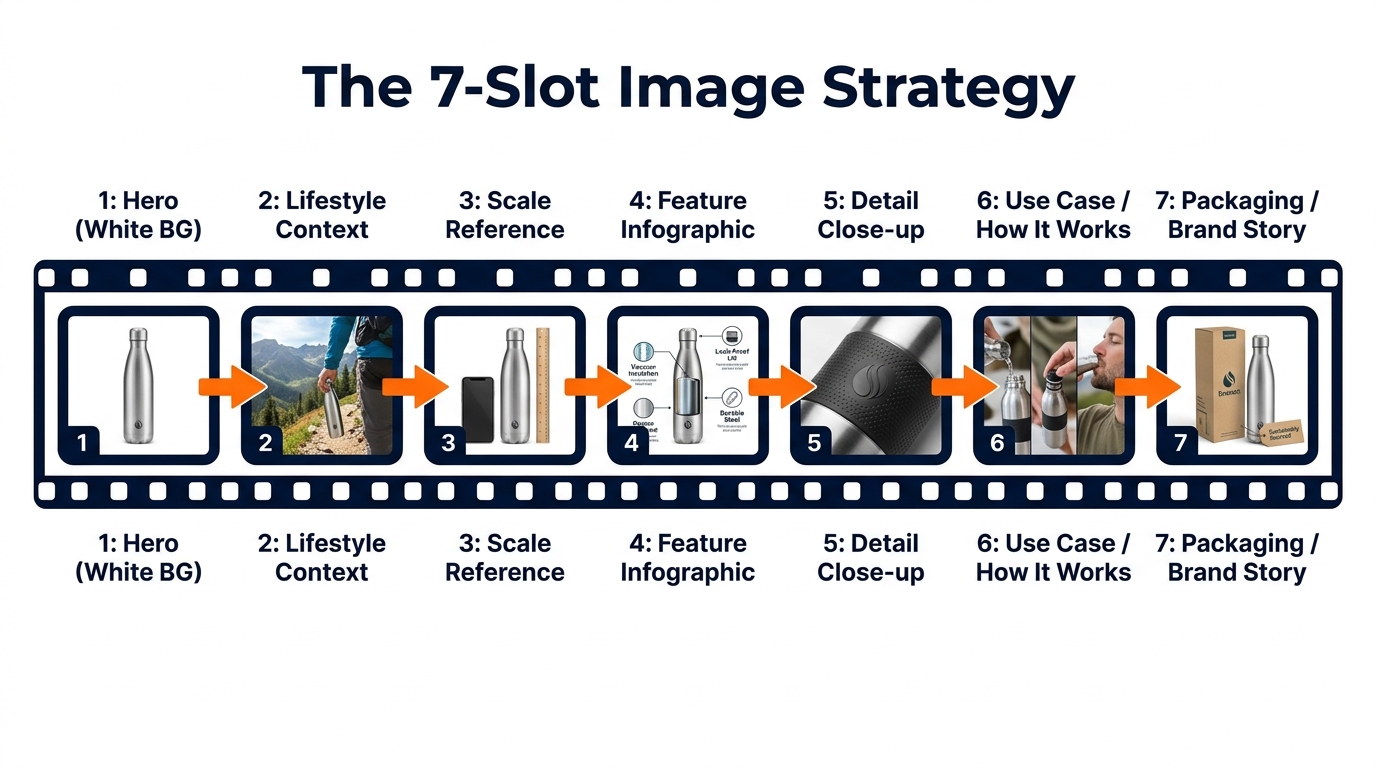
Secondary Image Mapping
Secondary images (images 2–9) operate under different rules than the primary image. Text overlays, lifestyle context, infographic callouts, and dimensional diagrams are permitted. But many sellers fail to map out what secondary image types are both permitted and strategically valuable for each ASIN category before production begins. Building a secondary image brief alongside the primary image brief ensures the full image set is planned, compliant, and purposeful before a single generation run starts.
Prompt Engineering for Compliance — What Most Operators Get Wrong
Prompt engineering for Amazon compliance is a distinct skill from prompt engineering for general image quality. Most operators learn quickly how to get a model to produce a visually appealing product image. Fewer know how to structure prompts so that compliance-critical attributes are reliably preserved across a large batch run.
Negative Prompting for Background Purity
If you’re using a model that supports negative prompts (Stable Diffusion, many fine-tuned commercial models), your compliance negative prompt should be explicit and detailed. A baseline negative prompt for Amazon primary image compliance includes:
off-white background, cream background, gray background, textured background, gradient background, patterned background, shadows on background, text overlays, watermarks, price tags, promotional badges, props, lifestyle context, hands, reflections extending to background, vignette edges
Running without a structured negative prompt and relying on post-processing alone is a higher-risk approach because it produces more output that needs to be fixed, increasing processing time and human review load.
Resolution Anchoring
Specify the target resolution explicitly in your prompt system settings, not just in the export step. Many operators generate at a model’s default resolution and upscale at the end. A better approach is to force the generation target to match your compliance requirement. When using API-based generation (Replicate, AWS Bedrock, StabilityAI API), set width and height parameters explicitly at 1,600 × 1,600 or higher. The upscaling step then becomes a quality enhancement, not a compliance lifeline.
Controlling Shadow and Reflection Artifacts
A particularly common failure mode with AI-generated product images is shadow or reflection bleed — the product casts a realistic shadow onto the background, or its reflective surface creates a gradient that disrupts background purity. Prompts should explicitly call for product on pure white background, no drop shadow, no surface reflection, no cast shadow, clean white floor. Even with these controls, a post-generation shadow-detection step is advisable for reflective products (cosmetics, electronics, kitchenware).
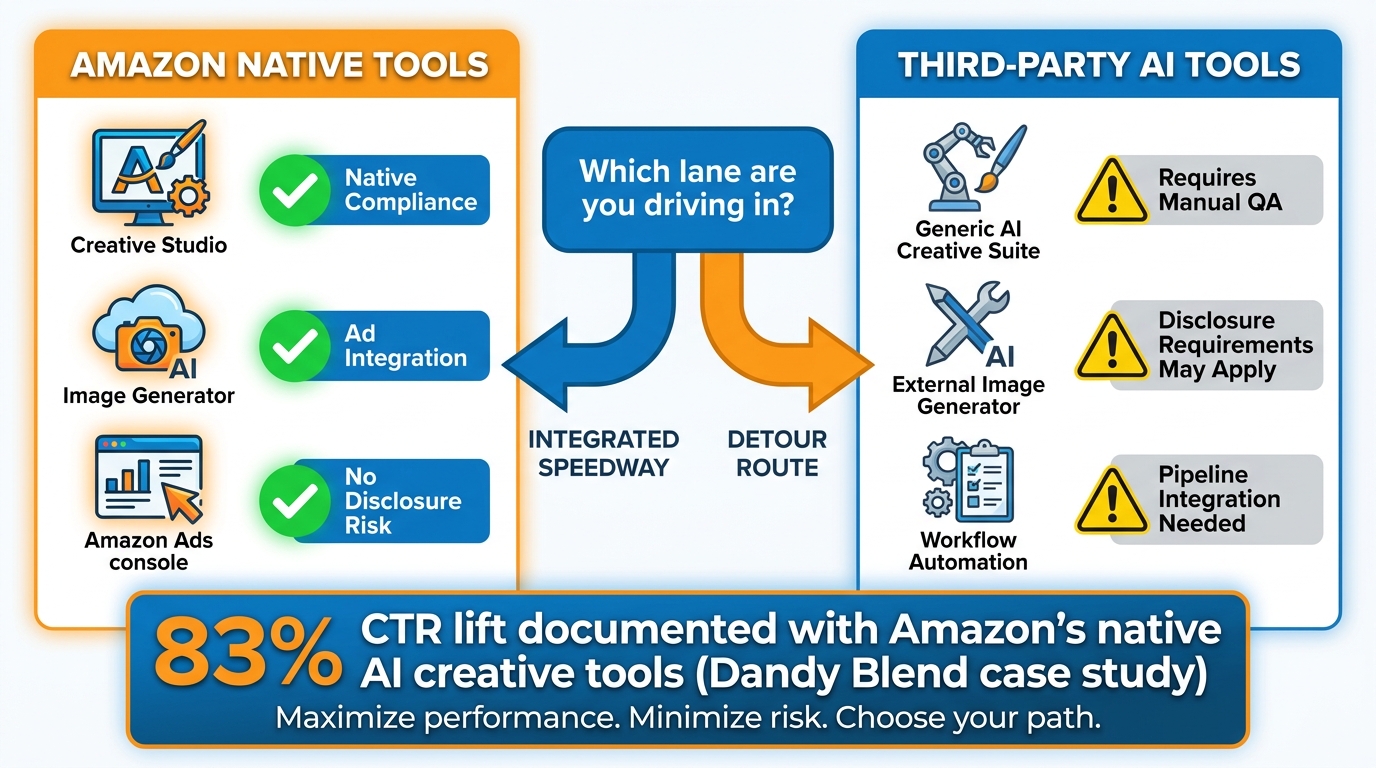
Model-Specific Behaviors You Need to Know
Different AI image models have different compliance risk profiles for Amazon specifically. Understanding these differences helps you choose the right tool for your production context:
- DALL-E 3 (via OpenAI/ChatGPT): Strong prompt adherence and clean outputs, but default resolution (1,024px) requires mandatory upscaling. Tends to add subtle environmental lighting that can affect background purity.
- Midjourney (v6/v7): Excellent aesthetic quality, but backgrounds frequently include ambient gradients. Nearly always requires a dedicated background replacement step. Not ideal for primary image production without robust post-processing.
- Adobe Firefly (Commerce Edition): Purpose-built for e-commerce with explicit white-background modes and brand kit integration. Highest native compliance rate for primary images among commercially available tools in 2026, though prompt flexibility is more constrained.
- Stable Diffusion (fine-tuned product models): Highest control ceiling when properly fine-tuned, but requires the most operator expertise. Best compliance results come from models specifically fine-tuned on product photography datasets with clean backgrounds.
- Amazon Bedrock (Titan Image Generator, Stability AI via Bedrock): Increasingly the enterprise choice for brands building AWS-native pipelines. Supports metadata logging and audit trails natively, which is valuable for AI provenance compliance.
The Pre-Flight QA Layer — Your Last Line of Defense
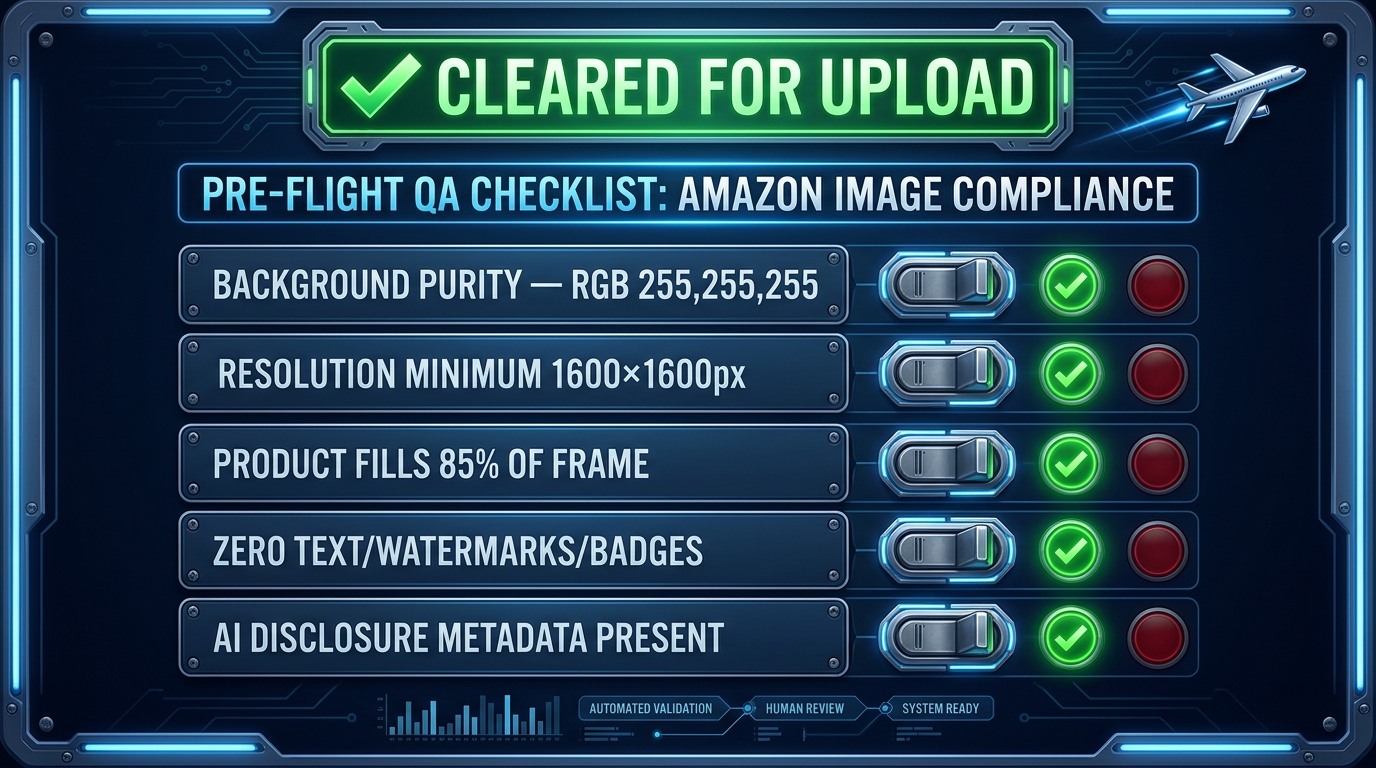
Even the best upstream compliance architecture will occasionally produce an image that fails a specific check. The pre-flight QA layer is the structured set of checks that every image must pass before it enters any upload queue — batch or individual. Think of it as the gate that separates production from publication.
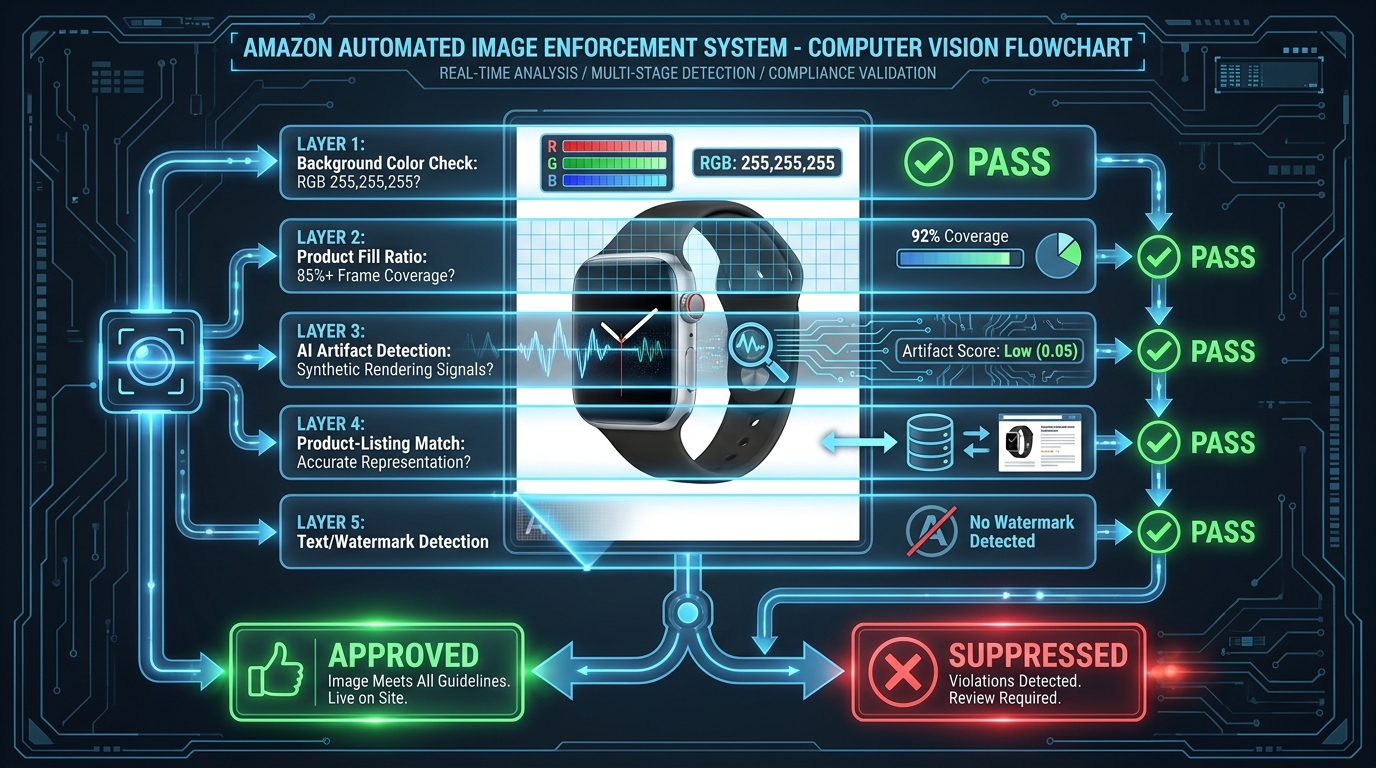
Layer 1: Automated Pixel-Level Checks
The first tier of the pre-flight layer should be fully automated — no human involvement, no exceptions. Automated checks at this stage include:
- Background purity verification: Sample pixels at defined coordinates across the background region. Any pixel outside the acceptable range (RGB 255,255,255 ± a small tolerance, typically ± 3 values per channel) fails automatically. Tools like IMG101’s browser-based compliance checker or custom Python scripts using Pillow can execute this check in seconds per image.
- Dimension and aspect-ratio check: Verify that the image is exactly 1:1 and meets the minimum resolution threshold. This is a trivial automated check that costs nothing to run but catches a surprisingly common error.
- File size and format validation: Amazon has maximum file size limits (10MB for most image types) and accepts specific formats. Automated format validation prevents submission errors before they happen.
- Metadata completeness check: Verify that required metadata fields — including AI provenance flags where applicable — are populated. An image that passes every visual check but is missing required metadata is still a compliance failure.
Layer 2: AI-Assisted Content Checks
The second tier uses AI detection tools to surface content-level compliance issues that pixel-level checks cannot catch:
- Text and overlay detection: Run images through a text detection model (Google Vision API, AWS Rekognition, or Tesseract for on-premise workflows) to identify any visible text, watermarks, or promotional overlays. Flag and route for human review if text is detected.
- Product fill estimation: Use object segmentation to estimate what percentage of the frame the primary product occupies. Anything significantly below 85% should be flagged for crop adjustment.
- Prohibited element detection: Check for hands, props, lifestyle backgrounds, or other prohibited elements for the specific product category. This check should be parameterized by category, not run with a single universal ruleset.
Layer 3: Human Spot-Check
Even with robust automated checks in Layers 1 and 2, a human spot-check layer is essential — particularly for new product categories, new AI models introduced to the workflow, or any run where the batch size exceeds a threshold your team has defined. Human reviewers at this stage are not looking at every image; they’re sampling a percentage of the batch (typically 10–20%) and reviewing any images that generated a “soft flag” (borderline pass) from the automated layers.
The key operational discipline here is that the human spot-check layer reviews and approves to send to upload — it does not directly upload. Separating the review step from the upload action prevents the all-too-common situation where a reviewer looks at an image, approves it mentally, and then accidentally uploads the wrong file.
Tools Worth Knowing in 2026
Several tools have emerged as useful components of the pre-flight QA layer for Amazon sellers:
- IMG101 Amazon Image Compliance Checker: Browser-based, pixel-level background analysis with no image upload required (images are analyzed locally). Useful for individual spot-checks and small batch validation.
- Listing Eagle / SellerApp Catalog Health: Catalog-level monitoring tools that flag compliance issues across a full ASIN catalog, including image-related suppression alerts.
- AWS Rekognition: Enterprise-grade image analysis for text detection, object identification, and content moderation. Can be integrated directly into a generation pipeline via Lambda functions for automated per-image checking.
- Custom Python pipeline (Pillow + OpenCV): For teams with technical resources, a custom pipeline combining Pillow for pixel-level checks and OpenCV for object detection gives the most control and the lowest per-image cost at scale.
Version Control and Asset Governance for Catalog Scale
One of the most underappreciated challenges in AI image workflows for large Amazon catalogs is not generation or compliance — it’s governance. Which version of this image is live on Amazon right now? Who approved the change? What was the previous version, and can we roll it back? When every image is AI-generated and iterated rapidly, these questions become genuinely difficult to answer without a structured asset governance system.
ASIN-Linked Asset Repositories
Every image in your catalog should be stored in a repository that is keyed to its ASIN. This sounds obvious but is frequently ignored by teams that organize images by creative campaign, shoot date, or product category. The ASIN is the canonical identifier on Amazon’s side; it should be the canonical identifier in your asset management system too.
A practical minimum structure for ASIN-linked asset management:
- One folder (or equivalent storage structure) per ASIN
- Sub-folders for primary image, secondary images 2–9, A+ content images, and archived/retired versions
- File naming convention that includes ASIN, image slot number, version number, and date: e.g.,
B09XYZABC1_main_v3_20260412.jpg - A companion metadata file per ASIN that records: current live version, approval status, compliance check date, AI provenance flag, and the operator who approved the upload
Change Logging and Rollback Capability
AI image workflows move fast. When a new lifestyle image variant is tested, when a resolution refresh is run across a hundred ASINs, or when a prompt change produces a subtly different look — all of those changes need to be logged with enough detail to understand what changed, when, who authorized it, and what the previous state was.
The rollback capability is particularly important after a suppression event. If a batch image update coincides with a suppression spike, you need to be able to immediately restore the previous compliant image for affected ASINs while the investigation into the new batch happens in parallel. Without version history, you’re stuck either waiting for the new images to be cleared or re-creating the old images from scratch under time pressure — neither of which is a good operational position.
Approval Routing Before Upload
No image should enter the upload queue without a documented approval step. This doesn’t need to be a lengthy review process. For teams using project management tools, a simple task state transition — from “QA Complete” to “Approved for Upload” — with the approver’s name attached is sufficient. For larger operations, tools like Monday.com, Asana, or dedicated DAM (Digital Asset Management) systems like Bynder or Brandfolder can formalize this routing.
The key governance principle is that the approval step and the upload step are separate actions, performed with a deliberate handoff. The person who approves an image should not be the same person who performs the batch upload, wherever this separation is operationally feasible.
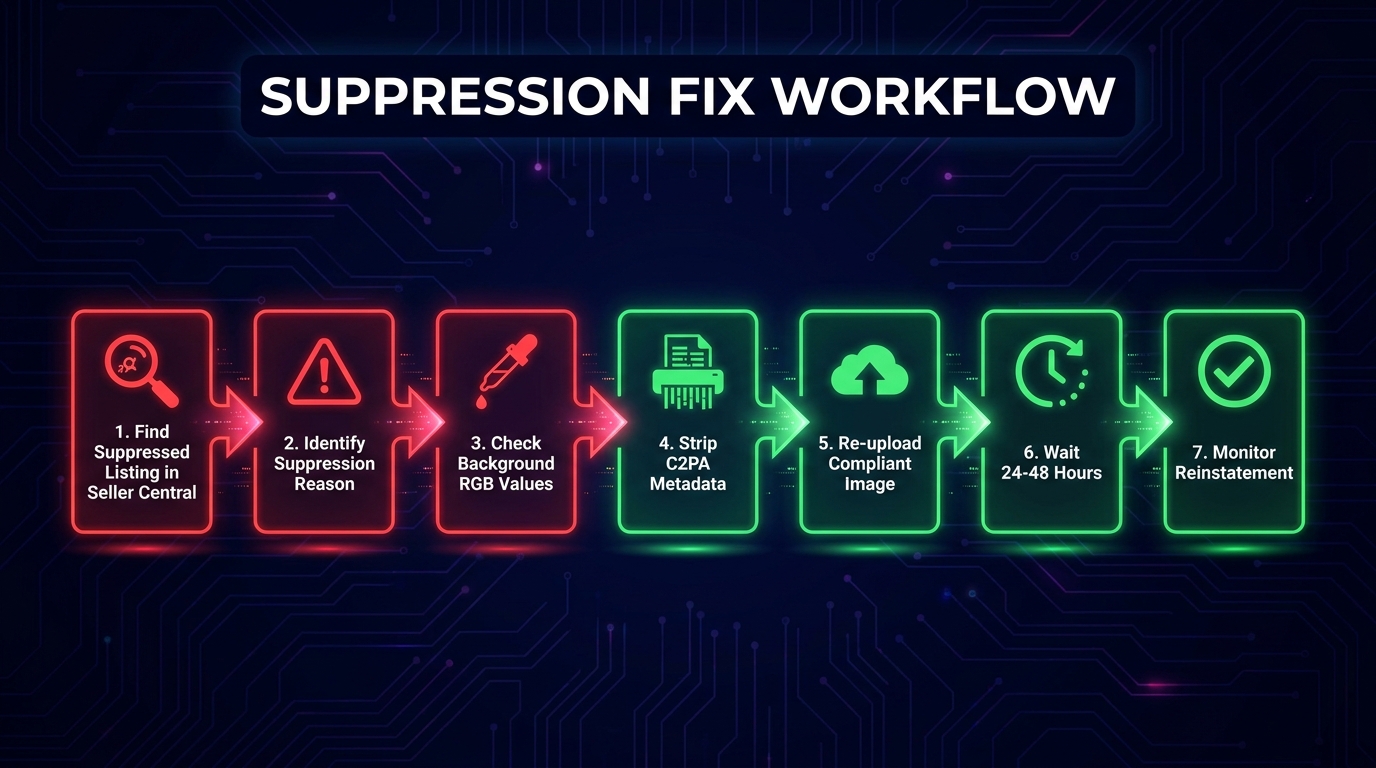
When Things Go Wrong — The Suppression Recovery Workflow
Even well-designed workflows will occasionally produce a suppression event. The suppression recovery workflow is not a failure of the compliance system — it’s the evidence that the compliance system caught something, even if too late. The measure of a mature ops team is not that suppressions never happen; it’s how fast and methodically they’re resolved when they do.
Suppression vs. Rejection — The Distinction That Changes Your Response
Amazon distinguishes between two different types of image-related compliance action, and the response workflow differs significantly between them:
Image Rejection occurs during the upload validation step. The image doesn’t meet a technical specification, and Amazon returns an error. The listing may still be live with its previous image, or it may go live without any image in that slot. Image rejections are typically lower urgency because the listing hasn’t lost visibility — yet.
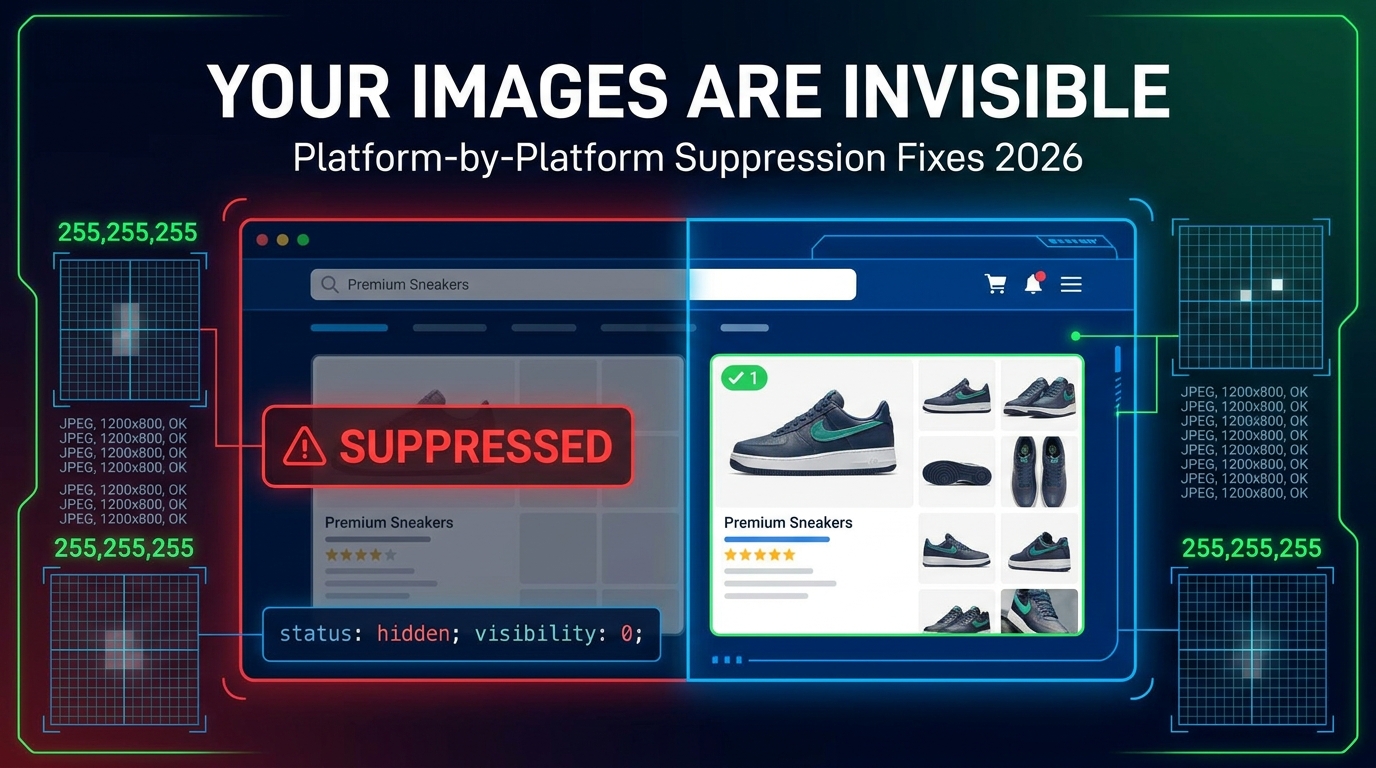
Listing Suppression is when Amazon removes a listing from search results due to a compliance issue — which may include image violations. This is a higher urgency event because the listing is invisible to search traffic while suppressed. Sales effectively stop for that ASIN until the suppression is lifted.
In 2026, Amazon’s system increasingly moves directly to suppression for image violations caught during automated audit cycles, bypassing the rejection warning phase. This is part of why the pre-flight QA layer is so critical — the penalty for getting past it with a non-compliant image has increased.
The 72-Hour Correction Window
Industry guidance consistently points to a recovery timeline of minutes to 72 hours after uploading a technically correct replacement image for a suppression caused by image-only issues. The fastest recoveries happen when the replacement image is clean on the first submission — no borderline pixels, no ambiguous elements, full compliance with the pre-flight checklist. Repeated resubmissions of images that continue to fail extend the recovery window and can trigger additional manual review.
The operational implication is that when a suppression occurs, the first resubmission must be the correct one. Don’t rush a replacement image through without running it through the full pre-flight QA layer. One clean image submitted once recovers a suppressed listing faster than three imperfect attempts.
POA Structure for Image-Related Appeals
For suppressions that don’t resolve automatically after a corrected image upload — particularly those involving suspected misrepresentation or policy violations beyond technical specs — you may need to submit a formal Plan of Action (POA). An effective POA for an image-related appeal has a three-part structure:
- Root Cause Statement: What specifically caused the violation? Be precise. “Our AI-generated images contained subtle off-white background values that failed the automated background purity check” is a better root cause statement than “our images were non-compliant.”
- Corrective Actions Taken: What have you already done to fix this? Describe the specific changes made to the offending images and confirm that compliant replacements have been submitted. Include the ASIN list and upload timestamps if available.
- Preventive Controls Added: What changes have you made to your workflow to prevent this from recurring? Describe the specific QA step added, the tool or check implemented, or the standard updated. Amazon’s review team responds better to concrete process changes than to assurances that it won’t happen again.
Preventing Cascade Failures in Large Catalogs
For sellers with catalogs above 100 ASINs, the primary suppression risk is cascade — one workflow error affecting many listings simultaneously. Two operational practices significantly reduce cascade risk:
Staged batch uploads: Rather than uploading an entire image batch at once, upload a representative sample (5–10 ASINs) first and verify that all images are live and in the expected state in Seller Central before uploading the remainder. This catches batch-level errors before they scale.
Post-upload monitoring: Set up Seller Central Health report monitoring (or use a third-party catalog monitoring tool) to alert your team within hours of any new suppression events. The faster you detect a suppression, the faster you can halt the remainder of a problematic batch upload before it affects more listings.
Building Feedback Loops That Prevent Repeat Failures
A compliance workflow without a feedback mechanism is a static defense in a changing environment. Amazon’s rules evolve — and its enforcement behavior evolves independently of its published rules. The teams that maintain near-zero suppression rates over time aren’t doing so because their initial workflow was perfect. They’re doing so because they built mechanisms to learn from every compliance event and update their processes accordingly.
Suppression Root-Cause Tagging
Every suppression event should be tagged with its root cause before the recovery ticket is closed. This doesn’t need to be elaborate — a simple tagging system works: Background Purity, Resolution, Overlay, Provenance, Misrepresentation, Category Rule, Other. Over time, the distribution of root cause tags will tell you where your workflow has persistent weak points.
A catalog team that sees 60% of its suppression events tagged as “Background Purity” needs to investigate its post-generation processing step, not its prompt engineering. A team where 40% of events are tagged “Category Rule” likely has a gap in its category-specific rules matrix. The data drives the fix.
Monthly Image Audit Cadence
Beyond reactive monitoring after uploads, a proactive monthly audit of a random sample of live listings is an important feedback mechanism. Amazon’s automated audit cycles mean that images that are compliant today may be flagged under updated enforcement parameters next month. A monthly human review of 5–10% of your live catalog, cross-checked against current compliance specs, catches drift before it becomes suppression.
The monthly audit also serves as a catalog hygiene mechanism. Legacy images from before the Visual ID Standard 3.0 update — images that may have passed review under the old 1,000px minimum but now sit below the 1,600px threshold — should be identified and queued for refresh. Amazon’s automated systems may not flag these immediately, but they create ongoing compliance vulnerability that a proactive audit removes.
Using Seller Central Health Reports
Seller Central’s Catalog Health and Listing Quality tools provide image-related compliance signals that many sellers underuse. The “Fix Your Products” report, the “Listing Quality Dashboard,” and the “Search Suppressed” report under Inventory are all sources of structured feedback about image compliance issues across your catalog. These reports should be reviewed on a weekly cadence by whoever owns catalog ops — not just when something has already gone wrong.
The Compliance-First Team Structure That Scales
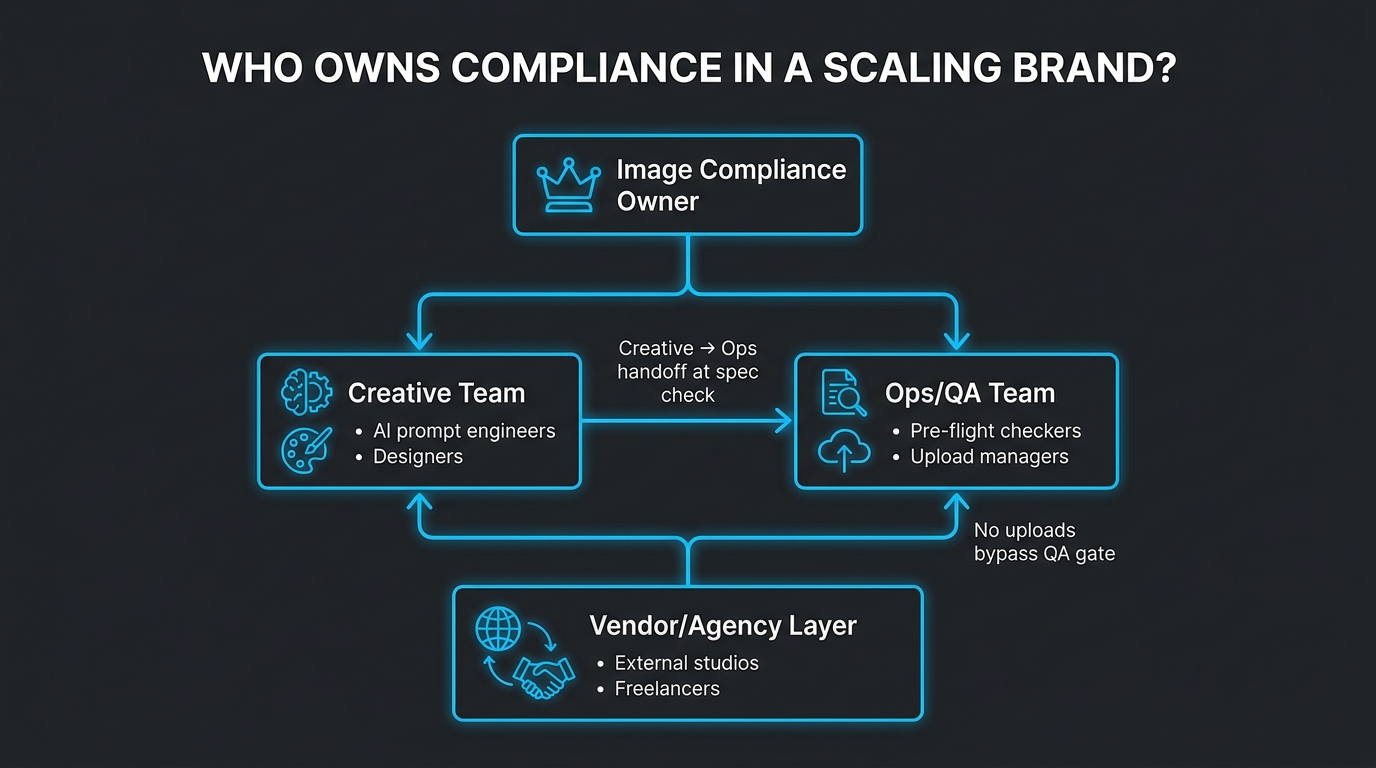
The structural question most growing Amazon brands get wrong is: who owns image compliance? In most organizations, the answer is “nobody in particular” — which functionally means it’s split between a creative team that’s focused on producing good-looking assets and an ops team that’s focused on not breaking the catalog. Neither group has a clear mandate to own the full compliance lifecycle, and issues fall through the gap between them.
The Image Compliance Owner Role
In any catalog operation managing more than 50 ASINs with active AI image production, there should be a designated Image Compliance Owner. This is not necessarily a full-time dedicated role at the outset — for smaller teams, it can be a defined responsibility within an existing role. But it must be explicitly assigned, not assumed to be covered by general ownership of the creative or ops function.
The Image Compliance Owner’s responsibilities include: maintaining the requirement briefs and category rules matrix, owning the pre-flight QA checklist and ensuring it reflects current policy, reviewing suppression root-cause tags and driving workflow updates based on patterns, running the monthly audit cadence, and serving as the point of contact for any suppression-related POA submissions.
The Creative-to-Ops Handoff
One of the highest-risk points in any AI image workflow is the handoff from the creative team (who generates and selects images) to the ops team (who runs the pre-flight checks and manages the upload). Without a defined handoff protocol, images can get uploaded directly from the creative stage without ever entering the QA layer — either because of time pressure or because team members don’t realize the handoff is required.
The handoff should be formalized: images enter a designated “Ready for QA” state or folder, and only the ops/QA function pulls from that queue to begin pre-flight checks. No creative team member should have direct catalog upload permissions in a mature operation. This sounds like bureaucracy; in practice, it’s the single change that most consistently eliminates cascade failures in growing Amazon businesses.
Vendor and Agency Oversight
Many brands outsource image production to agencies or freelancers who may be using their own AI tools and workflows. This creates a compliance risk that sits outside your direct operational control. Vendor contracts and briefs should explicitly include:
- The Amazon requirement specifications as a non-negotiable deliverable standard
- The requirement that all AI-generated images be flagged as such in metadata
- An acceptance criteria checklist that deliverables must pass before payment is triggered
- A re-work clause that specifies the vendor’s responsibility to fix compliance failures identified in pre-flight QA at no additional cost
If a vendor or agency cannot demonstrate familiarity with Amazon’s 2026 image compliance standards, treat that as a qualification gap that affects your vendor selection decision.
The Cost Math — What Proper Workflow Investment Actually Returns
The business case for investing in a structured AI image compliance workflow is not difficult to make once the numbers are on the table. The challenge is that most brands are not tracking the cost of image compliance failures explicitly, so the investment in prevention looks like overhead rather than risk management.
The Revenue Impact of Non-Compliance
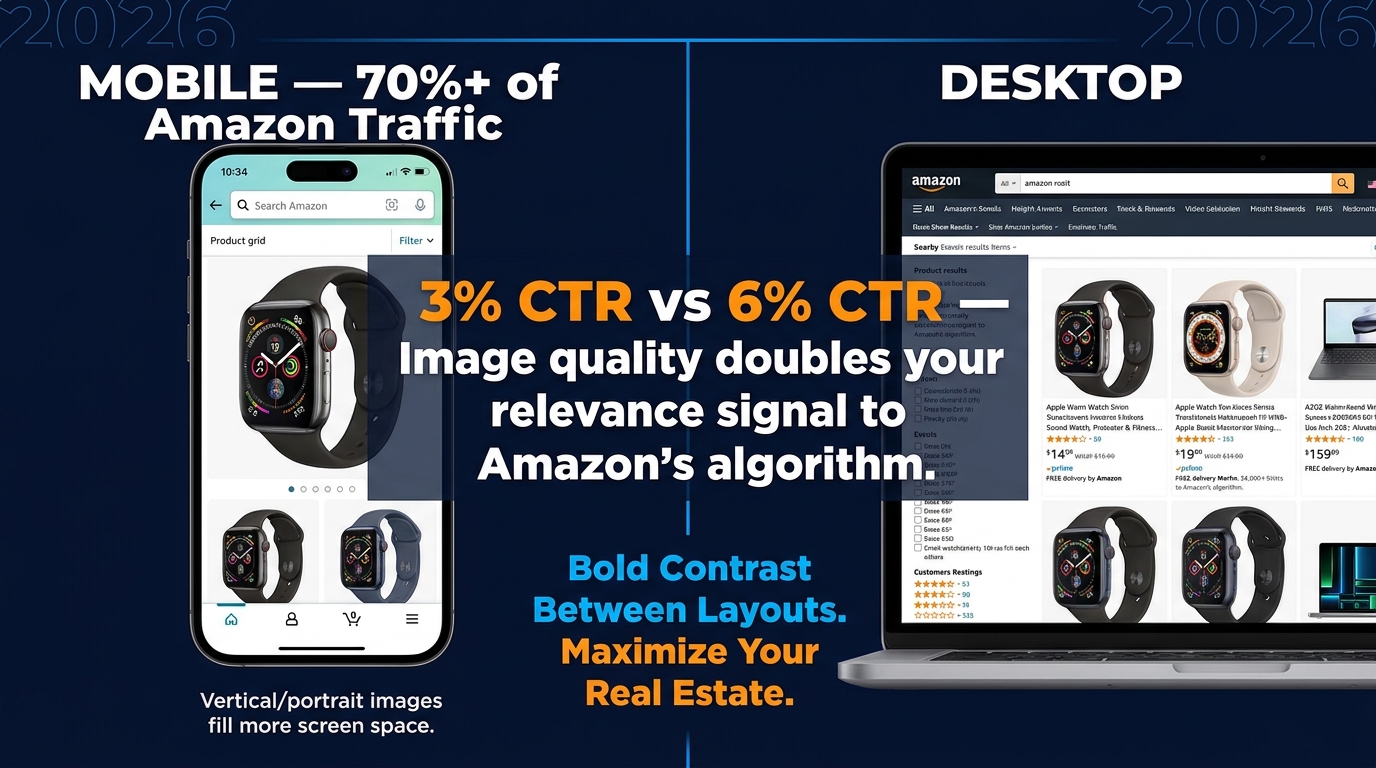
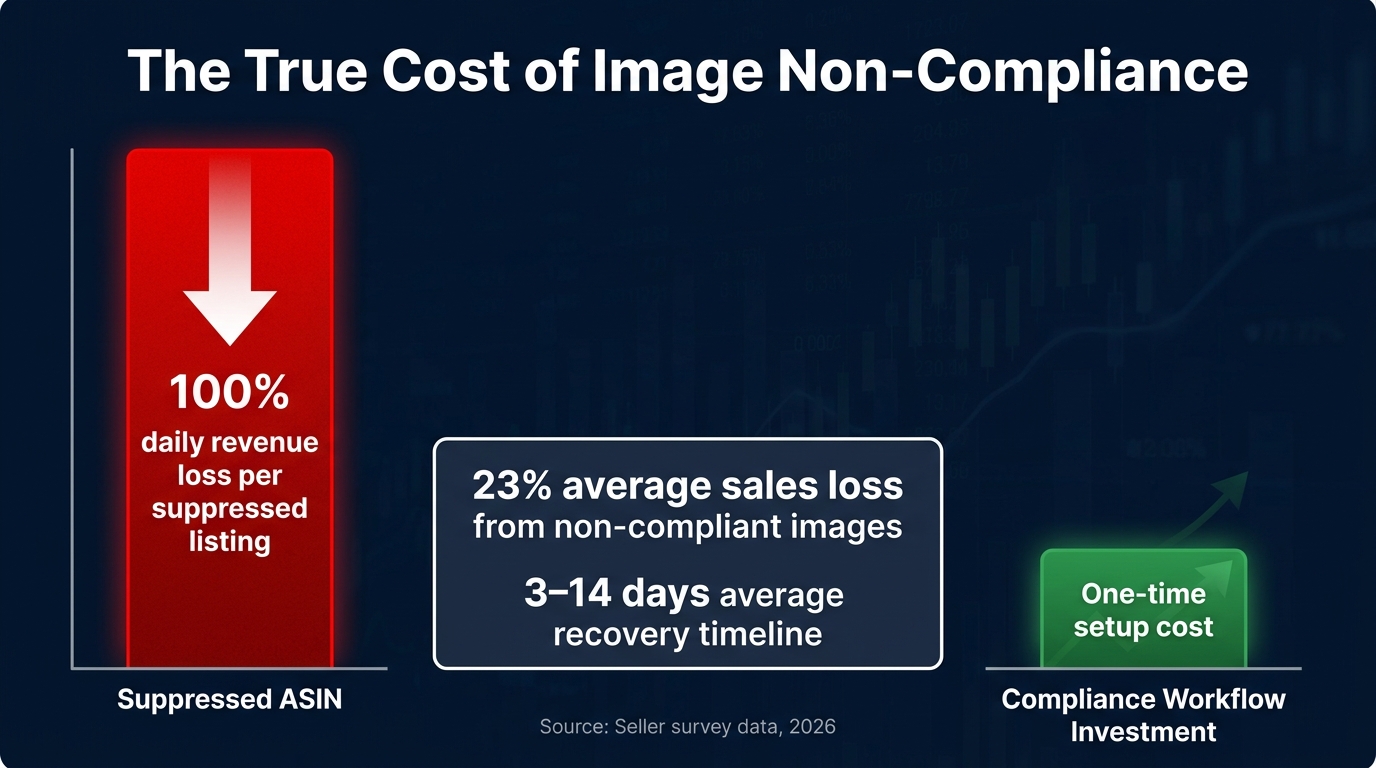
Seller survey data cited in 2026 compliance guidance estimates that sellers lose an average of approximately 23% of potential sales when images fail Amazon’s requirements. This is not a suppression-specific number — it includes the broader impact of lower conversion rates, reduced click-through from search, and the visibility penalty that Amazon’s algorithm applies to listings with image quality issues below the scoring threshold, even when the listing is not fully suppressed.
For a suppressed listing specifically, the revenue impact is more severe: the formula is straightforward — average daily revenue from that ASIN multiplied by the number of days suppressed. For a product generating $300/day in revenue, a 5-day suppression event represents $1,500 in lost gross revenue. A cascade failure affecting 20 ASINs averaging $150/day each for an average of 4 days represents $12,000 in lost gross revenue from a single workflow error.
The Cost of the Recovery Cycle
Beyond the direct revenue loss, suppression events carry operational costs that are harder to quantify but real:
- Team time: Diagnosing, correcting, and resubmitting suppressed images typically requires 30 minutes to several hours per ASIN, depending on the complexity of the violation. A 20-ASIN cascade failure can consume 2–3 days of catalog ops capacity.
- BSR recovery lag: Even after a listing is reinstated, its Best Seller Rank will have decayed during the suppression period. Recovering rank typically requires several days to weeks of restored sales velocity — a secondary revenue impact beyond the direct suppression period.
- Amazon algorithm signal: Frequent suppression events may accumulate negative signals in Amazon’s catalog quality scoring, creating compounding compliance risk over time.
What the Workflow Investment Actually Costs
By contrast, the investment in a structured pre-flight QA workflow is modest. For a mid-sized operation managing 100–500 ASINs:
- Tools: A combination of browser-based compliance checkers (free to low-cost), AWS Rekognition or Google Vision API for text detection ($1–3 per 1,000 images), and catalog monitoring tools ($50–200/month) represents a total tooling cost well under $500/month.
- Time: A well-designed automated pre-flight check runs in seconds per image. The human spot-check layer adds 15–30 minutes per batch of 50 images. For most operations, this is a contained, schedulable time cost — not open-ended firefighting.
- Training: The initial investment in documenting the requirement brief, building the QA checklist, and training the team on the workflow is a one-time fixed cost, not a recurring one.
The ROI case is not close. A single prevented cascade failure pays for months of workflow investment. The teams that treat compliance workflow as overhead are, in effect, choosing to absorb random, large, unscheduled revenue events rather than investing in small, predictable, bounded operational costs.
The Continuous Improvement Cycle — How the Best Operations Stay Ahead
Amazon’s compliance environment will continue to evolve. The Visual ID Standard 3.0 will not be the last major policy update. AI detection capabilities on Amazon’s side will continue to improve. Category-specific rules will shift. New disclosure requirements for AI-generated content may expand. A workflow that is correctly calibrated for April 2026 will need to be updated for the next change cycle.
Quarterly Policy Reviews
Assign the Image Compliance Owner to conduct a formal quarterly review of Amazon’s current Product Image Requirements documentation in Seller Central, cross-referenced against the existing requirement briefs and QA checklists. Any delta between current policy and documented internal standards triggers a workflow update cycle, not just a mental note.
The quarterly review should also include a review of Seller Central News and Policy Updates, Amazon Seller forums (particularly the Fulfilled by Amazon and Account Health sub-forums), and third-party seller intelligence sources for any enforcement pattern changes that may not yet be reflected in published policy.
A/B Testing Compliant Variants
Compliance is the floor, not the ceiling. Once a workflow reliably produces compliant images, the next layer of value is using that workflow to systematically test which compliant variants produce better conversion and click-through rates. Amazon’s Manage Your Experiments tool allows A/B testing of primary images between compliant variants, providing direct data on which visual approach performs better for a given ASIN.
Teams that have invested in a structured compliance workflow are in a much better position to run these experiments — because they’re not burning ops capacity on suppression recovery, they can allocate attention to continuous performance optimization instead.
Scaling the Feedback Loop
As catalog size grows, the feedback loop infrastructure needs to scale with it. A 50-ASIN operation can manage compliance feedback through a shared spreadsheet and weekly team check-ins. A 500-ASIN operation needs structured tooling — catalog health dashboards, automated suppression alerts, and a ticketing system for tracking compliance events from detection through resolution. The investment in this infrastructure should track the growth of the catalog, not lag it.
Conclusion: Compliance Is Infrastructure, Not a Checklist
The framing that causes the most expensive problems in AI image workflows for Amazon is treating compliance as a checklist item — something you reference once, apply at the end, and mark done. In the 2026 enforcement environment, with automated visual scoring across 127 parameters, machine-triggered search suppression, and Visual ID Standard 3.0 as the new baseline, that framing is not just inadequate — it’s actively dangerous for catalog health.
The operators running large catalogs with consistently low suppression rates are not doing so because they have better AI tools than everyone else. They are doing so because compliance is structural in their workflows. The requirement brief is the starting document. The category rules matrix is the standing reference. The pre-flight QA layer is a gate that cannot be bypassed. Version control makes rollback possible. The feedback loop makes improvement continuous.
This is infrastructure thinking applied to a creative production problem. And it is the only approach that scales without accumulating compounding compliance risk as the catalog grows.
Actionable Takeaways for Building Your Compliance Workflow
- Start with the brief, not the prompt. No image production run should begin without a documented requirement brief that translates Amazon’s current policy into specific, measurable parameters.
- Build the pre-flight QA layer as a gate, not a suggestion. Automated pixel-level checks, AI-assisted content detection, and human spot-check review should all be required before any image enters an upload queue.
- Assign a named Image Compliance Owner. Distributed ownership of compliance is functionally the same as no ownership.
- Separate the approval step from the upload action. This single change eliminates a significant class of cascade failure.
- Tag and analyze every suppression event. The distribution of root causes across time tells you exactly where your workflow needs strengthening.
- Review policy quarterly and update your internal standards accordingly. A compliance workflow calibrated for today needs to be recalibrated for the next enforcement update.
- Treat compliance investment as risk management, not overhead. The math is straightforward: one prevented cascade failure covers months of workflow tooling and process investment.
The catalog that stays visible, stays sellable. Building the workflow that guarantees that is not glamorous work — but it is the foundational work that everything else depends on.