Author: algofuse

  • The AI Intelligence Briefing: Everything That Actually Matters Right Now (2026 Edition)

    The AI Intelligence Briefing: Everything That Actually Matters Right Now (2026 Edition)

    AI intelligence control room in 2026 with holographic screens and neural network visualizations

    There are now more AI headlines published every day than most people can read in a week. Announcements stack on top of announcements. Model releases follow model releases. Every benchmark looks like a record. Every company claims to be winning.

    The result is a kind of informed paralysis — people who follow AI closely but feel less certain about what it all means than they did a year ago. That is not a coincidence. The volume of noise has grown faster than the volume of signal.

    This briefing is an attempt to cut through it. Not to cover everything, but to cover what actually matters: the developments with real consequences for how AI gets built, deployed, regulated, and used in the world right now. It draws on benchmark data, market research, regulatory filings, and production deployment patterns to give a grounded picture of where things stand in 2026.

    If you want hype, there is plenty of that elsewhere. If you want a clear-eyed account of the state of AI — the real capabilities, the genuine limitations, the economic shifts, and the decisions that are going to define the next 12 months — this is that.

    The landscape has fractured. There are winners and losers. There are problems that have been solved and problems that remain stubbornly unsolved. There are trends that look important but are not, and a few that look boring but will matter enormously. Here is what to pay attention to.

    The Model Wars: Where GPT-5.x, Claude 4.x, and Gemini 3.x Actually Stand

    Three AI models compared on radar benchmark chart with geometric shapes representing GPT, Claude, and Gemini

    The flagship model comparison has shifted from a question of “which is best” to a more useful question: “best at what, for whom, and at what cost?” The 2026 model landscape has three dominant closed-source players — OpenAI’s GPT-5.x series, Anthropic’s Claude 4.x line, and Google’s Gemini 3.x family — each with a meaningfully different performance profile.

    GPT-5.x: The Versatility Standard

    OpenAI’s GPT-5 series has established itself as the benchmark standard for general versatility. GPT-5.2 and GPT-5.4 post some of the highest aggregate scores across multiple evaluation categories. On SWE-Bench Verified — the most rigorous real-world coding evaluation available — GPT-5.x scores hit 80%, making it the top performer in production software engineering tasks. On GPQA Diamond, a graduate-level science reasoning benchmark, the model scores 92.4% on GPT-5.2 and climbs to 96.1% on the 5.4 variant. On AIME (mathematics competition problems), GPT-5.4 reaches a near-perfect 100%.

    The GDPVal benchmark, which evaluates economic reasoning and tasks that approximate expert-level analysis, shows GPT-5.4 at 83.0% — matching human expert performance. That single data point represents something that would have been difficult to believe as recently as 18 months ago.

    GPT-5.4 “Thinking” also crossed the 75% mark on OSWorld-V, a benchmark that tests autonomous execution of multi-step workflows across real software environments. The human baseline for that benchmark sits at 72.4%, which means the model has technically surpassed humans on desktop task execution. The caveat, as always, is that benchmarks measure narrow performance under controlled conditions — but the trajectory is clear.

    Claude 4.x: The Coding and Reliability Play

    Anthropic’s Claude 4.x lineup has carved out a distinct position centered on coding quality, low hallucination rates, and what practitioners describe as “predictable behavior” in agentic contexts. Claude Opus 4.6 achieves 65.4% on Terminal-Bench, a coding evaluation that tests real terminal-level debugging and code execution tasks, and it powers Cursor — currently the most widely adopted AI coding environment among professional developers.

    Where Claude differentiates is in the combination of accuracy and consistency. On the Humanity’s Last Exam (HLE) benchmark, a dataset of extremely difficult questions across disciplines, Claude Opus 4.6 reaches 53.1% when tool use is enabled — a notable result for a test designed to be near-unsolvable. Critically, Claude models post the lowest hallucination rates in standardized summarization evaluations, which has made them the default choice for regulated-industry applications where fabrication carries real legal and financial exposure.

    Gemini 3.x: The Enterprise Scale Architecture

    Google’s Gemini 3.x family has made a different bet: context, speed, and infrastructure integration. Gemini 3.1 Pro posts a 94.1% on reasoning benchmarks and processes up to 2 million tokens in a single context window — a capability that is not matched at scale by any competitor. For use cases involving extremely long documents, large codebases, or complex multi-source research synthesis, that context window is practically the only number that matters.

    Gemini’s integration with Google Workspace through automated SpreadsheetBench scoring at 70.48% is also significant for enterprise teams already embedded in Google’s ecosystem. The competitive positioning is clear: Gemini is the choice when scale, speed, and native cloud integration matter more than raw benchmark performance on any single axis.

    What This Means in Practice

    The practical implication of all this is that model selection is no longer a question of finding the “best” AI. It is an architecture and use-case decision. Teams running coding agents should evaluate Claude or GPT-5.x. Teams doing large document analysis need to look seriously at Gemini’s context capabilities. Teams where hallucination risk in legal or medical contexts is a compliance issue should prioritize Claude’s reliability profile. The days of one model being right for everything are largely over.

    From Chatbots to Agents: The Real Shift Happening in Production

    Multiple AI software agents in a coordinated workflow connected by glowing data streams

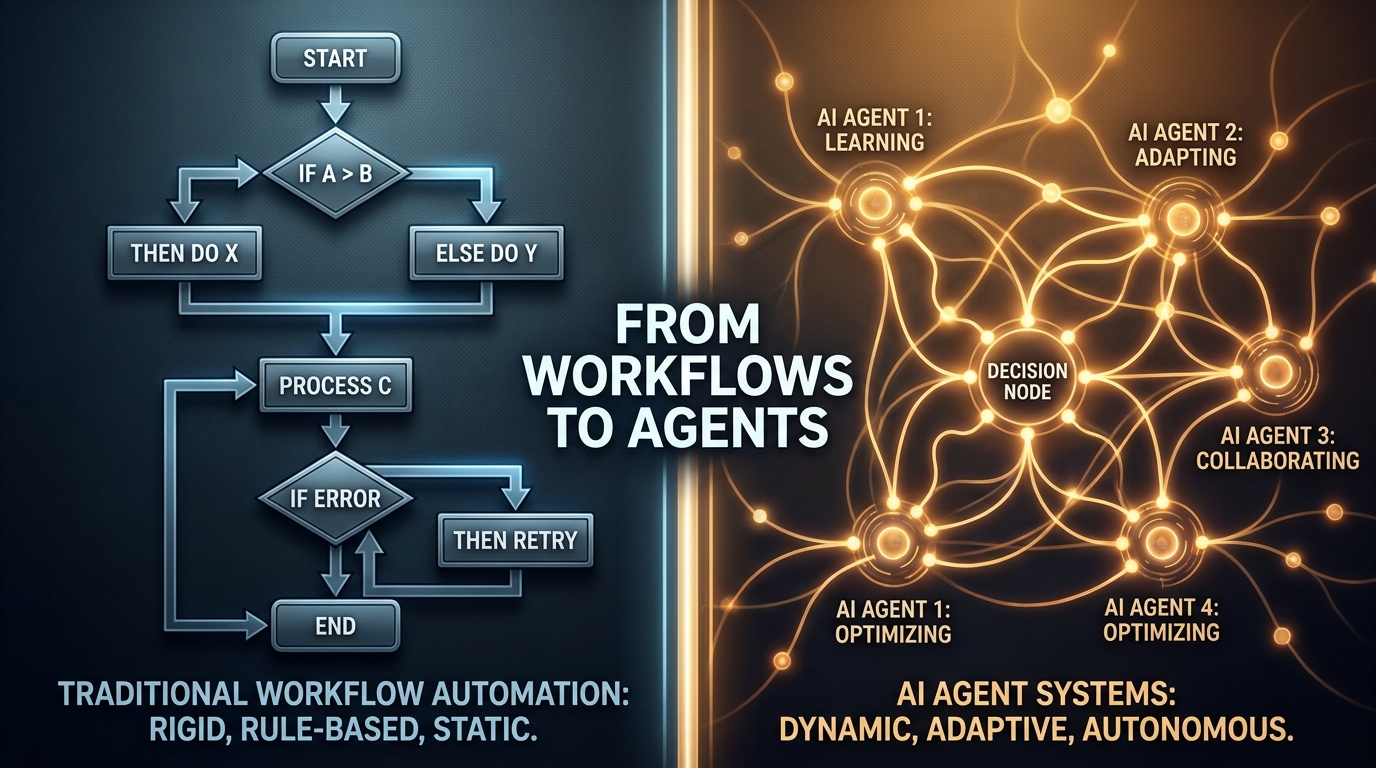
    The most consequential development in applied AI right now is not a new model. It is the shift from AI as a tool you query to AI as an agent that acts. This distinction sounds subtle but has profound operational implications.

    What the Adoption Numbers Show

    According to Gartner, fewer than 5% of enterprise applications embedded task-specific AI agents in 2025. That figure is forecast to reach 40% by the end of 2026. McKinsey data from late 2025 shows 62% of organizations are experimenting with AI agents, while only 23% have scaled in even one function. PwC’s figure puts enterprise AI agent adoption at 79% — a number that sounds high until you realize “adoption” in most surveys means “at least one pilot running somewhere.” The gap between piloting and scaling is where most organizations are stuck.

    Among the Global 2000 companies, 72% have moved beyond pilots into at least some production deployments — but “production” at large enterprises often means one workflow in one business unit, not widespread integration. The headline adoption numbers obscure a more complicated reality on the ground.

    Where agentic AI is genuinely scaling, the results are striking. High-performing deployments report 50-65% of customer support inquiries handled autonomously, 25-40% faster resolution times, and 20-30% cost reductions in the workflows where agents operate. One manufacturing company, Danfoss, reports automating 80% of certain operational decisions with near-instant response times — a result that would have required a significant human team to achieve manually.

    What Is Actually Meant by “Agentic AI”

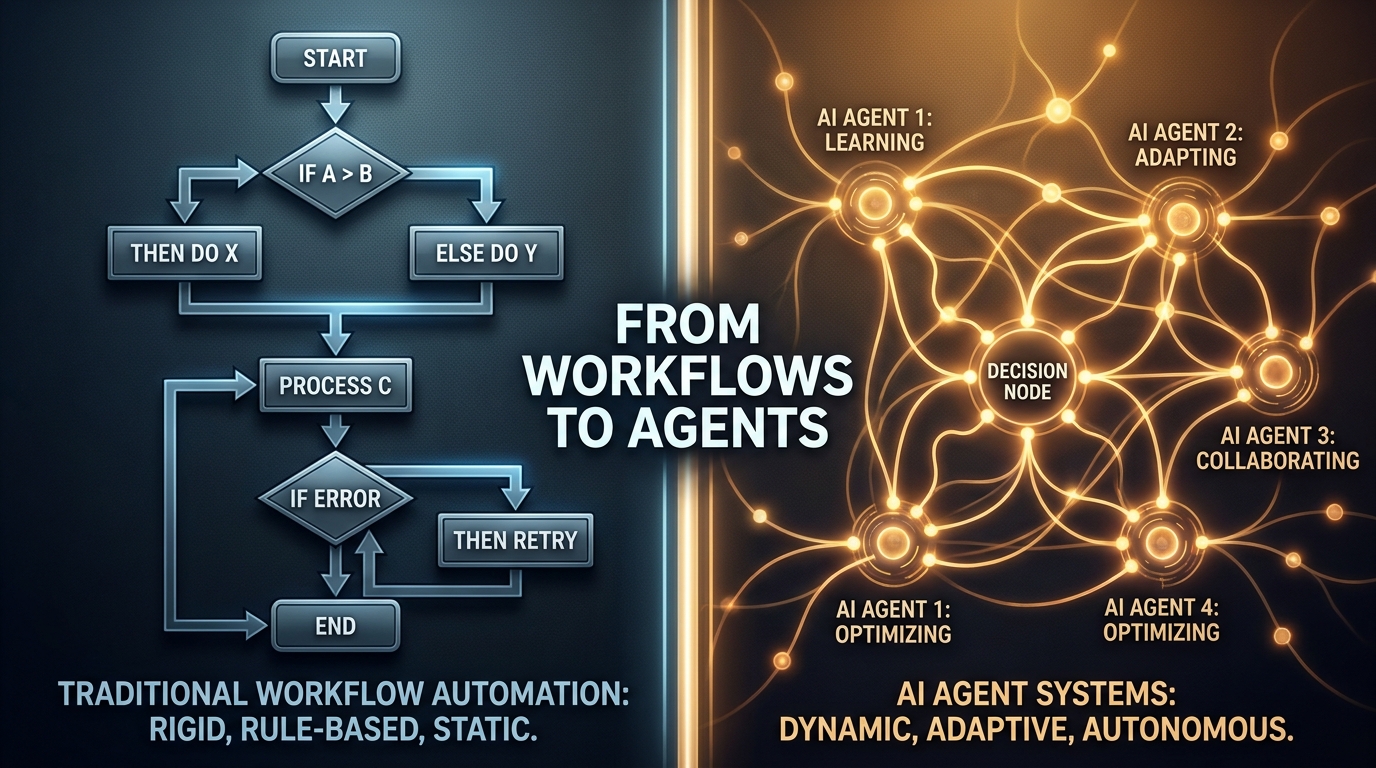
    The term gets used loosely enough to be almost meaningless, so it is worth being precise. An AI agent, in the meaningful sense, is a system that: sets or receives a goal, devises a plan to achieve it, takes actions in the world (calling tools, APIs, or other systems), observes the results of those actions, and adjusts its behavior accordingly — all without requiring step-by-step human direction for each action.

    This is distinct from a chatbot (which responds to queries), a code autocomplete tool (which suggests the next token), or an automated script (which executes a fixed sequence). An agent is goal-directed and adaptive. That capability introduces both its power and its risk. An agent that can achieve goals can also pursue them in ways you did not anticipate.

    The Failure Pattern

    Gartner has issued a significant warning alongside its adoption forecast: more than 40% of AI agent initiatives currently underway risk being abandoned by 2027. The reasons cited are governance gaps, unclear ROI, and cost management failures. This is consistent with a pattern visible across enterprise technology adoption cycles — wide experimentation, a painful winnowing, and then consolidation around what actually works.

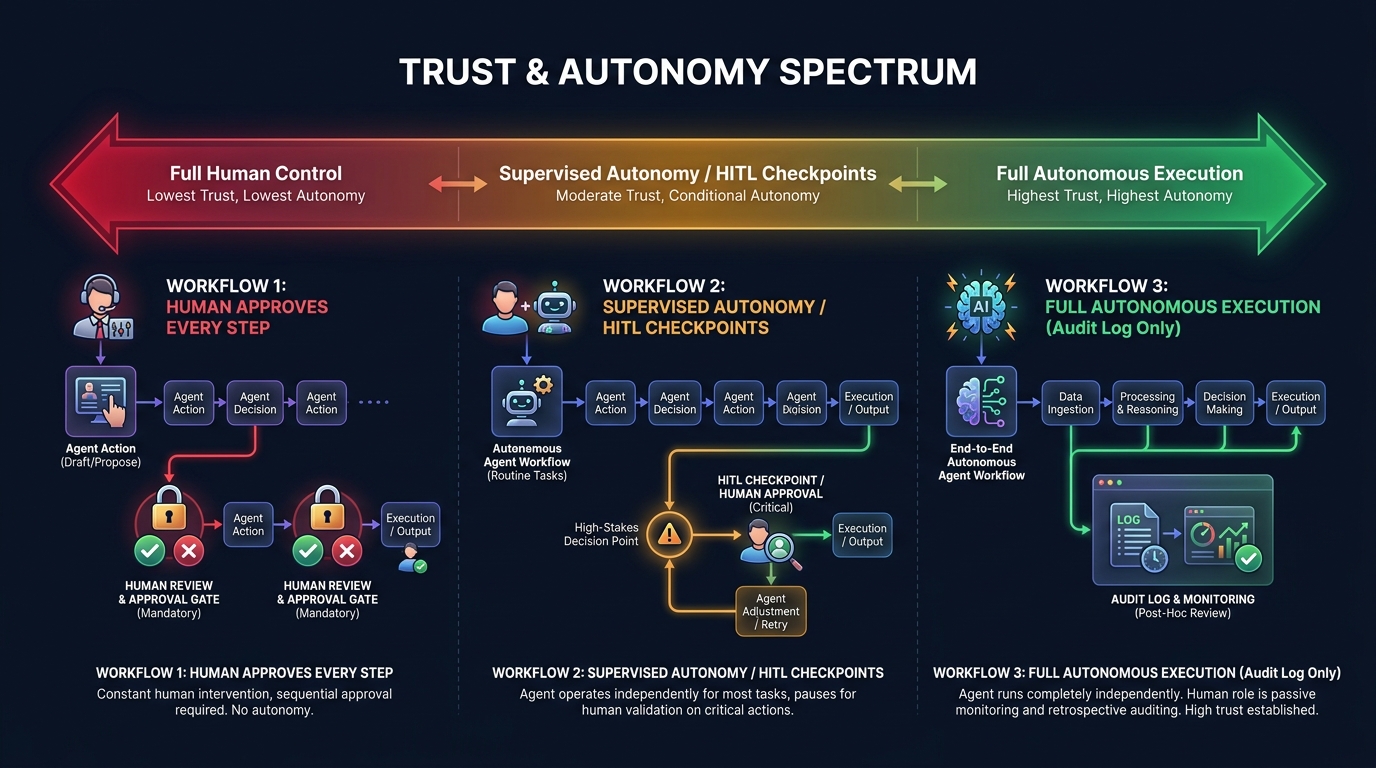
    The teams getting agentic AI into real production successfully share a few common traits. They start with workflows that are clearly bounded — not “improve our customer experience” but “handle tier-1 support tickets about order status.” They instrument heavily and monitor obsessively. And they design for human escalation from day one, treating human-in-the-loop not as a temporary crutch but as a permanent feature of the system architecture.

    The Multi-Agent Architecture Moment

    The conversation about AI agents has rapidly outgrown single-agent systems. In 2026, the leading edge of deployment is multi-agent architecture — networks of specialized agents coordinated by orchestrators to handle complex workflows that no single agent could manage alone.

    Why Single Agents Hit Walls

    A single AI agent working on a complex enterprise task runs into practical limits quickly. Context windows fill up. Errors compound. The combination of planning, execution, verification, and edge-case handling exceeds what one model can reliably sustain. Multi-agent systems address this by distributing work across agents that each have narrow, well-defined roles.

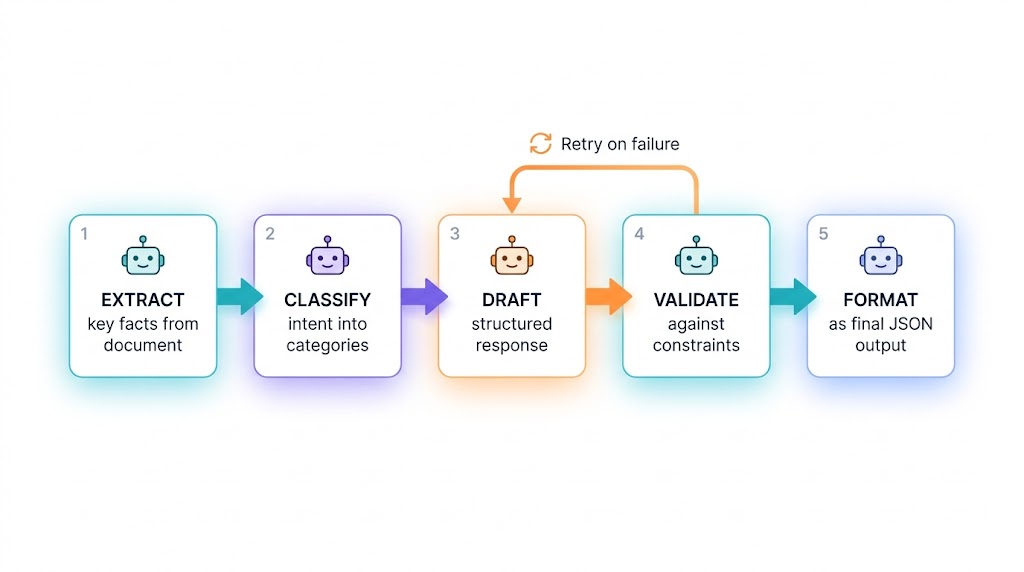
    A common production pattern looks something like this: an orchestrator agent receives a high-level task, breaks it into sub-tasks, routes each to a specialist agent (one for data retrieval, one for analysis, one for drafting, one for validation), collects and assembles the outputs, and delivers a finished result. If any specialist agent fails or produces output below a confidence threshold, the orchestrator can retry, escalate, or flag for human review.

    Forrester and Gartner both identify 2026 as the inflection point for multi-agent adoption. Current data shows 66.4% of the enterprise AI agent market now focusing on coordinated multi-agent architectures rather than single-agent solutions. The protocols enabling this — Agent-to-Agent (A2A) communication standards and the Model Context Protocol (MCP) — have matured enough to allow agents built on different underlying models to collaborate within shared workflows.

    Production Examples and What They Show

    In customer support, Microsoft and IBM have deployed multi-agent systems where one agent handles intent classification, a second retrieves relevant documentation or account data, a third generates a response, and a fourth validates tone and policy compliance before the message is sent. The process happens in seconds and handles what previously required three to five manual steps across different systems.

    In sales, multi-agent pipelines are handling the full sequence from lead qualification (data gathering and scoring agent) to outreach (personalization agent) to scheduling (calendar management agent) to proposal generation (drafting agent) to contract review (legal check agent). Companies report cycle time reductions of 70-80% in these sequences while keeping humans in decision-making roles at the end of the pipeline.

    The strategic implication is significant: the value of AI in 2026 is increasingly a function not of which model you use, but of how well you architect the system of agents around your specific workflows.

    Open Source vs. Closed: The Economics Are No Longer a Debate

    Split comparison of open source versus closed proprietary AI with padlock and vault imagery

    A year ago, the open source versus closed model debate was largely about performance. The argument was that open models were cheaper and more flexible but lagged meaningfully behind the frontier on capability. In 2026, that argument has mostly collapsed.

    The Benchmark Convergence

    Meta’s Llama 4, DeepSeek R1 and V3.2, and Alibaba’s Qwen 3.5 now match or exceed closed models on several key benchmarks. On MMLU (broad knowledge), open models score 92.0% versus approximately 92% for leading closed models. On MATH-500, open models reach 98.0% versus approximately 97% for closed. On GPQA Diamond, open models score 88.4% versus approximately 85% for leading closed alternatives.

    The remaining performance advantages for closed models are real but narrowly defined. On SWE-Bench for production coding, closed models lead at approximately 80% versus 76.4% for the best open alternatives. On complex agentic tasks and human preference evaluations (Chatbot Arena), closed models retain a meaningful edge. In the categories that matter most for cutting-edge software development and open-ended reasoning, the frontier closed models are still ahead — but the gap is measured in percentage points, not categories.

    The Cost Gap Is the Real Story

    Where open source has won decisively is on economics. DeepSeek’s API pricing runs at $0.028 to $0.28 per million input tokens — 10 to 30 times cheaper than equivalent OpenAI pricing. Meta’s Llama 4 can be self-hosted at inference costs that fall to near-zero at sufficient volume. Open models now hold 62.8% of the enterprise AI market by deployment share, up from a minority position just 18 months ago.

    DeepSeek’s architectural innovations deserve specific attention. Their Multi-Head Latent Attention (MLA) reduces KV cache memory requirements by 93% — a genuinely significant engineering achievement that makes running large models substantially cheaper. Their Group Relative Policy Optimization (GRPO) cuts reinforcement learning costs by 50%. These are not marginal efficiency gains; they represent a meaningful reduction in the infrastructure cost of running capable AI systems.

    The strategic question has shifted from “should we use open or closed models?” to “for which specific use cases does the performance premium of closed models justify the cost difference?” For many applications — internal search, document summarization, classification, moderate-complexity code generation — the answer is that it does not. Closed models remain the clear choice for frontier research, complex reasoning tasks, and applications where marginal performance differences have outsized consequences.

    The Sovereignty Dimension

    There is a third consideration that has grown substantially in importance: data sovereignty and regulatory compliance. Sending data to a third-party API creates privacy exposure, creates jurisdictional questions under frameworks like GDPR and the EU AI Act, and introduces vendor dependency risk. For organizations in regulated industries — healthcare, financial services, government — self-hosting an open model is often the only viable architecture, regardless of performance comparisons. The open source movement’s growth in enterprise adoption is partly a performance story and partly a compliance and control story.

    The Hallucination Problem Is Not Solved — It Has Just Become Situational

    One of the most consequential misunderstandings circulating in 2026 is the belief that hallucinations have been solved, or are close to being solved. The actual picture is more complicated and more important to understand correctly.

    The Task-Dependent Reality

    On standardized summarization benchmarks, the best models now achieve hallucination rates below 1%. Google’s Gemini 2.0 Flash posts approximately 0.7% on Vectara’s summarization leaderboard. OpenAI and Gemini variants cluster around 0.8-1.5%. These are genuinely impressive numbers, and they represent real improvement over models from 18-24 months ago.

    But hallucination rates are not a fixed property of a model. They vary dramatically by task type. Move from summarization to legal query answering, and rates jump to 18.7%. In medical information queries, the rate is 15.6%. In financial analysis, it reaches 17%. The tasks where hallucination is most damaging — regulated professional contexts, decisions with legal or financial consequences, medical information — are exactly the tasks where hallucination rates remain high.

    The Enterprise Damage Is Real

    The operational impact of this is not theoretical. Research from 2026 shows that 47% of enterprise AI users have made at least one major business decision based on hallucinated content. Industry losses attributed to AI fabrication were estimated at $67.4 billion globally in 2024, a figure that does not yet account for the expanded deployment of 2025 and 2026.

    Real-world incidents document the exposure clearly. Deloitte’s AI-generated report containing fabricated citations triggered partial government contract refunds. Healthcare organizations report delaying AI adoption specifically because of hallucination risk — 64% of healthcare organizations have deferred implementation while waiting for reliability standards to improve. Legal drafting tools with hallucination rates in the 18% range create systematic liability exposure in contract generation workflows.

    What Actually Reduces the Risk

    There are two mitigations that have demonstrated real effectiveness in production. Retrieval-Augmented Generation (RAG) — anchoring the model’s responses to a specific, verified document set rather than allowing it to draw on its full training distribution — reduces hallucination rates by 40-71% depending on the implementation. Grounding AI outputs in source material that can be audited is the single most reliable method currently available.

    The second effective mitigation is architectural: building verification layers into agentic pipelines so that outputs are checked by a separate validation process before being delivered. This means treating hallucination as a system design problem rather than a model quality problem. You cannot fully fix a model’s tendency to confabulate, but you can build pipelines that catch and reject confabulated outputs before they reach users or downstream processes.

    The practical takeaway is this: any organization deploying AI in contexts where accuracy is a compliance or liability matter needs active hallucination mitigation built into the architecture. Trusting model-level improvement to solve the problem is not a defensible position given the current evidence.

    AI Pricing Has Collapsed — What That Actually Means for Builders

    One of the most underreported stories in AI right now is what has happened to inference costs. The economics of building with AI have changed so dramatically that many of the cost assumptions embedded in 2024-era business cases are now incorrect — often in a favorable direction.

    The Scale of the Collapse

    GPT-4-level performance cost approximately $30 per million tokens in early 2023. The same level of capability now runs at under $1 per million tokens — a roughly 30x reduction in under three years. GPT-4o currently prices at $2.50-$5.00 per million input tokens and $10.00-$15.00 per million output tokens, itself representing an 83% reduction from earlier GPT-4 pricing.

    At the budget end of the market, the numbers are more striking. DeepSeek’s API prices start at $0.028 per million input tokens. Google’s Gemini Flash variants offer a 1 million token context window at approximately $0.38 per million total tokens. Claude Haiku 3 — a highly capable, fast model — runs at $0.25 input and $1.25 output per million tokens. In January 2026 alone, 109 of 302 tracked AI models reduced their prices.

    Forecasts suggest a further 50% price reduction across the market over the course of 2026, driven by competition, infrastructure efficiency gains, and the sustained pressure from open-source alternatives. Nvidia’s latest generation of AI chips achieves 105,000 times lower energy use per token than a decade ago, and those gains are gradually flowing through to inference pricing.

    What This Changes for Product Teams

    The cost collapse has several direct consequences for anyone building AI-powered products. Use cases that were economically unviable at 2023 inference prices are now viable. AI-powered features that would have cost tens of thousands of dollars per month to run can now be offered at a cost that supports meaningful margins.

    More importantly, the cost structure changes what kind of AI architectures are practical. Multi-step agentic pipelines — where a task might involve 10-20 separate model calls for planning, tool use, verification, and synthesis — were prohibitively expensive when tokens cost $30 per million. At current prices, a 20-step pipeline processing a moderate-complexity task might cost a few cents. That is a real architectural unlock that is not fully reflected in current product design thinking.

    The flip side is that cheap inference has also made it easier to build low-quality AI products quickly. When cost is less of a constraint, the quality bar for what gets shipped tends to drop. Teams with the discipline to invest the lower costs in quality, reliability, and user experience will differentiate; teams that use the cost savings to move faster and ship more will find themselves competing in an increasingly crowded and undifferentiated space.

    The Infrastructure Reality: Energy, Compute, and the $700B Build-Out

    Massive AI data center at night with server rows and cooling towers glowing with heat signatures

    The AI compute build-out underway right now is among the largest capital investments in infrastructure in modern history. Understanding its scale — and its constraints — is necessary context for anyone thinking seriously about where AI capability goes from here.

    The Numbers

    The four major hyperscalers — Alphabet, Microsoft, Meta, and Amazon — have committed a combined $700 billion in AI infrastructure investment for 2026. This follows $580 billion spent in 2025. Global data center electricity consumption hit 415 TWh in 2024, representing 1.5% of total global electricity use. By 2026, that figure is projected to exceed 500 TWh — approximately 2% of global electricity. The IEA projects 15% annual growth through 2030, reaching 945 TWh — nearly doubling current consumption within four years.

    In the United States, data centers’ share of national electricity consumption is forecast to reach 6.7% to 12% by 2028 depending on the growth scenario. That creates a structural problem: electricity grids were not designed for this rate of demand growth. The U.S. currently faces a projected power deficit of up to 25% by 2028, driven primarily by data center demand. This is not an abstract concern — it is already creating real siting constraints, permitting bottlenecks, and political pressure in every major data center market.

    The Morgan Stanley Intelligence Forecast

    Morgan Stanley’s early 2026 research forecast a 10x compute increase in the near term, with that scale of compute expansion potentially doubling the effective “intelligence” delivered by AI systems. If that relationship between compute and capability holds — and it is not guaranteed — then the systems available in 18-24 months could be substantially more capable than current flagship models on every dimension, including the complex reasoning tasks where improvements have recently slowed.

    What makes this uncertain is the power constraint. The U.S. electricity infrastructure cannot currently support the compute build-out at the pace that investment suggests. Power access, not capital availability, is the binding constraint on AI scaling in 2026. Every major data center project is running into power availability as the primary limiting factor.

    The Hardware Supply Chain

    Nvidia remains the dominant supplier of AI accelerator chips, and its position in the supply chain gives it extraordinary leverage over the pace of AI deployment. The Blackwell generation of GPUs — deployed at scale in 2025 and 2026 — represents a significant efficiency advance, but demand has outpaced supply through most of the past 18 months. Alternative chip architectures from AMD, Intel, and a growing number of AI-specific startups are making progress, but the ecosystem of software, tooling, and deployment expertise built around Nvidia CUDA remains a substantial moat.

    For organizations that are not hyperscalers, the infrastructure constraints mean that access to compute continues to flow primarily through cloud providers at variable pricing, or through a limited number of specialized AI cloud providers. The strategic implication is that compute efficiency — doing more with fewer tokens, building models that run well on smaller hardware, optimizing inference pipelines — is a significant competitive advantage that goes beyond pure cost management.

    The EU AI Act Enforcement Clock Is Ticking

    EU regulatory compliance for AI with golden star circle and compliance documents overlaid on neural pathways

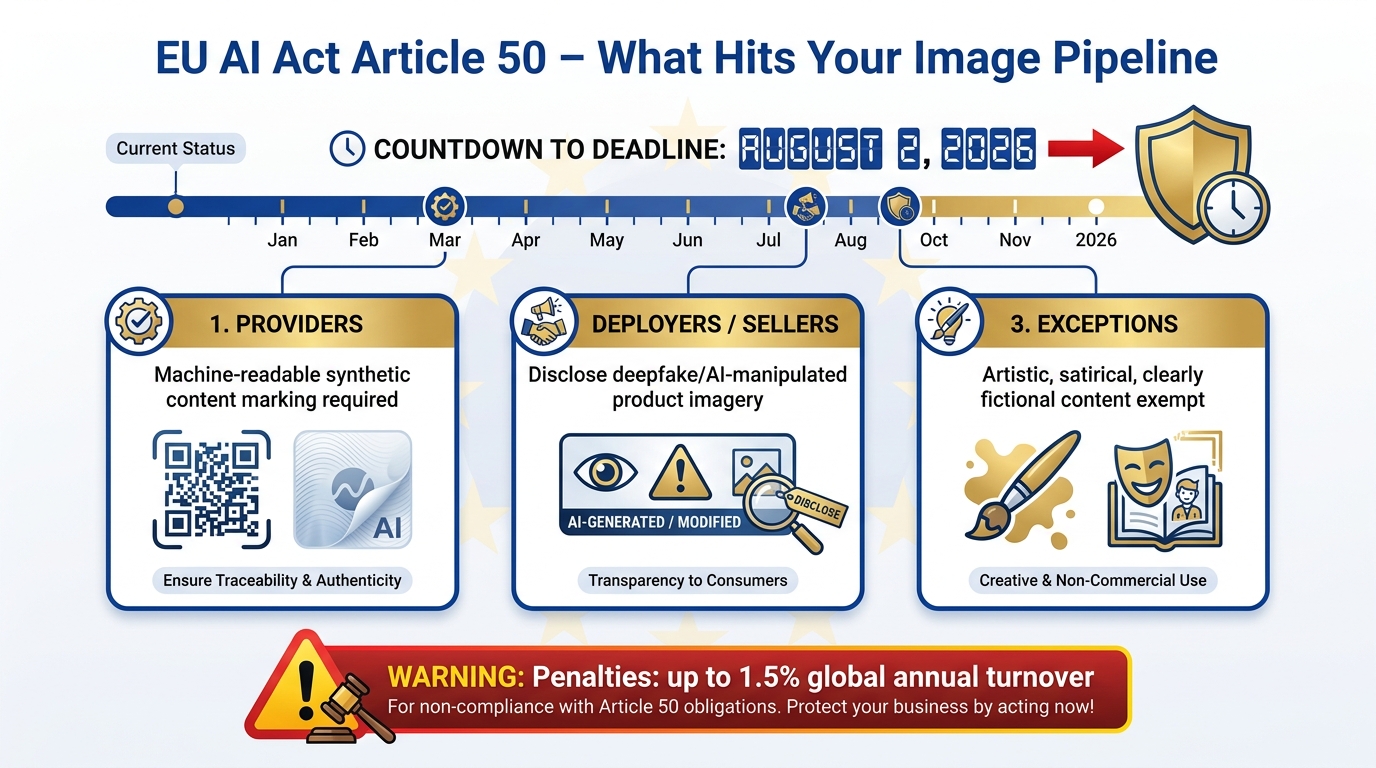
    August 2, 2026 is the date that every organization deploying AI in or to the European Union needs to have on their calendar. That is when the EU AI Act’s core enforcement provisions come into effect — and the penalties for non-compliance are not symbolic.

    What Comes Into Force on August 2

    The August 2026 milestone activates the full range of obligations for high-risk AI systems (those covered under Annex III of the Act, including AI used in employment, education, law enforcement, healthcare, and critical infrastructure), transparency requirements under Article 50, and market surveillance obligations enforced at both national and EU levels. The EU AI Office assumes central oversight responsibilities for general-purpose AI (GPAI) models — the category that includes most large language models.

    For GPAI model providers, the Act requires training data summaries, copyright compliance documentation, and incident reporting frameworks. For high-risk system deployers, the requirements are more extensive: risk assessments, data governance documentation, transparency disclosures to users, human oversight mechanisms, conformity assessments, and post-market monitoring programs.

    The Penalties

    Fines under the EU AI Act reach up to €35 million or 7% of global annual turnover for the most serious violations — placing prohibited AI systems on the market. Violations of high-risk system requirements attract fines up to €15 million or 3% of global turnover. For large AI companies, these are not rounding errors. They are existential-level penalties that require genuine compliance infrastructure, not a checkbox exercise.

    What Organizations Consistently Underestimate

    The compliance challenge for most organizations is not the prohibition on clearly banned systems — nobody who is paying attention is deploying social scoring or real-time biometric surveillance in public. The challenge is the documentation and governance infrastructure required for high-risk system compliance. Risk assessments need to be maintained and updated. Data governance needs to be auditable. Human oversight mechanisms need to be verifiable, not nominal.

    For SMEs, the compliance cost is particularly acute. Early 2026 assessments indicate that small and medium-sized enterprises face disproportionate compliance burdens relative to their AI deployments. The regulatory sandbox provisions in the Act are intended to provide some relief, with national AI regulatory sandboxes required to be operational by August 2026 — but accessing them requires active engagement with national authorities that many smaller organizations have not yet made.

    The practical advice for organizations operating in or selling to EU markets is straightforward: if you have not mapped your AI deployments against the Act’s risk classification framework, you are already behind schedule. The February 2, 2026 Commission guidance on Article 6 post-market monitoring was the last major guidance publication before enforcement begins. The window for strategic compliance preparation is closing.

    What AI Is Actually Doing to Work and Jobs in 2026

    AI workforce transformation with office workers and digital agents working side by side at desks blending into circuit boards

    The question of what AI is doing to employment is generating more heat than light in most public discourse. The alarmist framing (“AI is eliminating jobs”) and the dismissive framing (“AI just creates new jobs, it always has”) are both insufficient for understanding what is actually happening on the ground in 2026.

    The Displacement Numbers

    The data shows displacement is real, targeted, and concentrated in specific roles. In the United States, 55,000 AI-attributable job losses were tracked between January and November 2025. The first two months of 2026 saw 32,000 tech-sector layoffs. Salesforce eliminated 4,000 customer support positions citing AI capability. Among employers, 38% have reduced entry-level white-collar hiring, citing AI’s ability to handle work that previously justified those hires.

    The roles at highest risk follow a consistent pattern: roles where the primary work involves codifiable, repeatable processing of information. Computer programmers at 45% displacement risk. Customer service representatives at 42%. Data entry clerks at 40%. Medical records professionals at 40%. The 65% of retail roles estimated to be automatable by end of 2026 represents a particularly large category.

    AI-vulnerable sectors are already showing employment effects. Computer systems design employment is down approximately 5% from 2022, a trend running counter to the broader labor market. Young workers are disproportionately affected, because they cluster in the entry-level roles that AI is most capable of handling.

    The Creation Side

    The World Economic Forum’s analysis projects 170 million new jobs created by AI by 2030, against 92 million displaced — a net positive if the projections hold. But projections about job creation are structurally less reliable than projections about displacement, because the new roles require skills that are unevenly distributed and slow to develop.

    What is observable now, not projected, is the wage premium on AI-augmented roles. Positions requiring AI skills carry a 23% wage premium over comparable non-AI roles across industries. In some technical specialties, that premium reaches 56%. The demand for mid-level talent — workers with 5-10 years of experience who can work effectively alongside AI tools — is particularly strong. “AI agent orchestrator” roles, which barely existed two years ago, are among the fastest-growing job categories in enterprise technology.

    The Skills Gap Is Not About Technical Depth

    A common assumption is that the skills gap between what employers need and what the workforce can provide is primarily a technical one — that the problem is a shortage of machine learning engineers and AI researchers. That is partially true but increasingly secondary. The more widespread scarcity is in workers who can do substantive professional work effectively alongside AI tools — who can evaluate AI outputs critically, identify errors and hallucinations, prompt effectively for their domain, and make judgment calls in situations where AI has high confidence but is wrong.

    This is a problem that no amount of AI capability improvement solves, because it is fundamentally about human judgment. Organizations that invest in developing AI literacy — not just technical AI skills — across their professional workforce are building a competitive position that compounds over time and is not replicable by simply buying more AI tools.

    The Signal vs. the Noise: What Actually Matters Over the Next 12 Months

    Not every AI development that gets coverage is worth the attention it receives. Here are the specific trends and signals worth tracking over the next 12 months — and a few things that are consuming attention but likely matter less than they appear to.

    Watch Closely: Agent Reliability Standards

    The most important technical problem in applied AI right now is not capability — models are capable enough for most enterprise use cases. The problem is reliability. Agents that work well 90% of the time and fail unpredictably the other 10% are not deployable at scale in workflows that matter. The next 12 months will see significant work on agent reliability standards, error handling protocols, and the infrastructure needed to make agentic systems genuinely production-grade rather than impressive in demos.

    Watch for the emergence of reliability benchmarks specifically designed for agentic systems — not accuracy on single queries but consistency, error recovery, and graceful degradation under adversarial or edge-case conditions. Organizations that can demonstrate reliable agentic performance on these measures will have a significant advantage in regulated-industry deployments.

    Watch Closely: The MCP and A2A Protocol Ecosystem

    The Model Context Protocol (MCP) and Agent-to-Agent (A2A) protocols are the plumbing of the multi-agent future. They are boring to read about and consequential in practice. As these protocols mature and adoption grows, the ability to compose agents from different providers into coherent workflows will become significantly easier. The organizations that build expertise in this layer now — before it becomes commoditized — will have a head start in multi-agent architecture that matters.

    Watch Closely: Reasoning Model Costs

    The current generation of frontier reasoning models — GPT-5.4, Claude Opus 4.6, and Gemini 3.1 Pro — are expensive relative to their lighter-weight counterparts. The economics of complex reasoning at scale will be determined by how quickly reasoning capability can be achieved at lower inference costs. Expect significant competition here, driven by DeepSeek’s MLA and GRPO innovations and Meta’s continued push on Llama efficiency. If reasoning-quality outputs can be delivered at near-commodity prices, it will trigger another wave of previously uneconomic use cases becoming viable.

    Probably Less Important Than It Looks: Benchmark Racing

    The quarterly benchmark update cycle — where every major lab announces its latest score on MMLU, GPQA, AIME, and similar evaluations — receives substantial coverage but carries diminishing signal value. When multiple models score above 90% on any given benchmark, the benchmark stops discriminating meaningfully between them. The labs know this and work to stay ahead of the measurement curve, but the gap between benchmark performance and deployment performance remains significant in practice.

    More useful than benchmark scores for most practitioners is direct testing on your specific use cases with your specific data. That is the only measure that matters for production decisions.

    Probably Less Important Than It Looks: AI Companion and Consumer Features

    Consumer-facing AI features — AI companions, AI search enhancements, AI-generated social media content — attract significant media coverage and represent real product revenue for the major labs. For practitioners thinking about enterprise AI deployment, they are largely irrelevant. The developments that matter for building AI into business processes are happening at the infrastructure, model reliability, and agent coordination layers — not in the consumer experience layer.

    Conclusion: How to Read the Signal

    The AI landscape in 2026 is genuinely complex in ways that resist simple characterization. It is not “early days” — production deployments are delivering real results across industries, and the foundational capabilities of current models would have seemed speculative as recently as 2023. But it is also not “solved” — hallucinations remain a genuine risk, agentic systems fail in unpredictable ways, regulatory compliance infrastructure is still being built, and the energy costs of scaling are increasingly a structural constraint.

    The framework that makes the most sense for navigating this complexity is not to identify the most impressive capability or the most alarming risk and extrapolate from it. It is to maintain a clear-eyed view of what the evidence actually shows, distinguish between what has been demonstrated in production and what has been demonstrated in benchmarks, and make deployment decisions based on the specific demands of the use case rather than general excitement about the technology.

    Practical Takeaways

    • Model selection is a use-case decision, not a brand loyalty decision. Match the model’s strengths (GPT-5.x for versatility, Claude for reliability in regulated contexts, Gemini for large-context tasks) to the specific requirements of each workflow.
    • Treat hallucination as a system design problem. Build RAG, verification layers, and human escalation paths into any pipeline deployed in high-stakes contexts. Do not rely on model-level improvements to solve this at your layer.
    • The open-source economics have fundamentally shifted. Re-evaluate your model choices if cost and data sovereignty are constraints. The performance gap for most enterprise use cases no longer justifies premium pricing across the board.
    • If you are in the EU or sell to EU customers, August 2, 2026 is a hard deadline. Map your AI deployments against the risk classification framework now. The documentation and governance infrastructure required for compliance takes time to build.
    • Invest in AI literacy, not just AI tools. The wage premium and competitive advantage flowing to AI-augmented workers is real. The organizations that develop this capacity broadly — not just in a technical AI team — will compound that advantage.
    • Agentic architecture is the medium-term value driver. The move from chatbots to coordinated agent systems is where the largest productivity and efficiency gains are being realized. Building capability and expertise in multi-agent system design now is building infrastructure for the next phase of AI value creation.
    • Monitor inference pricing actively. The cost environment is changing fast enough that assumptions built into products or business cases from even 12 months ago may be significantly wrong. Revisit pricing assumptions quarterly.

    The signal in AI right now is not in the loudest announcements or the most dramatic benchmark claims. It is in the production deployments that are quietly delivering measurable results, the infrastructure limitations that are constraining what gets built, the regulatory frameworks that are establishing the rules of the game, and the economic dynamics that are determining which approaches scale and which do not.

    That is a less exciting story than the one that dominates the coverage. It is also a more accurate one — and in a field moving this fast, accuracy matters more than enthusiasm.

  • Amazon Main Image Requirements Your 2026 Seller Guide

    Amazon Main Image Requirements Your 2026 Seller Guide

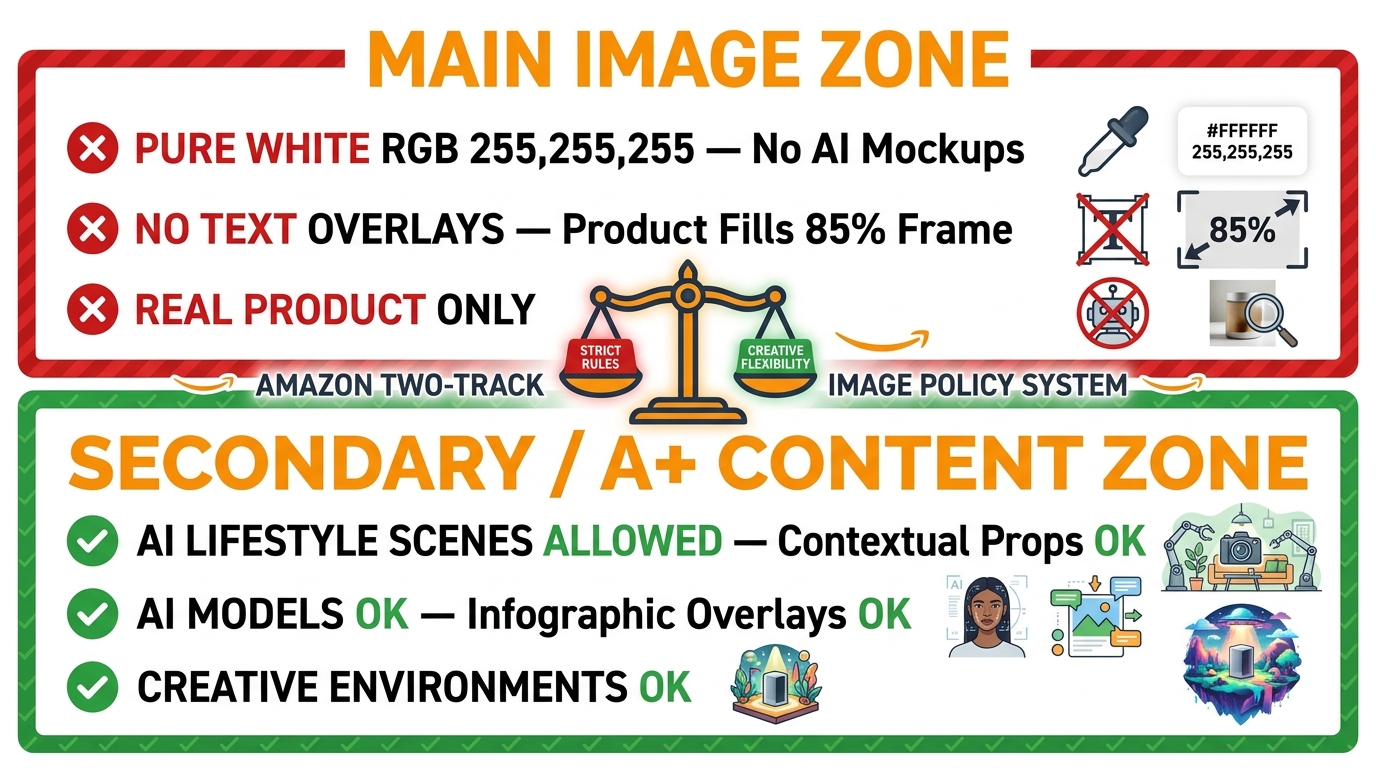
    When it comes to your Amazon main image, the rules are straightforward but absolutely non-negotiable. Your product must be photographed on a pure white background (RGB 255, 255, 255), fill at least 85% of the frame, and show only the product itself—no extra text, logos, or props. Getting this right is your first line of defense against a suppressed listing.

    A Quick Reference for Amazon Image Compliance

    A black DSLR camera on a tripod, a moss plant, and a 'QUICK REFERENCE' sign on white.

    I’ve seen it happen countless times: a single non-compliant image gets an entire listing pulled, and sales flatline overnight. Amazon’s enforcement is strict because they are obsessed with creating a uniform, professional look in their search results. That pure white (RGB 255, 255, 255) background isn't a suggestion; it’s a mandate to ensure consistency, especially on mobile where thumbnails are everything.

    You can’t use off-white, light gray, or gradients. This visual standard is a cornerstone of the Amazon shopping experience. For a deeper dive into how this impacts mobile conversions, check out this detailed guide about Amazon's image dimensions.

    Amazon Main Image Technical Specifications at a Glance (2026)

    To help you get it right every time, I've put together this quick-reference table. It covers the essential technical specs and, just as importantly, explains why each rule exists. Think of it as your compliance cheat sheet.

    Requirement Specification Reason & Impact
    Pixel Dimensions Minimum 1,000px on the longest side. Recommended: 2,000px+. Images over 1,000px enable the critical zoom feature, which is proven to build customer confidence and directly increase conversion rates.
    Background Color Must be pure white (RGB 255, 255, 255). This creates a clean, consistent look across all search results, reinforcing a professional and trustworthy shopping environment for customers.
    Product Fill The product must occupy 85% or more of the image frame. Maximizes how much of your product is visible in tiny thumbnail views, making your listing pop and improving your click-through rate from search.
    File Formats JPEG (.jpg), TIFF (.tif), PNG (.png), or GIF (.gif). JPEG is preferred. JPEG provides the ideal balance between high image quality and small file size, which helps your product page load faster—a factor in Amazon's A9 ranking algorithm.
    File Size Limit Maximum of 10 MB per image. Keeps your listing from becoming sluggish. Slow-loading pages frustrate shoppers and can negatively impact your search performance.
    Prohibited Content No text, logos, watermarks, inset images, props, or graphics. This rule ensures the customer's focus stays entirely on the product, free from distractions or any content that feels overly promotional.

    Following these technical rules is non-negotiable for keeping your listing active and visible. Pin this table, check it often, and you'll stay on the right side of Amazon's requirements.

    Breaking Down the Core Technical Specifications

    A wooden desk with a DSLR camera, an open laptop displaying images, a ruler, and a notebook.

    It's one thing to have a checklist of Amazon's rules, but it's another to understand why those rules exist. Getting the technical details right isn't just about avoiding a listing suppression; it's about directly influencing how customers see and interact with your product. When you know the reasoning behind the specs, you can make smarter choices that satisfy both Amazon's algorithm and your potential buyers.

    Let's get into the nitty-gritty of these critical amazon main image requirements to ensure your visuals are not just compliant, but genuinely built to convert.

    Pixel Dimensions and The Power of Zoom

    The single most important technical spec is your image size. Amazon requires a minimum dimension of 1,000 pixels on the longest side, and for a very good reason: it powers the hover-to-zoom feature. If your image is even one pixel short, say 999 pixels, the zoom function won't work. Shoppers will be unable to get a closer look at your product's materials, texture, and build quality.

    That zoom feature is no gimmick; it's a proven sales driver. With 66% of consumers now expecting multiple zoomable images before they even consider a purchase, it's an absolute must-have. While 1,000 pixels is the baseline, serious sellers push this further. We've seen that listings with images over 2,000 pixels get 35% higher engagement rates from shoppers using the zoom, especially with 75% of Amazon traffic coming from mobile, where users pinch-and-zoom to see every detail. For a deeper dive, check out the data on how image quality impacts Amazon conversions on Headlinema.

    Product-to-Frame Ratio

    Amazon's rule that the product must take up at least 85% of the image frame is all about winning the click on the search results page. Think about it: when a customer searches, your main image gets squashed into a tiny thumbnail. If your product fills the frame, it's big, bold, and instantly recognizable. If it only fills 50% of the space, it becomes a small, ambiguous blob that gets lost in the noise.

    Key Insight: The 85% rule is your best tool for improving click-through rates (CTR) from the search results page. A larger, clearer product thumbnail naturally draws the eye and encourages more shoppers to click on your listing over a competitor's.

    Picture two listings for the same coffee mug. One uses the full frame, making the mug's design and shape pop. The other has the mug floating in a sea of white space. Which one do you think gets the click? It’s the first one, almost every time.

    File Format and Size

    You have a few choices for file format, but JPEG (.jpg) is what you should be using. It simply provides the best balance of image quality and file size, which is a massive factor for how quickly your product page loads.

    • JPEG (.jpg): This is the gold standard for photos. It offers great compression to keep file sizes down without a noticeable drop in quality.
    • PNG (.png): Its main advantage is supporting a transparent background, but this often leads to much larger files. It’s better suited for secondary images or infographics.
    • TIFF (.tif): This is a lossless format, meaning it keeps perfect quality. The trade-off is enormous file sizes that almost always blow past Amazon's limit.

    And about that limit—you have to keep your image file under 10 MB. A bloated file will slow your page load speed to a crawl, which not only frustrates customers but can also hurt your ranking in Amazon's search algorithm. A properly compressed JPEG will easily stay under this limit while keeping the sharp detail needed for that all-important zoom feature.

    Avoiding Common Violations and Prohibited Content

    While getting the technical specs right is important, it’s the content rules that consistently trip sellers up. Getting these wrong is the fastest ticket to a suppressed listing. Amazon’s primary goal is a uniform, clean shopping experience, and your main image is the face of that policy. It must be a sterile, professional shot of only your product.

    Think of it this way: violating a content policy is like a red flag for Amazon's algorithm. Even something that seems helpful, like a “Made in USA” badge, can get your image rejected and your ASIN deactivated almost instantly. Knowing what's forbidden is every bit as critical as knowing the required pixel dimensions.

    Strictly Prohibited Elements in Your Main Image

    Amazon is notoriously strict about what can and cannot appear in that primary photo. If your image contains any of the following, expect it to be flagged.

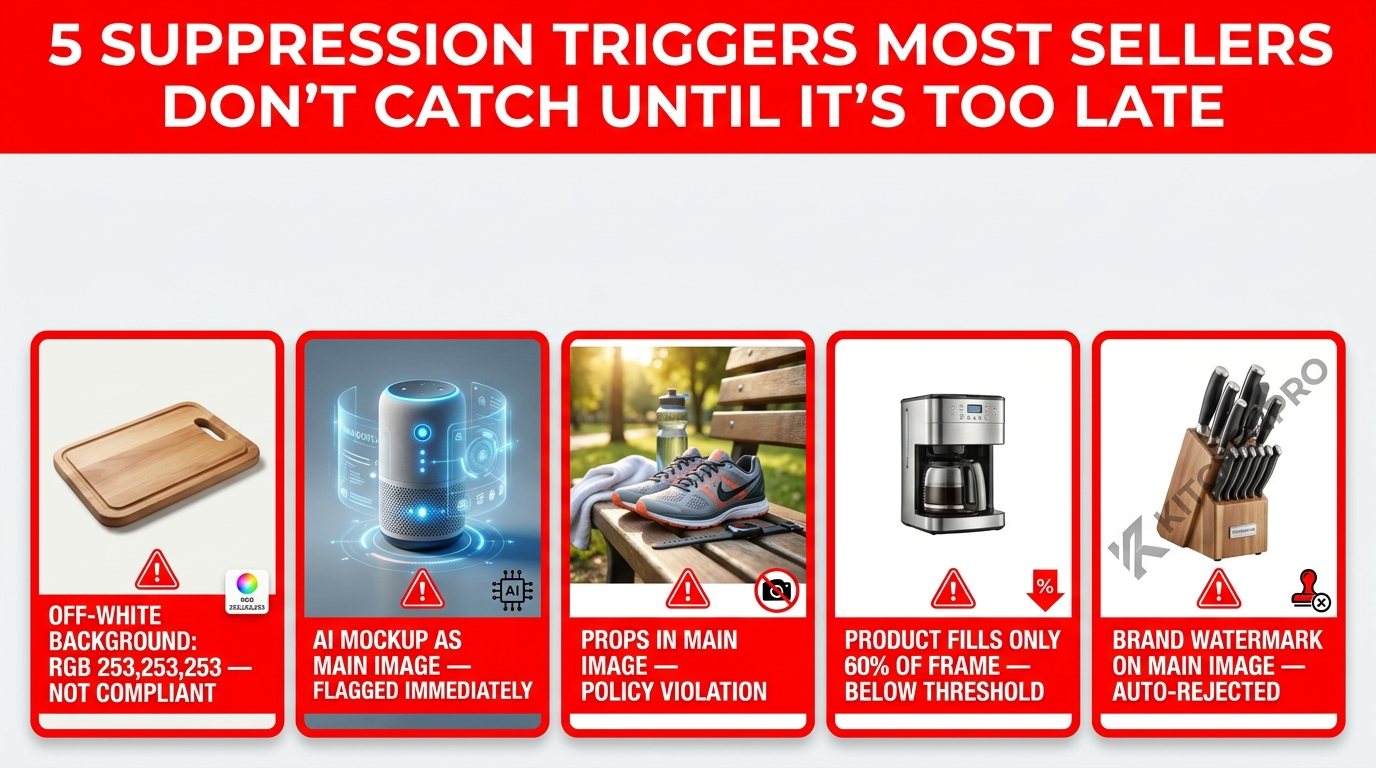
    • Text, Logos, and Watermarks: Your main image must be completely sterile. No promotional text like "Sale" or "50% Off," no informational text explaining features, and definitely no brand names or logos. Watermarks, even subtle ones from a photographer, are also banned.

    • Promotional Badges or Symbols: Any graphic that isn't part of the physical product is forbidden. This includes satisfaction guarantees, award emblems, or icons indicating fast shipping. The photo must showcase the product and nothing more.

    • Inset Images or Multiple Views: You can't create a collage or show smaller inset images of different product angles. The main image must be a single, clear view of the one product being sold. Showing multiple color variations in one shot is another direct violation.

    Props, Packaging, and Other Common Mistakes

    Beyond adding text and graphics, sellers often make the mistake of including items that, while related, aren't part of the actual sale. Amazon's philosophy is simple: what the customer sees in the main image is exactly what they should get.

    Expert Takeaway: A foolproof rule is, "if it's not in the box, it's not in the main image." This applies to any props, accessories, or even the product’s own packaging unless the packaging is a core feature, like a collectible gift box.

    Here are a few of the most frequent errors we see:

    • Accessories Not Included: Selling a camera? Don't show it with a lens, tripod, and bag unless all those items are included in the purchase price. Your photo has to represent the product precisely as it arrives.
    • Showing Unnecessary Packaging: Unless you’re selling a board game or a luxury gift set where the box is part of the experience, leave it out of the shot. The focus must be on the product itself, not the cardboard it ships in.
    • People, Mannequins, or Body Parts: Generally, your main image can't include human models—not even a hand holding the item. The major exceptions here are for the Clothing, Apparel, and Jewelry categories, which have their own specific modeling guidelines.
    • Drawings or Illustrations: The main image must be a genuine photograph. Using sketches, 3D renders, or other illustrations is prohibited because they can misrepresent what the customer will ultimately receive. Sticking to these rules is non-negotiable for keeping your seller account in good standing and avoiding the costly downtime of a suppressed listing.

    Beyond the Basics: Navigating Category-Specific Image Rules

    Getting the universal Amazon main image requirements right is a great start, but it's only half the battle. This is where so many sellers get tripped up: Amazon layers on another set of specific rules that change dramatically from one product category to another.

    What’s perfectly acceptable for a kitchen gadget can get your new clothing line suppressed in a heartbeat. It’s absolutely critical to understand these differences before you even think about a photoshoot. These aren't random rules; they're designed to create a consistent, helpful shopping experience tailored to how customers browse each specific department.

    Clothing, Apparel, and Accessories

    In a major twist from the general guidelines, the Clothing and Accessories categories don't just allow human models in the main image—they often require them. The whole point is to show a shopper exactly how an item fits, drapes, and looks in a real-world context.

    Of course, there are some strict conditions attached:

    • On-Model Is a Must: For most apparel, the product has to be worn by a person.
    • Stand Up Straight: The model must be in a standing pose. You can't use main images where the model is sitting, kneeling, or lying down.
    • No Visible Mannequins: While the "ghost mannequin" effect is sometimes allowed in sub-categories, a full, visible mannequin in the main slot is a definite no-go.

    Shoes, Handbags, and Luggage

    The shoe category is famous for having one of the most rigid and consistently enforced main image rules on the entire platform. Your main image must feature a single shoe, pointing to the left, and angled at precisely 45 degrees. There's no room for interpretation here. This ensures every shoe listing looks uniform, making it easy for customers to scan and compare products.

    Handbags and luggage follow a similar product-first philosophy. They need to be shot standing upright on their own, with no props or models in sight. For both, the pure white background and the ban on extra text or graphics are strictly maintained.

    This image perfectly summarizes the core "Do vs. Don't" principles that apply across the board.

    Image illustrating Amazon's main image rules, showing allowed and not allowed product photo examples.

    It’s a great visual reminder: your main image should be all about the product, clean and simple.

    Jewelry and Watches

    When it comes to Jewelry and Watches, expect Amazon's rules to be exceptionally strict. You absolutely cannot show the product on a model, a mannequin, a stand, or even a jewelry box in the main image. The item has to be shot either lying flat or propped up invisibly on that pure white background.

    For jewelry, Amazon wants nothing to distract from the fine details, materials, and quality of the piece. Using a model in the main image is one of the fastest ways to get your listing flagged for suppression.

    Books, Music, and Video/DVD (BMVD)

    Thankfully, the rules for BMVD products are refreshingly simple. The main image must be the front cover art, filling 100% of the image frame. No exceptions. That means no creative angled shots, no lifestyle photos of someone enjoying the book, and no digital "bestseller" stickers—unless a sticker is physically part of the printed cover design.

    To make these distinctions even clearer, here's a quick reference table breaking down the key differences.

    Main Image Rule Variations by Top Amazon Category

    This table compares the unique main image requirements for some of the most popular and distinct categories on Amazon.

    Category Primary Requirement Prohibited Elements Common Aspect Ratio
    Clothing Product must be shown on a human model (standing). Mannequins, seated poses, non-product props. 1:1 or 3:4
    Shoes & Handbags Single shoe, facing left at a 45-degree angle. Models, pairs of shoes, props inside a handbag. 1:1 or 4:5
    Jewelry Product photographed flat or propped invisibly. Mannequins, models, display stands, boxes. 1:1
    BMVD Cover art must fill 100% of the image. Angled shots, props, promotional graphics. 1:1.5

    Remember, these rules can and do get updated. Your single source of truth should always be the latest category-specific style guide, which you can find in Amazon Seller Central. It's a smart habit to check it before every new product launch.

    Optimizing Main Images for Higher Conversions

    Two gold iPhones on a white background with green leaves and a wooden accent. A black banner says 'BOOST CONVERSIONS'.

    Getting your main image to meet Amazon's technical rules is just the starting line. It gets you in the race, but it doesn't help you win. To actually capture a sale, your image needs to grab a shopper's attention and persuade them to click on your listing instead of a competitor's. The pure white background is a hard rule, but you can still use lighting, angles, and composition to make your product pop.

    Think of your main image as your single best chance to make a first impression. In the split second a customer scrolls past, it has to communicate your product's quality and value. A sharp, well-composed photo that shows off the product's key attributes will directly improve your click-through rate (CTR). This, in turn, is a powerful signal to the A9 algorithm that your listing is highly relevant, which can improve your search ranking.

    Composition and Product Psychology

    How you frame the product is everything. Your goal is to convey quality and present the item in its most attractive light. Sometimes, tiny adjustments in composition can lead to a surprisingly large impact on customer perception.

    We’ve seen A/B test data show that simply changing the product's angle can make a huge difference. For instance, a backpack shot at a slight three-quarter view often looks more substantial and high-end than one photographed completely flat from the front.

    Here are a few essential composition elements worth testing:

    • Product Angle: Does your item look best head-on, from a 45-degree angle, or with a slight overhead view? Experiment to find the angle that best highlights its selling points.
    • Lighting and Shadow: While you can't have strong, distracting shadows, you should use soft, natural-looking lighting to add depth. This makes materials look more realistic and premium. Steer clear of flat, harsh lighting that blows out important details.
    • Scale and Presence: Make your product look substantial. Filling at least 85% of the image frame and choosing a dynamic angle gives your product a much stronger presence than a competitor’s small, flat-looking photo.

    Key Insight: Main image compliance is more than a technical hurdle—it's a sales multiplier. High-quality visuals can boost overall conversions by up to 10% in major markets. Well-crafted thumbnails that follow all amazon main image requirements can increase click-through rates by 15-25% in crowded search results. You can learn more about these Amazon image trends to apply these findings.

    Using AI to Gain a Competitive Edge

    In the past, optimizing a main image was a slow and expensive process. It often involved multiple photoshoots and lengthy A/B tests, with sellers mostly guessing which angle or lighting setup would resonate with customers. Now, that entire approach is being rethought thanks to AI.

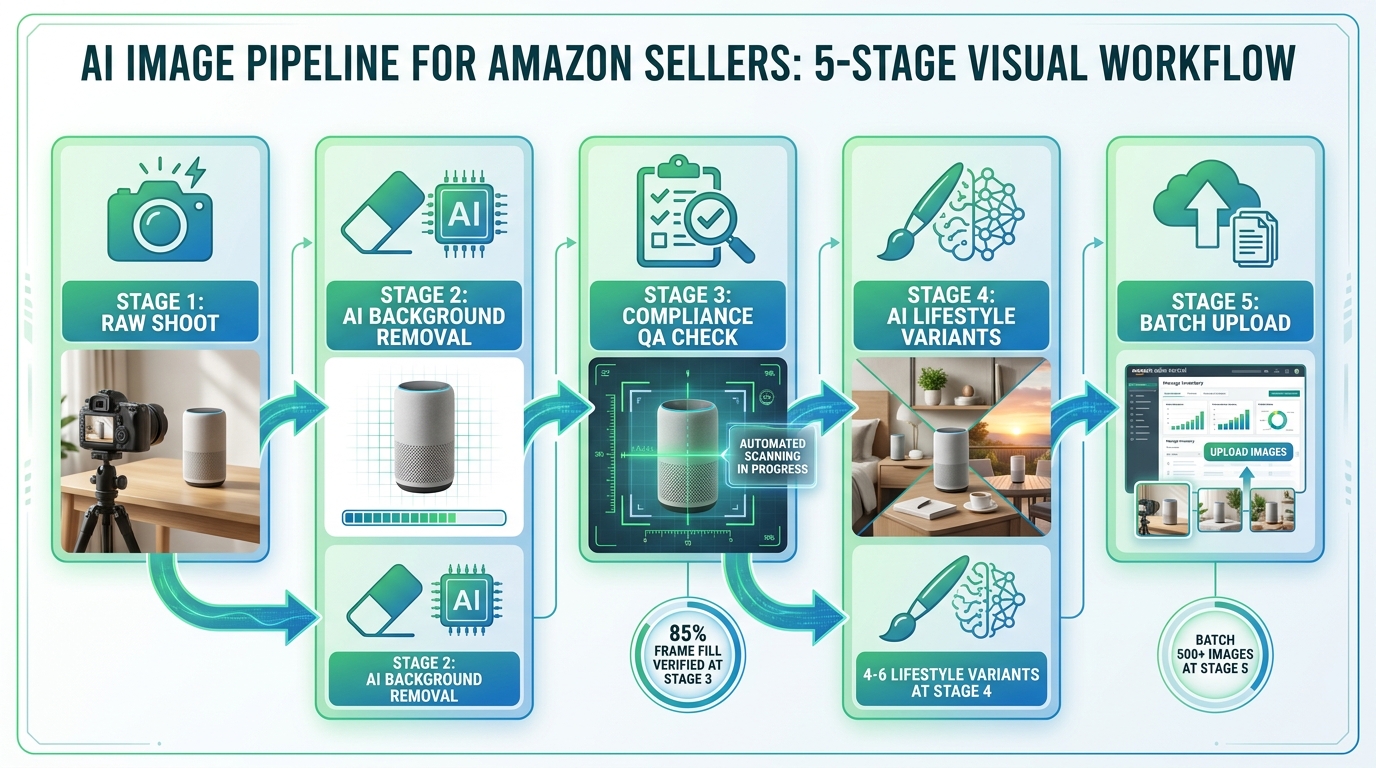
    Modern platforms like AlgoFuse.ai can analyze the main images of thousands of top-performing competitors for any given keyword. The AI pinpoints the specific patterns in composition, lighting, and angles that consistently correlate with higher clicks and sales. It then uses that data to generate new, optimized main images designed to perform well from day one.

    This data-driven method takes the guesswork out of the equation. Instead of hoping an image will perform, you can create one based on what is already proven to work in your specific category. It gives you a significant advantage, allowing you to produce high-CTR main images in minutes, without needing a designer. It’s a fast, affordable way to make sure your most critical visual asset is doing its job.

    Troubleshooting Common Image Rejection Issues

    Getting an image suppression notice from Amazon is a gut-punch for any seller. One minute your product is live and making sales, the next it’s completely invisible. This happens when Amazon's algorithm flags your main image for violating one of its strict product image rules.

    The good news is that this is almost always a straightforward fix. Most suppressions aren't due to some obscure, hidden rule; they're triggered by a handful of common and easily identifiable mistakes. Knowing what to look for is the key to getting your listing back online quickly.

    Identifying and Fixing the Rejection Cause

    While Amazon will usually notify you when a listing is suppressed, the reason they give can be frustratingly vague. Your best bet is to go straight to Seller Central, navigate to your inventory, and check the listing's status yourself to confirm the problem.

    Let's break down the usual suspects and how to handle them:

    • Non-Pure White Background: This is, without a doubt, the #1 reason for main image rejections. Your background must be pure digital white, which is RGB (255, 255, 255). Even a slightly off-white or light grey background will get flagged. Use a color picker tool in your photo editor to verify the RGB value. If it's not pure white (e.g., RGB 253, 253, 253), use a background removal tool to isolate your product and place it on a new, compliant background.
    • Text, Logos, or Badges: Your main image needs to be completely sterile—just the product, and nothing else. Any added text, brand logos, or promotional graphics ("Made in the USA," "New," etc.) will trigger an instant rejection. You'll need to edit your image to crop or remove these elements entirely.
    • Incorrect Image Size: For the zoom feature to work correctly, Amazon requires your image to be at least 1,000 pixels on its longest side. If it's smaller, your listing is at high risk of suppression. Simply resize the image in any editing software to meet this minimum. For the best customer experience, we always recommend aiming for 2,000 pixels or larger.

    Restoring Your Suppressed Listing

    Once you've corrected the image file on your computer, you're only halfway there. The fix doesn't count until you replace the old, non-compliant photo within Seller Central.

    The process is a simple one-two punch: first, edit the image to meet all of Amazon's main image requirements. Second, go to the "Manage Images" section for that specific product in your inventory and upload the corrected version.

    After you upload the new image, it goes into Amazon’s review queue. Approval can take anywhere from fifteen minutes to several hours. Once approved, your listing will be automatically reinstated and re-indexed, making it visible in search results and available for purchase again. Acting fast helps minimize your downtime and protects your sales velocity.

    Your Essential Main Image Compliance Checklist

    We've covered a lot of ground, from the nitty-gritty technical specs to the specific rules for different categories. Now, let's pull all that information together into a simple, actionable checklist you can use every single time you upload a product.

    Think of this as your final pre-flight check. Bookmark it, print it out, and make it a non-negotiable step for your team. A single "no" on this list is a red flag that could lead to a suppressed listing, so it’s worth the extra 60 seconds to get it right.

    Technical Specifications Checklist

    First up, the technicals. These are the foundational rules that ensure Amazon’s system accepts your file and that crucial features like the zoom function work correctly.

    • Is the image at least 1,000 pixels on its longest side? (Yes/No)
      • Why it matters: This is the absolute minimum for the zoom feature. We strongly recommend aiming for 2,000 pixels or more to give shoppers a crystal-clear, high-quality view.
    • Is the file format JPEG (.jpg), TIFF (.tif), PNG (.png), or GIF (.gif)? (Yes/No)
      • Why it matters: While all are accepted, JPEG is the gold standard here. It offers the best balance of image quality and a small file size, helping your page load faster for customers.
    • Is the file size under 10 MB? (Yes/No)
      • Why it matters: Huge files are page-speed killers. A slow-loading listing can frustrate shoppers and may even negatively impact your ranking in Amazon's A9 search algorithm.

    Content and Composition Rules Checklist

    Now for the part that trips up most sellers: what you can and can't show in the image. Getting these rules wrong is the fast track to a policy violation or rejection.

    Final Check: Just remember the golden rule: if it's not in the box your customer will receive, it can't be in your main image. This one simple test will help you avoid the most common content violations.

    • Is the background pure, clean white (RGB 255, 255, 255)? (Yes/No)
    • Does the product itself take up at least 85% of the entire image canvas? (Yes/No)
    • Is the image completely clean—no text, logos, badges, or watermarks of any kind? (Yes/No)
    • Are there any extra items or props in the photo that aren't included with the purchase? (Yes/No)
    • Is the image a real, professional photograph of the product (not a digital drawing or illustration)? (Yes/No)
    • If you sell in Clothing, Shoes, Jewelry, or another restricted category, have you double-checked and followed those specific main image rules? (Yes/No)

    Frequently Asked Questions About Amazon Main Images

    Even experienced sellers run into the same few questions about main images time and time again. Let's get you some clear, straightforward answers to the most common sticking points so you can stay compliant and focus on selling.

    Can My Main Image Show The Product Packaging?

    The short answer is almost always no. Your main image needs to be laser-focused on the product itself, exactly as a customer would receive and use it. Showing the box, wrapper, or any other packaging is one of the most common violations and a surefire way to get your image suppressed. Amazon considers it an extra prop.
    Of course, there are rare exceptions. If the packaging is a core part of the product's value—think a collectible toy in a mint-condition display box or a luxury gift set—then it's acceptable. But for 99% of products, show it out of the box.

    What Is The Fastest Way To Get A Pure White Background?

    Without a doubt, the quickest and most reliable method is using a dedicated background removal tool. Modern photo editors, from professional-grade software to simple web-based apps, often have a one-click "remove background" function that does the job instantly.

    Once the background is gone, you simply add a new layer behind your product and fill it with pure white. Make sure it's true white with an RGB value of (255, 255, 255). This completely removes any chance of having off-white tones or faint shadows that Amazon's automated system can, and will, flag.

    Key Insight: Don't risk trying to "paint" the background white by hand or hope your lighting is perfect. It rarely is. Automated tools guarantee you hit that perfect RGB (255, 255, 255), which is the single most important technical rule for avoiding rejection.

    How Can I Accurately Check The 85% Frame Fill Rule?

    The easiest way to check this is with a grid overlay in your photo editing software. Most programs let you lay a simple grid (a 10×10 grid works great) over your canvas. If your product is filling at least 85% of the frame, it should be touching or very close to the outer grid lines on most sides.

    Another quick trick is to just eyeball it. Imagine a 15% border around the entire image. Your product needs to fill up all the space inside that imaginary boundary. This check is crucial for making your product look as large and detailed as possible in search results, which directly helps your click-through rate.

    Does My Main Image Have To Be A Square?

    While it’s not a strict technical requirement, you should absolutely treat it as one. Amazon displays all main images in a square format. If you upload a rectangle, Amazon will automatically add white bars to the top and bottom or sides to force it into a square. This makes your product look smaller and less impressive.

    To get the most visual real estate, always build your main image on a square canvas (1:1 aspect ratio), such as 2000×2000 pixels. This guarantees your product fills the entire frame Amazon gives you, making it stand out against competitors who might have made the mistake of uploading a non-square image.


    Ready to stop guessing and start creating data-driven images that convert? With AlgoFuse.ai, you can generate a complete set of compliant, high-performing Amazon listing visuals in minutes. Our AI analyzes top competitors and applies proven best practices automatically, saving you time and money. Try AlgoFuse.ai for free and get your first listing created today.

  • How to win amazon buy box: 2026 Strategies to Boost Sales

    How to win amazon buy box: 2026 Strategies to Boost Sales

    If you're serious about growing your Amazon business, there's one goal that stands above all others: winning the Buy Box. With over 82% of all Amazon sales happening through that single button, it's the most direct path to more sales and better visibility.

    Let’s break down what it really takes to get there. It all boils down to excelling in three key areas: your fulfillment method, your landed price, and your overall seller performance.

    Understanding the Buy Box Algorithm

    Laptop displaying data charts, a notebook, pen, and a 'BUY BOX BASICS' sign on a wooden desk.

    The Amazon Buy Box, which Amazon now calls the "Featured Offer," is the holy grail for sellers. It's that prime real estate on a product page with the “Add to Cart” and “Buy Now” buttons. When a shopper clicks, the seller who currently "owns" the Buy Box gets the sale. Simple as that.

    For products with multiple sellers, Amazon’s algorithm doesn't just hand this spot to one person. It rotates the Buy Box among a select group of sellers who meet its demanding standards.

    Think of the algorithm as Amazon's ultimate customer satisfaction tool. Its only job is to give the buyer the best possible experience, and it constantly sifts through seller data to figure out who is most likely to provide that.

    First Things First: Getting Eligible for the Buy Box

    Before you can even compete for the Buy Box, you have to be invited to the game. Not every seller's offer is even considered. Amazon has a set of baseline requirements to weed out new or underperforming accounts.

    Here’s what you need to have in place:

    • A Professional Seller Account: This is non-negotiable. Individual seller accounts simply aren't eligible. You'll need the Professional plan, which runs $39.99 per month.
    • Sufficient Order Volume: Amazon is a bit cagey about the exact number, but you need a solid sales history. The algorithm needs data to analyze your performance, and a handful of orders just won't cut it.
    • Good Account Health: Your account needs to be in good standing. This means keeping your defect rates low and sticking to Amazon’s long list of policies.

    I've seen brand-new sellers get "Buy Box Eligible" status surprisingly fast by jumping straight into Fulfillment by Amazon (FBA). It’s a great way to build a positive track record right from the start.

    Pro Tip: You can quickly check your Buy Box eligibility for any product right in Seller Central. Just go to your "Manage Inventory" page, find the ASIN in question, and look at the "Buy Box Eligible" column. If you see a "Yes," you're officially in the running.

    The Three Pillars of Winning the Buy Box

    Once you're eligible, the real work begins. Amazon's algorithm zooms in on three main areas to decide who gets that coveted "Add to Cart" button. The exact formula is a closely guarded secret, but years of experience have shown these are the variables that move the needle most.

    Factor What It Means for You Why Amazon Cares
    Fulfillment Method How you get products to your customers. FBA and Seller Fulfilled Prime (SFP) get a massive advantage over standard Fulfillment by Merchant (FBM). Amazon trusts its own logistics network (FBA) to provide the fast, reliable shipping that Prime members expect. It's all about customer trust.
    Landed Price The total price the customer pays. This is your item price plus shipping. The algorithm wants to feature a competitive price. It doesn't always have to be the absolute lowest, but it needs to be in the ballpark.
    Seller Performance Your stats on the Account Health dashboard. Think Order Defect Rate, Late Shipment Rate, and customer feedback score. Strong metrics are proof that you're a reliable seller who follows through. This means fewer headaches and support tickets for Amazon.

    Nailing these three elements is the core of any winning Buy Box strategy. A rock-bottom price can't make up for slow shipping, and even the power of FBA can be undermined by an uncompetitive price. The sellers who consistently win are the ones who find a way to excel across all three pillars.

    Mastering Your Pricing Strategy

    A desk with 'SMART PRICING' text, a calculator, a phone, and blank price tags.

    Let's get one thing straight about winning the Buy Box: a competitive price is table stakes, but it’s absolutely not a race to the bottom. I've seen countless sellers destroy their profit margins by blindly slashing prices, thinking the lowest price automatically wins. It doesn't. The real key is to price smarter, not just lower.

    Amazon's algorithm is sophisticated. It doesn't just see your item price; it sees what the customer actually pays. This is the Landed Price—your item price plus any shipping costs. That's the only number that truly matters in its calculation.

    For example, an FBA seller with a product at $24.99 (with free Prime shipping) will almost always beat an FBM seller offering the same item for $19.99 plus $5.00 shipping. The landed price is identical, but the FBA fulfillment advantage gives the first seller a massive edge. Your pricing strategy has to be completely intertwined with your fulfillment choice and your seller metrics.

    Amazon's algorithm rewards the best overall value, not just the lowest price. A seller with superior performance metrics and FBA fulfillment can often win the Buy Box even when their price is slightly higher than a competitor's.

    Automating Your Pricing with Repricers

    If you're managing more than a few SKUs, trying to adjust prices manually is a losing battle. The market moves too fast. This is where automated repricing tools become non-negotiable. They are your 24/7 pricing analyst, monitoring competitors and adjusting your prices based on rules you set to capture the Buy Box at the highest possible profit.

    You’ll generally encounter two kinds of repricers:

    • Rule-Based Repricers: These are the workhorses. You set up direct "if-then" commands. A classic rule is: "If the Buy Box winner is an FBA seller, price my FBA offer $0.01 below them."
    • Algorithmic Repricers: These are the brains of the operation. They use machine learning to look beyond simple rules, analyzing competitor metrics, time of day, your performance stats, and more to make incredibly nuanced pricing moves.

    Both Amazon's own tool and third-party software can get the job done, but they're built for different stages of a seller's journey.

    Amazon Automate Pricing vs. Third-Party Software

    For anyone just starting out, Amazon's built-in Automate Pricing tool is a solid first step. It’s free with a Professional account and lives right inside Seller Central. You can create basic rules to match the Buy Box, beat it by a set amount, or price above other sellers.

    But as you scale, you’ll quickly hit its ceiling. It’s slower and just doesn't have the sophisticated rule options that specialized software provides.

    Feature Amazon Automate Pricing Third-Party Repricer
    Cost Free with Professional Account Monthly Subscription Fee
    Speed Slower (updates every 5-15 mins) Faster (near real-time updates)
    Rule Complexity Basic (match, beat, stay above) Highly advanced and customizable
    Competitor Analysis Limited to price and fulfillment type Analyzes competitor feedback, stock, etc.

    This is where third-party repricers, like those offered by AlgoFuse.ai's partners, really shine. Their main advantage is speed and intelligence. Reacting to a price change in seconds versus 15 minutes can be the difference between winning hundreds of Buy Box rotations or none at all.

    Configuring Your Repricer for Maximum Profit

    A repricer is only as smart as the rules you give it. The most critical step is setting a minimum and maximum price for every single product. Your minimum price is your absolute floor—your break-even cost plus your minimum acceptable profit. Never, ever set it lower. This is your safety net.
    Let's look at how this plays out in two real-world scenarios:

    1. High-Volume Consumable (e.g., Coffee Pods): Competition is brutal here. An aggressive strategy works best. Your rule might be: "Undercut the lowest FBA offer by $0.01, but never go below my floor price of $18.50. If no FBA offers exist, match the current Buy Box price." The goal is pure volume.

    2. Niche, High-Margin Item (e.g., Specialty Camera Lens): Here, you want to protect your margin, not give it away. A smarter rule would be: "If another FBA seller has the Buy Box, price $0.50 above them. When they sell out, I'll capture the next sale at a higher price. If I win the Buy Box, immediately reprice toward my maximum of $499." This is a profit-maximizing "price-up" strategy.

    By tailoring your rules to the product and the competition, you move beyond simple price-cutting. You start conducting a sophisticated pricing strategy that protects your margins and dramatically boosts your Buy Box win rate.

    Choosing the Right Fulfillment Method

    FBA Advantage warehouse with a white delivery van and stacked cardboard boxes, representing efficient shipping.

    While everyone obsesses over pricing, your fulfillment method is arguably the most powerful weapon in your Buy Box arsenal. How you get products into a customer’s hands sends a direct signal to Amazon’s algorithm about your reliability and speed. The choice between Fulfillment by Amazon (FBA), Seller Fulfilled Prime (SFP), and Fulfillment by Merchant (FBM) isn't just about logistics—it's a core strategic decision that can make or break your Buy Box eligibility.

    This choice is so critical because Amazon’s algorithm is built to protect its Prime promise. Winning the Amazon Buy Box is a huge deal, driving an estimated 82% of all sales on desktop. The data is clear: studies show that FBA sellers win the Buy Box an incredible 75-85% of the time. FBA automatically gives you Prime eligibility and perfect shipping performance, checking two of the algorithm's most important boxes right out of the gate.

    To help you visualize how these methods stack up, here’s a quick comparison of their impact on your Buy Box potential.

    Fulfillment Method Impact on Buy Box Wins

    Fulfillment Method Typical Buy Box Win Rate Key Advantage Primary Challenge
    Fulfillment by Amazon (FBA) Very High (75-85%+) Automatic Prime eligibility and perfect shipping metrics. Inventory costs, loss of control, and potential fees.
    Seller Fulfilled Prime (SFP) High Prime badge while maintaining control over your inventory. Incredibly strict performance metrics and high operational costs.
    Fulfillment by Merchant (FBM) Low to Moderate Full control over inventory, branding, and fulfillment. Competing against the speed and trust of Prime offers.

    As you can see, the path you choose for fulfillment directly correlates with how often you can expect to appear in the Buy Box. Let's break down what each of these really means for your business.

    The Undeniable Power of FBA

    If your main goal is to maximize your Buy Box share, Fulfillment by Amazon (FBA) is the most direct path. You ship your inventory to Amazon's warehouses, and they take over everything else—storage, picking, packing, shipping, customer service, and even returns.

    From the algorithm's point of view, an FBA offer is as good as gold. Amazon trusts its own logistics network implicitly.

    • Automatic Prime Eligibility: Your listings get the coveted Prime badge, making them instantly more attractive to millions of loyal Prime members who filter for it.

    • Perfect Shipping Metrics: With FBA, your shipping performance is flawless because Amazon is managing it. Late Shipment Rate, Valid Tracking Rate—these are no longer your problem.
    • Customer Trust: Shoppers see the Prime badge and know their order will arrive fast. This trust often makes them willing to pay a little more for an FBA item over a slightly cheaper FBM one.
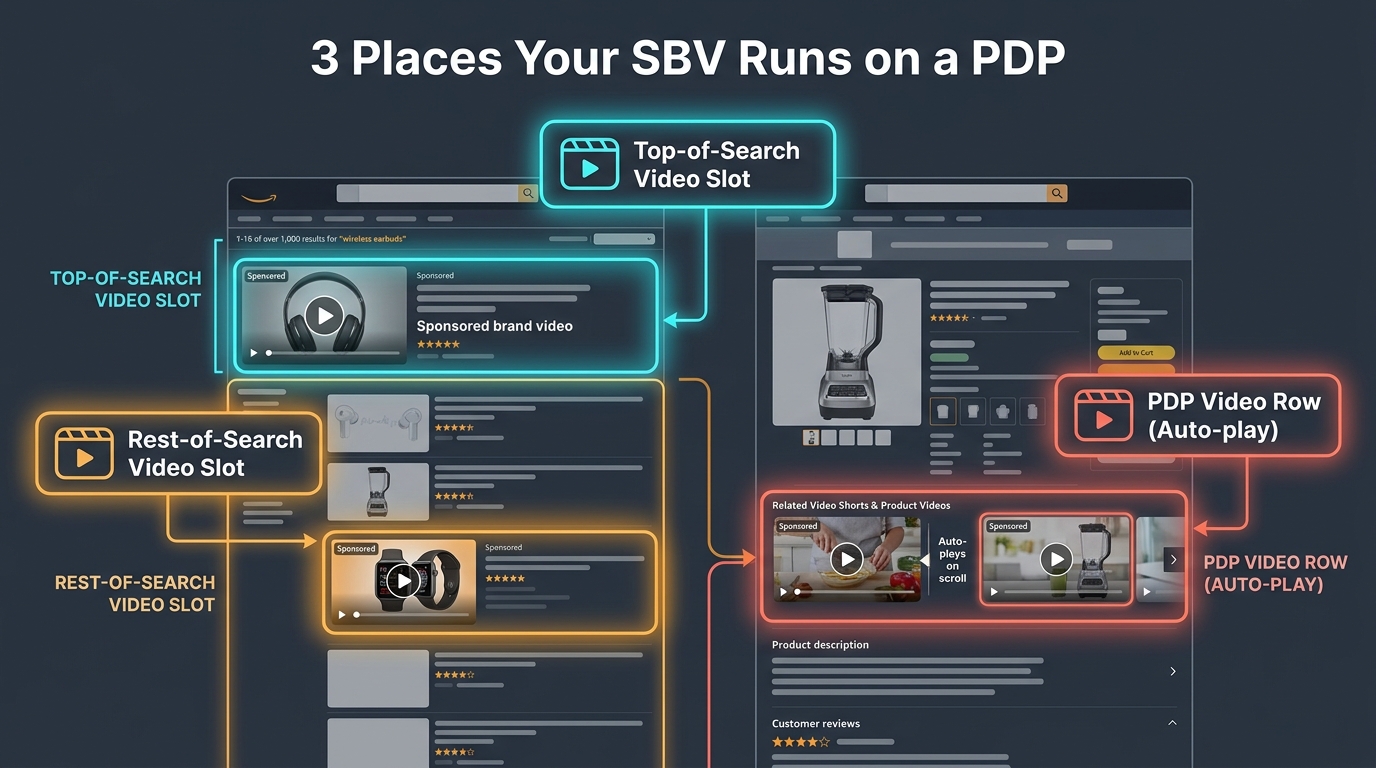
    This trifecta gives FBA sellers a massive, built-in advantage. The algorithm is designed to prioritize the best possible customer experience, and in Amazon's eyes, FBA is the gold standard.

    Seller Fulfilled Prime: The Best of Both Worlds?

    Seller Fulfilled Prime (SFP) presents an interesting middle ground. It allows you to get the Prime badge on your listings while fulfilling orders from your own warehouse. It sounds perfect, but be warned: it comes with incredibly demanding performance standards. Amazon essentially expects you to operate at an FBA level, which is a very high bar.

    To get in and stay in the SFP program, you have to prove you can deliver, day in and day out.

    • Nationwide Two-Day Delivery: You must be able to offer free two-day shipping to Prime members across the country, no exceptions.
    • Weekend Operations: SFP requires weekend shipping and processing to meet those tight delivery windows. The "it's Saturday" excuse doesn't fly.
    • Stellar Performance: Your metrics have to be near-perfect. That means an on-time shipment rate above 99% and a cancellation rate below 0.5%.

    SFP is really for established sellers who already have rock-solid, in-house logistics. If you’re just starting out, this probably isn’t for you.

    The key takeaway here is that Amazon's algorithm treats a qualified SFP offer almost identically to an FBA offer. If you have the operational chops to meet SFP's strict requirements, you can compete directly with FBA sellers for the Buy Box without handing your inventory over.

    Competing as a Fulfillment by Merchant (FBM) Seller

    With Fulfillment by Merchant (FBM), you're in the driver's seat for everything—storage, packing, and shipping. While this gives you total control, it puts you at a clear disadvantage in the Buy Box fight.

    To have a real shot as an FBM seller, you can't just be good; you have to be flawless. The algorithm is constantly comparing your shipping speed, handling time, and performance metrics against the benchmark set by FBA.

    Your FBM playbook has to include:

    • Fast Handling Times: Aim for same-day or, at most, one-day handling. Any delay gives Prime offers a huge head start.
    • Expedited Shipping Options: Don't just offer free economy shipping with a 7-day delivery window. That won't win you any points. You need to provide fast and affordable shipping options.
    • Pristine Metrics: Your Late Shipment Rate, Valid Tracking Rate, and Order Defect Rate must be perfect. Any slip-up, and you’re pushed to the back of the line.

    Winning the Buy Box with FBM is tough, but it’s not impossible. It's most feasible when you have a major price advantage or if you're the only seller on a listing. On highly competitive listings, however, you're fighting a steep uphill battle against the speed and trust that comes with every Prime offer.

    Perfecting Your Seller Performance Metrics

    Ever wonder why your perfectly priced product suddenly lost the Buy Box? More often than not, the answer is hiding in your seller performance metrics. Think of it this way: Amazon’s entire business is built on customer trust. Your metrics are how it gauges whether you’re upholding that trust.

    A great price and fast shipping might get your foot in the door, but a poor performance score will get you shown the exit. If your account health slips, Amazon will pull your offers from the Buy Box, no matter how low you price your items. Maintaining a clean dashboard isn't just a "best practice"—it’s your license to compete.

    Decoding the Order Defect Rate (ODR)

    The metric that Amazon watches like a hawk is the Order Defect Rate (ODR). This single number is a snapshot of your customer service quality over a rolling 60-day period.

    It’s calculated from three core problems:

    • A-to-z Guarantee Claims: This happens when a customer has a serious problem and asks Amazon to step in.
    • Negative Feedback: Any one- or two-star ratings from buyers.
    • Credit Card Chargebacks: A customer disputes a charge directly with their credit card company.

    Your mission is crystal clear: you absolutely must keep your ODR below 1%. If it creeps any higher, you’re not just risking the Buy Box; you’re putting your entire account at risk of suspension.

    The best defense here is a good offense. Don't let a customer issue escalate into a claim. Answer every single buyer message within 24 hours (yes, even on weekends) and be willing to solve problems quickly. Eating the cost of a small refund or a replacement product is a tiny price to pay compared to the sales you'll lose from a high ODR.

    Critical Shipping Performance Metrics

    For anyone fulfilling orders themselves (FBM), your shipping game is under intense scrutiny. The algorithm needs to see that when you promise a delivery date, you actually hit it. If you’re using FBA, Amazon takes care of all this for you, essentially giving you a perfect score right out of the gate. But if you’re an FBM seller, these numbers are all on you.

    Late Shipment Rate (LSR)
    This tracks how many of your orders are confirmed as shipped after the expected ship-by date. Amazon demands that your LSR stay below 4%. The easiest way to manage this is to be realistic with your handling times. If it takes you two days to get an order out the door, don't promise one-day handling. It’s always better to under-promise and over-deliver.

    Pre-fulfillment Cancel Rate (PCR)
    This is the percentage of orders you cancel before you even ship them, which is almost always because you ran out of stock. Your target here is to keep your PCR under 2.5%. A high cancellation rate screams "unreliable" to Amazon, and it's a direct result of sloppy inventory management.

    Valid Tracking Rate (VTR)
    Amazon wants proof of shipment. This metric measures the percentage of your orders that have a legitimate tracking number from a carrier Amazon recognizes. For FBM sellers, your VTR needs to be above 95%. This is non-negotiable. Always use carriers that integrate with Amazon’s system and make sure you upload those tracking numbers correctly and on time.

    Your seller performance metrics are the silent gatekeepers of the Buy Box. A few negative reviews or A-to-z claims can sideline your offers for weeks. To stay competitive, you must maintain an Order Defect Rate under 1%, a Late Shipment Rate below 4%, and a Valid Tracking Rate above 95%. Discover more insights about how these metrics influence your Buy Box share on jordiob.com.

    Using FBA to Outsource Performance Metrics

    Frankly, the easiest way to guarantee perfect scores on your shipping and service metrics is to let Amazon do the work for you with Fulfillment by Amazon (FBA). When you send your inventory to an Amazon warehouse, you're handing off these critical operational tasks to their world-class logistics network.

    Here's exactly what FBA takes off your plate:

    • Shipping Performance: Your Late Shipment Rate and Valid Tracking Rate are no longer your problem. Amazon is a master of logistics, so you automatically get top marks.
    • Customer Service: Amazon’s team handles all customer questions and returns for your FBA orders, dramatically cutting your risk of negative feedback related to shipping or delivery.
    • Feedback Removal: If a customer leaves you negative feedback for an FBA order that's entirely about fulfillment (like "the box was crushed"), Amazon will often strike through the feedback so it doesn't impact your ODR.

    For new sellers, FBA is a fantastic way to build a positive reputation while you're still learning the platform. For seasoned pros, it’s a strategic move to ensure your most important products have flawless metrics, giving you the best possible shot at owning the Buy Box.

    You can have the best price in the world and perfect seller metrics, but if you run out of stock, you’re invisible. It’s that simple. On Amazon, you can’t win the Buy Box if you have nothing to sell.

    This is a brutal, non-negotiable truth of the platform. Amazon’s algorithm is built to give customers what they want, right now. A stockout is a massive red flag, telling Amazon you can't be relied on to meet that demand. It doesn't just lose you a sale; it kills your momentum and can even hurt your product's search ranking long after you’ve restocked.

    The True Cost of a Stockout

    When your inventory hits zero, you instantly lose Buy Box eligibility. Gone. If other sellers are on the listing, the algorithm just moves on to the next best option without skipping a beat. If you're the only seller, the Buy Box might get suppressed entirely, forcing a shopper to click through extra steps just to see if or when your product will be back. Most won't bother.

    This sudden stop in sales velocity does lasting damage. It signals to Amazon that customer interest has dropped, which can send your product sliding down the search results page. Getting that momentum back is an uphill battle, making a preventable stockout a very expensive mistake.

    A stockout is a direct hit to your Buy Box momentum. The moment your inventory hits zero, you are completely removed from consideration. Reclaiming your spot after restocking isn't guaranteed and requires you to rebuild your sales velocity against competitors who remained available.

    Forecasting Demand and Managing Reorder Points

    The only way to avoid this is to get proactive with your inventory. Stop reacting to low-stock alerts and start building a system that anticipates your needs. This means forecasting your demand and setting clear reorder points.

    Getting a Handle on Your Sales Velocity
    First, dig into your historical sales data. Look at your sales over the last 30, 60, and 90 days to spot trends. But don't forget to factor in seasonality—it's a real thing. A best-selling Christmas ornament is dead weight in March, and a pool float isn't going to move much in November. Your forecast has to account for these predictable peaks and valleys.

    Setting Smart Reorder Points
    Your reorder point is the inventory level that tells you, "It's time to order more stock now." The formula is simple, but it’s one of the most powerful tools in your arsenal:

    Reorder Point = (Average Daily Sales x Lead Time in Days) + Safety Stock

    Let’s break that down with a real-world example:

    • Lead Time: This isn't just shipping time. It's the entire process from the moment you place an order with your supplier until those units are checked in and ready for sale at an FBA warehouse. You have to be brutally realistic and include production, freight, customs, and Amazon's own receiving time.
    • Safety Stock: Think of this as your buffer for when things go wrong—and they will. A supplier delay, a customs hold, or a sudden spike in sales can wipe you out. A good rule of thumb is to keep a safety stock equal to 30% of your lead time demand.

    So, if you sell an average of 10 units a day and your total lead time is 45 days, your calculation would be: (10 units x 45 days) + (135 units for safety stock) = 585 units. The second your inventory hits 585, you place your next order. No hesitation.

    Why Delivery Speed Is Non-Negotiable

    Having products in stock is step one. How fast you can get them to the customer is just as critical in the Buy Box battle. Amazon has invested billions to train us all to expect fast, free shipping, and its algorithm rewards sellers who deliver on that promise.

    This is precisely why FBA and Seller Fulfilled Prime (SFP) offers have such a baked-in advantage. Their speed and reliability are a given.

    If you’re a Fulfilled by Merchant (FBM) seller, this is where you have to shine. Speed is your primary weapon. Here’s how you can compete:

    • Set Handling Time to 1 Day or Less: The clock starts ticking the second an order comes in. You absolutely must aim to ship orders the same day. Anything over a 24-hour handling time is a major handicap.
    • Offer Expedited Shipping Options: Don’t just offer a slow, free shipping option. Give customers the choice to upgrade to two-day or even next-day delivery. Even if few people choose it, just having the option available sends a positive signal to the algorithm.
    • Use Regional Shipping Templates: Get smart with your shipping settings in Seller Central. You can create templates that offer faster and cheaper shipping to customers who live closer to your warehouse. This is a brilliant way to win the Buy Box in specific geographic areas where you can actually deliver faster than a national FBA offer.

    At the end of the day, your inventory and shipping aren't just backend logistics. They are core, customer-facing parts of your Buy Box strategy. By consistently keeping products in stock and delivering them quickly, you prove to Amazon that you provide the exact experience it wants for its customers.

    Your Buy Box Monitoring and Troubleshooting Routine

    Here’s a hard truth about selling on Amazon: winning the Buy Box isn't a "set it and forget it" achievement. It's a constant battle. The landscape can shift overnight, and a strategy that worked yesterday might be obsolete today. To protect your sales, you need a daily routine for monitoring your status and quickly troubleshooting any problems that knock you out of that top spot.

    Don't wait for your sales to nosedive before you start digging for answers. The first thing you should do every single morning is check your Buy Box win percentage in Seller Central. You can find this key metric under the "Pricing" tab on your Pricing Dashboard. Think of it as your early warning system. If that number suddenly dips, it’s a red flag telling you it's time to investigate.

    Diagnosing a Sudden Buy Box Drop

    When you see that win percentage drop, the key is not to panic—it's to diagnose. You have to put on your detective hat and run through a mental checklist of the usual suspects. Nine times out of ten, the answer is in one of these areas.

    Here’s the troubleshooting flow I run through whenever this happens:

    • New Competition: Is there a new seller on the listing? This is the most common culprit, especially if they are using FBA or have come in at a much lower price point. A new player can change the entire dynamic in an instant.
    • Price Wars: Did a competitor just undercut you? Or, maybe your own repricer made a move you didn't anticipate. Check the pricing history for that ASIN to see who changed what and when.
    • Performance Slips: Head straight to your Account Health dashboard. Did your Order Defect Rate (ODR) creep above 1%? Have a few recent shipments pushed up your Late Shipment Rate (LSR)? Even a small dip in your seller metrics can make you less appealing to Amazon's algorithm.
    • Inventory Check: This one sounds almost too simple, but it happens all the time. Are you actually in stock? A stockout is an automatic disqualification from the Buy Box.

    By methodically checking these four things, you can stop guessing and pinpoint the real reason you lost your position. This is far more effective than just blindly dropping your price.

    The Hidden Power of Your Listing Visuals

    While your price and seller metrics are the heavy hitters, there’s another factor that many sellers completely overlook: the quality of your product listing's visuals. Great images, well-designed infographics, and compelling A+ Content do more than just make your page look professional; they have a direct and measurable impact on your conversion rate.

    A higher conversion rate means more sales from the same amount of traffic. This creates a powerful feedback loop. To Amazon's algorithm, high sales velocity is a huge signal that customers prefer your offer. If you and a competitor are perfectly matched on price, fulfillment, and metrics, the seller with the higher sales volume will almost always get a bigger piece of the Buy Box pie.

    In short, great visuals act as a tie-breaker.

    This decision tree gives you a simplified view of the path to winning the Buy Box, focusing on the absolute non-negotiables: stock availability and shipping speed.

    Flowchart illustrating paths to win the buy box, considering stock, shipping speed, and potential loss.

    As the chart shows, if you don't have the product ready to ship quickly, you're not even in the game.

    Let’s say you’re selling a premium kitchen gadget. A competitor enters the listing, matching your price and also using FBA. On paper, you're equals. But your listing has an infographic comparing your model's features to others, plus a lifestyle video showing it in action. Those visuals help customers make a purchase decision faster, which boosts your conversion rate and overall sales. That extra velocity gives you the edge the algorithm is looking for.

    Remember, the Buy Box algorithm is ultimately designed to create the best possible experience for the customer. A listing that converts better is, by definition, giving customers what they want. Investing in top-notch visuals is a direct investment in your sales velocity and, by extension, your Buy Box dominance.

    This daily routine—monitoring, diagnosing, and constantly optimizing everything from your metrics to your images—is what separates the pros from the amateurs. It gives you the power to react quickly to threats and proactively defend the most valuable piece of real estate on Amazon.


    Are your listing images hurting your conversion rate and holding you back from winning the Buy Box? With AlgoFuse.ai, you can generate a complete set of data-driven, high-converting listing visuals in minutes. Stop guessing and start creating images that sell. Get your first listing for free at AlgoFuse.ai.

  • How to Launch a Product on Amazon in 2026

    How to Launch a Product on Amazon in 2026

    The success of your Amazon product launch all comes down to what happens in the first 30-45 days. This is what we in the business call the "honeymoon period." It's your one big shot to show the Amazon algorithm that you've got a winner on your hands by racking up consistent, early sales.

    A proper launch isn't about crossing your fingers and hoping for the best. It’s a calculated, data-backed campaign.

    Your Amazon Launch Blueprint for 2026

    Modern desk with a laptop showing business data, phone, sticky notes, and a notebook. 'LAUNCH BLUEPRINT' text.

    The game has completely changed. You can't just throw a listing up and expect sales to roll in. From the second your product goes live, you’re in a race against the algorithm. Your single most important goal is to impress Amazon's A10 algorithm during that initial launch window.

    Think of it as a trial run where Amazon gives your new product a temporary boost in visibility. It’s up to you to capitalize on that by generating sales velocity. That momentum signals to the algorithm that shoppers are interested, which is exactly what you need to lock in better organic search rankings for the long haul.

    To keep things organized, I like to break the launch process down into four distinct phases. Each one has a clear purpose and helps you focus your efforts where they matter most.

    The Four Phases of a Successful Amazon Product Launch

    Phase Primary Focus Key Objective
    Phase 1: Pre-Launch Listing & Asset Creation Build a fully optimized, conversion-ready product detail page.
    Phase 2: Launch Initial Sales Velocity Drive aggressive early sales through PPC and promotions to impress the A10 algorithm.
    Phase 3: Rank Keyword Targeting Achieve Page 1 ranking for your most important, high-volume keywords.
    Phase 4: Optimization Profitability & Scaling Refine PPC, improve conversion rates, and manage inventory for long-term growth.

    Following this phased approach turns a chaotic process into a manageable set of steps, guiding you from preparation all the way to profitability.

    Key Metrics for a Strong Launch

    During this critical period, a few numbers really matter. You should be aiming for at least 10 sales per day. That’s the benchmark I've seen time and again that proves to Amazon your product has market demand and deserves a spot on the first page.

    Another number to watch is your Advertising Cost of Sale (ACoS). Don't panic if it's high at first—I'm talking 60% or even higher during that first month. This isn't a loss; it's a strategic investment. That aggressive ad spend is the fuel you need to get the initial sales that drive your ranking.

    Understanding the Financial Realities

    The Amazon marketplace is a beast, with an incredible 7,800 items sold every single minute. A well-funded launch is what helps you cut through the noise. New products that consistently hit those 10 daily sales during the honeymoon period are rewarded with better organic search positions.

    Sellers who embrace that high 60% ACoS strategy often see a huge payoff. They can start scaling back their ad spend as conversion rates climb to 8-12% for new products, eventually stabilizing at 15% or more once they're established.

    The biggest mistake I see new sellers make is being too timid with their launch budget. A high initial ACoS is the fuel for your ranking engine. If you starve the engine, you’ll never leave the starting line.

    This initial investment in ads is non-negotiable for gathering data and driving traffic. As your organic rank climbs, your dependency on PPC will drop, and your profit margins will thank you. The trick is having the budget—and the nerve—to see it through.

    This guide is your playbook for a methodical, data-driven launch. We'll cover everything from getting your finances in order to post-launch tweaking. A huge piece of this puzzle is creating killer visuals, a process that AI tools like those from AlgoFuse have made incredibly fast and affordable.

    Building Your Pre-Launch Financial and Logistical Foundation

    This is the unglamorous, behind-the-scenes work that so many new sellers skip—and it’s precisely why they fail. Before you get excited about inventory and advertising, you need to build a solid plan for your money and your supply chain. This is all about playing defense to make sure your product isn't just a cool idea, but a genuinely profitable business from day one.

    Forget a quick peek at the competition. We're talking about a full-on forensic analysis of the top players to understand the battlefield you’re about to step onto. This is non-negotiable if you want to learn how to launch a product on Amazon the right way.

    Deconstructing the Top Competitors

    First, nail down your top 3-5 most important keywords. For each one, pull up the first page of Amazon's search results and look at the top 10-20 products. Your job is to dissect their entire operation, not just glance at their price tag.

    Get methodical with this. I recommend building a simple spreadsheet to track what you find. For every key competitor, you'll want to log:

    • Price Point: What are they actually selling for? Look for active coupons or promotions that affect the real price.
    • Review Count & Rating: A high review count tells you the market is mature and competitive. Note their average star rating, too.
    • Listing Quality: Read their title, bullets, and A+ Content like a customer. What promises are they making? What pain points are they solving?
    • Image Stack: Go through their images one by one. Are they using slick infographics, lifestyle photos showing the product in use, or charts comparing their product to others?

    This exercise gives you a clear blueprint of what works in your niche. You’ll start seeing the gaps they've missed and, just as importantly, the minimum standard of quality you absolutely have to beat.

    Calculating Your True Profit Margin

    Guessing your profitability is a recipe for disaster. For a new product, you should be aiming for a healthy net profit margin between 25-40% after every single cost is paid. Calculating this means getting brutally honest about all your expenses.

    Launching on Amazon isn't just about going live—it's a high-stakes race where an estimated 60-70% of new products fail within the first year, often due to skipping this exact type of competitive analysis. Winners preempt this by dissecting rivals' listings pre-launch, targeting net profit margins of 25-40% post-FBA fees, COGS, and ads—even accepting slimmer margins initially as rank-building investments. You can explore more data on Amazon's competitive environment and learn how strategic planning makes all the difference.

    To get a real number, your math has to include:

    1. Cost of Goods Sold (COGS): This is the per-unit cost you pay your supplier.
    2. Shipping & Duties: What it costs to get your inventory from the factory floor to an Amazon warehouse.
    3. FBA Fees: This covers Amazon’s referral fee (usually 15%), fulfillment fees (for picking and packing), and monthly storage costs.
    4. Initial Ad Spend: You need to budget for an aggressive launch. Your Advertising Cost of Sale (ACoS) will be high at first, cutting into profits, but it’s a necessary investment to gain momentum.

    A fantastic tool for this is Amazon’s own FBA Revenue Calculator. Just plug in a competitor’s ASIN and your estimated costs to get a realistic picture of your potential net profit. If the numbers don't look good here, don't move forward.

    Sourcing and Logistics: A Primer

    Once you’ve confirmed the product is viable on paper, it's time to find a supplier you can trust. Platforms like Alibaba are the go-to starting point, but the real key is doing your homework. You must order samples from at least three different suppliers to feel the quality for yourself.

    When you’re ready for your first real order, remember that everything is negotiable. You might not get a huge price break on a small test order, but you can often negotiate better payment terms. A common arrangement is 30% upfront and the remaining 70% after production is complete and inspected.

    For that first shipment, seriously consider hiring a freight forwarder. They are experts who manage the entire complicated journey from the factory to Amazon's fulfillment center, handling all the customs paperwork and logistics. For a first-timer, this service is worth its weight in gold, helping you avoid rookie mistakes that can cause costly delays and sink your launch before it even starts.

    Crafting a Listing That Turns Shoppers Into Buyers

    Alright, you've sorted out the numbers and the shipping. Now for the fun part: building your digital storefront. Your Amazon product detail page is where all your hard work pays off. This is where you turn that hard-won traffic into actual sales. A mediocre listing can sink a fantastic product, but a truly great one can propel a good product straight to the bestseller list.

    This is where you blend persuasive salesmanship with the science of Amazon's A9 algorithm. Every single piece of your listing, from the first word of your title to your very last image, has to work in harmony. They need to tell a compelling story, answer every question a shopper might have (even the ones they haven't thought of yet), and build a foundation of trust. Nailing this part is non-negotiable for a successful launch.

    Optimizing Your Title for Clicks and Conversions

    Your product title is, without a doubt, the most critical piece of copy on your entire listing. It's the first thing shoppers see in the search results, and it carries enormous weight with Amazon’s search algorithm.

    A killer title does two jobs at once: it weaves in your most important keywords and it screams the product's main benefit. I always start with the brand name, then the core keyword phrase, and follow it up with the top 2-3 details a customer needs to know right away.

    • Example for a yoga mat: "ZenFlow Extra-Thick Yoga Mat for Women and Men – 72-Inch Non-Slip TPE Material with Carrying Strap – Ideal for Hot Yoga, Pilates, and Floor Exercises"

    See how that works? It's packed with relevant keywords but doesn't sound like a robot wrote it. It instantly tells the shopper what it is (yoga mat), who it's for, its best features (extra-thick, non-slip), and what it’s used for.

    Writing Bullet Points That Sell Solutions, Not Just Features

    Think of your five bullet points as your quick-and-dirty sales pitch. This is your chance to stop listing features and start selling benefits. Nobody buys a drill bit because they want a drill bit; they buy it because they need a hole. Use this space to get ahead of objections and paint a vivid picture of how your product will make their life better.

    Here’s a simple structure I always follow:

    1. Lead with a capitalized, benefit-focused headline.
    2. Then, explain the feature that delivers on that benefit.
    3. Sprinkle in secondary keywords naturally as you write.

    For example, don't just say "Durable Material." That’s boring. Try something like this: "ALL-DAY COMFORT & DURABILITY: Made from a proprietary woven fabric that resists tearing and stays breathable, so you can wear it from your morning commute to your evening workout without irritation." This approach tackles a customer's unspoken concerns about comfort and longevity head-on.

    The Power of Backend Search Terms

    Backend search terms are your secret weapon. These are keywords you plug into the backend of Seller Central, completely invisible to shoppers. This is the perfect spot for all the keywords that didn't quite fit in your title or bullet points.

    Get creative here. Think of synonyms, common misspellings, and even foreign language terms. If you're selling a "garlic press," you should add terms like "garlic mincer," "ajo triturador," and even the common typo "garlick press" into your backend fields. It's a simple way to cast a wider net without cluttering up your actual listing.

    Your images aren't just pictures; they're your most effective salesperson. A study found that 75% of online shoppers rely on product photos to make a buying decision. If your images aren't doing the heavy lifting, you are absolutely leaving money on the table.

    Your Visual Strategy: The Image Stack

    While your text gets the algorithm's attention, your images are what sell to people. A well-planned "image stack" should guide a customer from casual interest to a confident purchase. Your main image has one job and one job only: to be clean, clear, and stop the scroll. It absolutely must be on a pure white background and feature only the product.

    The rest of your images need to tell a story:

    • Lifestyle Images: Show your product in action, being used by your ideal customer in a real-life scenario.
    • Infographics: Use slick text overlays to call out key features, dimensions, or technical specs.
    • Comparison Charts: Visually prove why your product is a better choice than the competition.
    • "What's in the Box" Image: Show everything the customer gets. This helps manage expectations and reduces returns.

    Putting together a full set of high-quality images used to mean hiring expensive photographers and designers. Frankly, it was a huge pain. Now, AI-powered tools like AlgoFuse.ai have flipped the script. You can analyze what's working for your top competitors and then generate an entire agency-quality image stack—from the main image to detailed infographics—in minutes. This is a massive shortcut for any seller, saving you thousands of dollars and weeks of waiting.

    Boosting Conversions with A+ Content

    Finally, if you're brand-registered, A+ Content is a must. This is the space below the fold where you can break free from the standard layout and create a beautiful, magazine-style experience. Use it to tell your brand story, cross-promote other products, and use big, impactful images.

    Listings with A+ Content regularly see a conversion rate bump of 5-10%. It’s a crucial tool for convincing shoppers on the fence that you're the right choice.

    Your Launch Week: It’s All About Driving Early Sales Velocity

    All the prep work—the research, the sourcing, the listing creation—has all been leading up to this. Your launch week is go-time, and your single most important mission is to generate as much sales velocity as you possibly can.

    This initial blast of sales is a huge signal to Amazon’s A10 algorithm. It tells the system your product is relevant and that shoppers want it. What you do in these first 7-30 days doesn't just get you a few sales; it sets the entire trajectory for your product's future.

    For now, forget about profit margins. Your new job title is "Momentum Creator." Every single decision you make should be laser-focused on one thing: getting those first critical sales across the finish line.

    Kickstart Sales with Aggressive Pricing and Promotions

    Your launch price needs to be compelling. I've found that pricing a new product 15-20% below its long-term target price is the sweet spot. This creates an almost irresistible offer for the first wave of shoppers who are taking a risk on a product with zero reviews. Think of it as a "thank you" discount that makes clicking that "Add to Cart" button a no-brainer.

    To really push them over the edge, you need to run an Amazon Coupon. That bright orange badge is a powerful visual magnet on a crowded search results page.

    • Creates Urgency: Coupons give shoppers a little psychological nudge, creating a sense of a special deal that encourages them to buy now.
    • Boosts Visibility: That colorful badge helps your listing stand out from the competition, which is fantastic for your click-through rate (CTR).
    • The One-Two Punch: When you combine a lower launch price with a coupon, you create an offer that established competitors simply can't match without slashing their own profits.

    This isn't a permanent price drop, of course. It’s a short-term, strategic investment to get the flywheel spinning. Once you have 10-15 reviews and are seeing consistent daily sales, you can start to ease off the coupon and gradually raise the price to your target.

    Mastering PPC to Fuel Your Launch

    Pay-Per-Click (PPC) is the engine of your launch. During this initial sprint, your goal is not profitability—it's to buy data and force sales. You have to get comfortable with a high Advertising Cost of Sale (ACoS), often hovering around 60% or even higher. This isn't a loss; it's an investment in ranking.

    I tell all my clients the same thing: A high ACoS in your first month is not a loss. It's the price you pay for data and market share. You are buying sales to teach the algorithm that your product belongs on page one.

    Your initial campaign structure should be a mix of broad discovery and more focused targeting.

    1. Start with an Auto Campaign: The first thing you should do is launch a broad automatic campaign with a generous budget. Let Amazon do the heavy lifting, testing your product against all sorts of customer search terms. This is your number one tool for "keyword harvesting"—finding the exact phrases real people are using to look for your product.
    2. Add Broad & Phrase Match Campaigns: Next, take the core keywords from your initial research and build out manual campaigns. Broad match will give you a wide net, while Phrase match will start to zero in on more relevant traffic.

    As sales data comes in, you’ll be on the lookout for high-performing search terms from your Auto campaign. Your job is to "promote" those winning terms into their own Phrase and, eventually, Exact match campaigns. This is how you systematically refine your ad spend from a shotgun approach to a sniper rifle, targeting only the highest-converting keywords.

    For sellers juggling multiple products, a platform that helps automate this process can be a game-changer. You can learn more about how to manage your product data effectively in your AlgoFuse.ai account.

    How to Get Your First Crucial Reviews

    Social proof is everything on Amazon. Without reviews, even the most amazing product will sit on the digital shelf collecting dust. Getting those first few ratings is an absolute top priority.

    This is where your beautifully crafted listing comes into play—it's what convinces a shopper to become a buyer, and a buyer to leave that all-important review.

    Flowchart illustrating the Amazon listing crafting process: optimize text, visualize images, and convert sales.

    As the graphic shows, optimized text and visuals are the foundation for converting traffic into customers, and customers into reviewers.

    By far, one of the safest and most effective ways to get legitimate early reviews is through the Amazon Vine program. If you're Brand Registered, you can enroll your product and give away up to 30 units for free to a hand-picked group of Amazon's most trusted reviewers.

    These "Vine Voices" are known for leaving detailed, honest, and unbiased feedback. While they aren't guaranteed to be five-star reviews, getting even a handful of thoughtful Vine reviews provides the critical social proof needed to earn the trust of your first organic customers.

    Scaling Your Product for Long-Term Profitability

    A desk with stacked shipping boxes, a tablet displaying business analytics, and a whiteboard saying 'SCALE PROFITABLY'.

    The adrenaline rush from your product launch is fading. That's a good thing. True, long-term success on Amazon isn’t about that initial sales spike; it's about what you do in the crucial window between 30 and 90 days post-launch. This is where you shift from an "all-out launch" mentality to a disciplined, profitable growth strategy.

    You've spent the money and made the noise to get noticed. Now, it's time to stop just buying sales and start building a real business. That aggressive ad spend bought you more than just initial rank—it bought you a treasure trove of data. Let's put it to work.

    From Discovery to Domination in PPC

    Think of your initial PPC campaigns, especially the automatic ones, as casting a wide net. You were in discovery mode, figuring out how real shoppers actually search for a product like yours. Now, it's time to pull in that net and see what you've caught. Your Search Term Report in Seller Central is your goldmine.

    It’s time to get surgical. Dive into that report and hunt for the exact customer search terms that are consistently bringing in sales at a decent ACoS. These are your proven winners.

    • Graduate Your Winners: Take those high-performing search terms and move them into their own Phrase and, more importantly, Exact Match campaigns. This gives you granular control over your bids, letting you dominate the placement for traffic that you know converts.
    • Cut the Losers: Just as crucial, find the terms that are eating your budget with clicks but no sales. Add these as Negative Keywords in your Auto and Broad campaigns. Stop the bleeding.

    This isn't a one-and-done task. It's an ongoing process of refining your ad spend, systematically moving your budget from wide, expensive discovery into hyper-focused, profitable campaigns. This is how you drive down your ACoS over time.

    The Metrics That Matter Now

    During your launch, you were probably glued to one number: daily sales. That's fine for day one, but now your dashboard needs a wider view. Sales velocity is still king, but you need to track the metrics that actually paint a picture of your business's health.

    The top 1% of sellers live in their Business Reports. They aren't just glancing at sales; they're dissecting session data, conversion rates, and unit session percentages. They spot optimization opportunities weeks before their competitors even know what's happening.

    Start tracking these numbers on a weekly, if not daily, basis:

    Metric What It Tells You Where to Find It
    Unit Session Percentage Your true conversion rate. It's the percentage of visitors who actually buy. Business Reports in Seller Central
    Total ACoS (TACoS) Your total ad spend divided by total sales (both PPC and organic). This reveals the real impact of ads on your bottom line. Calculated manually: Ad Spend / Total Sales
    Organic vs. PPC Sales The ratio of sales from paid ads versus organic search. As you rank, this should tip heavily toward organic. Business Reports in Seller Central
    Search Query Performance Which keywords are driving eyeballs and sales for your brand? This shows you what's working. Brand Analytics in Seller Central

    Watching these numbers tells you if your ranking efforts are paying off. As your organic sales climb, your reliance on PPC drops. Your TACoS falls, and your profit margin grows. It’s a beautiful thing.

    Your Post-Launch Optimization Checklist

    Your product listing isn't set in stone. It's a living asset that you should constantly be tweaking based on data and customer feedback. Think of it as a perpetual work in progress.

    Listen to your customers. Your reviews and Q&A section are free market research. Are people constantly asking the same question? Add the answer directly to an image or a bullet point. If a negative review highlights a misunderstanding, clarify it in your copy or with an infographic to prevent it from happening again.

    A/B test your main image. This is your biggest lever for getting more clicks. Use Amazon’s “Manage Your Experiments” tool to test a new main image against your current one. I've seen a seemingly small 1% increase in click-through rate lead to a massive boost in sales and ranking momentum.

    Get video on your listing. If you don't have a video in your image block yet, make it a priority. A good video can lift conversion rates by 5% or more. It's your best chance to show your product in action, overcome objections, and connect with shoppers on a deeper level.

    Weave in new keywords. Go back to your PPC search term report. Have you found new, high-converting keywords that aren't in your title or bullet points yet? Find a natural way to work them into your listing to improve your relevance and organic rank even further.

    Mastering this cycle of analyzing and optimizing is what separates a one-hit-wonder from a long-term, profitable brand on Amazon. These small, data-driven improvements compound over time, turning a great launch into a powerful, automated sales engine.

    Answering the Tough Questions About Your Amazon Launch

    Let's talk about the big, looming questions every new seller has. Forget the vague advice—we’re diving into the real numbers and timelines you need to budget for and expect when you're getting a new product off the ground.

    How Much Money Do I Really Need to Launch on Amazon?

    There’s no one-size-fits-all answer, but you need a realistic war chest. For a typical private-label launch, you should be prepared to invest somewhere between $5,000 and $15,000. That number might seem high, but it’s not just for buying your product; it covers the entire launch process.

    Here’s a practical breakdown of where that money goes:

    • Inventory Costs: This will be your biggest single expense. Plan for it to eat up 30-40% of your total launch budget.
    • Shipping & Import Duties: Getting your goods from the factory floor to an Amazon FBA warehouse will cost you. Earmark about 10-15% for this.
    • Initial Ad Budget: This is non-negotiable. You need to feed the Amazon algorithm with sales, and that means ads. Set aside 30-40% of your budget for your initial PPC campaigns. I've seen countless promising products fail because the seller got cheap with their ad spend right out of the gate.
    • Product Photography & Listing Creation: This is a crucial investment in your conversion rate. While it can be pricey, you can find smart ways to save money here with the right tools and process.

    How Many Units Should I Order for My First Run?

    Your goal for the first order is to have enough stock to cover 2-3 months of your projected sales. This is a tricky balance to get right.

    If you order too little and stock out, you’ve just killed your momentum. Your sales rank will plummet, and you’re basically telling the A9 algorithm that your product is unreliable. On the flip side, ordering too much ties up your cash and racks up FBA storage fees.

    The smart play is to use a product research tool to see what your top 10 competitors are selling each month. Take that average, and make sure your first order can sustain that sales velocity for at least 60-90 days. This gives you a safe buffer to get your next production run ordered and shipped without going out of stock.

    A stockout during your launch is like hitting the emergency brake mid-race. All the momentum you spent money to build vanishes instantly. It's always better to be slightly overstocked than to risk running dry.

    What’s a Good ACoS for a Brand New Product?

    Get ready to see some high numbers. During your launch phase—think the first 30-45 days—you need to be comfortable with an Advertising Cost of Sale (ACoS) between 60% and 100%.

    Don't panic. This isn't a loss; it's a strategic investment. You're buying data and you're buying sales velocity. The goal right now isn't profit. The goal is to prove to Amazon that people want your product, which earns you a better spot in the search results.

    After that initial push, you’ll have the data you need to start optimizing your campaigns. That’s when you’ll work on bringing your ACoS down to a more sustainable and profitable level, which for most established products is in the 25-35% range.

    Seriously, How Long Until I’m Making Money?

    You need to have some patience here. It's realistic to expect a new product to take anywhere from 3 to 6 months before it's consistently profitable.

    The first couple of months are all about the aggressive push for rank and sales history. You’ll likely be operating at breakeven or even a small loss because of how hard you’re running your ads.

    Then, from months 3 to 6, your focus shifts entirely to optimization. You'll be fine-tuning your PPC bids, watching your organic sales climb, and working to lower your Total ACoS (TACoS). This is the phase where the hard work starts to pay off and you finally begin to see healthy profit margins.

  • What is amazon brand registry? A Clear Guide to Brand Protection

    What is amazon brand registry? A Clear Guide to Brand Protection

    So, what exactly is Amazon Brand Registry? At its core, it’s a free program designed to give legitimate brand owners the keys to their kingdom on Amazon. It transforms you from just another seller into a protected, recognized brand with exclusive control over your product listings and access to a powerful suite of tools.

    Think of it this way: without Brand Registry, you're basically operating on borrowed land. With it, you own the deed.

    A person is typing on a laptop with 'BRAND PROTECTION' displayed on the screen, indicating digital security.

    Why Brand Registry Is No Longer Optional

    For any serious private-label seller, enrolling in Brand Registry has shifted from a "nice-to-have" to a foundational necessity. Trying to build a sustainable business on Amazon without it is a constant uphill battle. You're left vulnerable to hijackers changing your listing details, counterfeiters selling knock-offs under your name, and a general lack of control.

    Brand Registry is your digital fortress. It gives you the authority to lock down your brand's image, protect your intellectual property, and unlock marketing tools that your non-registered competitors can only dream of. It’s the critical difference between being a passive seller and an active, protected brand owner who is truly in the driver's seat.

    The Three Pillars of Brand Registry

    The entire program is built on three main pillars that work together to secure your business and fuel its growth. To help you see how it all fits together, here's a quick breakdown of what the program offers.

    To get a clearer picture, let's look at how these three pillars function.

    Amazon Brand Registry at a Glance

    Core Pillar Primary Function Key Seller Benefits
    Accurate Brand Representation Gives you ultimate control over your product detail pages. Lock your titles, descriptions, and images to prevent unauthorized changes and ensure a consistent brand message.
    Powerful Brand Protection Provides proactive and reactive tools to guard your intellectual property (IP). Automated systems find and remove infringements, plus you get powerful reporting tools to stop bad actors fast.
    Exclusive Growth Tools Unlocks premium content, advertising, and analytics features. Create A+ Content, run Sponsored Brands ads, and access analytics to better understand your customers and make data-driven decisions.

    These pillars are what separate thriving brands from those that are constantly putting out fires.

    The numbers don't lie. Over 700,000 brands have already enrolled, and for good reason. A staggering 63% of them report monthly sales exceeding $100k. In a marketplace that's expected to capture 60% of all US online sales by 2026, not being in Brand Registry is like leaving the front door of your business wide open. You can dig deeper into why top sellers prioritize Brand Registry with this analysis from Marknology.

    Bottom line? For serious Amazon FBA sellers, this means getting real results. Amazon’s dedicated team removes 99% of reported IP infringements within 48 hours, freeing you up to focus on what actually matters: growing your business.

    Your Ticket to Entry: Understanding the Trademark Requirement

    Let's get straight to the point: to get into Amazon Brand Registry, you need a registered trademark. Think of it as the non-negotiable price of admission. It's the official badge that proves to Amazon you're the real owner of your brand, not just some random seller.

    Without that trademark, the doors to Brand Registry's most powerful tools—the ones that protect you from hijackers and let you build beautiful listings—stay locked. This isn't just Amazon creating red tape. Your trademark is the legal bedrock that gives Amazon the authority to act on your behalf when someone tries to rip off your products or mess with your listings.

    Word Marks vs. Design Marks

    When you go to file that trademark, you’ll face a choice between two main types. Getting this right from the start can save you a lot of headaches down the road.

    • Word Mark (Text-Based): This protects the name of your brand itself—just the words. If you get a word mark for "Brandly," it's protected whether you write it in a simple font or a fancy custom script. For almost every new seller, this is the way to go. It gives you the broadest protection for your name.
    • Design Mark (Image-Based): This protects a specific logo, including any text or design elements inside it. This is a decent option if your logo is truly unique and the visual is more important than the name. The catch? It only protects that exact visual. Change your logo, even slightly, and you might lose your protection.

    My advice? Start with a word mark. It secures your brand name while giving you the freedom to update your logo and branding as your business grows, all without needing to file a new trademark. You can review our disclaimer for more information on legal and business decisions at https://www.algofuse.ai/disclaimer.

    Speed Up the Process with IP Accelerator

    Waiting for a government trademark office to give you the green light can take months, sometimes even a year. That’s a long time to leave your brand unprotected on a marketplace as competitive as Amazon. This is where the Amazon IP Accelerator program becomes your best friend.

    Amazon created this program to connect sellers with a hand-picked network of trusted IP law firms. Here’s the magic: once one of these firms files your trademark application, Amazon gives you early access to Brand Registry. You don't have to wait for the final government approval.

    Key Takeaway: The IP Accelerator is a total game-changer. It lets you start using A+ Content and powerful brand protection tools in a matter of weeks, not months, while your official trademark is still being processed.

    Yes, you'll have to pay the law firm's professional fees, but many sellers find it’s a small price to pay for speed and peace of mind. Trying to do it yourself can be risky; unverified or improperly filed trademarks can delay 20-30% of standard applications. Once you're in, sellers often report that they can resolve IP complaints two to three times faster than before. You can read more about why this efficiency is a game-changer for new sellers on myamazonguy.com.

    The Step-by-Step Enrollment Process Made Simple

    Alright, let's walk through the Amazon Brand Registry application. It can look intimidating from the outside, but it’s really just a series of logical steps. Once you see the path, you can get through it without the usual headaches and delays.

    Think of it like getting your paperwork in order before a big meeting. If you show up with everything you need, it’s a quick, productive session. If you’re scrambling for documents, you’ll just have to come back and do it all over again.

    Stage 1: Get Your Ducks in a Row Before You Start

    First things first: before you even open the Brand Registry website, you need to gather your essential information. Taking a few minutes to do this now will save you hours of frustration later. This is the single biggest thing you can do to make the process go smoothly.

    Here’s what you absolutely must have ready:

    • Your Brand Name: This has to match your trademark filing exactly. I can't stress this enough. If your trademark is for "SunBeam" but you enter "Sun Beam," the system will likely reject your application automatically. Pay attention to every space, hyphen, and capital letter.
    • Trademark Registration Number: This is the official number issued by the government IP office that granted your trademark. If you’re using the IP Accelerator program, you'll have a pending trademark application number, which works too.
    • Product & Packaging Photos: You need real-world photos of your product or its packaging that clearly show your branding. The critical rule here is that your brand name must be permanently affixed. That means it's printed, engraved, molded, or sewn on—not just a sticker you slapped on.

    Having these three items on hand is non-negotiable. They are the proof Amazon needs to connect your legal trademark to your physical products.

    This diagram clearly shows how the trademark process flows into Brand Registry, highlighting how the IP Accelerator program can get you there faster.

    Diagram showing the Brand Registry Trademark Process, including Trademark Application, IP Accelerator, and Access.

    The key takeaway here is simple: while waiting for a standard trademark can take months, the IP Accelerator is Amazon's official shortcut to getting Brand Registry benefits much, much sooner.

    Stage 2: Navigating the Enrollment Portal

    With your documents ready, it's time to head over to the Brand Registry portal and create an account.

    This is a crucial step: you must sign up using the same email and password associated with your Seller Central or Vendor Central account. This is what links everything together and ensures the new brand tools appear right inside your existing seller dashboard. Using a different email will create a disconnected account, which can be a massive pain to fix down the road.

    Pro Tip: You can actually create a Brand Registry account even if you don't actively sell on Amazon. This gives you access to the "Report a Violation" tool to police your trademark, though you won't get seller-specific perks like A+ Content or Brand Stores.

    Stage 3: Submitting Your Application

    Once you’re logged in to the Brand Registry portal, you’ll see an option to "Enroll a new brand." This is where you'll enter the information you just gathered. The form will ask for your brand name, your trademark number, and a logo file if you have a design mark.

    Next, you'll be prompted to upload those product and packaging photos. Remember, these need to be authentic pictures showing the permanent branding. Don't try to use mockups or digitally edited images—Amazon's verification system is pretty good at spotting them, and it will trigger an immediate rejection.

    Stage 4: The Final Verification Code

    You’re almost there! After you submit your application, Amazon's team begins the verification. They will reach out directly to the person listed as the official contact on your trademark filing—usually your attorney—and send them a unique verification code.

    Your job is to get that code from your contact and enter it back into your Brand Registry case log. This is the final handshake that proves you are the legitimate rights owner. Once that code is accepted, your enrollment is complete. You’ll unlock the full suite of Brand Registry tools and can finally start protecting your brand and building out your listings. This is also the perfect time to explore tools that can help create those new assets, like the AI-powered image generation on our signup page.

    Unlocking Your Brand's Superpowers

    A tablet displays 'Unlock Superpowers' text and icons on a wooden desk with a pen and notebook.

    Getting into Brand Registry is a game-changer. It’s like Amazon hands you the keys to a whole new set of tools—ones that most sellers don't even know exist. These aren't just small perks; they’re powerful features that shift you from being a seller at the mercy of the marketplace to a brand owner in full control.

    Think of it as getting a bundle of 'superpowers.' Each one gives you a distinct advantage, whether it's putting a digital fortress around your listings or creating a shopping experience so compelling that unregistered sellers simply can't compete. Let's dig into what these tools are and how they directly impact your business.

    Your Brand's Digital Bodyguard

    The first thing you’ll notice is the massive leap in brand protection. Before Brand Registry, you’re pretty much a sitting duck for hijackers and counterfeiters. After you enroll, you get a powerful arsenal to fight back.

    These tools are your frontline defense, working around the clock to protect your intellectual property and give you some much-needed peace of mind.

    • Proactive Protections: Amazon starts using your brand information to automatically spot and remove content that’s likely infringing or just plain wrong. It’s like having a 24/7 security detail that neutralizes threats before they can tarnish your brand’s reputation.
    • Report a Violation Tool: This is your red phone directly to Amazon’s internal team. It offers a clear, guided process for reporting everything from counterfeit products to trademark abuse. Because it's a streamlined system, takedowns happen much faster and more effectively.
    • Listing Control: Brand Registry gives you the final say over your product detail pages. This is huge. It prevents other sellers from messing with your titles, bullet points, and images, ensuring your brand's voice stays consistent and your information stays accurate.

    These protections aren't just about playing defense. They build a solid, secure foundation so you can focus on growth instead of constantly looking over your shoulder.

    Crafting a Premium Shopping Experience

    Beyond just protection, Brand Registry unlocks a whole suite of marketing tools that let you build a real brand on Amazon, not just sell products. This is your chance to tell your story, connect with customers, and stand out from the sea of generic listings.

    The most valuable of these is undoubtedly A+ Content. This feature lets you ditch the boring, plain-text product description and replace it with a visually stunning, magazine-style layout. You can add rich images, comparison charts, and detailed graphics to truly show off what makes your product great.

    A+ Content is far more than just eye candy—it’s a conversion-boosting powerhouse. Over 700,000 brands use features like this, with studies showing it can lift session conversion by 5-10%. The benefits are even greater when you combine it with AI-generated lifestyle scenes and feature callouts from platforms like AlgoFuse.ai. In fact, in 2026, Amazon Seller Central forums are buzzing with resolutions like deeper analytics dives and quarterly Brand Registry chats, signaling ongoing support. Discover more insights about the growth of Amazon Brand Registry at MaverickX.io.

    Another key feature is your own Amazon Store. Think of this as your personal, multi-page website hosted right on Amazon, free of any competitors. It’s a space where you can curate your entire product catalog, share your brand’s origin story, and create a dedicated destination for traffic from your Sponsored Brands ads.

    Gaining an Unfair Advantage with Data

    Finally, Brand Registry opens the door to a goldmine of data that regular sellers can only dream of. The Brand Analytics dashboard serves up insights pulled directly from Amazon’s vast pool of customer data, giving you a serious competitive edge.

    This dashboard helps you answer the questions that actually matter:

    1. Search Term Reports: You can see the exact keywords customers are typing to find your products—and your competitors' products. This is pure gold for optimizing your listings and fine-tuning your PPC ad campaigns.
    2. Market Basket Analysis: Ever wonder what else your customers buy? This report shows you which products are frequently purchased together with yours, uncovering priceless opportunities for bundling, cross-promotions, and new product development.
    3. Customer Demographics: Get a clear picture of who your buyers are with aggregated data on their age, income, and gender. This lets you sharpen your customer avatar and make your marketing dollars work that much harder.

    When you put all these tools together, you're no longer just selling stuff. You're building a protected, data-driven, and memorable brand. For any seller serious about scaling on Amazon, mastering these features is non-negotiable, and high-quality visuals are a huge piece of the puzzle. You can learn more about how AI can help create those stunning listing images to get the most out of your A+ Content and Brand Store.

    Alright, once you've got the essentials of Amazon Brand Registry down, it's time to dig into the really powerful stuff. The basic features are great for playing defense, but the advanced tools are what separate the top-tier sellers from everyone else. This is how you go on the offensive to actively grow your brand.

    Think of it this way: the basics are like knowing the rules of the game. These advanced tools are your championship playbook. When you learn how to use them strategically, you start finding incredible customer insights and building marketing campaigns that truly move the needle.

    Uncovering Hidden Keywords with Brand Analytics

    Brand Analytics is your direct pipeline into Amazon's massive database of customer search data. While there are a few different reports in there, the real magic happens in the Search Terms report. This thing shows you the exact search queries shoppers are typing in, ranked by search frequency.

    This isn't just about double-checking the keywords you think are important. It's about finding the ones you've completely missed. You can spot long-tail keywords your competitors aren't bidding on, see what's trending in different regions, and even identify which terms are sending the most clicks and sales to the top three products in your niche.

    Key Insight: This data is far more than just a list of words to sprinkle into your listing. Smart sellers use it to guide new product development. If you see a rising search term with no great product to match, that's your cue. It can also highlight gaps in your A+ Content or give you hyper-specific keywords for PPC campaigns that bring in high-intent shoppers for less money.

    Revealing Cross-Selling Goldmines with Market Basket Analysis

    Another gem inside Brand Analytics is the Market Basket Analysis report. This tool answers a simple but incredibly valuable question: "What else are my customers buying when they buy my product?" The report shows you the top three items most frequently purchased right alongside yours.

    This information is a goldmine for growth. Let's say you sell a premium yoga mat. If the report shows that customers are constantly buying a specific brand of yoga blocks with it, you've just identified a perfect product line extension.

    You can immediately put this data to work:

    • Create product bundles to capture a larger share of the customer's cart and boost your average order value.
    • Target Sponsored Display ads directly onto those complementary product detail pages.
    • Update your A+ Content to show your product being used with items you already know your customers are buying.

    Securing Early Reviews with Amazon Vine

    We all know that social proof is king on Amazon. Those first few reviews on a new product can make or break its launch. Brand Registry gives you access to Amazon Vine, a program designed to solve this exact problem.

    It lets you enroll up to 30 units of a new product and offer them for free to a group of Amazon's most trusted reviewers, called "Vine Voices." In exchange, they agree to leave an honest, unbiased review. There's no guarantee of a 5-star rating, but Vine reviews are often detailed and carry a lot of weight with shoppers. Getting even a handful of these early on can be the push your conversion rate needs to take off.

    With Brand Registry, you also unlock some seriously powerful advertising formats that other sellers simply can't access. The difference is pretty stark.

    Sponsored Ad Types Unlocked by Brand Registry

    Feature Available to All Sellers Exclusive to Brand Registry
    Sponsored Products ✔️ ✔️
    Sponsored Brands (Header Ads) ✔️
    Sponsored Brands Video ✔️
    Sponsored Display (Audiences) ✔️

    These exclusive ad types are a huge advantage, allowing you to build brand awareness and target customers in ways that go far beyond basic keyword ads.

    Dominating with Sponsored Brands Video

    If there's one advertising tool that truly changes the game for brand-registered sellers, it's Sponsored Brands Video. These are the short, auto-playing video ads that show up right in the middle of search results, and they are fantastic at grabbing a shopper's attention.

    A static image just sits there, but a video can show your product in action, highlight its best features, and tell a quick story—all in a few seconds. Sellers who use these videos well can completely dominate a crowded search page, often seeing much higher click-through and conversion rates than with standard ads. It’s your best chance to make a real impression before a customer even clicks on your product.

    Navigating Common Problems and Pitfalls

    So, you've enrolled in Amazon Brand Registry. That's a huge win, but let's be real—it's not a silver bullet. Even with Brand Registry's powerful arsenal, you're going to run into some head-scratching, frustrating problems. Knowing what to expect and how to handle these issues is what really makes the program work for you.

    The first hurdle often comes right at the start: the application. One of the most common and infuriating issues is getting a rejected application. Nine times out of ten, it’s because of a tiny mismatch between the information you submitted and what’s on your official trademark record. A single extra space, a slightly different spelling—that's all it takes for the system to kick it back.

    What to Do When Your Application Is Rejected

    If your enrollment gets denied, take a breath. Don't just re-apply blindly. The trick is to be meticulous and treat it like an appeal. You'll need to re-open your case with Brand Registry support and calmly, clearly lay out your argument.

    • Audit Your Information: Pull up your trademark certificate. Scrutinize every detail—your brand name, trademark number, and the mark type (is it a word mark or a design mark?). Compare it character-for-character with what you put in the application. If Amazon made the error, take screenshots of both to prove it.
    • Provide Clear Photographic Evidence: Your photos need to show the brand name permanently affixed to the product or its packaging. This is non-negotiable. A sticker just slapped on won't pass muster; it needs to be printed, engraved, or molded on.
    • Communicate Precisely: When you write to support, get straight to the point. For example: "My application was rejected for a brand name mismatch. As you can see in the attached trademark certificate, my registered brand 'Brandly' is an exact match to my application."

    Handling Stubborn Hijackers and Incorrect Listing Claims

    Even with Brand Registry fully active, you might log in one day to find another seller has somehow claimed your listing, or a hijacker you reported keeps popping back up. This usually happens because of old, conflicting data buried deep within the Amazon catalog. Your job is to prove to Amazon that you are the sole source of truth for that ASIN.

    To tackle this, you'll open a case with Seller Support (it's important to start here, not with Brand Registry support) to correct the "brand contribution" for the ASIN.

    Pro Tip: The fastest way to get this sorted is to provide what I call a "proof bundle." This package should have everything an agent needs to make a quick decision: your trademark certificate, real-world photos of your product showing both the UPC and your branding, and a link to your brand’s official website where the product is clearly for sale. This makes it dead simple for them to verify your ownership and fix the data.

    Understanding what is Amazon Brand Registry also means knowing how to work the support system. For sellers operating in multiple countries, these headaches can multiply. It takes patience and a mountain of evidence, but your persistence will pay off. You'll eventually reclaim full control and keep your brand protected across the globe.

    Still Have Questions About Brand Registry?

    Even after covering all the details, you probably still have a few questions rattling around. It's a big topic with a lot of moving parts. Let's tackle some of the most common ones we hear from sellers every day.

    How Much Does Amazon Brand Registry Cost?

    Here’s the good news: enrolling in Amazon Brand Registry is completely free. Amazon doesn't charge a dime to join the program or to use its fantastic brand-building tools. That's a common myth, so let's clear it up right now.

    The real cost comes from the prerequisite: getting a registered trademark. That legal process is what you pay for, and the fees can run anywhere from a few hundred to a few thousand dollars. It all depends on the country you're filing in and whether you bring in a lawyer to help. So, to be clear: Amazon's program is free, but the trademark that gets you in the door isn't.

    Can I Enroll With a Pending Trademark?

    Usually, the answer is no. Amazon wants to see a fully registered, active trademark with an official registration number before they let you in.

    However, there's a huge exception that every new brand should know about.

    Amazon has a program called the IP Accelerator, which connects you with a network of trusted law firms. If you use one of these firms to file your trademark, Amazon will grant you access to Brand Registry while your application is still pending.

    This is an absolute game-changer. It means you can start using A+ Content and crucial protection tools right away, effectively skipping the typical 6-12 month wait for your trademark to be approved. It’s Amazon's way of giving legitimate new brands a fighting chance from day one.

    What Happens if Someone Else Already Registered My Brand?

    It’s a gut-wrenching moment: you go to enroll your brand, only to find someone else has already claimed it. Whether it was done by mistake or with malicious intent, the situation is fixable, but you'll have to prove you're the rightful owner.

    You'll need to open a detailed case with Brand Registry support and come prepared with solid evidence. Don't hold back; you want to make your case undeniable. Gather everything you can, including:

    • Your official trademark registration certificate.
    • Links to your brand's official website and active social media profiles.
    • Invoices, purchase orders, or manufacturing agreements that clearly show you are the brand owner.

    This process can test your patience, but by providing clear and comprehensive proof, you can successfully reclaim control of your brand on the platform.


    Ready to elevate your listings with stunning, data-driven visuals that convert? AlgoFuse.ai generates complete, agency-quality image sets for your Amazon products in minutes. Skip the freelancers and complex software—get your first listing's images for free and see the difference AI can make. Start creating with AlgoFuse.ai today.

  • How to Optimize Amazon Listing: A 2026 Guide to Boost Sales

    How to Optimize Amazon Listing: A 2026 Guide to Boost Sales

    Optimizing your Amazon listing isn't just one thing—it’s a combination of nailing your keywords, visuals, and conversion signals. It starts with deep keyword research to find what real shoppers are searching for and then weaving those terms naturally into your title and bullet points. From there, it’s all about creating stunning images and A+ Content that stop the scroll and convince people to buy, all while making sure your backend and pricing are perfectly tuned.

    The New Reality of Amazon Listing Optimization

    Let's be blunt: the old playbook of just cramming keywords into your listing is completely dead. In 2026, winning on Amazon means you have to get inside the head of the A10 algorithm and work with, not against, new AI-powered shopping tools like Rufus. The game has shifted from chasing visibility to creating a genuinely better customer experience that the algorithm can't help but reward.

    This means you need a complete, top-to-bottom strategy. Every single piece of your listing that a customer—or an AI—sees has to be on point. It’s no longer enough to just have a great product; your listing has to be the most helpful, most complete answer to a shopper's search. The top sellers I see are moving past simple keyword matching. Instead, they're building conversion-focused content that directly answers customer questions and overcomes any hesitation to buy. This often involves leaning on new tech, and if you want to see how AI is changing the game, you can explore platforms designed to create high-converting Amazon listing images.

    The modern Amazon marketplace rewards listings that prove their authority and deliver real value. Your job is to show the A10 algorithm that your product page gives the best customer experience, which translates into higher engagement and, ultimately, more sales.

    The Core Pillars of a Winning Listing

    To really move the needle, you have to master a few core areas. Each one builds on the others to create a powerful, high-ranking listing that doesn't just attract shoppers—it converts them.

    Here's a quick breakdown of what's required to effectively optimize your listing for Amazon's algorithm in 2026. Think of these as the foundational pillars of your entire strategy.

    Quick Guide to Modern Amazon Listing Optimization

    A summary of the core pillars required to effectively optimize an Amazon listing for the A10 algorithm in 2026.

    Optimization Pillar What It Means in 2026 Primary Goal
    Intent-Driven Keywords Moving beyond raw search volume to find the exact phrases people use when they're ready to buy. Attract high-quality organic traffic that's more likely to convert.
    Conversion-Focused Visuals Using every image, video, and A+ module to answer questions, highlight benefits, and build trust. Boost "Add to Cart" rates and increase your overall session conversion.
    Problem-Solving Copy Writing titles, bullets, and descriptions that speak directly to a customer's pain points and tell a persuasive story. Establish your brand as an expert and eliminate any friction in the buying decision.

    Mastering these three pillars isn't just about checking boxes; it's about creating a cohesive and compelling page that works from every angle to win over both the algorithm and the customer.

    Mastering Keyword Research for Buyer Intent

    A laptop showing 'Buyer Intent' in a search bar, an Amazon planner, and an open notebook with a pen.

    Let's get one thing straight: if your keyword research is off, nothing else you do to your listing will matter. Great keywords aren't just about traffic; they're about finding the exact phrases people type right before they're ready to buy. It's the difference between attracting window shoppers and attracting actual customers.

    To do this, you have to learn to think like your shopper. What problem are they trying to solve? What words would they use to describe it? The goal isn't to find every possible keyword, but to build a strategic list that matches what a real person is thinking, from their first vague idea to the moment they're hunting for a specific feature.

    Even as we look ahead to 2026, this core principle holds true. Keyword optimization is still the engine of a successful listing. The data is clear: strategies built on real buyer intent—pulled from auto-suggest, competitor analysis, and search query reports—consistently produce listings that land in the top 10%. When you strategically place these keywords in your title, bullets, and backend, you're sending a powerful relevancy signal to Amazon's A10 algorithm. You can dig into the findings on Amazon listing optimization strategies from Velocity Sellers to see the numbers for yourself.

    Uncovering High-Intent Keywords

    The best place to start your search is right on Amazon. Forget expensive tools for a minute—the platform itself is an open book on how real customers look for products.

    The simplest, and honestly one of the most effective, methods is to just use the search bar's auto-suggest. Start typing your main product term, like "yoga mat," and pay close attention to what Amazon fills in.

    Those suggestions are pure gold:

    • "yoga mat for hot yoga" tells you there's a specific audience worried about sweat and grip.
    • "yoga mat thick non slip" points directly to features people care about—cushion and safety.
    • "yoga mat with carrying strap" reveals a demand for convenience and added value.
    • "travel yoga mat foldable" shows a niche of customers who prioritize portability.

    This isn't just a random list of terms. It's a direct look into your customer’s mind, showing you their priorities, their frustrations, and the exact benefits you need to be talking about.

    Reverse-Engineering Competitor Success

    Your top competitors have already spent time and money figuring out what works. Their listings are a proven roadmap. By digging into their strategy, you can get a massive head start. We often call this a "Reverse ASIN" lookup.

    First, identify your top 3-5 direct competitors. Go to their listings and just read. Comb through their titles, bullet points, and A+ Content. Are you seeing the same phrases pop up again and again? Those aren't there by accident. They’re targeting keywords that convert.

    Pay special attention to how they structure their titles. Do they lead with the brand? The product type? A key benefit? This tiny detail reveals their primary keyword target and can give you an angle they might be missing.

    Now, for the deep dive, you’ll want a good third-party tool. These platforms can pull back the curtain and show you the exact keywords—both organic and paid—that your competitors are ranking for. Your mission is to find high-value keywords where they have a strong organic rank (think positions 1-10) but you're not even on the map. Those are your low-hanging fruit.

    Balancing Volume and Relevance

    A classic rookie mistake is chasing keywords with massive search volume. Sure, a term like "water bottle" gets a ton of searches, but it's wildly competitive and the buyer intent is incredibly vague. The person searching could want anything from a cheap plastic bottle to a high-end smart bottle.

    The real money is in long-tail keywords. These are longer, more descriptive phrases with lower search volume but sky-high conversion rates. A person searching for a long-tail keyword knows exactly what they want.

    Comparing Keyword Intent:

    Keyword Type Example Search Intent Conversion Potential
    Short-Tail "water bottle" Broad, informational Low
    Mid-Tail "insulated water bottle" More specific, comparison Medium
    Long-Tail "32 oz stainless steel water bottle with straw lid" Highly specific, transactional High

    A winning strategy uses a healthy mix of all three types. Broad, short-tail terms can be useful in your backend search term fields or for broad-match PPC campaigns. But those specific, high-intent long-tail keywords? Those belong front-and-center in your title and bullet points, where they can do the heavy lifting of converting shoppers into buyers.

    Creating High-Conversion Visuals from Main Image to A+ Content

    Once you’ve nailed your keyword research, your visuals are what will make or break your listing. We’re talking about the split-second decision a shopper makes on your page. In that tiny window, your images have to tell a story, answer questions the shopper hasn't even thought of yet, and forge a real connection. Your copy is important, of course, but it's your visuals that truly stop the scroll.

    Think of your image carousel as your best, most efficient salesperson—one who works 24/7. Each image has a distinct job, from grabbing that initial interest all the way to sealing the deal. If even one of those images falls flat, the entire sales pitch can crumble. This isn't just a nice-to-have; it's a fundamental part of optimizing your listing for conversion.

    Amazon's A10 algorithm has clearly started rewarding listings with top-tier visuals. By 2026, we’re seeing listings with a full set of optimized images—a sharp main image, benefit-focused infographics, and authentic lifestyle shots—hitting conversion rates as high as 13-15%. That’s a massive jump from the 9-12% average for listings with just standard, run-of-the-mill photos. The difference is so significant that sellers using AI tools like AlgoFuse.ai to generate agency-quality visuals are reporting sales bumps of up to 25%. Digging into these Amazon seller statistics really shows you the full picture.

    Deconstructing the Perfect Main Image

    Your main image—the hero image—is hands-down your most important visual. It’s the very first thing shoppers see in a crowded search result, and its only job is to get them to click on your product instead of someone else's.

    Amazon has some strict, non-negotiable rules for this one. The background must be pure white (RGB 255, 255, 255), and your product needs to take up at least 85% of the image. But just following the rules isn't a strategy. Your hero image has to be incredibly sharp, perfectly lit, and show your product from its most flattering angle. A slightly blurry shot or a weird crop can instantly scream "amateur," killing trust before a shopper even lands on your page.

    Pro Tip: Don't just show the product sitting there. If it has a key feature that's instantly recognizable and compelling—like a unique texture, a special closure, or a critical component—make sure it's crystal clear. For a water bottle, that might mean getting a perfect, crisp shot of its innovative leak-proof lid.

    Building Your 7-Image Carousel

    The moment a shopper clicks, your secondary images need to take over. The goal here is to guide them on a visual journey that anticipates their questions and builds a genuine desire for the product. I've seen it time and time again: the most successful listings use each of their seven image slots for a very specific purpose.

    Think of it as a visual checklist for the customer. Here’s a blueprint I’ve used to structure image carousels for maximum engagement and conversion.

    Your 7-Image Listing Carousel Blueprint

    This table breaks down the purpose and best practices for each of the seven primary image slots in your Amazon listing, turning your carousel into a powerful conversion tool.

    Image Slot Primary Purpose Best Practice Example
    Image 1: The Hero Grab attention in search results with a crystal-clear product shot. A high-resolution photo of your product on a pure white background, filling the frame.
    Image 2: Infographic 1 Showcase your product's top 3-4 benefits, not just its features. A visual callout highlighting "Leak-Proof Seal," "BPA-Free Material," and "Keeps Drinks Cold for 24 Hours."
    Image 3: Lifestyle 1 Help shoppers visualize the product in their own lives. A photo of someone happily using your water bottle on a hike or at their desk.
    Image 4: Infographic 2 Explain a key feature or dimension in detail. An image showing the exact dimensions of the bottle and highlighting its non-slip grip.
    Image 5: Lifestyle 2 Show the product in a different use case or setting. A shot of the water bottle fitting perfectly into a car's cup holder or a gym bag.
    Image 6: Comparison Chart Position your product as the superior choice against competitors. A chart comparing your bottle's features (stainless steel, lifetime warranty) against generic plastic bottles.
    Image 7: The "How-To" Demonstrate how to use the product or unbox it. A simple graphic showing how to assemble the lid or a video showcasing its features in action.

    This structure is so effective because it systematically removes reasons for a customer to say "no." You start with a great product shot, explain why it’s great for them, show it being used in the real world, answer technical questions, and finally, prove it’s the best choice out there.

    Driving Conversions with A+ Content

    If you're Brand Registered, Premium A+ Content is where you can really separate yourself from the pack. It basically lets you build a custom landing page right inside your Amazon listing, using a mix of large-format images, detailed text, and powerful comparison modules.

    A common mistake is just recycling your main listing images here. Don't do it. A+ Content is your chance to go much deeper.

    • Tell Your Brand Story: Start with a big, bold banner module to introduce who you are. Are you a small, family-owned business? Do you use sustainable materials? This is where you build that all-important emotional connection.
    • Create Rich Comparison Tables: A+ Content gives you the space for much more detailed comparison charts. You can compare your entire product line, which helps customers pick the right item for them and often leads to upsells.
    • Showcase Your Product in Detail: Use modules that pair images and text to walk customers through every feature. This is where you can explain the technology behind your product or provide a step-by-step guide on how it works.

    For sellers without a dedicated design team, creating this kind of polished content used to be a massive headache. Now, platforms like AlgoFuse.ai have completely changed the game. These tools can analyze what's working for the top sellers in your category and generate a full suite of listing images and A+ Content in minutes.

    This is a huge advantage. It frees you up to focus on your overall strategy instead of getting lost in Photoshop. By automating the visual creation process, you can ensure every single image is perfectly aligned with what both the A10 algorithm and, more importantly, your customers want to see.

    Writing Compelling Copy That Turns Browsers into Buyers

    You’ve got great images that stopped the scroll. Now, your words have to do the heavy lifting. The biggest mistake I see sellers make is rattling off a list of product features and expecting shoppers to connect the dots.

    So your drill bit is "titanium-coated." Who cares? What does that actually do for the person building a deck on their weekend? The real secret is translating every single feature into a tangible benefit that solves a problem for your customer.

    You have to get out of your own head and stop thinking like a seller. Instead, think about the life your customer wants. Great copy doesn't just describe a product; it describes the result—the better, easier, or more enjoyable life your customer will have because of it. It’s this shift from describing to persuading that makes all the difference.

    From Features to Benefits

    A feature is a cold, hard fact about your product. A benefit is the positive outcome that feature delivers. Customers don't buy drills; they buy the holes the drill makes. They don't buy features; they buy solutions.

    Here's a simple way I reframe this for my clients. For every feature, ask yourself, "So what?" until you land on a real human value.

    • The Feature: Our power bank has a 10,000 mAh battery.
    • Ask "So what?": Well, it holds a ton of power.
    • Ask "So what?" again: That means you can charge your phone multiple times before the power bank itself needs a charge.
    • Craft the Benefit: "Go from Friday to Sunday without ever hunting for an outlet. The massive 10,000 mAh battery gives you enough power for the entire weekend, so a dead phone is one less thing to worry about."

    See the difference? You’ve just connected a technical spec to a real-world feeling: freedom from anxiety.

    Crafting Scannable Bullet Points

    Let's be honest—most Amazon shoppers are scanners, not readers. Your five bullet points are your billboard. This is your chance to shout your most important selling points from the rooftops before the shopper gets distracted and clicks away.

    Pro Tip: I always structure bullet points with a capitalized, benefit-first headline. Follow it with a sentence or two explaining the feature that makes it possible. This formatting makes your value proposition impossible to miss, even for the fastest scroller.

    Here’s a side-by-side for a kitchen blender that shows what I mean.

    Before (Just the facts):

    • 1200-watt motor
    • Stainless steel blades
    • 64-ounce container
    • Variable speed control
    • Comes with a tamper

    After (Benefit-driven):

    • CRUSH ICE IN SECONDS: Our powerful 1200-watt motor pulverizes the toughest ingredients, giving you perfectly smooth green smoothies with zero grit.
    • BUILT TO LAST FOR YEARS: Aircraft-grade stainless steel blades blend everything from frozen fruit to hot soups without dulling or chipping.
    • MAKE ENOUGH FOR THE WHOLE FAMILY: The large, BPA-free 64-ounce container lets you whip up big batches of soup, sauce, or margaritas all in one go.
    • TOTAL TEXTURE CONTROL: The variable speed dial gives you complete command, letting you go from a slow stir for chunky salsa to a high-speed blitz for creamy nut butters.
    • GET EVERY LAST BIT: We include a custom tamper to press ingredients down into the vortex, so you get a perfectly even blend without stopping to scrape the sides.

    The "After" version paints a picture. It solves problems the customer might have (gritty smoothies, dull blades) before they even think to ask.

    Weaving a Story in Your Product Description

    If you have Brand Registry and access to A+ Content, your product description is where you can truly let your brand's personality shine. This isn't the place to just re-list your bullet points. It's your opportunity to tell a deeper story, handle objections, and build a real connection.

    Your images grab attention, and your copy adds the meaning and context that lead to a confident purchase. As the process below illustrates, your visuals and words must work together to guide the customer on a seamless journey.

    Amazon visuals optimization process flow showing main image, infographic, and A+ content steps.

    Think of it this way: your main image makes them stop, your secondary images and infographics answer their immediate questions, and your A+ Content copy is what seals the deal by confirming they've found the perfect solution.

    Using External Traffic to Boost Your Ranking

    A laptop and a smartphone on a wooden table, illustrating external traffic and online content.

    Just optimizing your listing for shoppers already on Amazon isn’t enough anymore. Honestly, if you're only focused on internal traffic in 2026, you're playing a losing game. Amazon's A10 algorithm now heavily rewards listings that pull in customers from outside the platform, proving your product has broader market appeal.

    Think of it as getting a stamp of approval from the rest of the internet. When someone finds your product through a Google search, clicks over from a TikTok video, or follows an influencer’s recommendation and then buys, it sends a massive signal to Amazon. It tells the algorithm your product is a legitimate contender, not just something propped up by PPC ads.

    This “outside-in” strategy is now central to how we optimize Amazon listings. We've seen firsthand how external traffic from Google, TikTok, and Instagram creates a powerful feedback loop. It's not just about the clicks; it's about the quality of the engagement. Data shows that these shoppers have a 60% higher purchase rate, especially when they use tools like the Rufus AI assistant, because they arrive with strong intent. You can read more about how the A10 algorithm has evolved at Seller Labs.

    Building Your Off-Amazon Funnel

    The goal isn't just to drive a flood of random clicks. You need a real plan to attract shoppers who are genuinely interested and ready to buy. This means thinking about where your ideal customers hang out online.

    For example, if you sell a visually appealing product like a custom coffee mug, your best bet might be collaborating with TikTok and Instagram creators. But for something more technical, like a specialized computer part, you’d want to focus on getting featured in detailed blog reviews that rank high on Google.

    Here are a few of the most effective channels we see working right now:

    • Influencer Marketing: Find creators in your niche who can showcase your product to an engaged audience. A single, authentic shout-out can trigger a huge spike in sales.
    • Google SEO & Ads: So many shopping journeys start on Google. By ranking for your core product keywords, you catch buyers at the very beginning of their research phase.
    • Social Media: Don't just post ads. Build a real community on platforms like Instagram, TikTok, or Facebook where you can tell your brand's story and connect directly with customers.

    One of the biggest mistakes I see sellers make is sending external traffic straight to their product page without any tracking. You absolutely have to use Amazon Attribution links. It's the only way to know which campaigns are actually driving sales, so you can stop wasting money and double down on what’s working.

    Engaging Traffic Once It Arrives

    Getting shoppers to your page is only half the battle. The moment they land, your listing has to do the heavy lifting to keep them there. This is where all your on-page optimization efforts—your images, your copy, your A+ Content—really shine.

    Amazon is watching. They track on-page engagement metrics like how long someone stays on the page, if they watch your videos, and how they interact with your A+ Content.

    High engagement tells the algorithm that your listing is a great match for what the shopper was looking for. If someone sent from a TikTok video immediately watches your product video, scrolls through all of your A+ Content, and reads your FAQs, it’s a clear signal that you’re providing value. This is crucial for optimizing for AI assistants like Rufus, which prioritize listings that thoroughly answer customer questions.

    If creating compelling visuals feels like a weak spot, AI-powered tools can be a game-changer. Some platforms can analyze top-performing competitor listings to help you generate infographics and lifestyle images that are proven to grab attention and hold it. To get a feel for how this works, you can claim your free tokens for an entire Amazon listing on AlgoFuse.ai. When you pair a smart external traffic strategy with a highly engaging, well-optimized listing, you create a powerful cycle of growth that pushes you right up the search rankings.

    Your Top Amazon Listing Optimization Questions, Answered

    Even with a solid game plan, optimizing an Amazon listing always brings up nagging questions. It's one thing to know the playbook, but it's another to apply it when you're dealing with real-world budgets, timelines, and the constant pressure to see results. Let's clear the air and tackle some of the most common questions I hear from sellers.

    My goal here is to get practical. We’re moving past theory and into the "what ifs" and "how oftens" that determine whether your efforts actually pay off. Getting these right will help you make smarter decisions, use your resources wisely, and know for sure that you’re moving the needle.

    I'm on a Tight Budget. Where Should I Focus First?

    If your resources are limited, don't spread yourself thin trying to do everything at once. Your first and only priority should be changes that directly boost your conversion rate. Think of it this way: improving conversions on the traffic you already have is the quickest path to more cash flow, which you can then reinvest into bigger optimizations.

    Here's where you need to focus your firepower:

    1. Your Main Image: This is your digital handshake, and it has the single biggest impact on your click-through rate. It needs to be flawless—razor-sharp, professionally lit, and compliant with every single Amazon rule. A weak main image will stop a shopper in their tracks, killing your listing before they even click.

    2. Your Product Title: Your title does the heavy lifting for both keyword ranking and grabbing a shopper's attention. Get your most important, highest-intent keyword as close to the beginning as you can. A compelling, benefit-focused title is a magnet for clicks and a huge signal to the A9 algorithm.

    3. Your Bullet Points: Once the image and title get the click, the bullets have to close the deal. Stop listing features and start selling benefits. I always recommend a capitalized headline for each bullet point to make them instantly scannable and much more persuasive.

    Once you’ve absolutely nailed these three, you can start thinking about your other images and A+ Content as your budget and sales grow.

    The 80/20 rule is gospel here. 80% of your initial results will come from just 20% of your optimization efforts. For almost every listing, that 20% is perfecting the main image, title, and bullet points. Get these right before you even think about the rest.

    How Often Should I Be Updating My Listing?

    Optimizing your listing is a process, not a one-time project. The Amazon marketplace is a living, breathing ecosystem with new competitors, shifting customer habits, and constant algorithm updates. That said, you absolutely should not be making changes every day—that's a great way to confuse the algorithm and tank your rankings.

    The key is to find a rhythm of testing and iterating.

    • Major Overhauls: Plan for a deep-dive optimization about twice a year. This is when you'll redo your keyword research from scratch, refresh all your creative, and rewrite your copy. You should also trigger one of these if you see a significant, long-term slide in performance that you can't explain.
    • Minor Tweaks: On a quarterly basis, run small, controlled tests. Try swapping the order of your secondary images or A/B test a new main image. Amazon’s own "Manage Your Experiments" tool is your best friend for this, giving you hard data on what actually works.

    The biggest mistake sellers make is panicking after a day or two of bad sales. Always look at trends over at least two weeks before you decide a major change is necessary. After any update, document what you changed and give it at least 30 days to collect clean data and see the real impact. If you want to dig deeper into how Amazon handles user tracking, you can find in our article on cookie policies.

    What KPIs Tell Me if My Optimization Is Actually Working?

    To know if your changes are successful, you have to track the right metrics. Simply looking at your sales number is like looking at the scoreboard without knowing how the game was played. You need to understand the why behind your performance.

    Keep a close eye on these key performance indicators (KPIs) to get the full story:

    KPI What It Tells You Why It Matters
    Impressions How many times your listing was shown in search results. This is your top-of-funnel visibility. If impressions are low, your keyword and SEO strategy needs work.
    Click-Through Rate (CTR) The percentage of shoppers who saw your listing and clicked. This is a direct grade on your main image and title. A low CTR means you're failing to capture attention.
    Unit Session Percentage (Conversion Rate) The percentage of visits (sessions) that turned into a purchase. This is the ultimate report card for your entire listing—from your copy and images to your price and reviews.
    Organic Rank Your natural search position for your most important keywords. This is a direct measure of your SEO effectiveness and how relevant Amazon thinks your product is.

    When you track these four metrics together, you can diagnose problems with incredible accuracy. For instance, high impressions but a low CTR points directly to a problem with your main image or title. A high CTR but a low conversion rate tells you it's time to improve your bullet points, secondary images, and A+ Content.

  • Unlocking Sales with Amazon Product Optimization

    Unlocking Sales with Amazon Product Optimization

    If you're still treating your Amazon listings like a one-and-done task, you're already falling behind. The old playbook of setting up a product page and hoping for the best simply doesn't work anymore. Amazon product optimization is an ongoing, active process. You have to treat your product page like a living asset, constantly fine-tuning it to win over both shoppers and Amazon's A10 algorithm.

    The New Rules of Amazon Product Optimization

    Forget everything you thought you knew about simply stuffing keywords into your listing. Success on Amazon in 2026 is a whole new ballgame, and the A10 algorithm has rewritten the rules. The focus has shifted dramatically toward customer experience and genuine organic performance. Your job is no longer just to be found—it’s to convert, satisfy, and earn trust.

    This modern approach to Amazon product optimization rests on a few core pillars that successful sellers have mastered. It's about thinking holistically about the entire customer journey on your page.

    Key Pillars of Modern Amazon Optimization

    To really grasp this shift, it helps to break down the essential components. These are the areas where you need to be focusing your energy right now to stay competitive and get the algorithm on your side.

    Optimization Pillar Primary Goal Key Action
    Deep Keyword Mastery Attract highly qualified, ready-to-buy traffic. Dig for long-tail phrases and customer questions, not just broad, generic terms.
    Compelling Visuals Answer questions and build desire before they read. Create a full suite of images, infographics, and videos that show, not just tell.
    Strategic A+ Content Tell a brand story and stand out from competitors. Use rich media to build trust, explain benefits, and justify your price point.
    Reputation Management Build social proof and customer confidence. Proactively manage reviews and answer Q&A to show you're an engaged, reliable brand.

    Ultimately, these pillars all support one core principle that I've seen play out time and time again.

    The core principle is simple: a listing that excels at converting visitors into happy customers will be rewarded with higher rankings. The A10 algorithm prioritizes listings that demonstrate authority and generate consistent sales velocity.

    This is a huge evolution. Back in the day, the A9 algorithm was all about PPC and basic keyword relevance. Now, in 2026, the A10 algorithm cares far more about customer authority, organic sales, and even external traffic from sources like social media and blogs. It rewards brands that build a real audience.

    The payoff for getting this right is massive. For example, well-executed A+ Content is shown to deliver up to a +20% conversion boost, which is absolutely critical when over 50% of purchases happen on mobile. Brands that dominate the Buy Box consistently capture up to 70-80% of all sales in their categories. Top agency reports on Amazon marketing for 2026 show just how brands are adapting to this new reality.

    This guide will walk you through the actionable checklist you need to compete. We'll cover everything from deep keyword research and backend settings to creating stunning AI-powered visuals. To get a head start, see how AI can transform your product photography in our guide on creating high-converting Amazon listing images.

    Building Your Foundation with Keywords and Backend Fields

    Laptop displaying 'Keyword Foundation' software on screen, with a plant and notebook on a wooden desk.

    Before you even think about writing a catchy title or compelling bullet points, the real work of Amazon product optimization has to happen behind the scenes. This is all about building a solid keyword foundation and properly setting up your backend fields. Get this right, and you’re essentially giving Amazon's A10 algorithm a crystal-clear roadmap to who your product is for, making sure you show up in front of the right shoppers.

    I see so many sellers focus only on the big, obvious keywords—the "short-tail" terms like "yoga mat." And sure, they have a place. But the money is in the "long-tail" keywords. These are the super-specific, multi-word phrases like "extra thick non slip yoga mat for hot yoga." A shopper searching for that knows exactly what they want, and that intent translates directly to higher click-through rates and a much better return on your ad spend.

    Uncovering High-Intent Keywords

    The first step is a mental shift. You have to stop thinking about what you call your product and start thinking about the problems your customers are trying to solve. Modern keyword research is really part detective work, part data crunching.

    A great place to start is the Amazon search bar itself. Just begin typing your main product term and watch what Amazon's auto-suggest pops up. These are real searches from real customers, and they're often a goldmine of long-tail keyword ideas.

    From there, it's time to dig deeper.

    • Spy on Your Competitors: Pull up the top 10 listings for your primary keyword. Don't just skim them—analyze their titles, bullets, and especially their customer Q&A sections. What words do they use over and over? What questions do shoppers keep asking? These reveal pain points you can target.
    • Run Reverse ASIN Lookups: Grab the ASINs of your top three competitors and plug them into a dedicated SEO tool. A reverse ASIN search will spit out a list of the exact keywords they're ranking for, both organically and with ads. It's like getting a copy of their playbook.
    • Mine for Gold in Reviews: Go read the 3-star reviews on competing products. Why 3-star? Because they are often the most balanced, highlighting what's good but also what's missing. These "I wish it had…" comments are pure keyword gold.

    This whole process will give you a powerful list of keywords that goes way beyond the basics. You'll find phrases that tap into specific needs and help you connect with shoppers your competition is completely ignoring.

    Optimizing Your Backend Search Term Fields

    With your master keyword list in hand, you can start putting it to work. Your most valuable keywords will go in your title and bullets, but the backend fields are your secret weapon. This is where you can tell Amazon about all the other relevant terms without making your public-facing copy sound like a robot wrote it.

    The backend search term field is one of the most powerful—and most overlooked—tools you have. It's your private line to the A10 algorithm, letting you index for synonyms, common misspellings, and related concepts that just don't fit naturally into your main listing.

    Think of it as your strategic keyword overflow. You have a strict character limit, so you need a plan. Here's a quick checklist to do it right:

    • Search Terms (Generic Keywords): This is the main event. Fill this field with your secondary and long-tail keywords. Use all lowercase, separate words with a single space, and don't repeat anything that's already in your title, bullets, or other backend attributes. No commas, no semicolons—just a space-separated string of words.
    • Subject Matter: This helps Amazon's algorithm categorize your product more precisely. Add 3-5 relevant phrases that describe the product's use case or topic. For example, "outdoor patio furniture" or "mindfulness meditation guide."
    • Other Attributes: Don't skip these! Fields like "Target Audience" (e.g., "professional chefs," "beginner gardeners") and "Intended Use" are becoming more important for filtered search and voice search through Amazon's AI, Rufus. The more specific you are, the better.

    When you fill out these backend fields correctly, you’re giving Amazon a ton of valuable data. This helps you show up in more filtered searches and for a much wider range of customer queries, setting the stage for a truly optimized and profitable product.

    Crafting High-Conversion Titles, Bullets, and Descriptions

    A professional flat lay of a modern workspace with a tablet, pen, document, and 'High-Conversion COPY' text.

    Alright, you’ve done the crucial behind-the-scenes work. Your backend keywords are dialed in, building a solid SEO foundation for your product. Now comes the part where we turn that technical groundwork into persuasive copy that connects with real shoppers. This is where Amazon product optimization gets its personality.

    Your title, bullet points, and description are your front-line sales team. They have to grab a customer's attention in a sea of search results and guide them from a casual glance to a confident purchase. Think of it as a mini sales funnel on a single page: the title hooks them, the bullets answer their immediate questions, and the description seals the deal. If one part is weak, the whole system falters, and you leave sales on the table.

    Your Title: The Ultimate Click Magnet

    I tell every seller I work with: your product title is the single most valuable piece of real estate you have on Amazon. It’s the first thing anyone sees in the search results, and it has to do two jobs at once—satisfy the A10 algorithm and entice a human to click. A title overstuffed with keywords might get you seen, but a readable, benefit-rich title is what actually earns the click.

    The trick is finding that sweet spot. You want to front-load your most important keyword phrase and the product's core identity while ensuring it all makes sense. A formula I've seen work time and time again is:

    [Brand Name] [Primary Keyword Phrase] – [Key Feature or Benefit], [Size/Color/Quantity]

    For instance, a title like "EcoPure Water Filter Pitcher – Removes Lead and Chlorine for Better Tasting Water, 10 Cup Capacity, White" is worlds better than "Water Filter Pitcher Filter Water." It immediately tells the shopper the brand, what it does, why that matters, its size, and color. It answers five questions before they've even clicked.

    Amazon gives you a technical limit of around 200 characters, but don't feel you need to use all of it. In my experience, the first 60-80 characters are what count, especially on mobile. That's your prime real estate.

    Turning Features into Benefit-Driven Bullets

    This is where I see so many listings fall flat. Sellers just list out dry, technical specs in their five bullet points. Here's the thing: customers don't buy features; they buy the solutions and outcomes those features provide. Your job is to be a translator.

    So instead of just stating a feature like "Made with 304 Stainless Steel," you reframe it as a direct benefit: "BUILT TO LAST A LIFETIME: Crafted from rust-proof 304 stainless steel, so you never have to worry about replacing a flimsy or broken part again." See the difference? You’ve just sold them durability and peace of mind, not just a grade of metal.

    I like to structure bullets to tell a story and preemptively tackle customer concerns:

    • Bullet 1: Start with the main problem your product solves. Hook them immediately.
    • Bullet 2: Show off your unique solution or what makes your product different.
    • Bullet 3: Paint a picture of a specific use case or a positive experience.
    • Bullet 4: Build trust by talking about quality, materials, a warranty, or your brand's commitment.
    • Bullet 5: End on a strong note, maybe with a call-to-action or by reinforcing the core value.

    This approach walks a customer through their own decision-making process, building their confidence with every point.

    Remember, your bullet points aren't just a list; they are a conversation with your customer. Each one should anticipate and answer a question, moving them closer to clicking "Add to Cart."

    The Product Description: Your Final Pitch

    Even if you have access to A+ Content, your standard text description still gets indexed by Amazon and matters for SEO. And for sellers who aren't brand registered, this space is your last, best chance to make your case. Too often, it’s just a dreaded wall of text.

    The fix is surprisingly simple: use a little basic HTML to make it scannable. A few simple tags can completely change the reading experience. You can use <br> for line breaks and <b> to bold key phrases, guiding the reader’s eye.

    A simple structure that consistently performs well:

    • Start with a bold headline that repeats the main benefit.
    • Follow with a short, engaging paragraph that expands on the problem you're solving.
    • Use a mix of short sentences and paragraphs to explain features and benefits.
    • Bold important callouts like "Easy to Clean" or "Perfect for Gifting" to break up the text.
    • Wrap up with a final statement about your brand and exactly what's included in the box.

    This simple formatting transforms a dense block of text into an easy-to-scan sales pitch, ensuring your final message gets heard loud and clear.

    Mastering Visuals with AI-Powered Product Imagery

    A computer displaying product images, a camera on a tripod, and a cardboard box for AI product image creation.

    After you've dialed in your copy, your images have to do the real work. On Amazon, your product photos aren't just there to look pretty—they're your number one sales tool. They are often the first, and most powerful, impression a shopper gets. A top-notch visual strategy is no longer optional for Amazon product optimization; it's what stops the scroll, answers questions at a glance, and builds the trust needed to make a sale.

    Think of your image stack as a visual conversation with your customer. It begins with that perfect main image, your digital handshake, and then unfolds to tell a complete story through a series of carefully chosen shots.

    The Anatomy of a High-Impact Image Stack

    A truly effective image set does more than just show off your product. It gets ahead of every question, doubt, or curiosity a customer might have. A winning gallery is a mix of different image types, each with a specific job to do.

    • The Main Image: This is your hero shot, plain and simple. It needs to be on a pure white background, filling 85% of the frame, and make it instantly obvious what your product is. Its only goal is to be so clear and compelling that it earns the click from a sea of competitors on the search results page.
    • Lifestyle Photos: These shots put your product in a real-world setting, helping customers picture it in their own lives. A portable blender shown on a kitchen counter during a hectic morning routine tells a much richer story than a picture of the blender floating in a white void.
    • Infographics and Feature Callouts: Here's your chance to break down key benefits and specs into something scannable and easy to understand. Use them to highlight dimensions, materials, or unique features your copy mentions, reinforcing the product's value and justifying its price.
    • Comparison Charts: How does your product measure up against others? A simple chart can instantly show off your unique selling points, either against a competitor or other models in your own lineup. This helps shoppers make a quick, confident decision.

    For years, putting together this full suite of images was a major headache for sellers. It meant shelling out for expensive photoshoots, hiring graphic designers, and dealing with long turnaround times. It was a huge barrier to effective Amazon product optimization.

    High-quality product images are no longer just a "nice-to-have"—they are the core of your listing's performance. Listings featuring a full suite of 7 or more optimized images consistently see 20-40% higher engagement, directly fueling the sales velocity that the A10 algorithm rewards.

    The numbers don't lie. In-depth research on scaling an Amazon business has found that professional visuals can increase conversion rates by as much as 30% when everything else is dialed in. The problem has always been the price tag and the hassle. Freelancers can charge thousands of dollars for a single listing, an impossible expense for many sellers. Luckily, AI has completely flipped the script.

    The AI Workflow for Agency-Quality Visuals

    AI-driven platforms like AlgoFuse.ai have leveled the playing field, giving every seller the ability to generate a complete, high-converting image stack in just a few minutes. This workflow gets around the old-school bottlenecks of cost, time, and needing a designer on speed dial.

    The process itself is surprisingly simple. Instead of spending hours trying to write the perfect AI prompt or a detailed design brief, you just provide a few key inputs, like your product's ASIN or main keywords.

    The platform then does the heavy lifting, automating the entire creative process:

    1. First, it scans top-performing competitors for your keywords across all 19 Amazon marketplaces to see what visual styles are resonating with customers right now.
    2. Next, it automatically applies current best practices, making sure your main image is compliant and all your secondary images are designed for maximum impact.
    3. Finally, it generates a full suite of visuals, including lifestyle scenes, detailed infographics, and comparison charts, all based on your product’s specific features and benefits.

    This AI-powered approach delivers an entire agency-quality image package with a single click. It allows you to test, tweak, and even localize your visuals for international markets at a speed that was unimaginable just a few years ago.

    Manual Image Creation vs AI-Powered AlgoFuse.ai

    To really understand how big of a shift this is, it helps to see a direct comparison between the traditional method and the new AI-powered workflow. The table below breaks down the key differences in cost, time, and effort.

    Metric Manual Process (Freelancer/Agency) AI-Powered Process (AlgoFuse.ai)
    Cost Per Listing $500 – $3,000+ ~$15 (up to 95% less)
    Turnaround Time 1 – 4 weeks ~5 minutes
    Revisions Slow, often with additional costs Instant, with minimal token usage
    Expertise Needed Requires design briefs and direction None—fully automated best practices
    Scalability Limited by freelancer/agency capacity Unlimited—generate for entire catalog
    Localization Requires separate projects per market Built-in for global marketplaces

    As you can see, this isn't just a small step forward; it's a fundamental change in how sellers can manage their visual merchandising. Being able to create stunning, data-backed images on demand gives everyone a fighting chance—from brand-new sellers working on a tight budget to large aggregators who need to optimize hundreds of listings at once. This is the future of visual Amazon product optimization.

    Alright, you've nailed down your keywords, your copy is sharp, and your images are ready to go. Now it's time for the masterclass—the final layers that turn a good listing into one that truly dominates its category.

    This is where we move beyond the basics and get into strategic Amazon product optimization. We're talking about A+ Content, smart pricing, and building a rock-solid reputation with reviews. Think of these as the closers. Your title and images got them in the door, and the bullet points answered their first few questions. These next pieces are what will get them to confidently click "Add to Cart."

    Go Beyond Bullets with Strategic A+ Content

    A+ Content is your brand's dedicated space on the product page. It's your chance to tell a story, tackle any lingering doubts, and show off what makes your product special in a rich, visual way. When done right, it's a serious conversion driver—we've seen it boost sales by as much as 20% in some categories.

    The trick is to use the modules with purpose, not just as decoration.

    • Tell Your Brand Story First: Kick things off with a full-width banner that explains who you are. Are you a small family-run business? An innovator obsessed with sustainable materials? This is your chance to connect with the shopper on a human level.
    • Show, Don't Just Tell: Instead of more text, use comparison charts. They're fantastic for showing how your product stacks up against an older version or even the competition. You can also use a series of lifestyle images with text overlays to walk customers through the key benefits, making it much more digestible than a block of text.
    • Handle Objections Before They Happen: Is your product priced higher than others? Use a module to break down the premium materials or superior tech that justifies the cost. Worried people might think setup is complicated? Create a simple, step-by-step visual guide.

    I've seen so many sellers treat A+ Content like an afterthought, just throwing in a few extra images. That's a huge missed opportunity. It's your single best tool for building brand trust right on the page. Use it to answer the big question: "Why should I choose you?"

    For a long time, creating compelling A+ Content meant hiring a designer. Thankfully, that's changed. Modern tools have put professional-grade branding within reach for everyone. For instance, AI platforms like AlgoFuse.ai can generate stunning A+ modules in minutes, turning your product info into layouts that are designed to sell.

    Win the Buy Box with Smart Pricing

    Pricing on Amazon can feel like walking a tightrope. Go too high, and you'll lose the Buy Box. Go too low, and you're just giving away your profits. The real goal is finding that competitive sweet spot that drives sales and protects your margins.

    First thing's first: do your homework. Look at the top 5-10 competitors for your main keyword. Don't just glance at the price—dig deeper. How many reviews do they have? Are they FBA or FBM? Do they have great A+ Content? A well-established product with 5,000 reviews can easily command a higher price than a brand-new one.

    • Know Your Numbers: Before you set a price, you have to know your all-in costs. That means your cost of goods, inbound shipping, Amazon referral fees, FBA fees, and your ad spend.
    • Use a Repricer: Manually trying to keep up with competitor prices is a recipe for disaster. You can use Amazon's built-in Automate Pricing tool or a third-party repricer to set rules. This keeps you competitive without getting dragged into a race to the bottom.

    Build Unshakable Trust with Reviews and Q&A

    On Amazon, social proof isn't just important—it's everything. A listing with hundreds of positive reviews will almost always beat one with just a handful, even if the products are identical. This is why having a proactive strategy for getting reviews is a non-negotiable part of Amazon product optimization.

    The easiest and safest way to do this is by using the "Request a Review" button in Seller Central after a sale. Amazon sends a standardized, fully compliant email asking the customer for both a product review and seller feedback. It's simple, but it works.

    Don't sleep on your Q&A section, either. It’s a goldmine. Check it daily. When a potential customer asks a question, be the first to jump in with a clear, helpful answer. Not only does this help that one person, but it also signals to every future visitor that you're an active, responsive brand they can trust.

    Getting your listing live isn't the end of the job—it's just the beginning. The real work, the kind that builds a sustainable brand on Amazon, is in the constant tweaking and testing that comes next. A listing that just sits there is a listing that's slowly getting buried. This commitment to continuous Amazon product optimization is what I’ve seen separate the seven-figure sellers from those who just tread water.

    Think of it as a monthly rhythm. You have to regularly get your hands dirty in the data to see what’s actually happening on the ground. The idea is to find those small, smart changes that add up to major gains over time.

    Your Monthly Optimization Checklist

    First, pull up your Amazon Search Term reports. Are shoppers finding you with the keywords you thought they would? More often than not, you'll uncover some surprising new phrases that are driving real traffic. This report is a goldmine because it’s not theory; it’s the exact language your customers are using.

    Next, look at your unit session percentage rate—your conversion rate, plain and simple. If you’re pulling in tons of clicks but not enough sales, that’s a red flag. Something on your page is stopping people from clicking "Add to Cart." Maybe your price is off, your images aren’t compelling, or a new competitor just launched with a killer offer. A sudden dip in conversions is your cue to investigate.

    And speaking of competitors, you need to be watching them. What did they just change? Did they roll out new A+ Content? Tweak their main image? Drop their price by a dollar? These aren't just random changes; they're clues you can use to sharpen your own strategy.

    I tell my clients to treat this monthly review like a pilot’s pre-flight check. You wouldn't take off without making sure every instrument is working perfectly. Your Amazon listing is your business's engine—it needs the same level of attention.

    This routine is what lets you stop guessing and start making informed moves. You’ll know when it's time to test a new main image, rewrite a bullet point to address a common question, or shift your ad budget to a keyword that’s suddenly converting like crazy. If you need to whip up some new images for testing, you can generate a few options in minutes with a trial of AlgoFuse.ai.

    Taking Your Brand Global: Expansion and Localization

    Once you have a solid optimization process humming along in your primary market, it’s tempting to look at international expansion. But I’ve seen too many brands fail by simply copy-pasting their US listing into the UK or German marketplace. That approach just doesn't work.

    Going global means you have to go local. And that's about so much more than just a direct translation.

    • Localize Your Keywords: Don't just translate your best keywords. You have to do the research to find out what customers in Germany, Japan, or the UK are actually searching for. The language and slang are always different.
    • Adapt Your Imagery: That sunny California lifestyle photo might fall flat in a European market. Show local models and use backdrops that feel familiar and relevant to that specific audience.
    • Adjust Your Copy: Your clever American idioms won't make sense overseas. Rewrite your copy to connect with the unique culture and buying habits of each new market.

    This is a non-negotiable step for a successful international launch. The data shows that brands who commit to this level of localization see huge performance boosts. Using Premium A+ modules, for instance, can increase conversions by up to 20%. That's a massive advantage, especially as Amazon's search AI increasingly prioritizes listings with rich, detailed content.

    This diagram really breaks down the core pieces of your listing that you need to be constantly monitoring and refining.

    Diagram showing the Listing Dominance Process Flow, highlighting Brand Story, Price, and Reviews.

    From your Brand Story to your Pricing and Reviews, each part works together. Keeping them all in sync and constantly improving them is the key to dominating your category.

    Frequently Asked Questions About Amazon Optimization

    Even the most thorough checklist can leave you with a few lingering questions when you get into the nitty-gritty of Amazon product optimization. I've seen these same questions pop up time and again, so let's clear them up based on real-world experience.

    How Often Should I Update My Listing?

    This is a question I get all the time, and the honest answer is: it depends. But one thing is for sure—a "set it and forget it" mindset is a surefire way to get left behind.

    As a baseline, plan to do a deep dive into your listing and your top competitors at least once a month. This means you're actively looking at your keyword performance, conversion rates, and what changes your rivals are making to their images, copy, and pricing.

    That said, don't wait a month if you see a problem. If sales suddenly tank or a new competitor starts stealing your thunder, you need to react immediately. True optimization isn't just a scheduled check-in; it's a constant process of reacting to the market.

    What Is the Most Important Thing to Optimize for a New Product?

    When you're launching a new product, it's all about one thing: getting found. You can have the best product in the world, but if shoppers can't find it, you have zero chance of making a sale.

    From day one, your entire focus should be on discoverability. For me, that boils down to three non-negotiables:

    • A Killer Main Image: This is your billboard in a crowded search results page. It has to be sharp, clear, and compelling enough to stop a scrolling thumb and earn that click.
    • A Keyword-Rich Title: Your title is your most powerful SEO weapon. Front-load your most critical keyword phrase so both Amazon's A9 algorithm and shoppers know exactly what your product is at a glance.
    • Comprehensive Backend Keywords: This is your secret advantage. Fill out every character of your backend search terms with all the relevant synonyms, use cases, and long-tail keywords you've researched.

    Reviews are absolutely essential for long-term success, but you can't get reviews without getting seen first. The launch phase is a sprint to master search visibility and get that initial traffic flowing.

    How Do I Measure the Impact of My Optimization Changes?

    If you don't track your changes, you're just guessing. The biggest mistake I see sellers make is changing everything at once—new title, new bullets, new images—and then having no idea what actually worked (or didn't).

    Instead, test one element at a time. For instance, roll out a new title and let it run for two weeks. Keep a close eye on your click-through rate (CTR) and session count in your business reports. Did they go up?

    Once that test is done, update your bullet points and then monitor your unit session percentage (your conversion rate) for the next two weeks. The key metrics to live by are:

    • Sessions: Are more eyeballs landing on your page?
    • Click-Through Rate (CTR): Is your main image and title doing its job in search?
    • Unit Session Percentage: Are your images and copy convincing shoppers to click "Add to Cart"?

    This deliberate, one-change-at-a-time approach lets you pinpoint exactly what moves the needle. As you get comfortable tracking this, you can learn more about advanced keyword strategies in our in-depth guide to Amazon SEO.


    Ready to create stunning visuals that convert browsers into buyers? With AlgoFuse.ai, you can generate an entire agency-quality image stack—from infographics to A+ Content—in just five minutes. Get started for free and create your first listing today.

  • The Ultimate Amazon Listing Optimization Tool Guide for 2026

    The Ultimate Amazon Listing Optimization Tool Guide for 2026

    At its core, an Amazon listing optimization tool is a piece of software designed to help you perfect your product pages. It's about getting more eyes on your products, convincing more shoppers to click, and ultimately, driving more sales. Think of it as a central hub for everything from keyword research and content writing to generating images and tracking your performance, all based on hard data instead of guesswork.

    Why Listing Optimization Tools Are Essential in 2026

    Two engineers optimize a formula race car on a track, with a laptop displaying performance data.

    On Amazon's battlefield in 2026, just having a fantastic product won't cut it. Your listing is your digital storefront, your best salesperson, and the main engine for your growth. Trying to optimize it manually—piecing together keywords from one source and hiring a freelance designer for images—is like showing up to a Formula 1 race with a bicycle. You just can't compete.

    A modern listing optimization tool is your professional pit crew. While you're focused on the big picture of running the business, the tool is on the track, making constant, data-backed adjustments to keep you in the lead. It's analyzing your rivals, fine-tuning your strategy, and making sure your listing is always running at peak performance.

    The Shift from Guesswork to Data-Driven Automation

    The old days of "keyword stuffing" a title and just hoping for the best are long gone. Today’s marketplace rewards listings that are scientifically engineered to convert, and this is where data and automation become your secret weapons. These tools don't just find random keywords; they pinpoint the exact phrases and even the visual styles that are winning sales for your top competitors right now.

    This move toward data-driven optimization is no longer optional. When you’re up against millions of other products, an automated tool can process thousands of data points in seconds—something that would take a human seller weeks to accomplish. It’s the difference between navigating with a crumpled paper map and using a live GPS that automatically finds the fastest route around traffic jams.

    The real advantage is simple: an Amazon listing optimization tool helps you make smarter decisions, faster. It completely levels the playing field, giving sellers of any size the power to compete by using the same data-driven strategies that huge brands rely on to own their categories.

    The Tangible Impact on Your Bottom Line

    Bringing a powerful tool into your workflow isn’t just about saving a few hours. It’s about generating a serious return on your investment. We’re seeing that strategically optimized listings, especially those packed with high-quality images and video, can see a conversion rate increase of up to 30%. On top of that, sellers who tune their content for natural language queries—targeting Amazon's AI assistant, Rufus—are reporting sales boosts of 20-25%. You can dive deeper into these 2026 sales strategies and their impact on digitalhill.com.

    When you use an Amazon listing optimization tool to dial in your images, titles, and bullet points, you create a clear path to real growth:

    • Improved Organic Rankings: When your listing converts better, Amazon's algorithm notices. It sees your product as relevant and starts showing it to more people, organically.
    • Higher Click-Through Rates: A data-informed main image and a killer title will grab a shopper's attention, convincing them to click on your product instead of the one next to it.
    • Increased Revenue: It’s a simple formula. More traffic plus a higher conversion rate equals more sales and a healthier business.

    For any seller who is serious about succeeding on Amazon, these tools are no longer a luxury—they are a fundamental part of the toolkit.

    How Modern Optimization Tools Actually Work

    So, what do these optimization tools really do under the hood? Forget the marketing jargon for a second. Let's talk about what actually happens when you fire up a modern Amazon listing optimization tool.

    Think of it less like a simple piece of software and more like having a whole team of specialists on call. It's your market researcher, data analyst, copywriter, and graphic designer, all rolled into one powerful platform. Its main job is to take a standard, maybe even underperforming, product page and turn it into a genuine sales machine. It does this by swapping guesswork for hard data at every single step.

    The Brains Behind the Operation

    It all starts with reconnaissance. The first thing a good tool does is become an expert on your specific corner of Amazon. Instead of you spending hours manually clicking through dozens of competitor pages, the tool does it all in seconds, pulling out the crucial details on what's already winning over customers.

    This isn't just a quick glance at the best-sellers, either. The software systematically deconstructs their entire strategy, examining the key ingredients that make them successful:

    • Keyword Strategy: It pinpoints the exact high-traffic keywords your competitors are ranking for and, just as importantly, how they're weaving them into their titles, bullet points, and descriptions.
    • Visual Approach: It analyzes the types of images they’re using. What makes their main image pop in search results? Are they using infographics to explain complex features or lifestyle shots to sell an experience?
    • Pricing and Reviews: It can track competitor pricing strategies and even dig through customer reviews to find recurring complaints or highly-requested features you can capitalize on.

    This process gives you a clear, data-backed blueprint for what it takes to compete. The tool then uses this intel to guide the creation of your own listing, element by element.

    From Data to Done-For-You Content

    Gathering all that competitive data is just the first half of the job. The real power comes from turning that intelligence into a listing that actually sells. This is where modern AI-powered platforms have completely changed the game.

    Instead of just handing you a list of keywords and wishing you luck, these tools actively help build the content for you. For example, after identifying the most valuable keywords, an AI can draft optimized titles and compelling bullet points that speak to both Amazon's A9 algorithm and real, live shoppers.

    The biggest leap forward, though, has been in creating visual content. Your product’s images are often the single most important factor in convincing a customer to buy, and this is where modern tools are now focusing their power.

    Platforms like AlgoFuse.ai are a perfect example of this shift. They don’t just give you ideas for what kind of images to create; they actually create them for you. By analyzing the "visual DNA" of the top-performing listings in your niche, the AI in AlgoFuse.ai can generate a full set of data-driven, marketplace-compliant images in minutes. We're talking everything from the all-important main image to rich infographics and lifestyle photos. This removes the need for expensive photoshoots or designers, saving sellers enormous amounts of time and money. It's a data-first approach that ensures every part of your listing—especially its most critical visual assets—is built to perform from the second you hit "publish."

    Unpacking the Core Features That Drive Conversions

    So, what do these Amazon listing optimization tools actually do? Think of them less as a simple gadget and more like a complete command center for your product page. The best tools have a few core features that work together to get you more sales and a better rank.

    It’s a powerful feedback loop. Great images get you more clicks, the right keywords get you found in search, and solid analytics show you what to improve next. It all starts with the very first thing a shopper lays eyes on.

    AI-Powered Image Generation

    Imagine having a professional creative team on call, 24/7, that already knows exactly what visuals sell on Amazon. That’s pretty much what you get with modern AI image generation. This isn't just about slapping your product on a white background.

    A good tool digs into what the top-selling products in your niche are doing visually and then builds you a full set of high-converting images from scratch.

    This means it can generate:

    • Compliant Main Images: Crystal-clear hero shots that meet Amazon's rules and stand out in a sea of search results.
    • Engaging Lifestyle Scenes: Your product shown in a real-world setting, helping shoppers picture it in their own homes or lives.
    • Informative Infographics: Forget boring bullet points. This turns your product’s best features into graphics that are easy to understand at a glance.

    For many sellers, this one feature alone can replace the need for pricey photoshoots and graphic designers, saving you thousands of dollars and weeks of work on a single listing.

    Advanced Keyword and Competitor Analysis

    Next up is getting inside your customer's head. This is where the tool gives you x-ray vision into what shoppers are typing into the search bar and what your competitors are doing to win their clicks. It’s so much more than a basic keyword finder.

    By pulling apart the titles, bullets, and even the hidden backend search terms from the top-selling ASINs, the tool creates a detailed map of what’s working. You’ll uncover not just the obvious high-volume keywords, but also the lucrative long-tail keywords that people use when they’re ready to buy.

    This lets you stop guessing and start using the exact phrases your target audience uses. Your listing will finally speak the language of both the Amazon algorithm and your customers, pulling in more of the right kind of traffic.

    A/B Testing and Performance Analytics

    Your new and improved listing is live—now what? How do you know if your changes are actually making a difference? This is where you get to play scientist. A/B testing and analytics features let you test different parts of your listing to see what really moves the needle.

    You can finally get concrete answers to questions you've probably been asking for years:

    • Does my lifestyle image get more clicks than the plain white background one?
    • Which title converts better: the one highlighting "durability" or the one focused on "style"?
    • Do these new bullet points actually lead to more people adding my product to their cart?

    This process turns optimization from a guessing game into a data-driven strategy. By tracking metrics like click-through rates, sessions, and conversion rates, you get hard proof of what’s making you money. It’s this constant feedback loop that helps you stay ahead of everyone else.

    These features are powerful on their own, but they're critical when used together. As shopper behavior changes, the data changes with it. We’re already seeing predictions that by 2026, listings with strong multimedia could see 30% conversion uplifts. Plus, AI-generated A+ content can help deliver the visuals needed for 20%+ rate increases. Top agencies and brands are already using these tools to find weak spots in their catalogs and see what customers are saying in competitor reviews, all to build a smarter content strategy. You can learn more by checking out the top Amazon seller strategies for 2026 on sellerlabs.com.

    A Step-by-Step Guide to Image-First Optimization

    For years, the standard advice for selling on Amazon was always the same: start with keywords, write your title and bullets, and then, almost as an afterthought, upload your images. In a marketplace where shoppers scroll endlessly, that process is completely backward. Your images are your storefront, your salesperson, and your one shot to stop a customer mid-scroll.

    That's why savvy sellers are flipping the old model on its head. Using an amazon listing optimization tool like AlgoFuse.ai lets you build your listing around its most important asset: the visuals. This image-first workflow is more intuitive and, frankly, far more effective at building listings that actually convert.

    Step 1: Analyze What the Top Sellers Are Showing

    Before you even think about your own product, you have to understand what your customers are already responding to. The first move is to use your tool to pull up the listings for the top 5-10 sellers for your main keyword and study their images. This isn't about subjective taste; it's about reverse-engineering their visual strategy.

    Pay close attention to a few key things:

    • The Main Image: Is it a clean, studio-style shot on a white background, or does it incorporate packaging or a small graphic element to stand out?
    • The Infographics: What specific features or benefits are they calling out with text and icons? Are they using comparison charts to put down competitors?
    • The Lifestyle Photos: What kind of person or setting are they using? Does it help the shopper imagine the product in their own life?

    This detective work gives you a clear picture of the visual language that’s already winning in your niche.

    Step 2: Generate Your Data-Driven Image Set

    Now that you have your competitive intel, it's time to create your own image gallery. This is where a dedicated tool really shines. You feed your product information into a platform like AlgoFuse.ai, and its AI gets to work. It combines the patterns from your top competitors with proven design principles to generate a full set of high-converting images in just a few minutes.

    This new workflow is all about building a visual foundation first, then layering in the keywords and copy, and finally, analyzing the results to keep improving.

    Diagram showing the Amazon listing optimization cycle with steps for images, keywords, and analytics.

    The result is a set of images that aren’t just beautiful—they’re strategically built from the ground up to speak directly to what your target customers want to see.

    Step 3: Refine and Perfect Your Visual Story

    The first draft from the AI is usually a fantastic starting point, but the real power comes from your own expertise. Using the platform’s editor, you can easily make small but impactful adjustments. Maybe you want to rephrase the text on an infographic, swap the background on a lifestyle photo, or generate a few extra main image options to A/B test later.

    Your goal is to build a complete visual story. Each image should answer a question, overcome an objection, or build the trust a customer needs to click "Add to Cart."

    Step 4: Write Copy That Supports the Visuals

    Once your image set is finalized, writing the rest of the listing becomes shockingly easy. You're no longer staring at a blank page trying to invent compelling copy. Instead, your job is simply to write text that reinforces what the images are already communicating.

    It’s a simple "show, then tell" approach:

    • Does your infographic highlight "Durable Stitching"? Your bullet point can elaborate with, "Features reinforced double-stitching to ensure it holds up to daily wear and tear."
    • Does your lifestyle image show the product on a rainy hike? Now you can confidently write a title that includes "Fully Waterproof for Any Adventure."

    The copy practically writes itself because you've already established the core story with your visuals.

    Step 5: Publish, Monitor, and Improve

    With your new, image-first listing complete, it’s time to push it live and see how it performs. A good amazon listing optimization tool will include a performance dashboard where you can track crucial metrics like sessions, click-through rate, and most importantly, your conversion rate.

    This data is your feedback loop. It tells you what's working and what isn't, allowing you to continually test, tweak, and iterate on your listing to stay ahead of the competition.

    Choosing the Right Tool for Your Business

    A person interacting with a tablet showing a digital checklist for making decisions wisely.

    Picking the right Amazon listing optimization tool can feel like a major commitment, but it doesn't need to be so complicated. The secret isn't finding the tool with the most bells and whistles; it's about matching its strengths to your specific business needs.

    After all, a solo entrepreneur launching their first private label product is playing a completely different game than an agency juggling fifty client accounts. Let's walk through what different sellers should be looking for to get the best fit for their goals and budget.

    For New and Budget-Conscious Sellers

    When you're just starting out, every dollar and every minute counts. Your focus should be on getting the fastest possible return without a steep learning curve or a hefty price tag.

    You'll want a platform that offers:

    • An Intuitive Interface: You shouldn't need a user manual the size of a phone book just to create a listing. The process should feel straightforward and guided.
    • Scalable Pricing: A pay-as-you-go or token-based model is a game-changer here. It lets you optimize one or two listings without getting stuck in a monthly subscription you’re not fully using.
    • A Free Trial or Credits: Being able to test the tool on a real listing is the ultimate proof of concept. You get to see the results before you spend a single cent.

    The goal for a new seller is simple: maximum impact, minimal waste. A tool that quickly gives you a professional-grade listing for a single product is infinitely more valuable than a complex platform with dozens of features you won't touch for months.

    For Agencies and High-Volume Sellers

    Once you're managing a portfolio of ASINs—whether for your own brands or for clients—your priorities shift dramatically. It's no longer just about one perfect listing; it's about efficiency, scale, and collaboration.

    Look for these critical features:

    • Multi-ASIN Management: A centralized dashboard is a must. You need a single place to organize projects by client or brand without losing your mind.
    • Team Collaboration: The ability for multiple team members to access and work on listings is essential for smooth handoffs and quality control.
    • Bulk Processing: Creating or updating content for several products at once isn't a luxury; it's a massive time-saver that directly impacts your bottom line.
    • Localization Capabilities: If you serve international brands, the tool must be able to analyze competitors and generate content for different marketplaces, like Amazon.de or Amazon.co.jp.

    For Established Brands

    If you're an established brand, your reputation is everything. You have a distinct voice, a specific look, and your main goal is to maintain that hard-won brand consistency across your entire catalog.

    Your checklist should prioritize:

    • Brand Consistency Features: The best tools let you upload brand assets—logos, fonts, color palettes—that the AI can then weave directly into generated images.
    • Advanced Editing and Customization: You need granular control to tweak every infographic and lifestyle shot until it perfectly aligns with your brand’s aesthetic.
    • A+ Content Generation: A huge bonus is a tool that also helps create visually rich A+ Content. This is where you get to tell a deeper brand story and really connect with customers.

    Feature Checklist for Selecting an Optimization Tool

    To make your decision easier, use this checklist to compare different Amazon listing optimization tools based on the features that matter most to your business.

    Feature AlgoFuse.ai Generic Tool A Manual Process (Freelancer)
    Image Generation Yes, AI-powered infographics & lifestyle images Basic templates or none Yes, but at high cost and long turnaround times
    Keyword Research Yes, integrated with listing copy generation Often a separate, disjointed feature Manual research required; quality varies
    A/B Testing Support Yes, generates variations for "Manage Your Experiments" Limited or non-existent Extremely costly and slow to implement
    Analytics & Scoring Yes, provides listing quality score and recommendations Basic analysis, often lacks actionable insights No integrated analytics; requires separate tools
    Team Collaboration Yes, designed for agencies and brand teams Usually limited to single-user accounts Requires manual file sharing and version control
    Localization Yes, supports multiple Amazon marketplaces Often limited to one primary marketplace Requires hiring separate freelancers for each region
    Pricing Model Flexible, pay-as-you-go tokens Fixed monthly/annual subscription Per-project or hourly rates, often with hidden costs
    A+ Content Generation Yes, integrated workflow Typically not included or is a basic add-on A separate, expensive project requiring a designer

    This table highlights how an all-in-one solution like AlgoFuse.ai can consolidate your workflow, providing features that are either missing or inefficient in other tools and manual processes.

    Pricing Models Explained

    Understanding how you'll be charged is just as important as the features themselves. The two most common models are monthly subscriptions and pay-as-you-go tokens. A fixed subscription offers predictability, but you often pay for capacity you don't use.

    In contrast, a flexible token-based model, like the one offered by AlgoFuse.ai, gives you a much clearer ROI because you only pay for exactly what you generate.

    With Amazon's A10 algorithm laser-focused on conversion rates, professionally optimized images and A+ content can drive sales well beyond the 20% mark. For any seller, using an AI tool to create a full seven-image set with infographics for just a few tokens is a massive cost advantage. This strategy allows for constant, affordable testing and can lead to savings of up to 95% compared to hiring freelancers for the same work. You can find out more about how new AI tools are helping sellers optimize listings at novadata.io.

    Your Action Plan for Higher Conversions

    We’ve walked through everything from the fundamentals of a modern amazon listing optimization tool to building a powerful, image-first workflow. If there's one thing to take away, it's this: winning on Amazon isn't about outworking everyone; it's about outsmarting them. An AI-driven platform is what makes that possible.

    You've seen how these tools act like an in-house expert—part data analyst, part creative director. They dig through the competition, pinpoint the exact keywords shoppers are using, and help you create visuals that actually sell. The best part? You don't need a degree in design or data science to build a listing that can go head-to-head with the top sellers.

    Moving from Theory to Action

    Let's be honest, the old methods of guessing which keywords might work and spending a fortune on freelance designers are broken. The sellers who are pulling ahead are the ones who have embraced data-driven automation. When you adopt an AI-powered tool, you're not just getting a piece of software; you're getting an immediate competitive advantage. You can finally create listings that aren't just attractive, but are scientifically built to convert.

    This shift lets you get back to what you do best—sourcing great products and growing your business—while the tool handles the heavy lifting of optimization. It's about reclaiming your time and your budget.

    The real game-changer here is empowerment. With the right platform, it doesn't matter if you're a one-person shop or a growing brand. You can compete with established giants, save thousands on creative work, and start making decisions based on solid data, not just a gut feeling.

    Your Next Step to Growth

    This guide has laid out the roadmap. You now know how to spot a good tool, what core features to look for, and how to put an image-first strategy into practice that focuses on what truly moves the needle.

    The final step is to see it for yourself. Reading about the benefits is one thing, but experiencing the technology firsthand is what makes it all click. That "aha!" moment when you watch an AI generate a full set of data-backed images for your product in just a few minutes is something every seller should experience.

    This is your chance to stop playing catch-up and start setting the pace. To see how an amazon listing optimization tool can genuinely change your workflow and lift your conversion rates, the best way is to simply give it a try.

    Get started with a tool like AlgoFuse.ai for free and see the difference it makes on your own product.

    Frequently Asked Questions

    If you’re exploring how to get more out of your Amazon listings, you probably have a few questions. We get it. Here are the straight-up answers to the things sellers ask us most.

    How Quickly Can I See Results After Optimizing?

    That's the big question, isn't it? The honest answer is, it depends on what you’re measuring. You can often see an immediate bump in metrics like click-through rates (CTR) and conversions just days after launching new AI-generated images. Great visuals grab a shopper's attention right away.

    The bigger prize, a higher organic keyword ranking, takes a bit more patience. You should start seeing a real difference in 2 to 6 weeks. That’s the typical timeframe for Amazon’s A10 algorithm to collect enough performance data, see that your listing is converting better, and reward you for it.

    Does an AI Image Tool Replace My Keyword Tools?

    Not at all. Think of it this way: they’re two different experts working together on your project. An AI image generator like AlgoFuse.ai is your visual strategist, using keywords and competitor insights to create images that are wired to sell. But you still need your dedicated keyword research tools to build that foundational list of search terms.

    The winning strategy is a one-two punch:

    1. First, use a research tool to pinpoint your most valuable keywords.
    2. Then, feed that data into an amazon listing optimization tool to produce visuals that convert the exact traffic those keywords bring in.

    Can I Use These Tools for International Marketplaces?

    Absolutely, and this is where things get really powerful. Modern platforms are designed for global sellers. They can analyze the best-selling products in specific markets—like Amazon.de in Germany or Amazon.co.uk in the UK—and then generate localized lifestyle photos and infographics that connect with the local culture and buying habits.

    This saves a massive amount of time and money. You no longer have to hunt down and manage local designers for every single country you want to sell in.

    Is a Token-Based Tool More Expensive Than a Subscription?

    It's actually much more cost-effective for most sellers, especially since optimization needs can come in waves. Instead of being locked into a flat monthly fee for features you might not touch, you just pay for what you create. For example, you could generate a full 7-image set for a product listing for as little as 90 tokens. You can get all the details on our flexible payment options and see how our refund policy work here.

    When you stack that against the $500-$2,000 it costs to hire a freelancer for a single listing, the savings can climb as high as 95%. This makes it a smart, scalable solution whether you're a new seller launching your first product or a big agency juggling hundreds of ASINs.


    Ready to stop guessing and start creating listings scientifically built to convert? AlgoFuse.ai puts a creative agency and a data analyst into one simple platform. Generate a complete, high-converting image set for your product in minutes.

    Try AlgoFuse.ai for free and optimize your first listing today.

  • AI Product Image Generator A Guide for Amazon Sellers

    AI Product Image Generator A Guide for Amazon Sellers

    Think of an AI product image generator as a specialized tool that takes a single, clean photo of your product and instantly creates a full suite of professional listing images. It can generate everything from lifestyle shots and infographics to your all-important main image, effectively replacing the need for expensive photoshoots with a smarter, faster process. For anyone selling on Amazon, this means getting top-tier visuals in minutes, not weeks.

    Your New Advantage in Ecommerce Imagery

    In the fiercely competitive world of Amazon, your product images do all the heavy lifting. They're your digital storefront, your silent salesperson, and often the one thing that convinces a shopper to click "Add to Cart." For years, creating a complete set of high-converting images was a frustrating cycle of hiring photographers, finding graphic designers, and going through endless rounds of revisions.

    That old, expensive model is no longer the only option. The arrival of a dedicated AI product image generator puts the creative power right back where it belongs: in your hands. This isn't just about saving a bit of cash; it’s about gaining a critical advantage in speed and strategy that used to be impossible for most sellers.

    Before we dive into the workflow, let's look at how this new approach stacks up against the old way of doing things.

    Traditional vs AI-Powered Image Generation

    Metric Traditional Freelancer/Agency AI Product Image Generator (AlgoFuse.ai)
    Turnaround Time 2-4 weeks ~5 minutes
    Cost Per Listing $500 – $3,000+ $15 – $30
    Revision Process Slow; multiple day turnarounds Instant; generate new options in seconds
    Scalability Cost & time increase with each product Consistent cost & time, easy to scale
    Creative Basis Designer's intuition, subjective feedback Data-driven from top competitor listings

    The table makes it clear: the shift to an AI-powered workflow isn't just an incremental improvement. It represents a fundamental change in how you can approach your visual merchandising on Amazon.

    Speed Reimagined from Weeks to Minutes

    The most obvious benefit is the massive time savings. A traditional photoshoot, from finding the right person to getting your final edited images, can easily eat up two to four weeks. An AI product image generator can deliver a complete set of seven marketplace-ready images in about five minutes.

    Think about what that speed does for your business. You can:

    • Launch new products the moment they land, catching trends while they're hot.
    • Instantly refresh aging listings for a holiday promotion or to fight back against a new competitor.
    • A/B test entirely different visual angles without committing weeks and thousands of dollars to new creative.

    Shifting from Guesswork to Data-Driven Visuals

    But here's the real game-changer: modern AI tools are built on a foundation of data. Instead of just relying on a photographer's creative eye or your own best guess, a platform like AlgoFuse.ai actually analyzes what's already winning on Amazon. It scans thousands of top-performing listings for your main keyword, identifying the exact visual elements and styles that are proven to drive clicks and sales.

    Key Takeaway: The AI doesn't just create a pretty picture; it engineers an image designed to perform based on real-time market data. This data-first approach transforms your visual strategy from an art project into a measurable science.

    This process ensures your new images—from the hero shot's composition to the layout of an infographic—are already optimized to match what customers are looking for and what Amazon's algorithm favors.

    Unlocking Brand Consistency and Scalability

    As your brand expands, keeping a consistent visual identity across tens or hundreds of SKUs becomes a huge operational headache. An AI product image generator completely solves this. You can define a core visual style and apply it across your entire catalog, ensuring every single listing looks professional and feels like it belongs to your brand.

    This creates a repeatable, scalable system for your visuals. Whether you're launching your second product or your two-hundredth, you can produce high-quality, on-brand imagery without your costs or timelines spiraling out of control. It's a complete workflow shift, moving from one-off creative projects to a reliable engine for growth.

    Creating Your First Data-Driven Image Set

    Getting started with an AI product image generator is surprisingly simple, and it all boils down to one thing you already have: a decent photo of your product. This is your starting block, and the quality of everything that comes after hinges on this single image.

    Don't worry, you don't need a fancy studio setup. Just find a neutral background, like a plain white wall or even a sheet of poster board. Good, even lighting is key—try to avoid harsh shadows. Honestly, the camera on a modern smartphone is more than enough to get a sharp, clear shot.

    The whole point is to give the AI an unobstructed look at your product. From there, it can spin up a whole set of visuals designed to compete on Amazon.

    From a Single Photo to a Full Listing

    Once you've got your product photo, the real fun begins. You'll upload that image and give the AI just one more bit of information: your main Amazon keyword or the ASIN of a competitor you want to analyze. That’s it. This one action kicks off a powerful workflow that’s driven entirely by real-world market data.

    This isn't about slapping your product on a random stock background. The moment you provide that keyword, the AI dives into Amazon and analyzes what the top-selling products are doing. It's looking for patterns in:

    • Main Image Styles: What angles, lighting, and compositions are the big players using?
    • Infographic Layouts: How are competitors using text and icons to show off their product's best features?
    • Lifestyle Themes: What kind of scenes and environments are helping shoppers connect with the product and imagine it in their own lives?

    This is what makes a purpose-built e-commerce tool so different from a generic AI art generator. The images it creates aren't just a creative guess; they're based on what's already proven to work and make sales in your exact niche.

    Think of the AI as your own personal market researcher, creative director, and graphic designer all working together. It crunches data from thousands of successful listings to build a visual strategy for your product in minutes.

    In about five minutes, the entire process is done. You get a complete set of seven marketplace-ready images—a compliant main image, detailed infographics, and compelling lifestyle shots—all from that one photo and keyword.

    The difference between this and the old way of doing things is pretty stark.

    Diagram comparing traditional imagery creation (photoshoot, weeks, expensive) to AI imagery generation (minutes, affordable).

    As you can see, we're talking about a massive reduction in time and cost. What used to take weeks and cost thousands of dollars now takes minutes and costs next to nothing.

    The Science Behind the Scenes

    So what’s actually happening under the hood? It’s a clever mix of computer vision and market analysis. When you upload your photo, the AI first cleanly cuts your product out from its original background. This creates a perfect digital asset—the "actor" it can now place on any "stage."

    At the same time, the keyword analysis is building that stage. If your keyword is "coffee grinder," the AI doesn't just find a generic kitchen picture. It generates a kitchen scene with the specific type of lighting, countertop materials, and background props that are common among the top-selling coffee grinders. It learns that for a yoga mat, a calm, minimalist indoor space converts better than a busy park scene.

    This data-first approach is applied to every single image. For infographics, the AI might see that top competitors are all using a three-icon layout to call out their main benefits. For lifestyle shots, it might notice that showing the product being used by a certain demographic is a winning formula.

    The result is a strategically built image set designed from the ground up with one goal in mind: to rank higher and convert more shoppers. You can see this workflow in action yourself when you sign up and try it for free.

    Refining AI-Generated Images to Perfection

    A person types on a wireless keyboard while working on photo editing software on a dual monitor setup.

    Getting that first set of images from an AI product image generator feels like magic. In minutes, you have a nearly complete listing. But here’s something I’ve learned from experience: that first draft is your starting block, not the finish line. The real art is in the edits that follow—tweaking, regenerating, and guiding the AI until the images don’t just look good, they look perfectly on-brand.

    Think of the AI’s initial output as a fantastic, educated guess. It knows what generally works on Amazon. Your job is to inject your specific brand DNA and creative direction. The good news is, you don't need to be a Photoshop wizard. Modern tools are designed for exactly this kind of back-and-forth.

    The Iteration Loop: Your Key to Greatness

    So, let's say the AI creates a gorgeous lifestyle shot of your new kitchen gadget. It's set in a sleek, minimalist kitchen, but your brand is all about that rustic, farmhouse charm. Do you start over? Absolutely not.

    This is where the real power lies. You just select that image and tell the AI to regenerate it, maybe adding a simple prompt like "in a rustic farmhouse kitchen." A single click can give you several new options, one of which will likely nail the cozy vibe you had in your head.

    It's the same for infographics. If the text on a feature callout feels a little off from your brand’s voice, you don’t have to fire off an email to a designer and wait. You just edit the text directly inside the tool, and the image updates right there.

    Pro Tip: Don’t hesitate to hit "regenerate" a few times. I've found that each new version teaches the AI more about what you're looking for. This rapid trial-and-error is what makes this process so much faster and more affordable than the old way of doing things.

    This isn't just a niche trick; it's rapidly becoming the industry standard. AI image editing was the fastest-growing software category of 2024, exploding with a 441% year-over-year traffic increase. With nearly 20% of Americans already using AI to create images, your customers are seeing more polished visuals than ever. Keeping up isn't optional anymore. You can dive deeper into these trends by checking out the latest AI image statistics.

    Smart Edits Don’t Have to Be Expensive

    This whole process of fine-tuning works so well because of how token-based pricing is structured. In the past, every round of revisions with a photographer or graphic designer meant more hours and more money. The economics of AI are completely different.

    Generating an entire seven-image listing from scratch might cost you 90 tokens. But making a small, critical change—like swapping a background or updating the text on one image—could cost as little as 5 tokens. This model encourages you to get everything just right.

    • Swap Backgrounds: That beach scene isn’t working? Try a mountain view for just a few tokens.
    • Adjust Demographics: Need your lifestyle shot to resonate with a different audience? Regenerate it with models that better reflect your target customer.
    • A/B Test Main Images: Create a few variations of your hero image with different angles or props. The cost is so low, it’s a no-brainer.

    This approach gives you the freedom to experiment in ways that were once far too costly or time-consuming. You can test visual hypotheses and optimize every single image without ever worrying about blowing your budget.

    Taking Full Control of Your Visual Story

    At the end of the day, the editing dashboard is your creative command center. It puts you in the director's chair, giving you final say over every visual element that represents your product. This is how you ensure every image is not just a pretty picture, but a strategic asset designed to convert.

    This level of hands-on control is what separates a good listing from a great one. Whether you’re dialing in the perfect aesthetic or localizing images for an international marketplace, these refinement tools are what let you build a powerful, cohesive brand story. Once you’ve perfected your visuals, you can keep all your projects organized and accessible in your dedicated AlgoFuse.ai dashboard.

    Advanced Strategies to Turn Your Images Into Conversion Engines

    A good set of images gets you in the game. But a great set? That's what wins the sale. The difference is moving beyond just showing what your product is and instead showing what it does for the customer. This is where we shift from description to persuasion, using our images to answer questions, overcome objections, and guide a shopper straight to the "Add to Cart" button.

    This is where an ai product image generator becomes a secret weapon. Forget just making pretty lifestyle shots. You can now instantly create powerful selling tools—think comparison charts, feature callouts, and visual how-tos—that directly tackle a shopper's biggest hesitations. Your images stop being passive decoration and start actively selling.

    Telling a Visual Story That Sells

    Think of your image stack on Amazon as a silent salesperson telling a story. Each image has a specific job, and when they work together, they build a compelling case for why your product is the only one they need. If you lose their attention, you've lost the sale.

    Here’s how I think about the flow of images on a listing that consistently converts:

    • The Scroll-Stopper: This is your main image. Its only goal is to pop on a crowded search results page. It has to be clean, clear, and compelling enough to earn that first click. No distractions.
    • The "Aha!" Moment: Your second image should immediately show the product solving a real-world problem. A lifestyle shot or a simple infographic here helps the customer instantly visualize the benefit in their own life.
    • The Differentiator: Now it's time to show why you're better. Use infographics and callouts to highlight the 2-3 key features that set you apart from the competition. Is it stronger? Easier to use? More durable? Show, don't just tell.
    • The Quality Proof: Get up close. Use stylized close-ups to show off premium materials, intricate craftsmanship, or a unique design detail. This builds perceived value and justifies your price.
    • The Final Handshake: Seal the deal and remove any last-minute doubts. This is the perfect spot for a comparison chart against competitors, a "what's in the box" graphic, or an image that tells your brand story and builds trust.

    When you structure your images this way, the purchase feels like the obvious and logical next step for the shopper.

    Building High-Impact A+ Content Modules

    Premium A+ Content is where you can truly let your brand shine, and frankly, it's one of the best conversion boosters Amazon gives us. We all know that listings with A+ Content just convert better—it's not even a debate anymore. An AI image generator makes creating this rich, immersive content almost trivially easy.

    Instead of paying a designer for every single module, you can prompt the AI to create assets tailored specifically for A+ layouts.

    • Full-Width Banners: Prompt something like, "wide, cinematic lifestyle photo of [my product] on a marble kitchen island, with soft morning light from a window." This creates an aspirational feel that screams "premium brand."
    • Comparison Charts: You don't need the AI to generate the final chart with text. Instead, have it create a branded, professional-looking table template. Then, you can easily drop in your text comparing your product's features against key competitors.
    • Feature Stacks: To break up text-heavy sections, generate a series of smaller, cohesive images. Each one can illustrate a single benefit you're discussing, making the entire section more scannable and impactful.

    The explosive growth in AI image generation is a clear signal of where e-commerce is headed. The market is expected to surge from $9.10 billion in 2024 to an incredible $63.29 billion by 2030, all driven by the demand for richer visual content. This is exactly what A+ Content is built for. You can dig into the data behind these AI image generator market trends to see just how big this shift is.

    By using an AI tool for these assets, you can create a complete, top-tier brand experience in hours, not weeks. This allows you to roll out conversion-lifting A+ Content across your entire catalog, giving you a massive advantage over slower-moving competitors.

    Go Global by Looking Local: Scaling Your Brand with Image Localization

    Split image: urban street with person, outdoor cafe with coffee and cake, text 'LOCALIZE GLOBALLY'.

    Expanding your brand into new countries is one of the biggest growth opportunities for any seller. But it's also where many stumble. An image that sells like crazy in the United States could be a total dud in Germany or Japan. Success isn't just about translating your bullet points; it's about making your entire listing feel like it was made for that specific culture.

    This is exactly where an AI product image generator can become your secret weapon for global expansion.

    Not long ago, this kind of visual localization was a logistical nightmare. You'd have to fly to different countries for photoshoots, hiring local models, photographers, and stylists to get the right look. The costs were astronomical, putting true global branding out of reach for all but the largest corporations. AI completely changes the game.

    From a Single Product to a Worldwide Presence

    Let’s say you sell premium coffee beans. For your U.S. listing, you might have a lifestyle image of someone holding a big travel mug in a bustling, modern kitchen. It works perfectly. But that same image in Japan? It might not connect. A better approach could be a shot featuring a smaller, more elegant ceramic cup in a quiet, minimalist space. With an AI image generator, you can create both of those scenes in minutes, all from a single photo of your product.

    This is possible because a smart tool like AlgoFuse.ai is built to understand the subtle differences between Amazon marketplaces. It knows the visual styles, the types of environments, and even the model demographics that resonate best with shoppers in each country. You just tell the AI you’re targeting Amazon.de or Amazon.co.jp, and it gets to work creating scenes that feel genuinely local.

    How AI Nails the Cultural Details

    This goes way beyond just changing the background. A good AI tool handles the small, critical details that build trust and make a shopper feel understood.

    • Environments: The AI can place your skincare product in a bathroom that looks like it belongs in a Berlin apartment, not a sprawling Los Angeles home.
    • Props: It can surround your kitchen gadget with food and utensils that are common in that specific culture, making the scene feel instantly familiar.
    • Models: You can generate lifestyle shots with models who actually look like the local population, making your product feel more relatable and trustworthy.

    By getting these details right, your listings don't just feel translated—they feel native. This is how you meet regional marketplace standards and, more importantly, connect with customers on a deeper, emotional level.

    You're not just making a few new pictures. You're building a scalable visual strategy for every market you enter. An AI product image generator cuts the cost and complexity of global expansion by an order of magnitude, turning what used to be a months-long project into a single afternoon of work.

    The Business Case for AI-Powered Localization

    It's hard to overstate just how significant this shift is. The market for AI image generators is expected to skyrocket from roughly USD 3.16 billion in 2025 to over USD 30 billion by 2033. This explosive growth is happening because businesses have realized AI can slash image production costs by up to 95% compared to traditional photoshoots, all while delivering top-tier quality.

    With North America already making up over 41% of the market, the pressure to adopt these tools is only going to grow. You can dive deeper by reading the full report on the AI image generator market.

    For an Amazon seller, this is huge. Expanding into a new country is no longer a high-stakes bet. You can now test your product's appeal in a new market with a fully localized listing for a tiny fraction of the old cost. If it works, you've unlocked a new revenue stream. If it doesn't, you've learned a valuable lesson without a massive financial loss. This makes your global strategy faster, smarter, and far more profitable.

    Jumping into any new tool, especially one that handles your Amazon images, is bound to bring up some questions. It’s smart to be skeptical—these images are your most critical sales assets. Let's walk through some of the most common concerns I hear from sellers about using an AI product image generator.

    Can AI Images Really Compete with Professional Photography?

    Not only can they compete, but in many strategic ways, they often pull ahead. Modern tools, particularly an ai product image generator built with e-commerce in mind, create visuals that are virtually indistinguishable from high-end studio shots.

    But the real edge isn't just about quality; it's about strategy.

    Instead of just aiming for a "nice-looking" photo, these AI systems are trained on what’s actually working on Amazon. They analyze the lighting, shadows, and layouts of top-performing listings in your category. This means your images are designed for conversion right from the start.

    Plus, you get a level of speed and flexibility that a traditional photoshoot just can't offer. You can generate a dozen variations to find the perfect angle or background, something that would cost a fortune with a human photographer. The technology is surprisingly good at creating the whole package:

    • Clean, compliant main images that stand out in crowded search results.
    • Sharp infographics that clearly communicate your product’s value.
    • Believable lifestyle scenes that help shoppers imagine the product in their day-to-day life.

    Ultimately, the final images aren't just professional; they're data-driven and built specifically to perform on the Amazon marketplace.

    Do I Need Design Skills to Use This Type of Tool?

    Absolutely not. That’s one of the biggest reliefs for most sellers. Platforms like AlgoFuse.ai were built for entrepreneurs and brand managers, not for graphic designers. The entire workflow is meant to feel intuitive.

    You start with a simple, clean photo of your product. Then, you tell the AI your main keyword or give it a competitor's ASIN to analyze. That’s really it. The AI does all the heavy lifting.

    It studies the market, pinpoints the visual cues that work in your niche, and then generates a complete set of images. You don't need to mess with layers in Photoshop or write a complex brief. You just review the images in a simple dashboard and make changes with a few clicks.

    The whole point is to give you the power to create agency-quality visuals on your own terms. You're the creative director, without needing any of the technical design skills.

    How Does the Pricing Work and Is It Cost-Effective?

    Most of these advanced AI platforms run on a token-based system, which is where the savings really start to make sense. You move away from big, upfront project fees and into a much more flexible, on-demand model.

    For example, with a platform like AlgoFuse.ai, generating a full set of seven Amazon listing images might only cost you around 90 tokens. Most starter plans give you hundreds of tokens, and new users often get enough free tokens to produce their entire first listing without spending a dime.

    Now, compare that to the old way of doing things. A freelance photographer and graphic designer can easily run you $500 to over $2,000 for just one product.

    The cost-effectiveness really shines during the revision process. Need to tweak the text on an infographic or try a different lifestyle scene? That might only be 5 tokens. With a designer, that's another round of feedback and another line item on your invoice. For sellers launching multiple products, the savings can climb upwards of 95%, not to mention the turnaround time shrinking from weeks to mere minutes.

    Can the AI Create Images That Match My Brand Identity?

    Yes, and you can get surprisingly specific. This is all handled through a simple process of refining and iterating on what the AI gives you.

    The AI’s first attempt is based on what’s broadly successful for your keyword, but the editing features are where you dial in your specific brand look.

    Let's say the initial lifestyle photos look a bit too sleek and modern, but your brand has more of a warm, rustic vibe. You can just hit "regenerate" and guide the AI toward different environments, color schemes, or moods. For infographics, you can edit the text directly to make sure it matches your brand's voice.

    It becomes a quick feedback loop where you steer the AI's powerful engine until the output is not only optimized for Amazon but also a perfect reflection of your brand.


    Ready to see just how quickly you can get this done? AlgoFuse.ai gives you all the tools you need to generate a full set of high-converting, data-driven images in about five minutes. Get started for free today and create your first listing on us.

  • Your Guide to an AI Product Image Generator for Amazon Listings

    Your Guide to an AI Product Image Generator for Amazon Listings

    At its core, an AI product image generator is your on-demand creative studio. It’s a specialized tool that uses artificial intelligence to spin up a full suite of professional, high-converting product photos from just one or two simple pictures of your item. For anyone selling on Amazon, this means you can get all your lifestyle shots, infographics, and main images done in minutes, without ever hiring a photographer or graphic designer.

    Why Visuals Are Your Most Powerful Sales Tool on Amazon

    On Amazon, your product images do the heavy lifting. They’re your silent salesperson. When a shopper lands on your page, they can’t hold your product or see it in action. All they have are your pictures. This is where so many sellers stumble—they treat their images like a chore to be checked off, not as the single most important factor driving their sales.

    Let’s be blunt: generic, uninspired images don't just blend in; they actively repel customers. They scream "amateur," raise doubts about your product's quality, and send shoppers straight to your competitor’s more polished listing. This directly tanks your click-through rate, your session time, and, ultimately, your sales velocity and BSR.

    The Staggering Cost of Traditional Photography

    Think about the old way of getting this done. A traditional product photoshoot is a long, expensive headache. It usually looks something like this:

    • First, you have to find and hire a freelance photographer or an agency.
    • Then, you’re shipping your valuable inventory out for the shoot.
    • Next comes all the back-and-forth to coordinate models, props, and locations.
    • You wait days, sometimes weeks, to get the final edited photos back.
    • Finally, the invoice arrives, often for thousands of dollars for just a handful of images.

    The whole process is slow, rigid, and incredibly expensive. Want to create a few images for a Christmas promotion or test a different lifestyle angle? You have to fire up that entire costly cycle all over again. For sellers with more than a few SKUs or those looking to expand internationally, this model just doesn't scale.

    To put it in perspective, let's compare the two approaches side-by-side.

    Traditional vs AI-Powered Image Generation: A Quick Comparison

    The table below breaks down the core differences in cost, time, and output quality between the old-school route and using an AI platform for your Amazon listing images.

    Metric Traditional Method (Freelancer/Agency) AI Product Image Generator (e.g., AlgoFuse.ai)
    Cost $1,000 – $5,000+ per photoshoot $29 – $99 per month for unlimited generations
    Turnaround Time 1-4 weeks 2-5 minutes
    Image Variety Limited to the original shoot concepts Infinite variations and concepts on demand
    Scalability Low; each new product requires a new shoot High; easily generate images for entire catalogs
    Flexibility Low; revisions are costly and time-consuming High; instantly test new scenes, models, and styles

    As you can see, the shift isn't just about incremental improvement; it's a fundamental change in how you can approach your visual marketing.

    The Rise of AI in Ecommerce Visuals

    This is exactly why the AI image generator market is booming. The industry is projected to jump from USD 412.51 million in 2025 to an incredible USD 1,747.63 million by 2034. That explosive growth is driven by the non-stop demand for better visuals in ecommerce, particularly on a competitive battlefield like Amazon. With a dominant 40.34% market share, North America is leading this charge. You can dig into the full report on this market's rapid expansion for more details.

    An AI product image generator completely upends the traditional model. Instead of dropping thousands on a single shoot, you get the power to create infinite visual concepts whenever you want, for a tiny fraction of the cost.

    This isn't just about saving a buck, though. Modern tools like AlgoFuse.ai give you a serious strategic edge because they're built with market intelligence at their core. By analyzing what's working for top-selling products across 19 different Amazon marketplaces, these platforms can generate visuals that are already dialed in for conversion. The AI knows what kinds of infographics, lifestyle scenes, and feature callouts are grabbing customers' attention in your niche right now.

    This data-first approach takes all the guesswork out of the equation. You get agency-quality visuals that are engineered to sell from the get-go. You’re no longer just making pretty pictures; you’re deploying a targeted visual strategy designed to capture attention and build trust instantly.

    Creating High-Converting Amazon Images From a Single Photo

    This is where the real magic happens. Forget the weeks of back-and-forth with photographers and the thousands of dollars spent on photoshoots. You can take one simple, clean product photo and turn it into a complete set of seven conversion-ready Amazon images.

    The whole approach is built for speed and, more importantly, for what actually works on Amazon right now. You don't need to be a prompt engineer or a graphic designer. The AI handles the creative work by first analyzing what’s already winning in your market.

    It All Starts With One Good Photo

    Everything hinges on your source image, but getting it right is surprisingly straightforward. You don't need a professional studio shot; a high-resolution photo from a modern smartphone will do the job perfectly.

    The goal is just to give the AI a clean, unobstructed view of your product. For the best results, keep these tips in mind:

    • Stick to a plain, neutral background. A simple white or light gray backdrop makes it easy for the AI to isolate your product perfectly.
    • Get the lighting right. You want even, consistent light. Try to avoid harsh shadows or bright glares that might hide product details. Natural light from a nearby window is usually your best bet.
    • Capture a clear, head-on angle. Think of this as your main "hero" shot. It should show the product clearly and accurately.

    This single image is the only raw material you need. It becomes a "digital twin" that the AI will place into dozens of different scenes, infographics, and lifestyle shots. A solid input photo is the foundation for sharp, professional, and convincing final images.

    Let Market Intelligence Guide the Way

    Once your photo is ready, this is where a platform like AlgoFuse.ai really changes the game. Instead of asking you to dream up creative prompts from scratch, it starts with hard data. All you do is enter your main target keyword or the ASIN of a top competitor.

    This simple action kicks off a real-time analysis of the top-performing listings for that exact keyword on Amazon. The AI immediately gets to work identifying which types of images are currently driving the most clicks and sales.

    This is the core advantage, and it can't be overstated. The AI isn't just generating pretty pictures at random. It’s reverse-engineering the visual strategies of the most successful sellers in your niche, giving you a proven blueprint to follow.

    The system studies everything—the camera angles, the benefits highlighted in infographics, the demographics of models in lifestyle photos, and even how comparison charts are structured. It then synthesizes all these best practices to build a custom image strategy just for your product.

    Generating Your Full 7-Image Stack in Minutes

    After the market analysis is done, the AI generates a complete set of seven essential Amazon images all at once. The whole process usually takes about five minutes.

    Here’s a look at the kind of image set you can expect and why each one is so critical for driving sales:

    • The Main Image: A perfect hero shot on a pure white background, ready to go and fully compliant with Amazon's rules.
    • Two Lifestyle Images: These place your product in realistic, aspirational settings that help your target customer imagine it in their own life. You get a couple of different contexts to show off its versatility.
    • A Benefit-Focused Infographic: This one gets straight to the point, calling out 3-5 key benefits with clean icons and short text. It instantly answers the customer’s biggest question: "What's in it for me?"
    • A Feature Callout Image: This image zooms in on specific technical features, materials, or dimensions. It’s all about building trust and showcasing quality.
    • A Comparison Chart: A powerful tool that positions your product against a generic competitor, making it obvious why yours is the better choice.
    • A Final "In-Use" or Brand Shot: This last image often reinforces the brand story or shows the positive outcome of using your product, leaving a lasting impression.

    This visual shows just how much this modern AI workflow simplifies the journey from a single photo to a full-fledged Amazon listing.

    Flowchart comparing traditional image generation process with AI image generation workflow, from capture to usage.

    The takeaway here is the incredible compression of time and resources. What once took weeks of coordination and a whole creative team is now an automated task that’s over in minutes. You get a complete, market-tested set of visuals without writing a single prompt or hiring outside help. This one-click generation is the new playbook for launching and optimizing products at a speed that was impossible just a few years ago.

    Refining Your AI-Generated Images for Maximum Impact

    Getting your first set of AI images is a great start, but the real magic happens next. Don't think of those initial outputs as the finished product. Instead, see them as a solid foundation you can build on. The best part is that you can refine, tweak, and perfect these visuals without ever leaving the platform.

    This is where an ai product image generator evolves from a simple generator into an interactive creative suite. The top-tier tools come with built-in AI editing features, letting you make surprisingly specific changes with just a few words.

    A person uses a stylus on a tablet displaying a photo gallery of various landscape images, on a wooden desk.

    Fine-Tuning Images with AI Editing

    Let's say one of your new lifestyle shots is almost perfect, but the background feels a little flat. Instead of regenerating a whole new batch, you can just edit what you have.

    For example, imagine your product is a portable blender, and the AI placed it on a generic kitchen counter. That's fine, but it doesn't scream "on-the-go." You can simply command the AI to "change the background to a hiking trail at sunrise." In moments, the tool swaps out the entire scene, intelligently keeping your product as the perfectly lit hero.

    This kind of prompt-based editing is a massive time-saver. You can use it for all sorts of things:

    • Change the setting: Swap a plain living room for a high-end modern office or a relaxing beach scene.
    • Add or alter props: Place a steaming mug next to your coffee maker or add a smartphone beside your new tech gadget to show scale.
    • Update infographic text: Quickly change "Durable Design" to a more compelling "Built to Last a Lifetime."

    It’s these quick, targeted adjustments that turn a good image into a great one that nails your specific marketing angle.

    Generating Variations for A/B Testing

    Here’s where things get really interesting. Because creating a completely new image concept is so fast and affordable, you can finally stop guessing and start A/B testing your visual strategy.

    The ability to instantly create and test different visual hypotheses is a huge advantage. You're no longer debating what your audience might want to see; you're using real data to optimize for conversions.

    Let's say you're selling a premium desk chair. You could generate two completely different lifestyle images to see which performs better:

    1. The "Professional" Angle: An image of the chair in a sleek, minimalist home office to attract remote workers and executives.
    2. The "Gamer" Angle: The same chair but in a high-tech gaming rig with RGB lighting, targeting the massive gaming community.

    By running both images in your listing (or in your ad campaigns), you’ll get clear data on which one drives more clicks and sales. This iterative process takes the expensive guesswork out of building your brand's visual identity. Platforms like AlgoFuse.ai make it easy to start creating and testing your own image variations.

    This rapid evolution is part of a huge shift in e-commerce. The AI image generator market, valued at USD 3.16 billion in 2025, is on track to hit a staggering USD 30.02 billion by 2033. This incredible growth is fueled by sellers who now have 24/7 access to agency-quality visuals, helping them slash costs and boost conversions. To see how this boom is impacting sellers worldwide, you can explore more insights on the AI image market's growth.

    Localizing Your Product Images for Global Amazon Sales

    Taking your brand global on Amazon is a massive opportunity, but I’ve seen countless sellers stumble right out of the gate with a simple, yet costly, mistake. They just copy their US-based product images and paste them into their listings for Amazon.de, Amazon.co.jp, or Amazon.com.au. This is a surefire way to scream "foreign seller" to local shoppers, instantly killing trust and your conversion rate.

    What resonates with a customer in Ohio can feel completely alien to a buyer in Osaka. That classic family barbecue scene that works wonders in Australia? It might just look odd and out of place in Germany. To truly succeed worldwide, you need to go beyond just translating text—you have to localize your visuals. This is where a good ai product image generator becomes one of your most valuable assets for international growth.

    A triptych showing an outdoor restaurant, a table setting with 'LOCALIZE VISUALS' text, and a pagoda building.

    Why One-Size-Fits-All Images Don't Work

    Cultural context is everything. A generic lifestyle photo with North American models in a sprawling suburban home just won't connect with a shopper in Tokyo who lives in a smaller, more modern apartment. It creates a subtle but powerful disconnect, making your product feel like it wasn't made for them.

    This is a huge blind spot I see all the time. Sellers pour money into logistics and professional translations but then treat their most powerful sales tool—their images—as an afterthought. The result is predictable: lower conversion rates, fewer clicks, and a painfully slow start in a promising new market.

    Don’t let your visuals betray your global ambitions. A localized image tells a shopper, "We made this for you and your lifestyle," which is one of the most powerful messages you can send in e-commerce.

    Crafting Culturally Authentic Scenes with AI

    Instead of dealing with the logistical nightmare and high cost of photoshoots in every single country, you can use a quality ai product image generator to spin up authentic, localized scenes in just a few minutes. The trick is using a platform that’s actually built for this kind of detailed, specific generation.

    Let's say you're selling a premium coffee grinder. Here’s how you could adapt your imagery for three totally different markets:

    • For Amazon.com (USA): You might generate a shot of the grinder on a big granite countertop in a spacious, open-concept kitchen, maybe with a family milling about in the background.
    • For Amazon.it (Italy): The scene could shift to a cozy, sun-drenched kitchen, with the grinder sitting next to a classic stovetop Moka pot on a rustic wooden table.
    • For Amazon.co.jp (Japan): Here, you'd want to place the grinder in a compact, minimalist kitchen, focusing on clean lines, organization, and a feeling of calm efficiency.

    Each image is selling the exact same product, but they’re speaking a completely different visual language—one that feels familiar, authentic, and aspirational to the local shopper. That's how you build an instant connection and show you've done your homework.

    Tapping into Marketplace Data for Smarter Localization

    The really powerful AI platforms, like AlgoFuse.ai, take this a step further by basically doing the cultural research for you. Instead of guessing what a typical German kitchen looks like, the AI can analyze the top-performing competitor listings directly on Amazon.de.

    This completely changes the game for sellers. The workflow is incredibly straightforward:

    • You pick the marketplace you're targeting, like Amazon UK.
    • You enter your main product keyword.
    • The AI scans the current best-sellers in that country for that keyword.
    • It then generates a complete set of listing images, including lifestyle shots, that mirror the models, environments, and overall aesthetic that is already proven to convert with British shoppers.

    This process removes all the cultural guesswork. Your visual strategy is now grounded in real-time market data, not stereotypes. You're not just making a "British-looking" scene; you're creating a scene that aligns with the visual trends dominating your niche on that exact Amazon storefront. This is how you build trust and drive sales from day one, no matter where in the world you decide to sell.

    Understanding Pricing and Calculating Your Return on Investment

    Whenever you consider a new tool, the first question is always, "What's this going to cost me?" With an AI product image generator, the pricing can feel a bit different. Most platforms, AlgoFuse.ai included, run on a token or credit system instead of a simple per-image fee.

    At first, that might seem abstract, but it’s actually built to give you more control over your budget. You’re not paying a flat rate for every single image. Instead, you use a certain number of tokens for specific tasks. This means you can match your spending directly to your needs, whether you're creating an entire image stack from scratch or just making a few minor edits. It’s a far cry from the rigid, all-or-nothing project fees you get from a photography studio.

    Breaking Down the Token Costs

    So, what does this look like in the real world? Let’s use AlgoFuse.ai as an example. The token cost is tied directly to how much work the AI has to do. A simple task uses fewer tokens, while a more complex one will use more. It’s that straightforward.

    Here's a quick look at the costs you can expect:

    • Full 7-Image Listing: Generating a complete set of seven images—your main shot, lifestyle photos, infographics, and even a comparison chart—all from just one photo costs 90 tokens.
    • Premium A+ Content Module: Need a beautiful banner or a custom module for your A+ Content? That’ll run you 60 tokens.
    • Simple Image Edit: Just want to swap out a background or change some text? That’s a quick fix and only costs 5 tokens.

    This structure ensures you’re only paying for what you actually use. A full visual overhaul for a new product has a predictable, manageable cost, while tweaking a listing for a holiday promotion becomes almost trivially inexpensive.

    Calculating Your Immediate ROI

    This is where the numbers really start to make sense. A traditional product photoshoot can easily set you back $2,000 to $5,000 and take weeks of planning and execution. With an AI platform, you can get a more comprehensive and market-tested set of visuals in minutes, often for less than the cost of a dinner out. The savings are immediate, often cutting your creative costs by up to 95%.

    By moving from expensive, one-off photoshoots to a low-cost subscription, you’re turning a major capital expense into a small, predictable operational cost. This frees you up to test, iterate, and refresh your listings whenever you want, not just when the budget allows.

    This isn't a niche trend; it's a massive market shift. Analysts are painting a very aggressive picture of where this technology is headed. For instance, MarkNtel Advisors projects the AI image generator market will skyrocket from USD 9.10 billion in 2024 to USD 63.29 billion by 2030. That’s a compound annual growth rate of 38.16%. This explosion is being driven by the relentless growth of e-commerce and the need for high-volume sellers to work more efficiently.

    Strategies for Maximizing Your Token Value

    You can stretch your investment even further if you're smart about it. When you’re evaluating plans, look for features designed to give you maximum value over time.

    For example, some higher-tier plans offer token rollover, which lets your unused tokens from one month carry over to the next. This is a fantastic feature for sellers whose creative needs come in waves. You won't have to worry about losing the value you've already paid for during a slow month.

    Most importantly, you should never have to buy a tool blind. A good platform will let you test it out first. We give new users free starter credits on AlgoFuse.ai—enough to generate a complete 7-image listing for a product. This gives you a chance to see the quality for yourself and get a feel for the workflow before you ever pull out your credit card.

    If you have questions about how plans or billing works, it's always smart to have a look at the fine print. You can check out the company's refund and subscription terms right on their site. That kind of transparency is exactly what you should look for when making an investment in your brand’s future.

    Common Questions About AI Product Image Generators

    Whenever I talk to sellers about using AI for their product photos, the same few questions always pop up. It’s new territory, so a healthy dose of skepticism is natural. Let’s get straight to it and address the most common concerns I hear from Amazon sellers diving into these tools.

    Can AI Really Replace a Professional Product Photographer?

    For the bread-and-butter images you need on an Amazon listing, the answer is yes, it absolutely can. While you might still hire a photographer for a huge, artistic brand campaign, an ai product image generator is built for the specific, conversion-focused images that actually drive sales on the marketplace.

    Think about the standard image stack for a successful listing. An AI can knock these out in minutes, not weeks:

    • Lifestyle shots that show your product in a real-world setting.
    • Infographics that clearly highlight key benefits with clean text and icons.
    • Comparison charts that stack your product up against the competition.

    These are the workhorse images that do the heavy lifting for your conversion rate. Getting them done with a traditional photographer is often slow and costly. The AI automates this, giving you a full set of assets that are perfectly tailored for the Amazon environment with incredible speed.

    Do I Need Design Skills to Use These Tools?

    Not at all. This is probably the biggest misconception holding sellers back. The best platforms are built for entrepreneurs and marketers, not professional graphic designers. The entire process is designed to be intuitive from the get-go.

    You won’t be wrestling with complex software or trying to become an expert prompt engineer. The most effective systems are guided by real market data. You just give it a single photo of your product, and the AI handles the composition, lighting, and graphic design elements based on what’s already proven to sell in your niche.

    The whole point of these tools is to eliminate the technical headaches of great design. If you can upload a photo and type a simple phrase, you have everything it takes to create a complete, high-converting image set.

    What Kind of Photo Do I Need to Start With?

    Simple is best. You don’t need a fancy, professionally lit studio shot. In fact, a single, clean photo of your product against a plain white or neutral background works perfectly. This gives the AI a clear, unobstructed "map" of your product's shape, texture, and details.

    Honestly, a high-resolution photo from a modern smartphone is usually more than enough. When you provide a clean "digital twin" of your product, you give the AI the best possible foundation to work from. It can then accurately place that item into countless different scenes and graphics. Don't overthink it—a clear shot is all you need to get started.

    How Does the AI Know What Images Convert Well on Amazon?

    This is the real magic that separates a generic image tool from one built specifically for e-commerce. Advanced platforms like AlgoFuse.ai aren't just creating pretty pictures; they're performing real-time market analysis to inform every image they generate.

    Here's a look under the hood:

    1. You start by giving it your main keyword or the ASIN of a direct competitor.
    2. The AI instantly goes to work, scanning the top-performing listings for that exact keyword in your marketplace.
    3. It then identifies the visual patterns, layouts, and benefit callouts that are winning clicks and sales right now.

    This data-first approach is what makes the results so effective. The AI isn't just guessing what might look good. It's applying the proven visual strategies of your most successful competitors directly to your own product, giving you a massive shortcut to a listing that converts.


    Ready to stop guessing and start generating visuals that are engineered to sell? Try AlgoFuse.ai today and create your first complete, data-driven Amazon image set for free. https://www.algofuse.ai