Category: Uncategorized

  • Your Daily AI Intel Stack: Building a Fast-Scan System That Actually Filters Signal From Noise

    Signal vs. Noise — Your Daily AI Intel Stack: a split-desk showing curated five-item digest versus chaotic overflowing feeds

    There is a version of your morning that goes like this: you open your laptop, your inbox has fourteen newsletters in it, your RSS reader shows 347 unread items, two Slack channels are blowing up about something that happened overnight in the AI space, and a colleague has already forwarded you three links with the note “thought you should see this.” You spend forty-five minutes reading, skimming, and tab-hopping — and by the time you actually start your real work, you have a vague sense that things are moving fast but no clear idea of what, specifically, has changed or what you are supposed to do about it.

    That is not an intelligence system. That is a firehose pointed at your face.

    The problem is not a shortage of information about AI. If anything, the pace of genuine, consequential AI development in 2026 means there are more legitimate signals worth tracking than ever before — model releases, regulatory updates, enterprise adoption case studies, pricing changes, agentic workflow breakthroughs, safety papers. The problem is architecture. Most people have never designed their intake system intentionally. They have accumulated subscriptions, bookmarks, and Slack channels the way people accumulate unread books: optimistically, and without a clear plan for when they will get to them.

    This post is about designing the system properly. Not just which tools to use, but how to layer them, how to time-box the process, how to define what counts as a signal worth acting on versus background noise worth skimming or ignoring — and how to know, measurably, whether your stack is actually working. The goal is a morning routine that takes under twenty minutes and leaves you genuinely more informed and better equipped to make decisions than the alternative of reading everything and retaining little.

    The approach here is deliberately architectural. We are going to talk about tiers, protocols, filters, and failure modes. We are going to be specific about tools, but the underlying logic matters more than any individual tool choice — because the landscape of AI monitoring products will keep shifting, and the principles will not.

    Why Most AI Monitoring “Systems” Are Just Noise Aggregators in Disguise

    Funnel infographic showing information overload narrowing to five actionable signal cards through three filter tiers

    Before building something better, it helps to understand exactly what goes wrong with the default approach. The most common failure is what might be called the aggregation trap: people solve the problem of too much information by adding a tool that collects more information in one place. They subscribe to five newsletters because five is better than one. They add twenty RSS feeds because more sources means fewer blind spots. They join three Slack communities because that is where the conversation is happening.

    What they have built is a louder version of the same problem, not a solution to it.

    The Collector Mentality vs. the Intelligence Mentality

    There is a meaningful distinction between being an information collector and being an intelligence operator. Collectors measure success by coverage — how many sources they are tapped into, how quickly they see something when it drops. Intelligence operators measure success by decision quality — whether the information they consume actually changes what they do, improves a choice they were going to make, or prevents a mistake they would otherwise have made.

    These two orientations produce radically different systems. The collector’s stack grows over time. The intelligence operator’s stack gets pruned. The collector feels anxiety about what they might miss; the intelligence operator has pre-decided what is worth missing. The collector scans everything; the intelligence operator has a clear definition of signal and filters aggressively for it.

    The shift from collector mentality to intelligence mentality is the single most important change you can make to your daily reading system. Everything else — tool choice, time-boxing, tier design — flows from it.

    The Real Cost of Undifferentiated Intake

    According to multiple workplace productivity studies cited in 2026, roughly 80% of global knowledge workers report experiencing significant information overload, up from around 60% six years ago. The average knowledge worker now receives approximately 117 emails and 153 chat messages per day, and faces interruptions roughly every two minutes during core working hours. It takes, on average, 23 minutes and 15 seconds to fully regain focus after an interruption.

    These numbers are striking on their own. But the real damage from undifferentiated information intake is not just time lost — it is the quality of thinking that gets crowded out. When your mental bandwidth is consumed by triage, there is little left for synthesis. You end up knowing more facts and drawing fewer useful conclusions. The goal of a good intel stack is to invert that ratio: less raw intake, more genuine understanding.

    How AI Tools Are Making This Worse Before Making It Better

    Here is the counterintuitive problem with many AI-powered monitoring tools in 2026: they are excellent at generating more content to read. Summarisation tools produce crisp summaries — but if you are subscribed to thirty sources, you now have thirty crisp summaries instead of thirty long articles. The volume of reading material has not decreased; its density has increased. You are reading less padding and more signal, which sounds good, until you realise you are still reading from thirty sources and most of them are telling you variations of the same thing.

    The solution is not better summarisation. The solution is better curation upstream of the summarisation layer. You need fewer sources, chosen more deliberately, filtered more aggressively, before any AI tool touches them.

    The Decision-First Architecture: Start With What You Need to Act On

    Every well-functioning intelligence system starts with the same question, and it is not “what should I be reading?” It is “what decisions do I need to make in the next 30 to 90 days where better information would change my choice?” That question sounds abstract until you write down the answers, and then it becomes remarkably practical.

    Defining Your Decision Horizon

    Most professionals, when pushed to articulate it, have three to five recurring decision categories that their work actually depends on. For an AI product manager, those might be: which model capabilities are mature enough to build features on top of, which competitors are shipping what and how fast, and whether any new regulation or platform policy will affect the product roadmap. For a founder in an AI-adjacent business, the list might be: where the technology is genuinely headed versus where the hype cycle is inflating expectations, which cost curves are shifting fast enough to change unit economics, and whether any enterprise buyer behaviour patterns are emerging that should reshape the go-to-market.

    Write down your three to five decision categories. Be specific. “Keeping up with AI” is not a decision category. “Deciding which foundation model API to build on for our enterprise Q&A feature in Q3” is a decision category. The specificity is what lets you filter — anything that does not bear on one of those categories is, by definition, nice-to-know rather than need-to-know.

    The 90-Day Decay Test

    A practical filter for any piece of information in your stack: if this item will not be relevant to any decision I need to make within the next 90 days, it is background reading, not intelligence. This does not mean you never read it — it means you do not let it compete for attention with information that is genuinely decision-relevant this week. Background reading can happen on weekends, on commutes, or in dedicated longer-form reading sessions. It should not be mixed into your fast-scan morning workflow.

    The 90-day test has a useful side effect: it forces you to notice when your intel stack is mostly feeding your intellectual curiosity rather than your professional decision-making. Both are legitimate. Only one belongs in a fast-scan morning routine.

    The Three Signal Categories

    Once you have your decision categories, you can classify incoming information into three buckets:

    • Act: This changes something I am doing or deciding in the next two weeks. Requires immediate attention and a follow-up action.
    • File: This is relevant to a future decision or project. Worth saving and tagging, but not urgent.
    • Skip: Not relevant to any current decision category. Ignore without guilt.

    Most information, if you have built your stack correctly, should fall into the Skip category. That is not a failure of your intake system — it is evidence that your filter is working. A stack where 70% of items can be skipped after a two-second headline scan is a well-tuned stack. A stack where everything seems potentially relevant is a stack that has not been filtered at all.

    Tier 1 — Primary Sources: The Anchor Layer of Your Stack

    Three-column daily intel briefing interface showing primary sources, aggregators, and active research tools with relevance score badges and 18-minute scan time header

    The first tier of your stack is primary sources: official channels, direct publications, and first-party data that do not pass through any editorial or curation layer before reaching you. This is your anchor for facts. Everything else you read — newsletters, aggregators, social commentary — is interpretation of what first appeared somewhere in this tier.

    What Belongs in Tier 1

    For anyone monitoring the AI space professionally, Tier 1 typically includes:

    • Official research blogs: OpenAI’s research blog, Google DeepMind’s publications, Anthropic’s research updates, Meta AI, and Mistral’s announcements. These are where model releases, benchmark results, and safety findings actually originate.
    • arXiv preprints (filtered): Not all of arXiv — a firehose in its own right — but a narrow, curated alert for specific topics. Setting a weekly arXiv digest alert for one or two specific search terms is manageable. Subscribing to arXiv broadly is not.
    • Regulatory and policy sources: If policy affects your work, the EU AI Act implementation portal, the US NIST AI Risk Management Framework updates, and relevant national AI strategy publications belong here. Check these weekly, not daily — they move slowly but consequentially.
    • Company newsrooms: For the specific companies whose moves are decision-relevant to you, bookmark or RSS-subscribe to their official newsrooms, not third-party coverage of them. You will typically see the same story a few hours earlier and without the interpretation layer added by a journalist who may or may not understand the technical context.
    • Earnings call transcripts and SEC filings: For publicly traded AI companies, quarterly earnings calls and annual reports contain forward-looking statements, capital allocation decisions, and strategic priorities that do not get covered in sufficient depth anywhere in the newsletter ecosystem.

    How to Manage Tier 1 Without Drowning In It

    The key discipline here is minimalism. Tier 1 should have no more than ten to twelve active sources. Every time you add a new one, you should ask whether it is genuinely primary or whether it is actually a secondary source — someone’s interpretation or aggregation — that you are miscategorising as primary.

    RSS is the most reliable delivery mechanism for Tier 1. Tools like Feedly or Inoreader allow you to subscribe to official blog feeds and see new posts as they appear, without having to visit each site manually. The RSS layer for Tier 1 should be checked once per morning during your fast-scan window, not continuously throughout the day. Continuous monitoring is for automated alerts, not human attention.

    One practical note: for primary sources that do not have RSS feeds — some government portals, some research pages — set up a Google Alert with the exact site name plus “site:” syntax, or use a monitoring tool to track the page for changes. The goal is to pull the information to you on a schedule rather than pushing yourself to check it manually.

    Tier 2 — Aggregators and Digest Tools: What Actually Works

    Tier 2 is your curation and synthesis layer. These are the newsletters, AI digest tools, and RSS aggregator AI features that gather signals from across a wide source landscape and present them to you in condensed form. Done well, this tier saves you from having to read one hundred sources directly. Done poorly, it adds a layer of AI-generated summaries that are slightly shallower than the originals and no less voluminous.

    Choosing Your Daily Digest

    The dominant pattern among professionals with well-tuned stacks in 2026 is one daily AI newsletter for broad scanning, paired with one or two specialist weeklies for deeper domain coverage. The daily newsletter is for breadth — catching anything major that happened in the last 24 hours across the AI landscape. The weekly specialist is for depth — a more considered, analytical take on a specific corner of the space that matters to your work.

    For daily breadth, the most consistently recommended options currently are:

    • The Rundown AI: Broad AI news and business applications, written for a general-professional audience. High signal-to-noise ratio for a daily brief. Works well as a first-pass scan where you are just looking for story titles that match your decision categories.
    • TLDR AI: More technically oriented than The Rundown, better suited to practitioners who want to know about model architecture updates, research papers, and developer tooling changes. Shorter format, faster to scan.
    • Superhuman AI: Tilts toward practical AI tool adoption and workflow use cases. Useful if your decision categories include how other organisations are actually deploying AI, not just what models are being released.

    Pick one. Read it at the headline level first — spend thirty seconds scanning all headlines before clicking anything. If a headline matches one of your defined decision categories, read the summary. If the summary raises a question worth exploring further, mark it for your Tier 3 research session. This is the fast-scan protocol in miniature: structure before depth, always.

    Feedly Leo and AI-Powered RSS Triage

    For professionals who follow more than eight or ten specific sources and need help triaging across them, Feedly Pro+ with the Leo AI assistant addresses the problem of RSS overload directly. Leo can be trained on specific topics and priority signals, and it surfaces the articles most likely to match your defined interests while suppressing duplicates and low-relevance items.

    The critical discipline with Feedly Leo is that the topics you train it on should map directly back to your decision categories, not to your general curiosity. If you train Leo on “AI tools” broadly, it will surface everything. If you train it on “enterprise AI deployment case studies in financial services” or “open-source model releases below 70B parameters,” it will surface only what is genuinely decision-relevant. The specificity of your training inputs determines the quality of your curation outputs.

    What to Avoid in Tier 2

    Several common mistakes degrade Tier 2’s effectiveness. First, subscribing to multiple daily newsletters on the same topic. The Rundown AI, TLDR AI, Superhuman AI, and The Batch all cover overlapping terrain. Subscribing to all four means reading four versions of the same fifteen stories. Choose one daily and let the others go without guilt.

    Second, treating Tier 2 as a reading destination rather than a triage layer. Newsletters are not meant to be read in full. They are meant to be scanned for trigger words and story types that match your defined signal categories. The best use of a daily newsletter is a ninety-second headline scan, not a fifteen-minute deep read.

    Third, mixing social media into Tier 2. Twitter/X, LinkedIn feeds, and Reddit threads are not aggregators — they are ambient signal environments where quality varies enormously and recency bias runs high. If specific accounts or communities produce reliably high-signal content, consider following those sources through RSS where available, or routing their content through a dedicated tool. Do not let social scroll time bleed into your structured fast-scan window.

    Tier 3 — Active Research Tools: Perplexity Spaces and Scheduled Briefs

    Tier 3 is where you go deep, but only on the specific signals that cleared your filters in Tiers 1 and 2. This tier is not about consuming more information — it is about understanding the specific items that flagged as genuinely decision-relevant during your morning scan. The tools here are built for synthesis, not curation.

    Perplexity Spaces as a Persistent Research Layer

    Perplexity’s Spaces feature — particularly its scheduled tasks capability — has become one of the more genuinely useful additions to professional research workflows in the past twelve months. The core use case is creating a dedicated Space for each recurring research lane in your decision categories, then running a standardised prompt each morning that asks: “What has changed in this space in the past seven days?”

    The output is a concise, cited summary of recent developments. Because Perplexity grounds its responses in real-time search rather than training data alone, it catches things that would not yet appear in weekly newsletters. Because the Space maintains context from previous sessions, it can flag changes relative to what it told you last week rather than just describing the current state in isolation.

    A well-configured Perplexity Space setup for AI professionals might look like this:

    • Space 1: Model Releases and Benchmarks. Prompt: “What new AI models have been announced or released in the past 7 days? Include benchmark comparisons where available and flag any that represent a meaningful capability jump versus previous state-of-the-art.”
    • Space 2: Competitor Intelligence. Prompt: “Summarise any announcements, product updates, partnerships, or strategic moves from [specific companies] in the past 7 days. Focus on anything that signals a strategic shift.”
    • Space 3: Regulatory and Policy. Prompt: “What new AI regulation, policy guidance, or enforcement action has been published or announced in the past 7 days in [relevant jurisdictions]?”

    The discipline here is the same as elsewhere: match your Spaces to your actual decision categories, not to your intellectual interests. A Space you never act on is a source of guilt, not intelligence.

    When to Use ChatGPT or Claude for Deep Synthesis

    For items that cleared all your filters and appear to require deeper understanding — a technical paper, a complex policy document, a lengthy earnings transcript — a deep synthesis prompt to a capable frontier model is faster and often more useful than reading the original document in full. The key is to give the model enough context: paste the document or key sections, and ask it to extract specifically what is relevant to your decision category, not just summarise the document generically.

    The distinction matters. “Summarise this earnings call” produces a general summary. “What does this earnings call say about the company’s plans for enterprise AI deployment, pricing model changes, and revenue split between API and product?” produces intelligence. The specificity of the prompt determines whether the output is useful or merely informative.

    Saving to a Knowledge Base Without Creating a Third Problem

    Many professionals who build good collection and triage layers eventually face a new problem: they are tagging, saving, and archiving more than they are using. The “second brain” accumulates; the retrieval never happens. If you are going to maintain a knowledge base — whether in Notion, Obsidian, or a similar tool — keep it deliberately lean and decision-oriented. Tag items by decision category, not by topic. An item tagged “AI regulation” is hard to retrieve usefully. An item tagged “Q3 product roadmap — compliance implications” is immediately actionable when Q3 planning arrives.

    The Fast-Scan Protocol: A Time-Boxed Morning Workflow

    Professional at standing desk at 7:18 AM with clean morning briefing document on laptop screen and stopwatch showing 18 minutes — The Fast-Scan Protocol

    All three tiers exist to serve a single, time-boxed morning workflow. The fast-scan protocol is not a vague suggestion to spend some time reading. It is a structured, sequenced routine with a hard stop time. Here is how it works in practice.

    The 18-Minute Morning Stack Routine

    Set a timer. Eighteen minutes is the target; twenty is the outer limit. The time constraint is not arbitrary — it is the mechanism that forces triage. When you know you have only eighteen minutes, you cannot read everything. You scan for what matters. The constraint creates the discipline the system depends on.

    The sequence looks like this:

    1. Minutes 0–3: Tier 1 RSS scan. Open your Feedly or Inoreader dashboard. Scan headlines from your ten to twelve primary sources. Do not click anything yet. Look for items that match your decision categories. Star or mark two to four maximum for follow-up reading. Everything else: mark as read and move on.
    2. Minutes 3–8: Tier 2 newsletter scan. Open your one daily newsletter. Read headlines only first — all of them, taking thirty to forty-five seconds. Then go back and read the summary paragraph for any headline that triggered your signal categories. If the summary is enough, move on. If it raises a question, add it to your Tier 3 queue.
    3. Minutes 8–15: Tier 2 follow-up reading. Read the one or two starred Tier 1 items in enough depth to understand what actually happened and whether it requires action. For each: Is this Act, File, or Skip? Act items get added to your task list. File items get saved and tagged. Skip items get closed.
    4. Minutes 15–18: Tier 3 Perplexity check (3 days per week). Not every day — three mornings per week, check your Perplexity Spaces for their latest briefings. On the other two mornings, use this slot to scan one newsletter item in more depth or review anything in your File queue that is becoming decision-relevant.

    When the timer goes off, you stop. Whatever is left unread stays unread. This is not a failure. It is the system working as designed.

    The One-Line Daily Brief

    At the end of your eighteen minutes, write one sentence: “The most decision-relevant thing I learned today is ___, and the action it triggers is ___.” This takes thirty seconds and has a disproportionate effect on how useful your morning intake session actually is. It forces synthesis. It prevents the scan from being purely consumptive. And it gives you a record of what your stack is actually producing in terms of actionable intelligence — which becomes the raw material for the measurement step described later.

    Protecting the Time Window

    The morning fast-scan window needs to be protected from two common threats. First, email: do not open your email before or during your fast-scan routine. Email is reactive by nature — someone else’s agenda entering your attention. The fast-scan window is for your agenda. Second, social media scroll: the discovery-oriented, algorithmic nature of social feeds is designed to be open-ended. It will reliably expand to fill whatever time you give it. Keep it out of the structured window entirely.

    Some professionals find it useful to do their fast-scan before checking email at all — before the reactive layer of their day begins. Others prefer to do a quick email triage first, then do the fast-scan, then dig into the email responses. Either sequence works. The non-negotiable is that the fast-scan happens within a defined time window, with a hard stop, before social media.

    Building Your Signal Filter: Defining What Actually Counts as Intelligence

    The architectural work described so far — tiers, decision categories, time-boxing — only functions as well as your signal filter. The signal filter is the set of explicit criteria you use to decide, in two seconds per item, whether something is worth your attention or not. Without it, you are still making the same judgment calls as before; you are just making them faster. With it, you are operating on pre-decided rules that remove cognitive load from the triage process itself.

    Building Your Trigger Word List

    A trigger word list is a short, written set of terms, phrases, company names, and topic categories that you have pre-decided are decision-relevant. When one of these words appears in a headline or summary, it automatically moves the item to read-more status. Everything else moves to skip status.

    A sample trigger word list for an AI product strategist might look like this: foundation model API pricing changes; enterprise deployment case study; regulatory compliance AI; [specific competitor names]; multimodal capability; cost per token; on-device inference; reasoning model benchmark. When scanning headlines, your brain is running a pattern match against this list, not making a fresh judgment about every headline.

    Review and update your trigger word list monthly. Decision categories shift, projects launch and close, and your list should track those changes. A trigger word list that was built six months ago and never updated is slowly becoming a list of your old priorities, not your current ones.

    The Freshness Threshold

    Not all information ages at the same rate. Model release announcements are stale within 48 hours. Regulatory guidance is relevant for months. Pricing changes have an immediate action window and then become baseline knowledge. Training yourself to assess the freshness threshold of each item type helps you triage more efficiently — you stop treating all information as equally time-sensitive and start routing it to the appropriate attention window.

    A practical heuristic: if an item is older than 72 hours and you have not already read it, ask whether the relevant action window has already closed. If yes, skip it without regret. If no — if the decision it informs is still open — read it, but briefly.

    The Duplication Test

    One underrated source of stack inefficiency is reading the same story through multiple sources. The Rundown covers a model release, TLDR AI covers it, three newsletters forward the same article, and a colleague links you the same piece on Slack. You have now read five versions of one story. This is not a signal problem — it is a coverage-overlap problem, and the solution is deliberately reducing source overlap rather than trying to read faster.

    When you notice you are regularly seeing the same stories through multiple channels, that is evidence of redundant sources. Cut one. The one you cut almost certainly duplicates coverage you are already getting and adds no unique signal.

    Common Stack Failure Modes — and How to Fix Them

    Infographic showing 5 ways AI monitoring stacks fail, with red-X failure modes on left and green-checkmark fixes on right

    Even professionals who have thought carefully about their stack tend to fall into predictable failure modes. Knowing them in advance lets you diagnose and fix them faster when they appear — and they will appear, because maintaining a high-signal stack requires active maintenance, not just good initial design.

    Failure Mode 1: The Subscription Creep

    What it looks like: Over six months, you have added twelve new newsletters, three new Slack channels, and four new RSS feeds “just to stay current.” Your unread count has tripled. The time required for your morning scan has quietly expanded from eighteen minutes to forty-five.

    The fix: Schedule a quarterly stack audit. Go through every active source and ask two questions: In the last 90 days, did this source produce at least one item that changed a decision I made? And does this source produce unique signals, or does it duplicate coverage I get elsewhere? Any source that fails either question gets cut. Be ruthless. You can always re-subscribe.

    Failure Mode 2: The FOMO Override

    What it looks like: You have a well-designed filter, but you keep making exceptions. “This one seems important even though it does not match my decision categories.” “I should probably read this even though I do not have a clear use for it right now.” Over time, the exceptions become the rule, and the filter stops functioning.

    The fix: Acknowledge that FOMO is real and build a sanctioned release valve for it. Create a “background reading” queue — separate from your decision-relevant stack — where items that are interesting but not currently actionable can go. Schedule thirty to sixty minutes per week for background reading. This keeps intellectually curious material out of your fast-scan window without asking you to permanently ignore it.

    Failure Mode 3: The Aggregator as Primary Source

    What it looks like: You are relying on newsletter summaries and AI digests as your primary factual layer, without reading any original sources. When details matter — pricing specifics, technical benchmarks, policy language — you are working from someone else’s interpretation of the original, and errors or oversimplifications are accumulating without your noticing.

    The fix: For any item you classify as Act — something that will change a decision or trigger an action — always read the original source before acting. The Tier 2 layer is for discovery and triage, not for decision-grade factual accuracy. Build the habit of clicking through to primary sources on anything that influences real decisions.

    Failure Mode 4: The Deep-Dive Detour

    What it looks like: You find one genuinely interesting item during your morning scan and spend forty minutes going down a research rabbit hole. The rest of your stack goes unread, and you emerge knowing a lot about one thing while missing everything else that happened.

    The fix: The fast-scan window is for triage, not for deep research. Mark interesting items for follow-up and move on. Deep research happens in dedicated time blocks outside the morning stack window. The discipline of maintaining a clear boundary between scanning and researching is foundational to the system working at scale.

    Failure Mode 5: Tool Proliferation Without Architecture

    What it looks like: You are using seven different AI-powered tools that each claim to solve the information overload problem. They partially overlap, partially contradict each other, and together require more management overhead than the original problem they were meant to solve.

    The fix: One tool per tier. Tier 1 needs an RSS reader and a search alert system — that is two tools. Tier 2 needs a newsletter client and possibly an AI RSS triage layer — that is one to two tools. Tier 3 needs one deep research tool. Total: four to five tools maximum, each with a clearly defined role that does not overlap with the others. When a new tool appears that claims to replace one of these, evaluate it against the one it would replace, not as an addition to the stack.

    How to Measure Whether Your Stack Is Actually Working

    Analytics dashboard showing decision relevance at 82 percent, scan time at 18 minutes, and action rate at 34 percent with weekly signal quality score trending upward

    Most professionals never measure whether their intelligence system is producing results. They operate on a vague sense that staying informed is valuable, and they keep consuming information without a feedback loop that would tell them whether the consumption is actually improving their decisions. Building measurement into your stack is what separates a system that gets better over time from one that just persists.

    The Four Metrics That Matter

    Track these four indicators on a weekly basis. Each takes under two minutes to record.

    1. Decision Relevance Rate: Of all the items you read or flagged during your morning scans this week, what percentage were genuinely relevant to an active decision category? If this is below 50%, your sources are too broad or your filter is too loose. If it is above 80%, you are either very well-tuned or possibly too narrow — make sure you are not missing signals outside your current categories.

    2. Scan Time: How many minutes did your morning stack routine actually take this week, averaged per day? If it is consistently above 25 minutes, your stack has grown too large or you are reading too deeply during the scan window. If it is consistently below 10 minutes, you may have cut too aggressively and are missing genuine signals.

    3. Action Rate: Of the items classified as Act this week, how many actually led to a concrete action — a task added, a conversation started, a decision updated? If this number is near zero, your Act classification is too loose. Items you classify as Act but never act on are really File items in disguise.

    4. Source Contribution Rate: Which specific sources produced the Act-classified items this week? Track this over eight to twelve weeks, and you will see clearly which sources in your stack are earning their attention and which are presence without contribution. Cut the contributors with zero Act items over a 12-week period without exception.

    The Monthly Stack Review

    Set aside thirty minutes per month for a deliberate stack review. Bring your four metric records, your one-line daily briefs from the past four weeks, and your list of decisions made during the month. Ask: which of those decisions were improved by something I found through my stack? Which decisions would have benefited from information my stack did not surface? The answers tell you both what to keep and what to add or restructure.

    This review is the feedback loop that prevents the system from calcifying. A stack built for your priorities in January may be significantly miscalibrated by April if your work has shifted, projects have launched or closed, or the AI landscape has moved in an unexpected direction. The review is what keeps the system current.

    The Compounding Effect Over Time

    A well-maintained stack that produces one genuinely useful decision-relevant insight per week, over the course of a year, produces fifty-two insights that would not have been there otherwise. Some of those will be incremental. A few will be significant. The compounding effect is not the single insight — it is the accumulated depth of understanding across your decision categories that develops when you are consistently ingesting high-signal information in those areas over months and years.

    This is the under-discussed value of a good intelligence system. The immediate return is faster, better-informed daily decisions. The long-term return is a substantially deeper mental model of the domain you are operating in — a model built from consistent, filtered, high-quality signal rather than random browsing and news-of-the-day consumption.

    Adapting the Stack as the AI Landscape Moves

    The AI landscape in 2026 is moving at a pace that makes any specific stack recommendation have a relatively short shelf life. The tools mentioned here will evolve, merge, be surpassed by newer entrants, or be deprecated. The specific newsletters that are useful today may have changed character in six months. The model APIs that are relevant to your decision categories will shift as capabilities and cost curves shift.

    Designing for Change Without Constant Redesign

    The solution to a fast-moving environment is not a stack that is constantly being rebuilt from scratch. It is a stack built on stable architecture with modular, swappable components. The three-tier structure — primary sources, aggregators, active research — is stable because it reflects how information moves from creation to interpretation to synthesis. That structure will remain valid even as every specific tool within it is replaced.

    When a tool within a tier becomes less useful, replace it with another tool that serves the same tier function. Do not add a new tier, do not blur the distinction between tiers, and do not expand the stack to accommodate a new tool before removing an old one. The modularity is what keeps the system manageable as the landscape shifts.

    Watching the Meta-Level: When the AI Space Itself Changes Character

    One specific adaptation challenge for AI-focused stacks is that the nature of the news being tracked is itself changing. In 2026, the dominant story has shifted from “which foundation model is most capable” toward questions about deployment, cost, enterprise adoption patterns, agent reliability, and regulatory compliance. The sources that were most relevant when the story was primarily about model capabilities are not the same sources that are most relevant now that the story is primarily about implementation and business outcomes.

    Review your Tier 1 source list with this question in mind: are these sources tracking the story as it currently is, or as it was eighteen months ago? Primary sources that have not adapted to the shifting terrain of the field — that are still publishing mostly benchmark comparisons when the live question is enterprise deployment economics — should be deprioritised in favour of sources that are tracking the current story.

    When to Expand the Stack

    Adding sources to a well-tuned stack should be a high-bar decision. The test is not “does this source cover something interesting?” It is “does this source produce signals that are decision-relevant to an active category that my current stack does not cover?” If you can answer yes with a specific example — a decision category that went un-supported for two weeks because no current source surfaced relevant intelligence — then an addition is warranted. Otherwise, the default answer is no.

    Conclusion: The Stack Is a Living System, Not a Setup Task

    The most important thing to understand about your daily AI intel stack is that building it once is not the work. The work is maintaining it, measuring it, pruning it, and adapting it as your decision priorities and the information landscape both shift. The initial setup — defining your decision categories, identifying your tier sources, establishing your trigger word list, building the eighteen-minute protocol — might take a few hours. But the real investment is the ongoing commitment to running the monthly review, cutting sources that are not contributing, and resisting the subscription creep that will inevitably try to re-bloat what you have just trimmed.

    The professionals who get the most value from their intelligence systems are not the ones who are tapped into the most sources. They are the ones who have built the most deliberate filters — who have thought hardest about what decisions they are actually trying to make and what information would genuinely change those decisions. Their stacks are smaller than you would expect, their read rates are lower than most people would be comfortable with, and their decision quality is noticeably higher.

    The goal is not to know everything that is happening in AI. Nobody knows everything, and the people who try to know everything know less than they think they do, because they are spending more time consuming and less time synthesising. The goal is to know what matters, when it matters, with enough depth to act on it. That is what a well-built fast-scan system actually delivers — and it is a substantially different thing from what most people’s current information habits produce.

    Your fast-scan system is only as good as your willingness to define what you do not need to read. The filtering is the skill. The tools just make it faster.

    Actionable Takeaways

    • Write down your three to five active decision categories before touching any tool in your stack. The categories, not the tools, drive everything else.
    • Limit your total stack to twelve or fewer primary sources, one daily newsletter, and one to two weekly specialist newsletters. Quantity is the enemy of quality here.
    • Build your trigger word list and review it monthly as decision priorities shift.
    • Set a hard eighteen-to-twenty-minute morning scan window. The time constraint is the mechanism that forces productive triage.
    • Measure your stack on four metrics weekly: decision relevance rate, scan time, action rate, and source contribution rate.
    • Schedule a thirty-minute monthly stack review. Cut any source that produced zero Act-classified items in the past twelve weeks.
    • Design your stack on stable three-tier architecture so that individual tools can be swapped as the landscape changes without rebuilding the system from scratch.

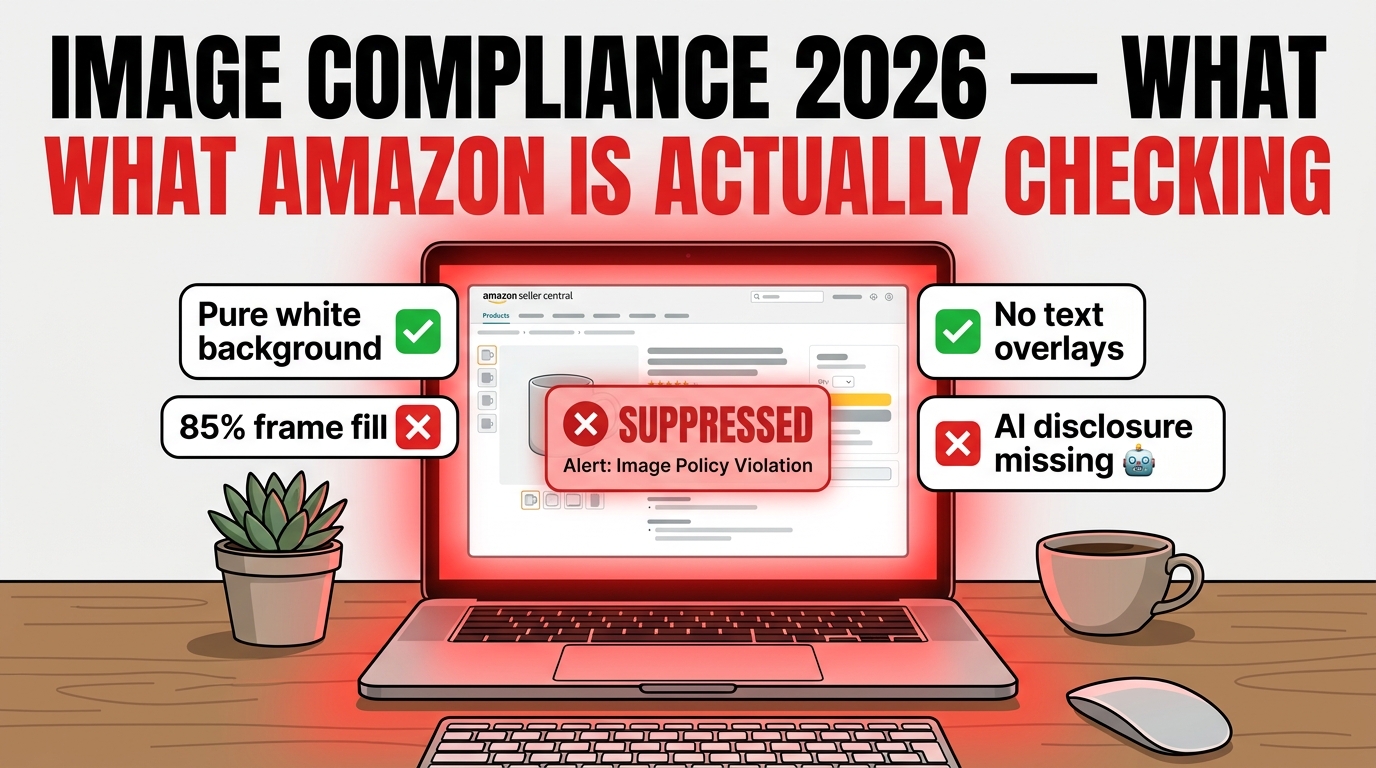
  • Why Amazon’s Image Compliance System Flags Good Images — And the Framework to Build a Bulletproof Gallery in 2026

    Why Amazon’s Image Compliance System Flags Good Images — And the Framework to Build a Bulletproof Gallery in 2026

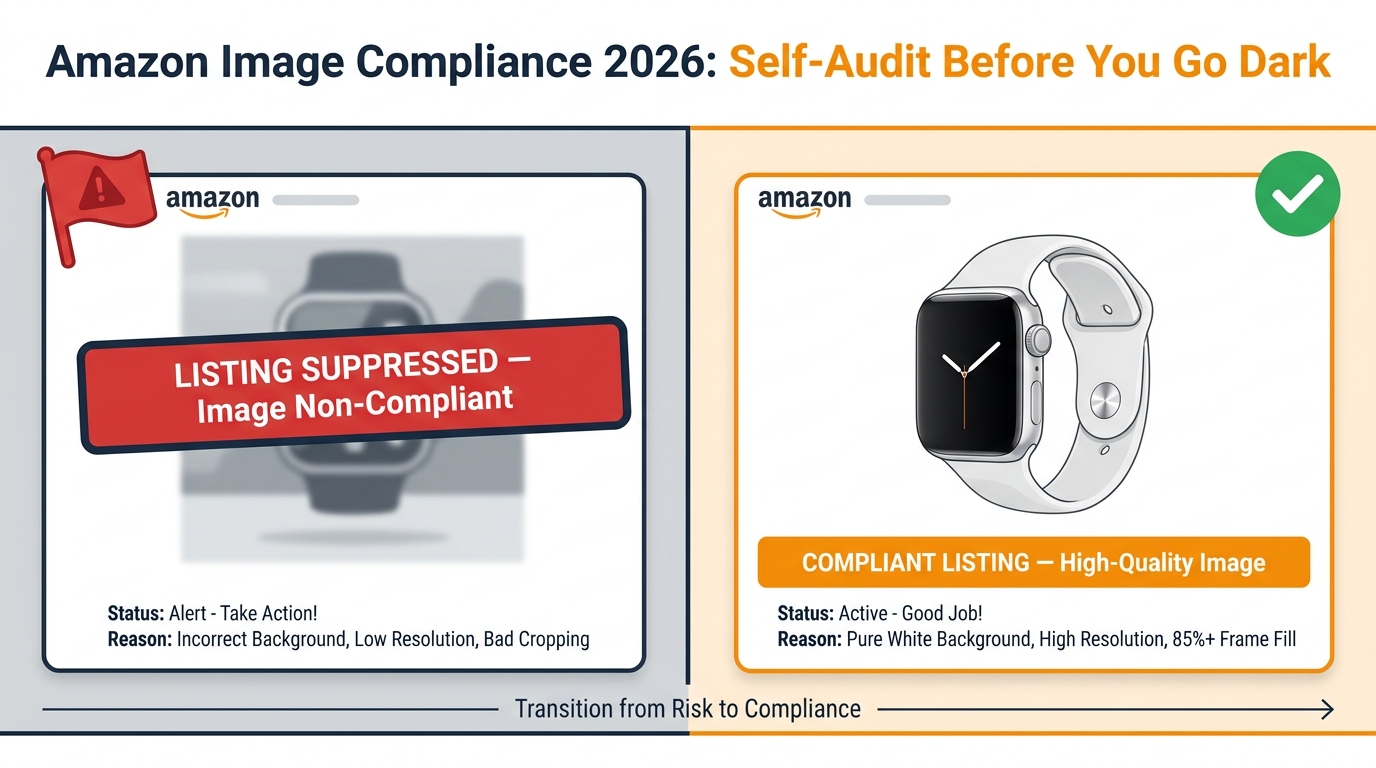
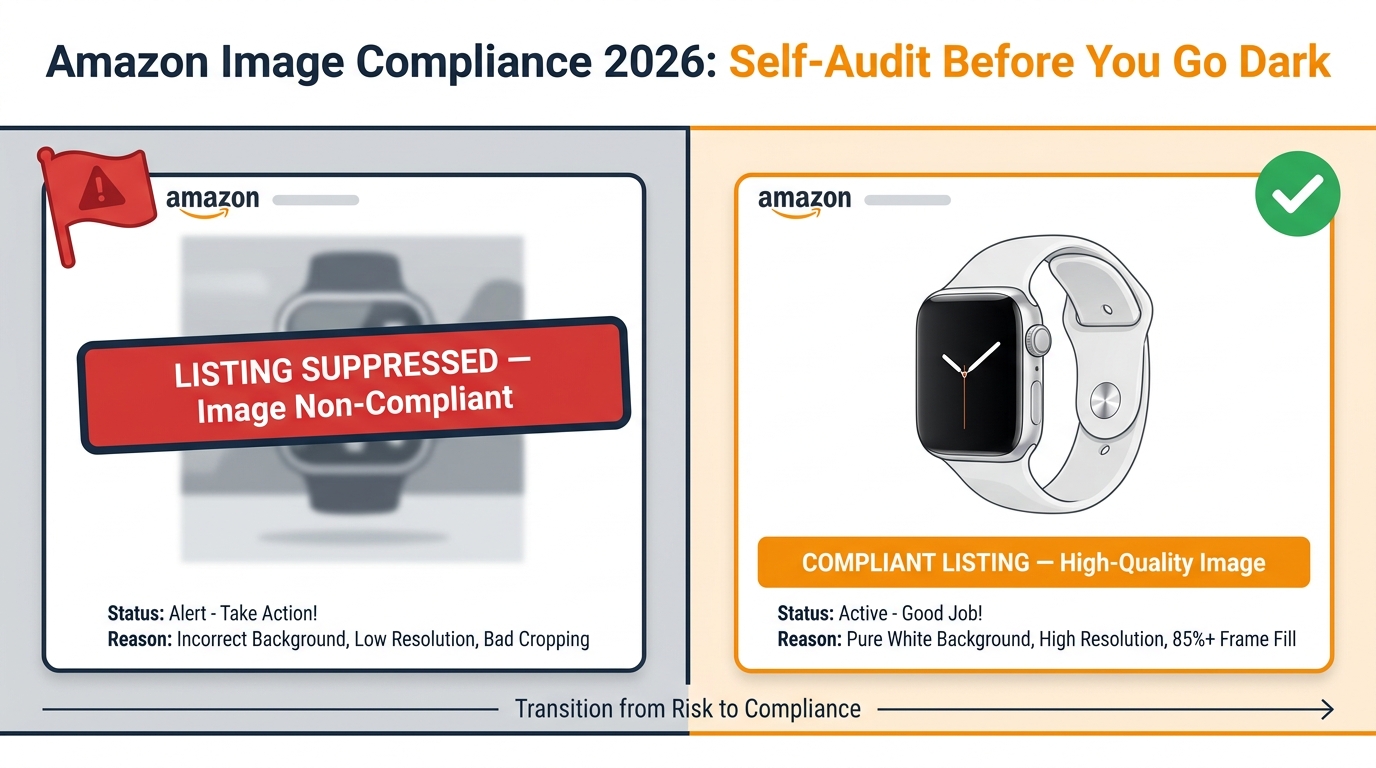
    Split-screen showing Amazon product image flagged as SUPPRESSED versus compliant and live in 2026

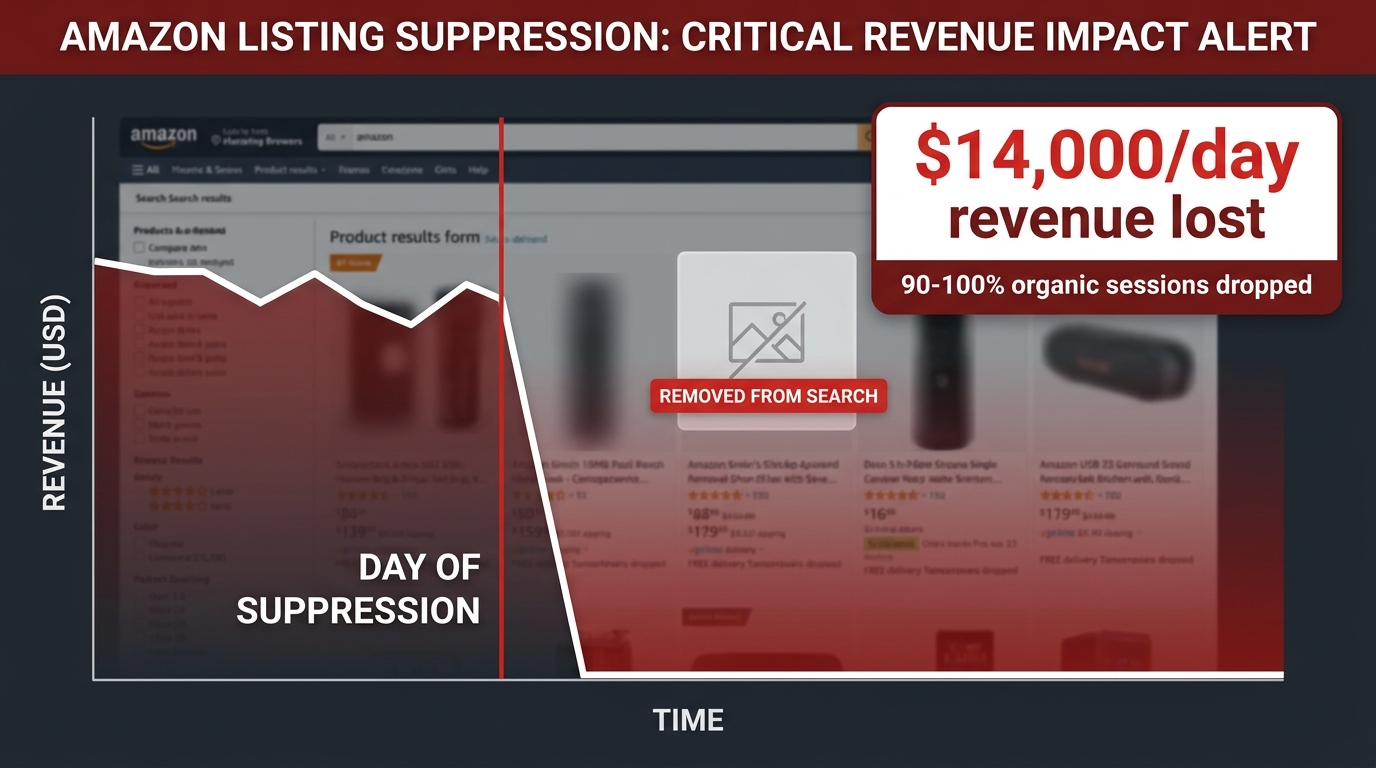
    You spent two days getting your product images right. A clean white background, sharp photography, correct resolution, no watermarks. You checked every box on Amazon’s help page. Then, forty-eight hours after upload, Seller Central shows a suppression notice — your listing is gone from search.

    This is not a hypothetical. Sellers across every category are running into exactly this scenario in 2026, and the frustrating part isn’t the occasional false positive. It’s that the system flagging images has become significantly faster, significantly less transparent, and significantly more consequential than it was two years ago. Amazon’s automated image compliance scanner now processes violations in minutes rather than days, suppression can happen before you even notice it, and for repeat offenses the escalation path leads directly to account health actions.

    What most coverage of this topic misses is the why. Not the rules — those are documented, if poorly communicated — but the system behavior underneath them. What exactly is the scanner checking, and in what order? Why do technically compliant images still get flagged? What does the July 2026 AI disclosure requirement actually change at the file level? And when a false positive hits, what does recovery actually look like?

    This post answers all of those questions with a practical framework for building image galleries that don’t just meet the rules as written — they pass the scanner as it actually operates. That distinction matters more than most sellers realize.

    How Amazon’s Automated Image Scanner Actually Decides What to Flag

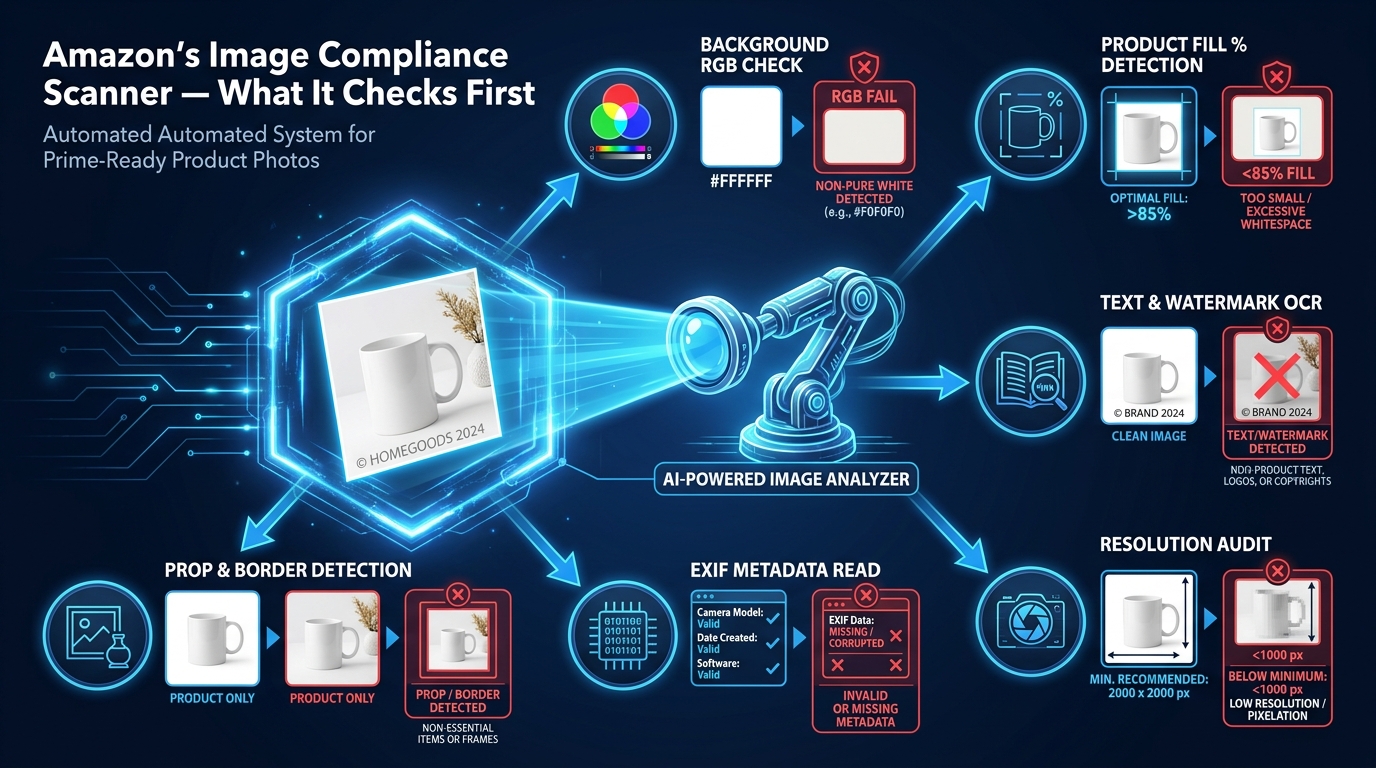
    Technical infographic of Amazon's image compliance scanner showing all checks: background RGB, product fill, text detection, resolution, EXIF metadata, and prop detection

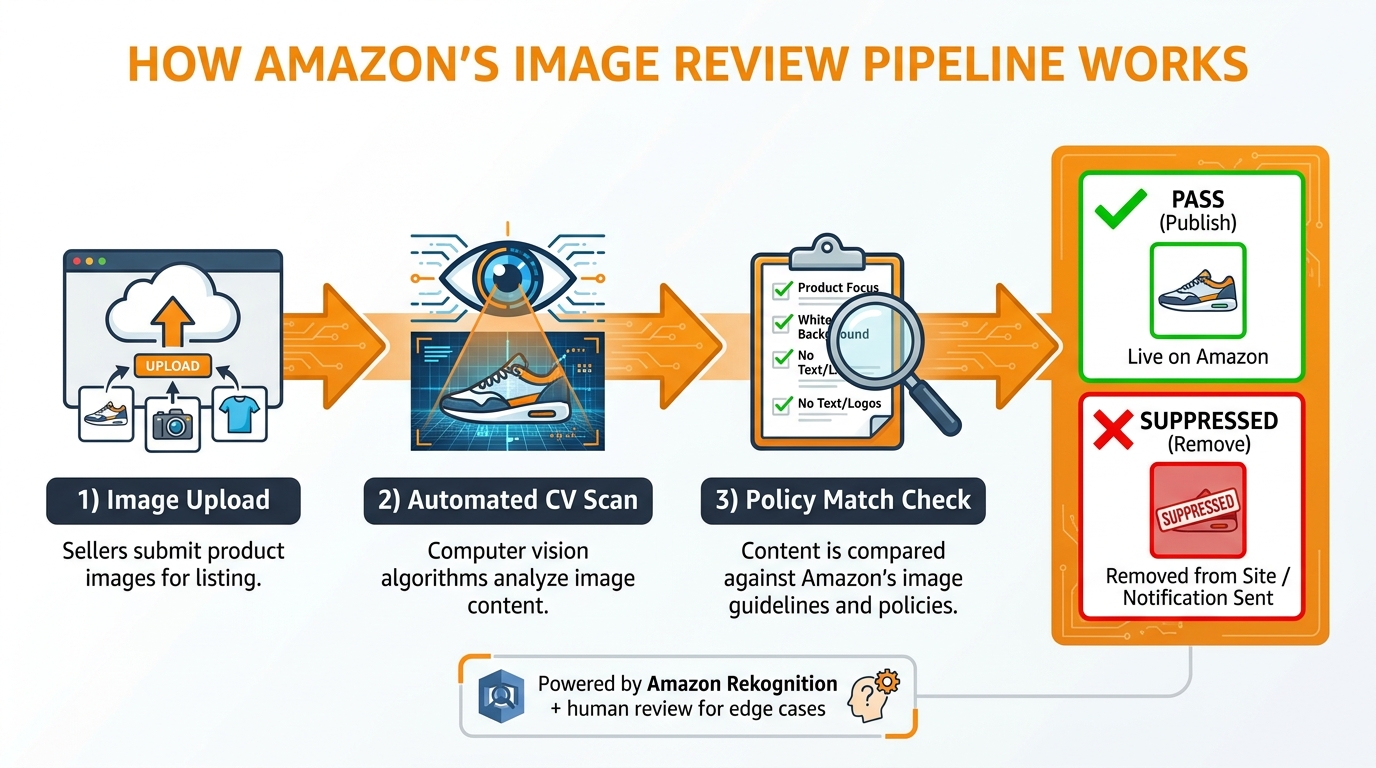
    Amazon’s image compliance system is not a single gate you pass through. It’s a layered series of automated checks that run in a defined sequence, each with its own detection method and failure mode. Understanding the sequence is the first step to understanding why images that look fine to a human reviewer still fail the system.

    The Automated Detection Layer

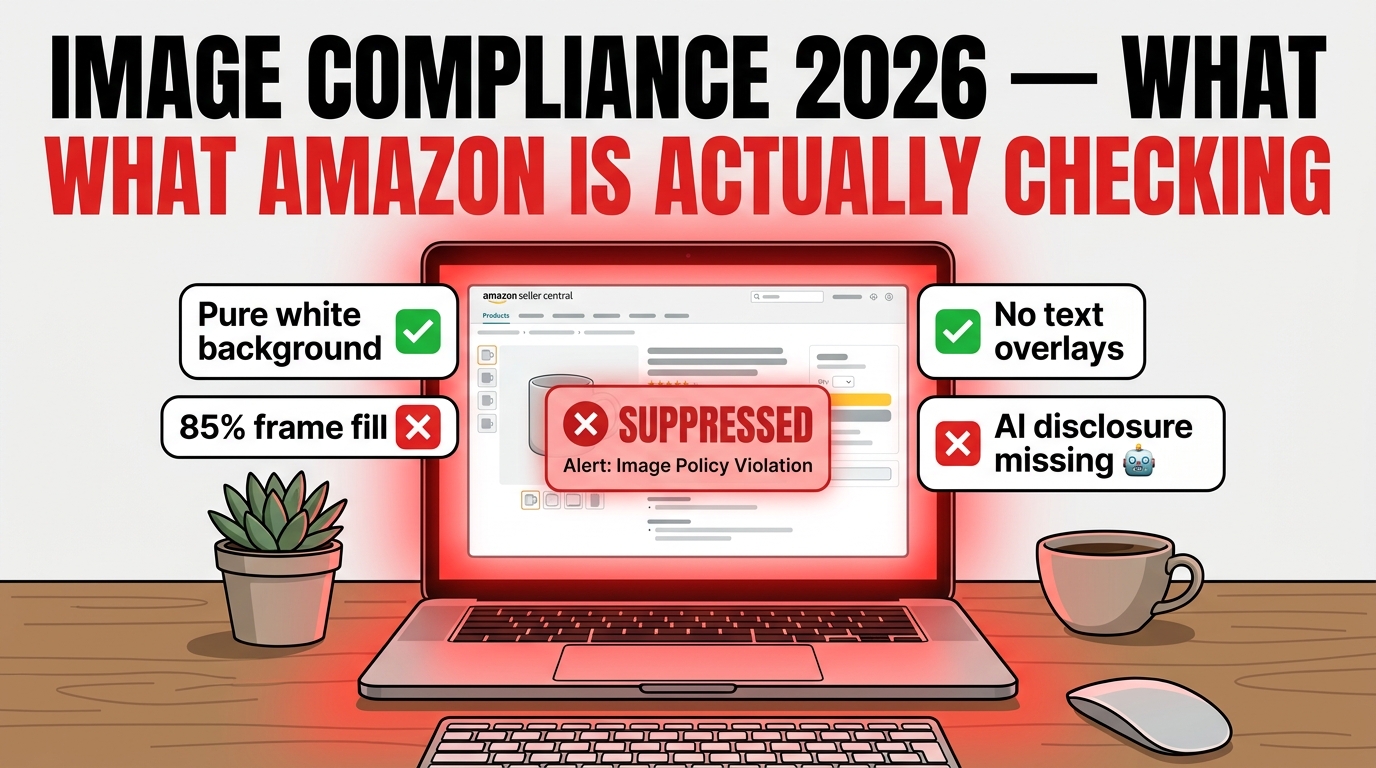
    When an image is uploaded to Amazon’s catalog, the first pass is automated — running background analysis, dimensional checks, and resolution verification before a human reviewer ever sees it. Third-party seller reporting from early 2026 suggests this automated layer now achieves approximately 94% accuracy, which sounds impressive until you consider what the 6% error rate means at Amazon’s catalog scale.

    The automated scanner evaluates images roughly in this order: background color purity, product fill percentage, resolution sufficiency, presence of text or watermarks, presence of prohibited props or borders, and — newly added this year — EXIF and XMP metadata flags for AI-generated content. Each of these checks uses a different detection mechanism.

    Background Detection vs. Text Detection: Why They Fail Differently

    Background color detection is pixel-based and relatively binary: the system samples background pixels and compares them against RGB target values. Text detection, by contrast, uses optical character recognition (OCR) to scan for character strings across the image. These two systems fail in different ways. Background checks produce false positives when natural shadows or product reflections push edge pixels off white. Text detection can misread graphical product elements — say, a logo printed on packaging — as a prohibited text overlay.

    Prop detection is perhaps the most error-prone of the automated checks. The system uses image recognition to identify non-product elements in the frame. This is where sellers with products that include accessories (consider a camera with a lens cap, or a power bank with its cable) most commonly hit false flags, because the scanner may classify included accessories as props.

    Human Review: When It Kicks In and When It Doesn’t

    Human review is reserved for edge cases — images that pass the automated scan but receive a complaint, or cases that are flagged at a borderline confidence threshold by the automated system. The practical implication is significant: if your image fails the automated check, it is highly unlikely to be caught before suppression by a human reviewer who might recognize the contextual nuance. The automation acts first. Appeals bring human review later.

    This is the enforcement architecture most sellers don’t account for. You’re not building images for Amazon’s reviewers. You’re building images for a detection system that has no tolerance for ambiguity.

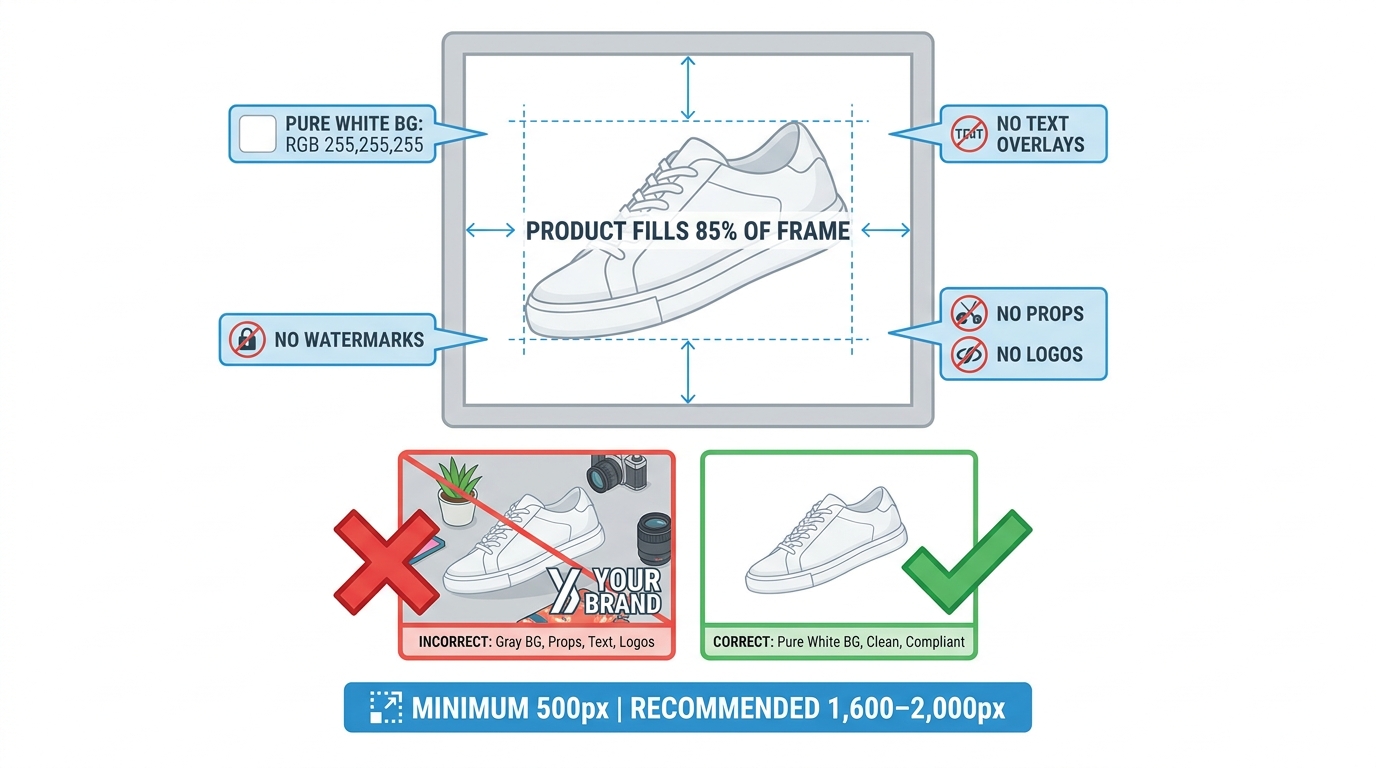
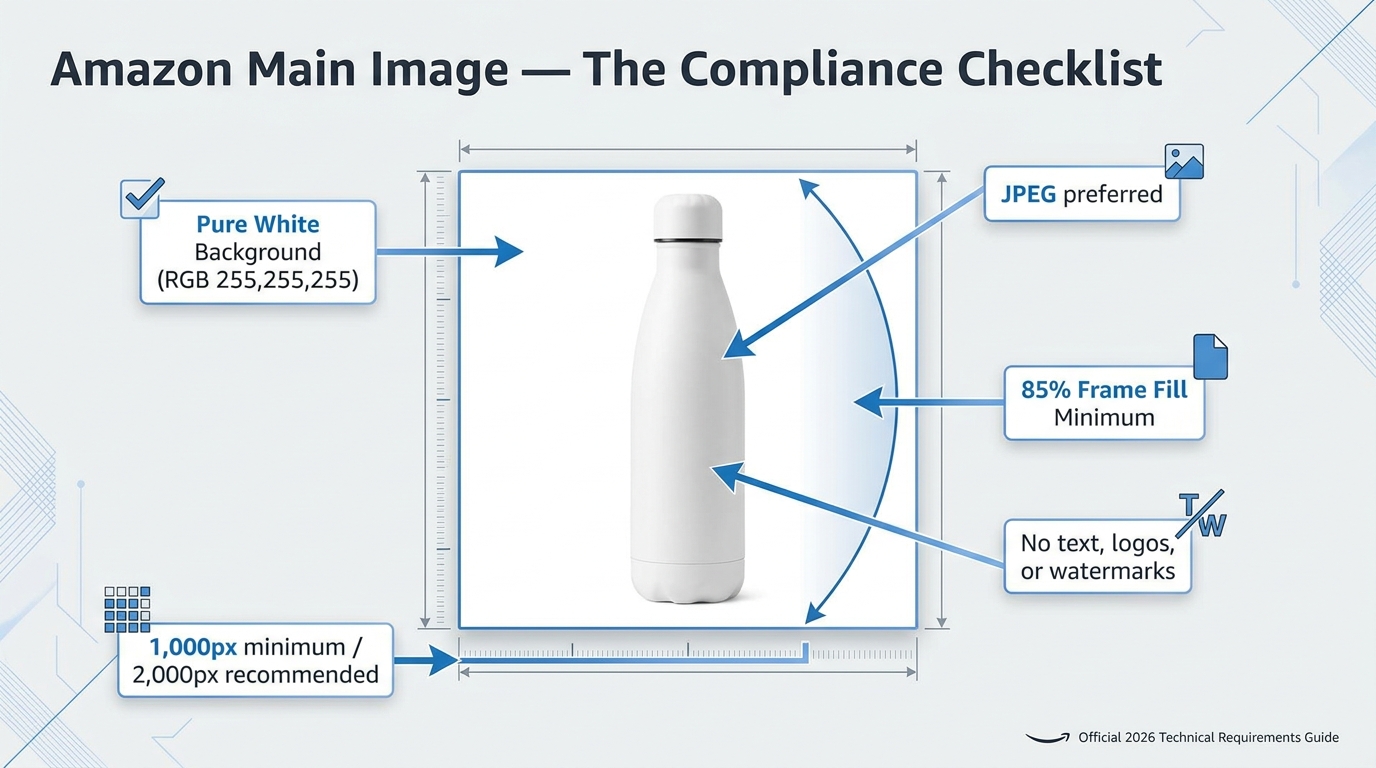
    The “Pure White” Problem: Why RGB 255/255/255 Is Necessary but Not Sufficient

    Side-by-side comparison of off-white background (RGB 245/238/225) failing Amazon's scanner versus pure white (RGB 255/255/255) passing, with supplement bottle product

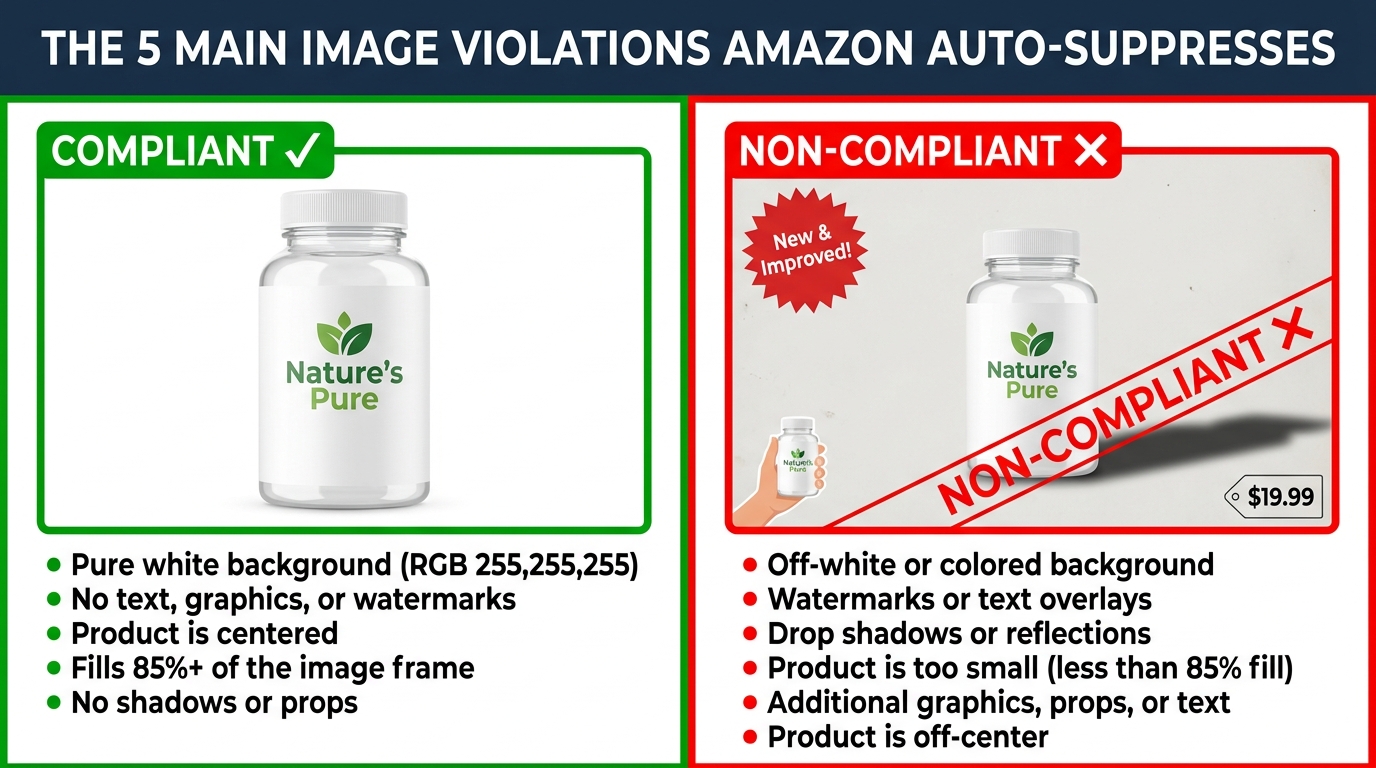
    Ask any seller what Amazon requires for main image backgrounds and they’ll say: “pure white.” That’s technically correct. But there’s a critical gap between knowing the rule and understanding how the scanner actually validates it — and that gap is where a huge proportion of suppression events originate.

    What “Pure White” Means to a Pixel-Based Scanner

    Amazon’s scanner samples background pixels and compares them to RGB values. Pure white in digital terms is RGB 255/255/255. The issue is that most photo editing workflows — including Lightroom, Photoshop, and virtually every AI background removal tool — don’t produce pixel-perfect white. They produce near-white. Even Photoshop’s “white” canvas can output values like RGB 253/253/253 or RGB 250/248/245 depending on color profile settings and export compression.

    An off-white background that looks identical to the human eye at a value of, say, RGB 240/238/235 can be enough to trigger the scanner’s background failure check. According to 2026 seller reports, approximately 72% of early-year image rejections were tied specifically to background color issues — making this the single most common compliance failure point by a significant margin.

    Three Background Problems Most Sellers Don’t Catch

    First: JPEG compression artifacts. When you export a white-background image as a JPEG, the compression algorithm introduces color variation in background pixels, particularly near product edges. The background that was 255/255/255 in your editing software may become slightly varied after export. PNG format preserves pixel values more reliably, which is why many compliance-focused sellers export secondary images as PNG even when JPEG is accepted.

    Second: Drop shadows. A realistic drop shadow beneath your product is a hallmark of professional-looking photography. It’s also a violation. The shadow pixels are not white, and the scanner flags them. This catches sellers whose images look beautiful and photorealistic but fail the technical check. Remove all shadows, or ensure any shadow is so faint that the pixel values remain at or near 255/255/255.

    Third: Color profile mismatch. Images shot in a color space other than sRGB (such as Adobe RGB or ProPhoto RGB) and not converted before upload can render background “white” in a way that translates to off-white pixel values in the sRGB color space Amazon’s system evaluates against. Always convert to sRGB before uploading.
    The Practical Fix

    After background replacement or editing, use your image editor’s color picker to sample at least five distinct points in the background area — especially near product edges, corners, and any area where lighting might create falloff. Every sampled point should read 255/255/255. If any point is off by even a few values, correct it before upload. This single habit eliminates the most common suppression trigger.

    Seven Triggers That Catch Even Technically Correct Images

    Beyond the white background, there’s a set of less obvious triggers that cause compliant-seeming images to fail. These are the violations that feel unfair — and that generate the most confusion in seller forums — because the images in question often do look correct to a human reviewer.

    1. The 85% Fill Threshold — And How It’s Measured

    Amazon requires the product to fill approximately 85% of the image frame. The issue is that “fill” is measured differently depending on product shape. A flat square item fills frame space easily. A long, narrow item — a yoga mat, a power strip, a fishing rod — fills frame space poorly in a standard 1:1 square crop, leaving dead space that the scanner reads as a fill deficiency. Sellers of elongated products need to either rotate the product diagonally, use a tighter crop, or shoot in a way that maximizes perceived fill without distorting the product’s actual dimensions.

    2. Product Packaging When the Product Itself Is the Listing

    If you’re selling the product unboxed, showing the product inside its packaging can trigger a suppression — because the scanner may interpret the packaging as a prop obscuring the main product. Conversely, if you’re selling a packaged item (like a gift set), the full package must be visible and must accurately represent what the buyer receives. The rule is: show exactly what arrives at the buyer’s door, nothing more.

    3. Printed Text on the Product Itself

    This is a surprisingly common false positive. A supplement bottle with a visible label, a branded t-shirt with text across the chest, a notebook with a printed cover — all of these can trigger OCR-based text detection, even though the text is part of the product, not an overlay. In most cases, Amazon’s system learns to distinguish product text from overlaid text, but newly listed ASINs are more vulnerable during the period before the system has established a baseline for that ASIN’s imagery.

    4. Inaccurate Variation Images

    If your listing has variations (colors, sizes, styles) and the images don’t match the specific variation selected, Amazon’s system can flag the mismatch. A red variation showing a blue product is a clear violation. But the more subtle issue is image stacks that show the full variation range in every image for every variation — shoppers see a product that doesn’t match what they’re purchasing, and the system catches it as inaccurate product representation.
    5. Insufficient Resolution for Zoom

    Amazon’s official minimum is 1,000 pixels on the longest side, but 2026 guidance consistently recommends 1,600 pixels minimum and ideally 2,000 pixels or more to activate zoom functionality. Images that meet the technical minimum but don’t support zoom are increasingly being flagged for quality issues — particularly in categories where detail matters (jewelry, electronics, textiles).

    6. Borders and Frames

    Any border around the main image — even a subtle 1-pixel border added during export, or a thin frame from a Canva template — is a violation. This sounds trivial but catches a meaningful number of images created using design tools that automatically add borders as part of their template formatting.

    7. Transparent Backgrounds Exported as White

    Some image editors and AI tools export transparent background images with the transparency layer rendered as a light gray or off-white rather than true white. This is especially common when the output format is JPEG rather than PNG, since JPEG doesn’t support transparency and the editor must choose a background color to render. Always explicitly set the background fill to RGB 255/255/255 before exporting as JPEG.

    AI-Generated Images: The New Metadata Rules That Determine Pass or Fail

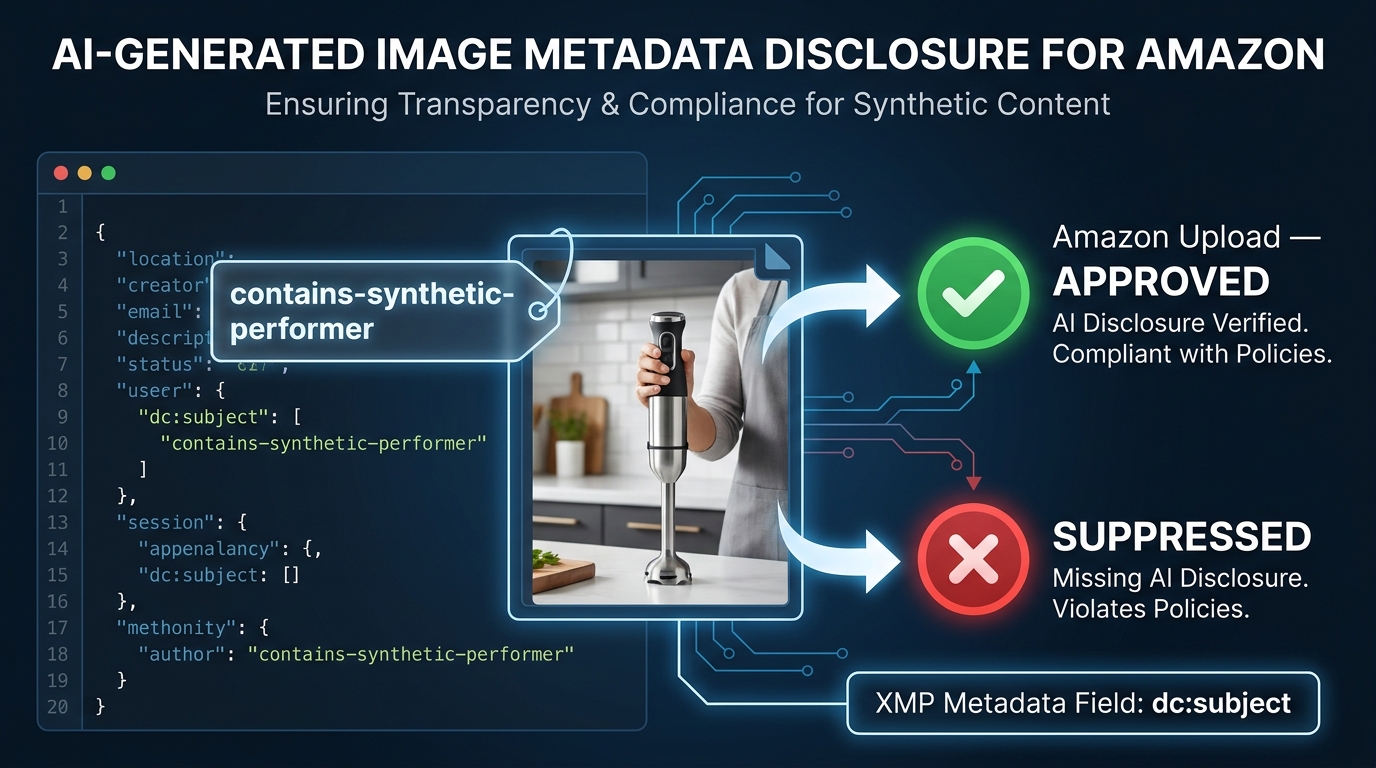
    Infographic showing the Amazon AI image metadata disclosure requirement: contains-synthetic-performer XMP tag in dc:subject field, with approved and suppressed outcome paths

    The single largest policy change affecting AI-generated Amazon images in 2026 has nothing to do with image quality, background color, or text overlays. It’s a metadata requirement — and most sellers have never heard of it.

    What Changed in July 2026

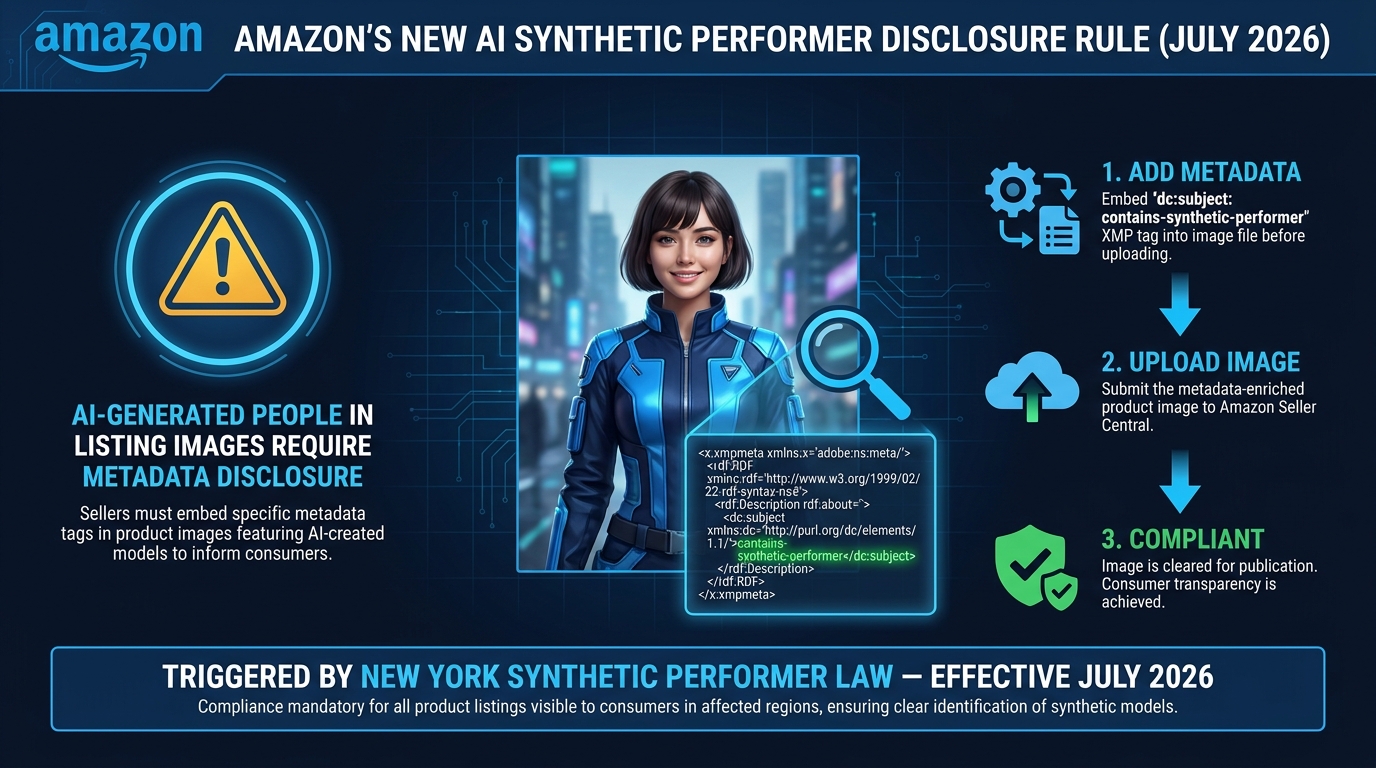
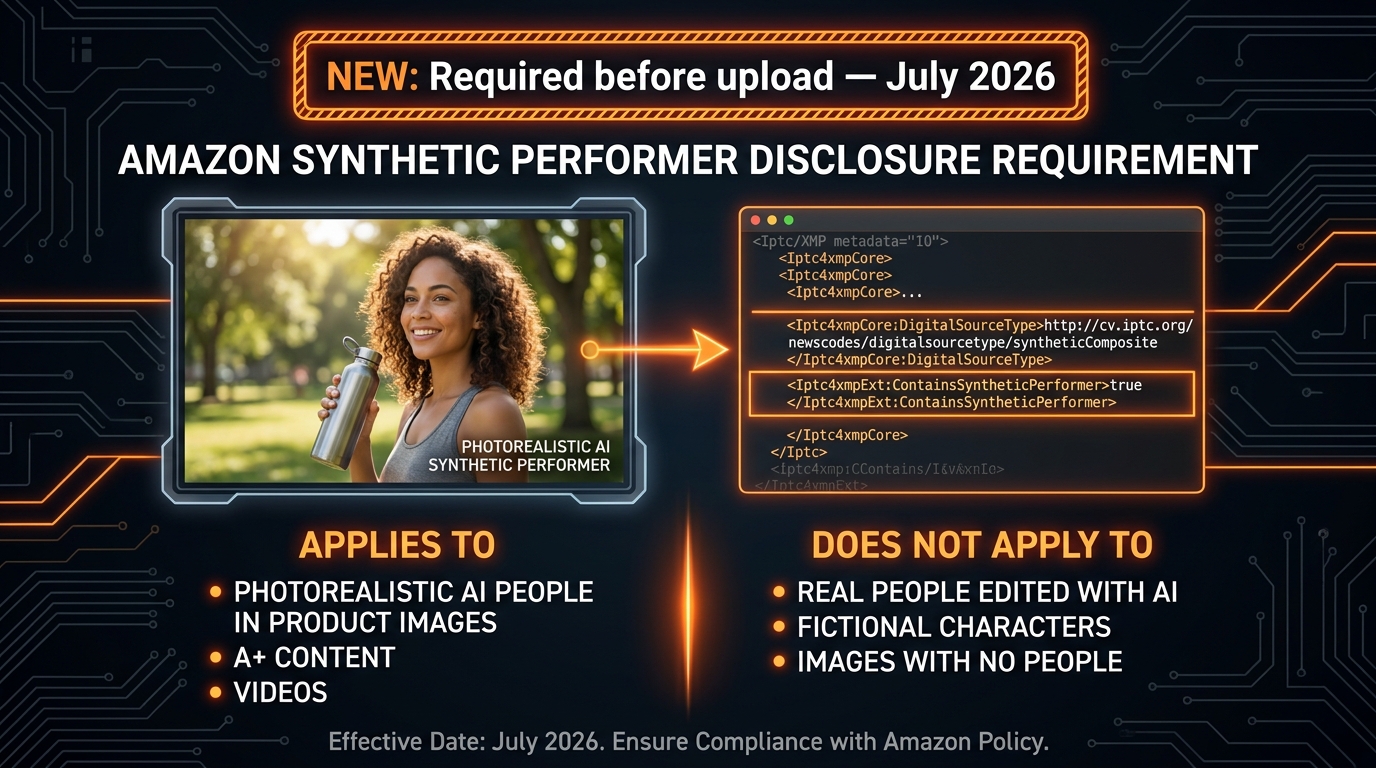
    In late July 2026, Amazon rolled out a new requirement tied to New York state’s synthetic performer disclosure law, which took effect in June 2026. The rule: any buyer-facing image or video that contains a photorealistic AI-generated person — not an edited real person, but a person entirely created by AI — must be tagged with specific metadata before upload. The required tag is the keyword contains-synthetic-performer added to the file’s XMP dc:subject metadata field.

    When this tag is present, Amazon reads it on upload and adds a shopper-facing disclosure indicator where applicable. When the tag is absent from an image that contains AI-generated people, the image is at risk of suppression once Amazon’s system or a reviewer detects synthetic content — which is becoming increasingly likely as Amazon builds out its AI content detection capabilities.

    What Images Are Affected

    The requirement applies to images where a person is entirely generated by AI. This covers lifestyle imagery where a model is AI-generated rather than a real person. It covers A+ content featuring AI-generated people. It covers product-in-use shots where the hands or body visible in the frame are AI-rendered. It does not apply to images that simply use AI for background removal, color correction, or editing of real photography — the person must be wholly synthetic.

    Importantly, this does not constitute a ban on AI-generated people in listings. Amazon is not prohibiting this content. It is requiring disclosure. Sellers who tag correctly can continue using AI-generated lifestyle imagery; those who don’t are taking on suppression risk as enforcement scales.

    How to Add the Metadata Tag

    The tag must be embedded in the image file’s XMP metadata before upload. This cannot be done by entering information into Seller Central — it’s a file-level requirement. The process:

    1. Use an IPTC-compatible metadata editor such as Adobe Bridge, ExifTool (free, command-line), or Photo Mechanic.
    2. Open the image file in the editor.
    3. Navigate to the XMP metadata panel and find the dc:subject field (sometimes labeled “Keywords” or “Subject” depending on the editor).
    4. Add the exact text: contains-synthetic-performer as a keyword entry.
    5. Save the file and verify the metadata was written correctly before uploading to Amazon.

    For A+ content specifically, Amazon has reportedly added a checkbox within the A+ Content Manager that automatically applies this disclosure without requiring manual metadata editing. But for standard listing images, the file-level tag is the required path.

    The Broader Implication for AI Image Workflows

    This requirement signals a direction, not just a rule. Amazon is building the infrastructure to detect, disclose, and eventually audit AI-generated content in listings. Sellers who build their image production workflows with metadata compliance from the start — embedding the correct tags before assets go anywhere near Seller Central — are positioned significantly better than those who treat this as an afterthought.

    The practical approach is to add metadata tagging as a mandatory step in your image handoff process. Every AI-generated lifestyle image goes through a metadata audit before it’s uploaded anywhere. This adds minimal time and eliminates a risk category that will only grow as Amazon’s detection capabilities improve.

    Secondary Images: Where the Rules Get Complicated

    Secondary images (images 2 through 7 in your gallery) operate under a materially different rule set than the main image — and the gap between what’s allowed in secondary positions versus the main image is where most of the conversion-driving creativity lives. Understanding this distinction clearly is essential for building galleries that are both compliant and high-performing.

    What Secondary Images Can Include That Main Images Cannot

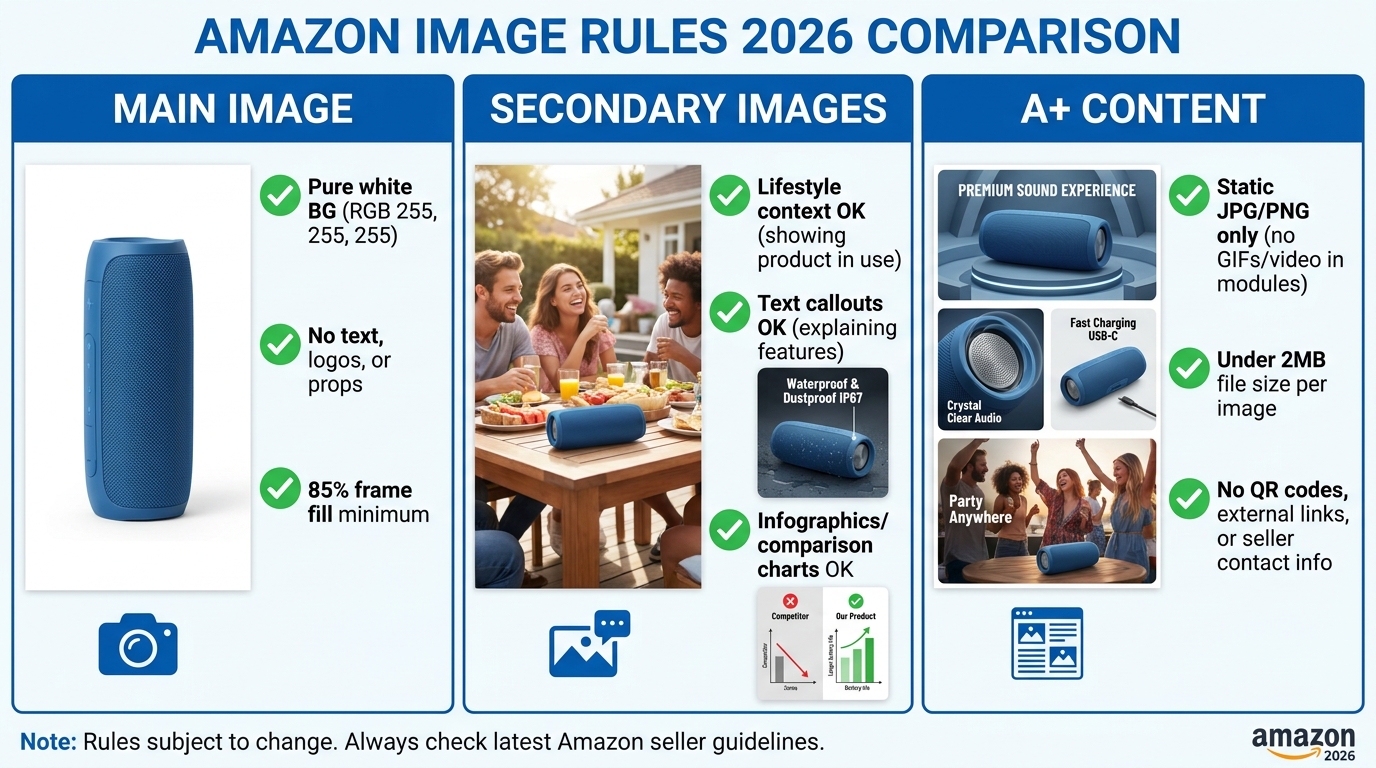
    The main image must be product-only, pure white background, no text, no props. Secondary images allow considerably more latitude. Text overlays describing features, dimensions, or ingredients are generally permissible. Lifestyle scenes — the product in use in a realistic environment — are not only allowed but consistently cited as the highest-converting secondary image type in 2026 guidance. Comparison charts, infographics, size guides, and bundle representations are all acceptable in secondary positions provided they accurately represent what the buyer receives.

    The Key Compliance Rules That Still Apply to Secondary Images

    Flexibility in secondary images does not mean anything goes. Several rules apply across the entire gallery, not just the main image:

    • Accuracy. Every image must accurately represent the product being sold. Lifestyle imagery that shows a product in a context or configuration that doesn’t reflect reality is a policy violation, even in a secondary position.
    • No Amazon branding or badges. Third-party seller images cannot include Amazon’s logos, “Best Seller” badges, “Amazon’s Choice” labels, or any other Amazon-owned visual marks. This is a categorical prohibition.
    • No contact information. Website URLs, email addresses, phone numbers, and QR codes that lead shoppers off Amazon are prohibited.
    • No misleading claims. Infographics are allowed. Infographics that make unsubstantiated health claims, performance claims, or comparative claims without evidence are violations and can trigger suppression or, more seriously, category-level compliance reviews.
    • No AI-generated people without disclosure. The contains-synthetic-performer metadata rule applies to secondary images as much as main images.

    The Gray Area: Bundles and Multi-Product Images

    One of the trickier compliance questions in secondary image positions is how to represent bundles and included accessories. The rule is that what you show must be what the buyer receives. If your product includes an accessory, showing it is not only allowed but appropriate. If your secondary image shows a product lifestyle scene that includes items not included in the purchase, the scene must be clearly contextualized in a way that doesn’t imply the other items are included.

    The safest approach for lifestyle images that include environmental props (a coffee mug next to your supplement, a cutting board near your kitchen gadget): show the product prominently, make the environmental elements clearly secondary in size and focus, and never imply that environmental elements are part of the purchase. Ambiguity in this area is what generates compliance flags.

    The Image Stack Architecture That Passes Every Check

    Ideal Amazon 7-image stack layout showing main hero, lifestyle context, infographic features, close-up detail, size guide, comparison chart, and social proof images all with green compliance checkmarks

    A compliant Amazon image gallery is not just a collection of images that each individually pass the rules. It’s an intentionally structured sequence in which every image has a defined role — both from a conversion perspective and a compliance perspective. The architecture matters because Amazon’s scanner evaluates the gallery as a set, and inconsistencies between images can trigger flags even when individual images look clean.

    Image 1: The Compliant Hero

    Position one must be the most rigorously compliant image in your gallery. It is the primary driver of click-through rate from search results, which means it must work at thumbnail size on mobile — typically displayed at around 100–150px — while also passing every automated compliance check. The hero image should feature the exact product sold, on a pure white background, filling at least 85% of the frame, in the highest resolution you can produce.

    For products with multiple components included (a skincare set, a tool kit, a cooking bundle), show all included components arranged together on the white background. This satisfies both the “what the buyer receives” accuracy requirement and gives you maximum product fill without violating any single-product rules.

    Image 2: Lifestyle Context — High Priority, High Compliance Risk

    The lifestyle image is consistently cited as the highest-converting secondary image type. It’s also where compliance risk is highest, for the reasons described in the previous section. The lifestyle image should show the product in a realistic use context — the actual product, used by an actual person (or an AI-generated person with the correct metadata tag), in an environment that reflects the product’s intended use case.

    Keep the product as the clear visual focal point. Use a professional photography or AI generation approach that produces photorealistic results. If using AI-generated models, apply the contains-synthetic-performer metadata tag before upload, every time, without exception.

    Images 3–4: Feature Infographic and Close-Up Detail

    The feature infographic is the workhorse of the gallery — it’s where you communicate specifications, key benefits, and differentiators using text overlays on a product image. This is fully permissible in secondary positions. Design clean, legible infographics with text large enough to read on mobile screens without pinching to zoom. Avoid making unsubstantiated performance claims in your callouts — every claim should be factually accurate and defensible if reviewed.

    The close-up detail image serves a different function: reducing purchase uncertainty by showing texture, material quality, finish, connector types, thread count — whatever detail matters most for your product’s category. This image typically has the lowest compliance risk because it’s simply a tighter crop of the actual product.

    Images 5–6: Size Guide and Comparison Chart

    Size guides showing dimensions with overlaid measurements are permissible and highly effective for products where sizing uncertainty drives return rates. Comparison charts that contrast your product against alternative offerings (or against cheaper alternatives in your own lineup) are allowed, with the caveat that you must not misrepresent competitors or make claims that could be characterized as false advertising.

    Image 7: Trust and Social Proof Signals

    The final image slot is often used for trust signals: certifications, awards, guarantee messaging, or media mentions. These are permissible with important restrictions. Third-party certifications must be ones you genuinely hold. You cannot display Amazon “Best Seller” badges or Amazon’s own rating graphics. Awards or media mentions should reflect actual recognition rather than manufactured social proof. If you display a money-back guarantee in an image, that guarantee must be honored — it becomes part of your product claim set.

    Before You Upload: A Pre-Flight Compliance Checklist

    The most effective way to prevent suppression is to catch violations before upload rather than appeal them after the fact. The following pre-flight process is designed to catch every common compliance failure point at the image production stage, not the crisis management stage.

    Main Image Pre-Flight

    • Background pixel check: Sample at least 5 background pixels including corners and areas near the product edge. Confirm all read RGB 255/255/255.
    • Product fill estimate: Visually estimate product fill — the product should occupy at least 85% of the canvas area. For elongated products, consider diagonal orientation if needed.
    • Resolution check: Confirm the image is at least 1,600 pixels on the longest side (2,000+ preferred). Verify the file was not upscaled from a lower resolution source.
    • Color profile: Confirm the image is in the sRGB color space before export.
    • Text/watermark scan: Open the image full-screen and visually inspect for any text, watermark, or border. Check corners and edges carefully — borders can be easy to miss at reduced preview sizes.
    • Shadow and reflection check: Confirm no visible shadow extends beyond the product area in a way that produces non-white pixels.
    • Format check: Confirm the image is exported as JPEG or PNG with no transparency layer artifacts.

    Secondary Image Pre-Flight

    • Accuracy audit: Does every element shown in the image reflect what the buyer actually receives? Is the product configuration shown accurate?
    • Claim review: Do any text callouts make claims (health, performance, comparative) that could be challenged? Remove or qualify any claims that lack clear evidence.
    • Amazon marks check: Confirm no Amazon logos, star rating graphics, “Best Seller” text, or “Amazon’s Choice” language appears anywhere in the image.
    • Contact info check: Confirm no URLs, QR codes, email addresses, or phone numbers are visible in the image.
    • AI disclosure check: If any person visible in the image is entirely AI-generated (not a real photographed person), confirm the contains-synthetic-performer XMP metadata tag has been applied to the file.
    • Mobile legibility: Reduce the image to 200px width and confirm all critical text is still legible. If it’s not, increase font size in the infographic design.

    Catalog-Level Pre-Flight for Variation Listings

    • Confirm that each variation’s image set shows the correct variation — color, size, style — in the hero image position.
    • Confirm that the listed image set for each variation doesn’t show images from sibling variations as if they were the selected variation.
    • Verify that bundle images show exactly the items included in each specific bundle variation, not the full range across all variations.

    When Good Images Get Flagged: The False Positive Recovery Protocol

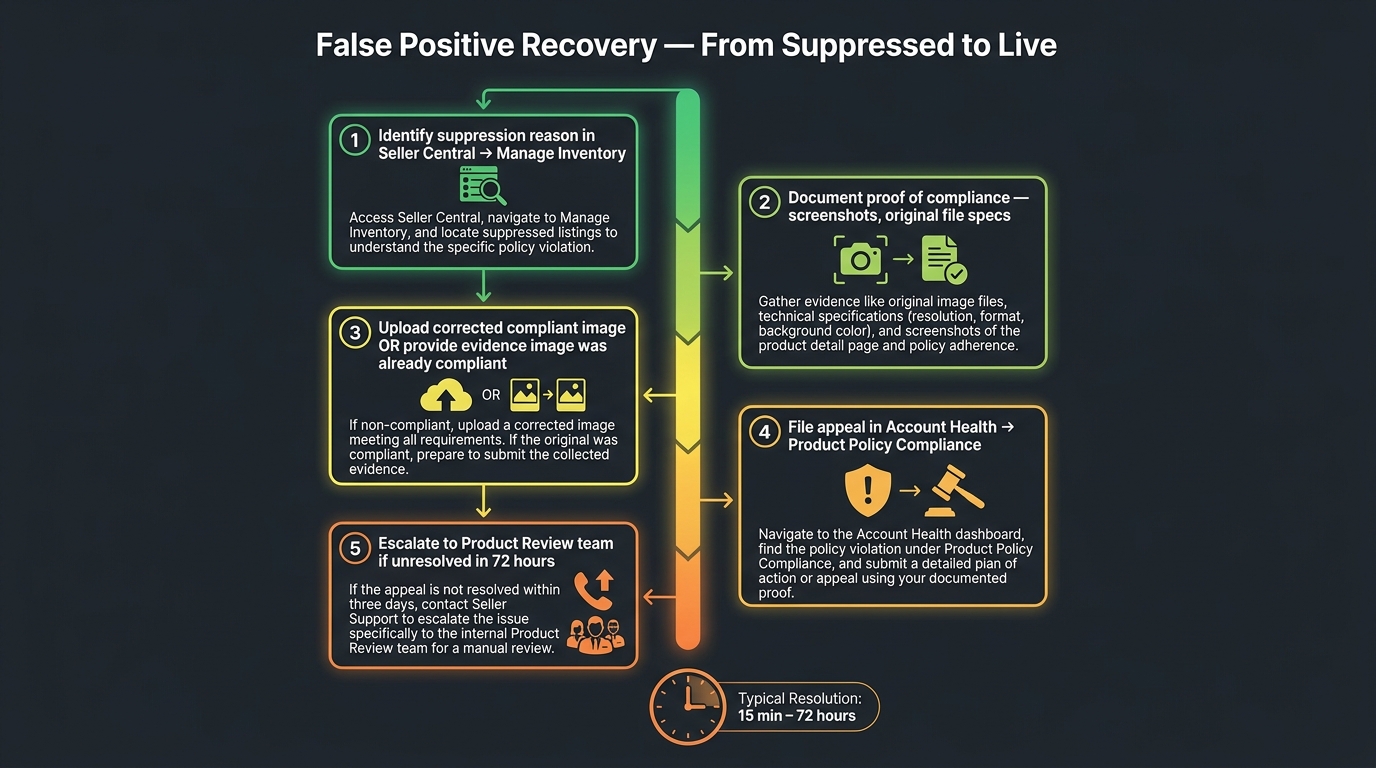
    5-step false positive recovery protocol timeline from suppression to live listing, showing Seller Central path, documentation, appeal, and escalation steps, with resolution time of 15 minutes to 72 hours

    Even after executing a rigorous pre-flight checklist, image suppression false positives happen. When they do, the speed and structure of your response determines how much revenue you lose during the suppression window. Here is the exact protocol — based on how Amazon’s appeal and review systems actually function in 2026.

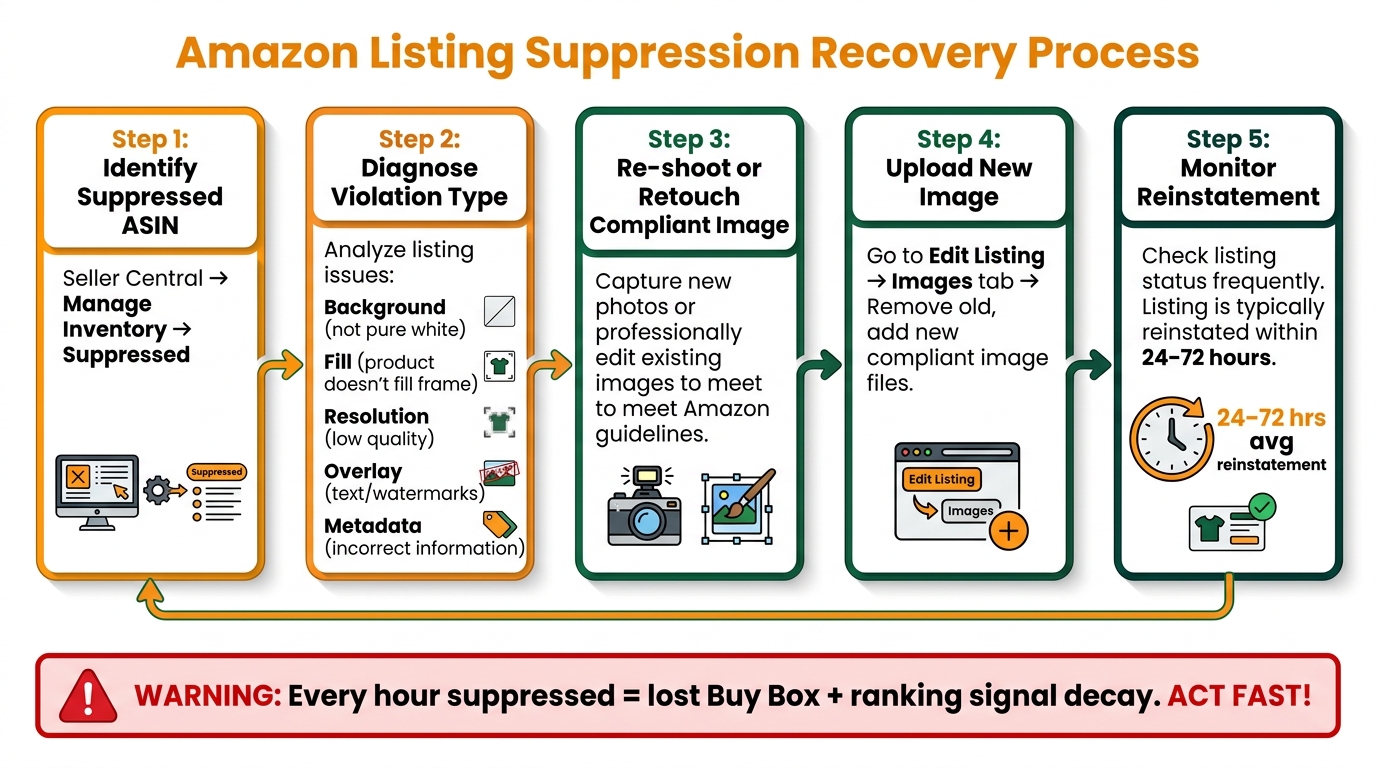
    Step 1: Identify the Exact Suppression Reason (Don’t Skip This)

    In Seller Central, navigate to Inventory → Manage All Inventory and filter for suppressed listings. Alternatively, go to Inventory → Fix Blocked Listings or check the Listing Quality Dashboard. Click into the affected ASIN and read the specific suppression reason — not the category, but the exact stated violation. This information is critical because the appeal path varies depending on whether the issue is classified as a technical image violation, an accuracy violation, an IP complaint, or a policy compliance matter.

    Step 2: Document Before You Change Anything

    Before you replace or modify the flagged image, take screenshots of: the suppression notice with its stated reason, the current image in the listing as it appears in Seller Central, and the original image file’s technical specifications (resolution, color profile, file size, pixel values). This documentation is your evidence in the appeal if you believe the suppression is a false positive.

    Step 3: Decide — Fix and Resubmit, or Appeal Without Changing

    If you believe the image is genuinely compliant and the suppression is a false positive, you can appeal without replacing the image — but this is slower. If you can quickly produce a clearly compliant replacement (which you should, if you’ve been building backup images as part of your compliance workflow), upload it immediately to restore the listing, then appeal the original suppression as a false positive. The priority is getting the listing live again; the appeal is a secondary concern.

    Typical reinstatement timeline after uploading a compliant replacement: 15 minutes to 24 hours for straightforward cases. Complex cases or those requiring internal review can take 24 to 72 hours. Cases that require category-level or brand-level review may take up to 7 days.

    Step 4: File the Appeal Through the Correct Path

    Navigate to Account Health → Product Policy Compliance and find the specific violation record. Use the Appeal or Submit Additional Information option attached to that specific record — not a generic support ticket. In your appeal submission:

    • State clearly that you believe the suppression is a false positive.
    • Provide your documentation: pixel value screenshots, resolution data, comparison between your image and the stated violation reason.
    • Be specific and factual. Appeals that say “my image is fine” without evidence are rejected at a much higher rate than appeals that provide concrete technical data showing compliance.

    Step 5: Escalate If Not Resolved Within 72 Hours

    If your appeal has not been resolved in 72 hours, open a new Seller Support case specifically referencing the ASIN, the suppression date, the appeal case number, and requesting transfer to the Product Review team. Generic case routing in Seller Support often cycles you back to the same automated responses. Explicitly requesting the Product Review team increases the likelihood of a human with appropriate authority reviewing your case. Do not accept a generic “your appeal has been received” response as a resolution — follow up until you have a written confirmation that the suppression has been cleared or a specific reason for rejection.

    The Amazon Image Replacement Risk — And How to Protect Your Listings

    Dramatic infographic showing Amazon's automated image replacement process replacing a brand's carefully crafted listing image with an alternate image without notice

    Beyond the risk of suppression, 2026 has introduced a more insidious risk that many sellers don’t discover until after it’s already affected their listings: Amazon’s ability — and increasing willingness — to replace seller images on non-compliant or weak listings.

    What Amazon’s Image Replacement Mechanism Actually Does

    Amazon’s policies give it the latitude to modify or replace listing images when the current main image doesn’t meet standards. In practice, this means Amazon can pull in an alternate image from the catalog — sometimes from another seller on the same ASIN, sometimes from Amazon’s own vendor catalog, sometimes from indexed product images it has sourced independently — and promote that image as the main image for the listing.

    This has been reported on brand-registered listings as well as non-brand-registered ASINs. Brand Registry provides stronger protection but does not provide absolute immunity, particularly if your own images have compliance weaknesses that give Amazon’s system a justification to intervene.

    Why This Is a Conversion Threat, Not Just a Compliance Threat

    The images Amazon selects as replacements are not optimized for conversion. They may be technically compliant but contextually wrong for your product positioning. They may show a different variation. They may show the product from an angle that emphasizes a feature that isn’t your primary selling point. They may simply be lower quality than your carefully produced imagery.

    The conversion impact of a misaligned main image is significant. The main image is the primary driver of click-through rate from search results. An image that passes Amazon’s compliance check but doesn’t communicate your product’s key value proposition clearly is costing you clicks that should be yours.

    Protection Strategy

    The most effective defense against image replacement is ensuring your own images give Amazon’s system no reason to intervene. This means: every image in your gallery must be technically compliant before any automated check would flag it. Beyond compliance, this means maintaining a full image gallery — all 7 positions filled with compliant, high-quality images. Listings with sparse or incomplete galleries are at higher replacement risk than listings with complete, compliant galleries.

    If you’re on Brand Registry, use the Brand Registry portal to monitor and manage your listing images actively rather than treating image uploads as a one-time task. Audit your gallery on a quarterly schedule — not just when a suppression notice appears.

    Bulk Catalog Auditing: Finding and Fixing at Scale

    For sellers managing catalogs of hundreds or thousands of ASINs, the image compliance challenge isn’t conceptual — it’s operational. A single pre-flight checklist applied image by image doesn’t scale. The question becomes: how do you systematically find and fix compliance risks across a large catalog before they turn into suppression events?

    Start With Seller Central’s Built-In Suppression Reports

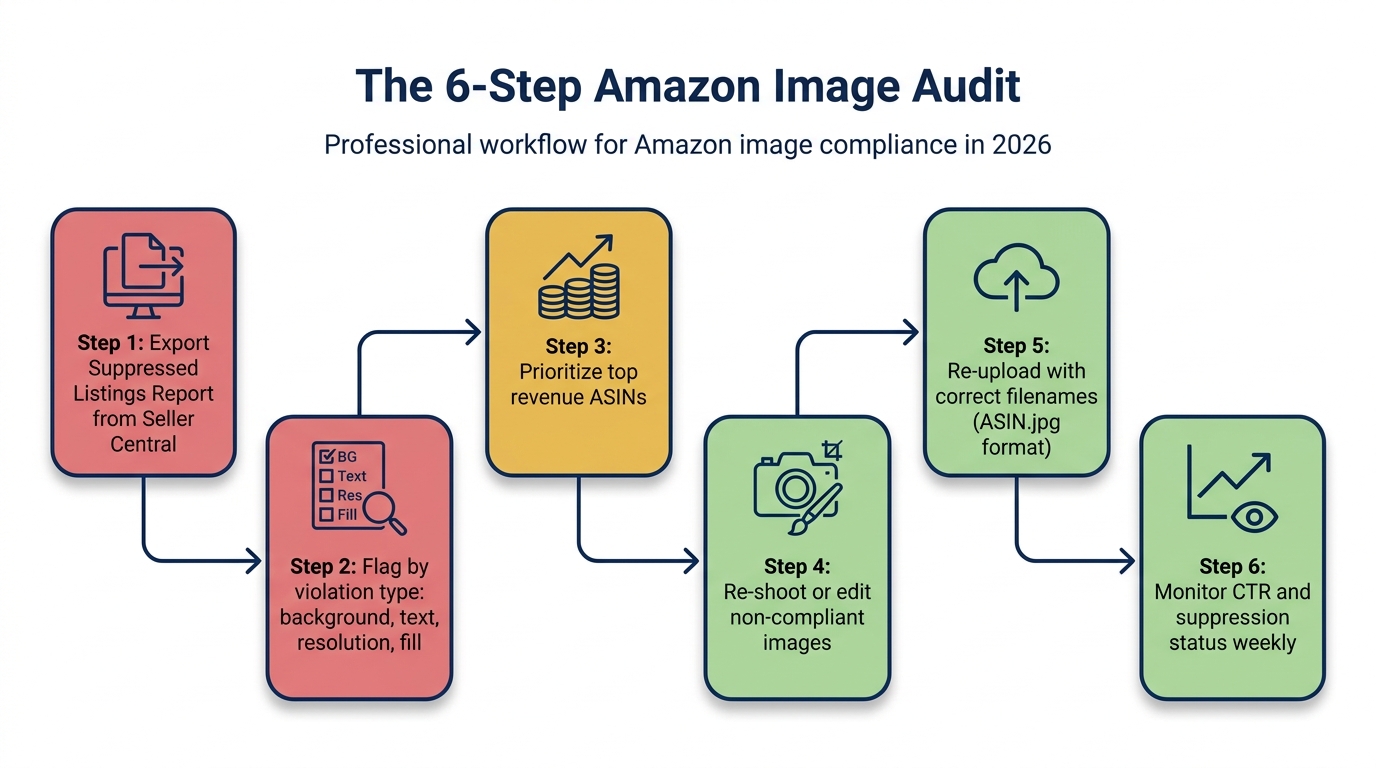
    Seller Central’s suppression reports under the Listing Quality Dashboard and Fix Blocked Listings view provide the most direct signal of current compliance issues. Export these reports regularly — weekly for active catalogs — and build a tracking system that records suppression type, ASIN, date of suppression, date of fix, and outcome. Pattern recognition across this data will show you which image types, which product categories, or which production vendors are generating the most compliance risk.

    Use Third-Party Auditing Tools Selectively

    Several third-party listing audit tools — including those from Helium 10, DataDive, and listing quality SaaS platforms — offer background detection, resolution checks, and compliance scoring. These tools vary significantly in how current their rule databases are and how accurately they replicate Amazon’s actual detection logic. They are useful for initial bulk scans that surface obvious issues (off-white backgrounds, low resolution, text in main images) but should not be treated as a substitute for manual review of images flagged by Amazon’s own system.

    Prioritize by Revenue Impact

    When auditing a large catalog, not all ASINs carry equal weight. Prioritize compliance auditing in this order:

    1. High-revenue, high-traffic ASINs — the listings where a suppression event has maximum revenue impact.
    2. Recently launched ASINs — new listings are particularly vulnerable during the initial indexing period before the system establishes a compliance baseline for the ASIN.
    3. Variation parents with multiple child ASINs — a compliance issue on a parent-level image can cascade across all child variations.
    4. ASINs with AI-generated lifestyle imagery — these need an immediate metadata audit to verify contains-synthetic-performer tags are correctly applied.
    5. Long-tail catalog depth — older, lower-traffic ASINs that haven’t been image-audited recently.

    Build a Compliance Buffer: Backup Images

    One practice that significantly reduces suppression recovery time for large catalogs is maintaining a library of pre-approved backup images for top-priority ASINs. These are fully compliant main image alternatives — different angles, different fills, same white background and technical specs — that can be uploaded immediately if the current main image is suppressed. The goal is to shrink recovery time from “time to produce a new compliant image” to “time to click upload.” For ASINs that generate significant daily revenue, that difference in recovery speed is directly measurable in dollars.

    Building Compliance Into Your Creative Process — Not Onto It

    The sellers who spend the least time managing image compliance crises are not the ones who have memorized every rule. They’re the ones who have embedded compliance checks into their creative workflow at the point of production — before any image reaches Seller Central.

    The Handoff Protocol That Prevents Most Violations

    If you work with photographers, designers, or AI image production vendors, the compliance burden needs to be defined in the brief, not discovered in the review. Every creative brief for Amazon imagery should include explicit requirements for: background color specifications (RGB 255/255/255, verified), minimum resolution, export format and color profile, prohibited elements checklist, and — for any content featuring AI-generated people — metadata tagging instructions.

    Requiring vendors to deliver images with a technical spec sheet showing their compliance checks, rather than just the final image file, shifts accountability to the point of production. It’s far more efficient than discovering a background issue after 50 images have been shot in the same setup.

    Use Staged Review Before Live Upload

    Before uploading images to production listings, maintain a staging workflow: upload new images to a draft ASIN or use Amazon’s image preview tools to verify that images render correctly within the Seller Central environment before going live. This adds a day to the image deployment timeline but surfaces rendering issues — color profile mismatches, resolution problems, format artifacts — before they affect live listings.

    Schedule Quarterly Gallery Audits

    Amazon’s image rules evolve. What was compliant eighteen months ago may not meet current standards. A quarterly review of your full image gallery — not just checking for suppression flags but proactively comparing your images against the current published guidelines — catches drift before it becomes a problem. This is particularly important for sellers who produce images infrequently and whose galleries may be built on older production standards.

    Track the Rules That Are Changing, Not Just the Rules That Are

    The AI disclosure requirement that emerged in July 2026 is a clear signal that Amazon’s compliance framework is actively evolving in response to external legal and regulatory changes. Sellers who only pay attention to compliance rules when they get flagged will always be reactive. Building a practice of monitoring Amazon’s policy update announcements and, when relevant, the legal landscape that drives them — as the New York synthetic performer law did — positions your operation to adapt before enforcement arrives.

    What All of This Actually Means for Your Image Strategy in 2026

    The core insight across everything covered in this post is one that most sellers — even experienced ones — underestimate: Amazon’s image compliance system is not designed to be fair. It’s designed to be consistent. Automated scanning at the scale of hundreds of millions of ASINs cannot afford nuance. It catches the things it was trained to catch, in the order it was trained to check them, with the tolerance thresholds it was calibrated to enforce.

    Working within that reality means building images that don’t require nuance to pass. Not images that are technically on the right side of a borderline — images that are unambiguously, verifiably compliant by every measurable parameter. And it means understanding that compliance and conversion are not in opposition. The sellers generating the strongest image performance in 2026 are those who have mastered the constraint: a bulletproof main image that Amazon’s scanner never has cause to touch, paired with a well-structured secondary gallery that does all the persuasion work within the rules that govern it.

    Build to pass the scanner first. Then build to convert the human. In that order, every time.

    Actionable Takeaways

    • Run a pixel-level background check on every main image before upload — sample at least 5 background points and verify RGB 255/255/255 at each.
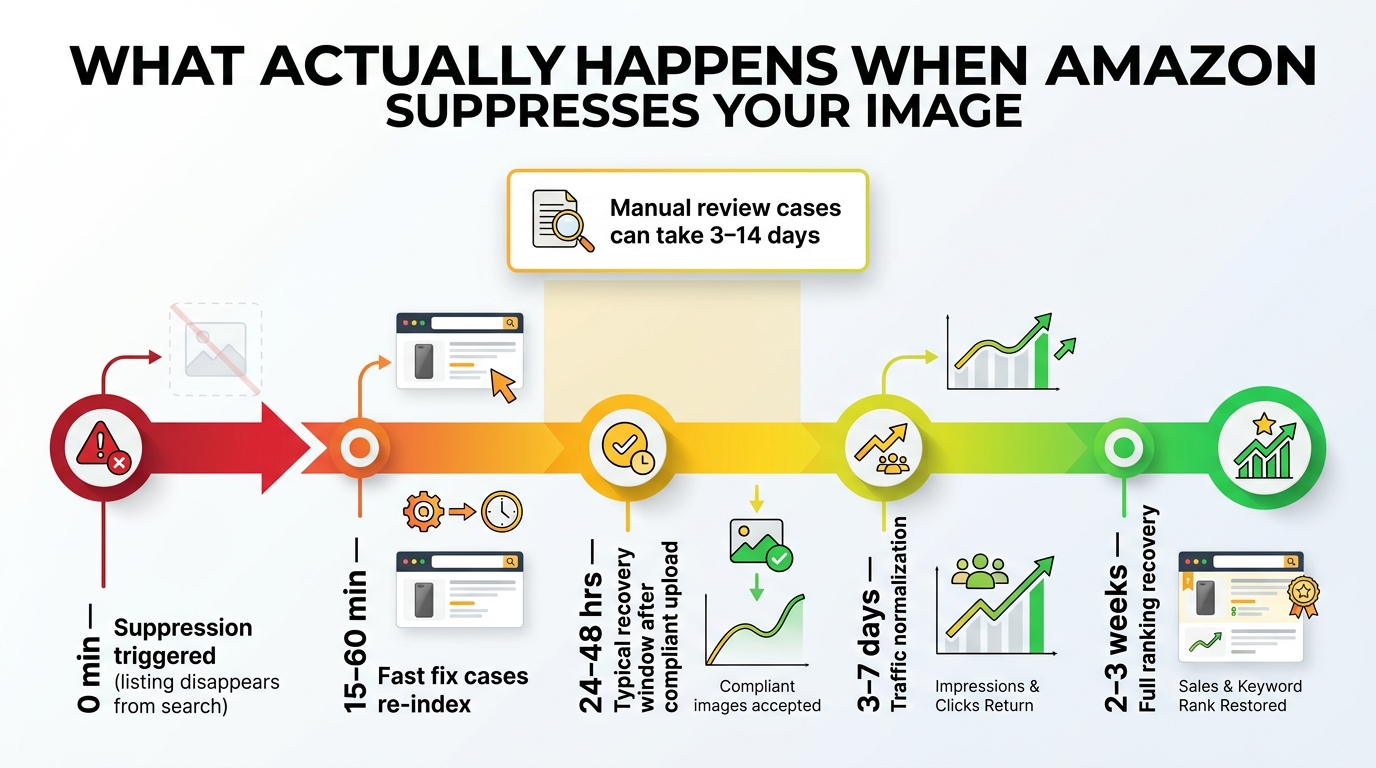
    • Apply the contains-synthetic-performer metadata tag to every image or video containing an entirely AI-generated person, before upload, every time.
    • Maintain a backup image library for top-revenue ASINs — pre-compliant alternatives that can be uploaded immediately if the current main image is suppressed.
    • Embed compliance requirements in your creative brief — don’t review for compliance after production. Specify it before production begins.
    • If you’re suppressed, document before you change anything — your original image evidence is the foundation of a successful false positive appeal.
    • Audit your AI-generated lifestyle images immediately if you haven’t already checked for the metadata disclosure requirement — this is the most under-addressed compliance risk in catalogs right now.
    • Schedule a quarterly gallery review across your full catalog. Image rules change. Your galleries shouldn’t be set-and-forgotten assets.
  • The Operator’s Field Manual for Amazon SBV Hook Testing: A Data-Driven Framework for Winning Creatives

    The Operator’s Field Manual for Amazon SBV Hook Testing: A Data-Driven Framework for Winning Creatives

    Amazon SBV hook testing framework — the 3-second decision window on mobile search results

    Most Amazon advertisers treat Sponsored Brands Video as a format they run. Set up a campaign, upload a clip of the product, aim it at the right keywords, and let it spend. If CTR is decent, it stays. If it underperforms, swap the creative. Repeat.

    That’s not a strategy. That’s guesswork with a budget attached.

    The sellers consistently extracting outsized returns from SBV are doing something fundamentally different: they’re using the format as a structured creative-testing lab, and specifically, they’re treating the first two to three seconds of every video as a hypothesis to be proven or disproven on live traffic. They call this approach hook testing, and when it’s run correctly — with controlled variables, meaningful sample sizes, and the right interpretation of Amazon’s video engagement metrics — it produces a compounding advantage. Each test narrows the gap between what you’re spending and what’s actually working.

    This post is a field manual for that process. Not a high-level overview of why video matters (you already know that), and not a list of creative tips without structure. This is the operational framework: how to design tests that generate signal rather than noise, how to read the engagement funnel Amazon actually exposes in reporting, when to declare a winner, how to scale a validated hook, and what gets operators into trouble when they think they’re testing but are actually just rotating creatives.

    The data underpinning this framework: SBV’s 2026 average CTR benchmarks are running at 0.89–1.0%, roughly 2.6 times higher than static Sponsored Brands formats. Conversion rates average around 11.2%. Amazon’s own research across 15 countries found SBV delivered 17.7 times higher CTR than static image ads. That’s not a feature of the video format alone — it’s a feature of what the format forces advertisers to do: show the product doing something in the first few seconds or lose the shopper entirely.

    The hook is where all of that performance lives or dies. Let’s build the framework from the ground up.

    Why the First Three Seconds Are the Entire Game

    Amazon Sponsored Brands Video autoplays in the search results feed, muted by default, on a screen the shopper is already scrolling. There is no built-in goodwill. There is no context. The person did not choose to watch your ad — it simply appeared between things they were actually looking for, and you have a fraction of a second before their thumb continues moving.

    This is why Amazon’s own ad specifications tell sellers to show the product within the first two seconds and demonstrate the product function within the first five. Those aren’t aesthetic guidelines. They’re retention guidelines, derived from the same behavioral reality that makes the first three seconds of any autoplay video the highest-stakes moment in the entire creative.

    The Drop-Off Reality

    Practitioner data and broader digital video research consistently show that the steepest audience drop-off in short-form video happens in the first three seconds — by some estimates, around 70% of total viewer loss occurs before the hook window closes. For SBV specifically, this means that a video with a weak opening is not just underperforming — it’s effectively invisible to most of the people who see it, because they’ve already scrolled past before anything meaningful was communicated.

    Amazon’s video-specific engagement metrics, which are available in SBV reporting, confirm this pattern. The platform exposes 5-second views (and 5-second view rate), first quartile views, midpoint views, third quartile views, video completes, and unmutes. The gap between raw impressions and 5-second views is almost always the largest single drop in the funnel. If you’re not measuring that gap specifically, you’re missing the primary signal of hook effectiveness.

    Sound-Off Compounds the Challenge

    Because SBV autoplays muted, the first three seconds can’t rely on audio to carry the message. A voiceover that says “tired of dealing with messy cables?” is completely invisible to most viewers. The visual storytelling has to do the work that audio would normally support — and it has to do it fast enough that the hook lands before the shopper scrolls away.

    This constraint changes the creative brief entirely. It means the hook has to be legible in visual terms: the product has to be recognizable, the benefit has to be implied or stated in on-screen text, and the opening shot has to be compelling enough to stop a muted scroll. Everything else in the SBV creative framework flows from this foundational constraint.

    The Five Hook Archetypes — and What Makes Each One Work

    Five SBV hook archetypes infographic — problem, solution, proof, comparison, and pattern interrupt

    Not all hooks are created equal, and the best hook for a given product depends heavily on category dynamics, competitive context, and where the shopper is in their buying journey. The field has converged on five primary archetypes, each with distinct mechanics and ideal conditions.

    1. The Problem Hook

    The problem hook opens by naming or visualizing a specific pain point before the product is shown. The logic: if you identify the shopper’s frustration in the first two seconds, you’ve established relevance before they’ve had time to scroll away. Done well, it creates a micro-commitment — the shopper pauses because they recognize themselves in what they’re seeing.

    This hook is most effective when the pain point is visceral and immediately recognizable from a visual alone. A tangle of charging cables. A blurry photo of food. A leaking water bottle in a bag. The opener doesn’t need narration — the image of the problem is its own hook. The product appears as the resolution in the following seconds.

    Problem hooks tend to perform best in established categories where shoppers already know they have a need. If someone is searching for “cable organizer desk” they already know the problem — they just need you to confirm that you understand it too.

    2. The Solution Hook

    The solution hook skips the problem framing and opens directly with the product performing its primary function. This is the “show, don’t tell” approach in its purest form. A pour-over coffee device dispensing a perfect cup in slow motion. A portable solar charger snapping onto a backpack. The product in action, immediately.

    Solution hooks work well for categories where the product itself is visually arresting — where watching it work is inherently engaging. They also perform well when the competitive landscape is crowded and the differentiation is in the product experience rather than the problem definition. You’re not selling the pain; you’re selling the capability.

    3. The Proof Hook

    The proof hook leads with credibility: a before/after comparison, a results visual, a review count, a star rating, or a clear performance claim in text overlay. The first seconds are dedicated not to the product doing something, but to evidence that it works.

    This archetype is particularly powerful when the product makes a claim that shoppers might reasonably doubt. Supplements, skincare, fitness equipment, cleaning products — categories where purchase intent is high but skepticism about results is equally high. Opening with “4.8 stars from 12,000 reviews” or a before/after skin comparison in the first two seconds addresses the doubt before it can suppress the click.
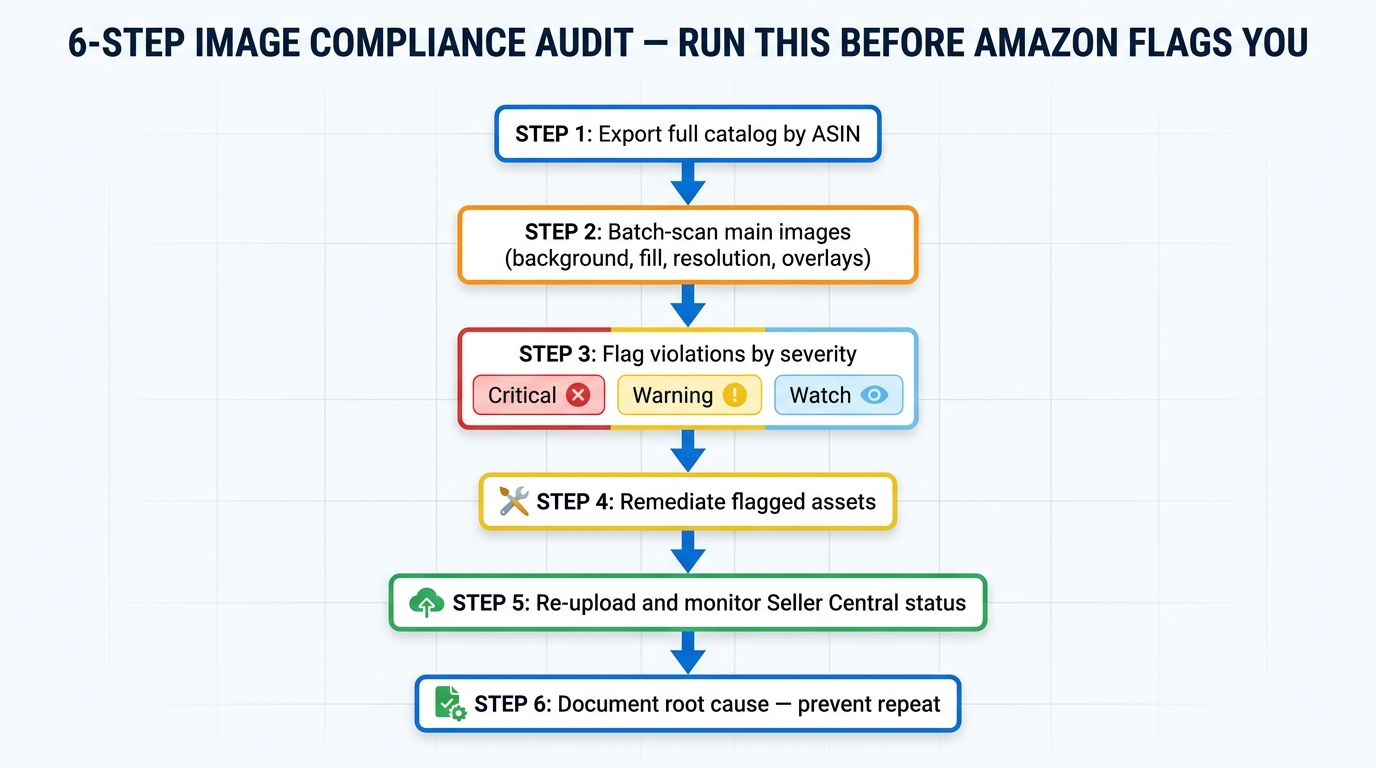
    4. The Comparison Hook

    The comparison hook opens with a direct or implied contrast — “other products vs. ours,” a side-by-side visual of a competing approach versus the product, or a split-screen showing the inferior alternative and the solution. This is competitive positioning baked into the creative format.

    Comparison hooks are most effective when there’s a clear, established way of doing something that your product replaces or improves upon. The hook implicitly positions you as the upgrade without requiring the shopper to already understand the category landscape. It’s particularly useful in categories where shoppers are searching for alternatives to something they already use.

    5. The Pattern Interrupt

    The pattern interrupt hook uses something visually unexpected — an unusual camera angle, an unexpected color scheme, an action that defies expectation, or a bold on-screen statement — to stop the scroll through sheer novelty. It doesn’t lead with problem or product; it leads with visual disruption.

    This is the highest-risk, highest-variance archetype. When it works, it can generate dramatically higher 5-second view rates than more conventional hooks because the brain is wired to pay attention to the unexpected. When it doesn’t work, it confuses shoppers who don’t understand what they’re looking at fast enough to stay. Pattern interrupts are most appropriate for established brands with clear awareness, products with strong visual uniqueness, or launch strategies where standing out matters more than immediate conversion efficiency.

    Designing the Test Matrix: Controlled Experiments That Generate Real Signal

    SBV A/B test matrix showing four hook variants with all other variables held constant

    This is where most SBV testing breaks down. The principle behind hook testing is straightforward: if you change only one variable and everything else stays identical, then any performance difference between variants is attributable to that variable. In practice, operators frequently compromise on the “everything else stays identical” part — and when they do, the test data becomes unreadable.

    The Core Isolation Rule

    When running a hook test, the following elements must be held constant across all variants:

    • Keyword set: All variants run against the same keywords, at the same match types.
    • Bids: Identical keyword bids across all ad groups running the variants.
    • Daily budget: Equal allocation per variant. If one variant has access to more daily spend, it will generate more impressions and appear to perform differently even if the creative is equivalent.
    • Campaign schedule: All variants run during the same days and time windows.
    • Landing page: All variants send traffic to the same destination — either the same product detail page or the same Brand Store page.
    • Video body and CTA: The middle section and closing seconds of the video are identical. Only the first two to three seconds — the hook — changes across variants.

    The only variable that should differ between test ads is the hook itself. Change the opening shot, the opening text overlay, the first visual, or the opening framing — and nothing else.

    How Many Variants to Run

    The practical recommendation, supported by the resource constraints most operators face, is to test two to four hook variants simultaneously. Two variants (control vs. challenger) gives you the clearest signal but limits how quickly you can explore the hook space. Four variants lets you cover multiple archetypes in a single testing cycle but requires more impressions before results reach statistical significance per variant.

    For most brands, running three variants — a current control hook, one challenger from a different archetype, and one challenger that’s a variation within the same archetype — provides the best balance of speed and signal quality.

    Campaign Structure for Hook Testing

    There are two approaches to structuring SBV hook tests:

    Option A — Separate ad groups within one campaign: Create one SBV campaign, then build a separate ad group for each hook variant, each with identical keyword targeting and budgets. This is easier to manage but can create budget allocation imbalances if Amazon’s delivery algorithm favors one ad group over others.

    Option B — Separate campaigns per variant: More administrative overhead, but gives you precise budget control per variant and eliminates the risk of unequal delivery. Each campaign runs the same keywords, the same bids, and the same daily budget. This is the cleaner experimental design.

    The tradeoff between these approaches depends on your account scale. For smaller budgets, separate campaigns per variant gives you more control over the equal-spend requirement. For larger accounts where budget floors aren’t a concern, either approach can work as long as daily delivery is monitored for imbalances.

    Minimum Run Time and Impressions

    A consistent recommendation across Amazon PPC practitioners is to run tests for at least seven to fourteen days before interpreting results — and to require at minimum 1,000 impressions per variant before drawing any conclusions. The seven-day floor matters because Amazon’s performance can fluctuate significantly day-to-day based on keyword auction dynamics, competitor activity, and platform traffic patterns. A hook that appears to be underperforming on day three may be leading by day ten simply because of normal variance.

    The impression threshold matters because CTR is a percentage, and percentages computed from small samples are statistically unreliable. A variant with 200 impressions and a 1.5% CTR is not demonstrably better than a variant with 200 impressions and a 1.0% CTR — the confidence intervals overlap significantly. At 1,000+ impressions per variant, the data begins to stabilize enough to make informed decisions.

    Reading the Metrics Funnel: What Amazon’s SBV Data Actually Tells You

    The SBV attention funnel — from impressions through 5-second views, quartiles, completes, and unmutes

    Amazon now exposes a rich set of video-specific engagement metrics for Sponsored Brands Video campaigns. Most operators focus on CTR, CVR, and ACoS — which are critical — but they miss the diagnostic power of the engagement funnel that sits upstream of those conversion metrics. Understanding how to read the full funnel changes how you interpret test results and how you diagnose creative problems.

    The Five-Second View Rate: The Hook’s Primary Report Card

    Amazon defines a 5-second view as an impression where the shopper watched the complete video or at least five seconds, whichever comes first. The 5-second view rate — 5-second views divided by total impressions — is the most direct measure of whether your hook is working.

    A high 5-second view rate means your opening captured attention and held it long enough for the viewer to enter the body of the video. A low 5-second view rate, relative to other variants in your test, means the hook is failing before it can communicate anything meaningful. When comparing variants, the 5-second view rate should be your first comparison point, before you even look at CTR.

    Why before CTR? Because a hook can be so strong that it generates high 5-second view rates but poor CTR — the video held attention but didn’t create click intent. That’s actually useful diagnostic information: it tells you the hook is doing its job, but the message isn’t resonating or the product-market fit for that angle isn’t generating purchase intent. The failure point has moved downstream.

    Quartile Views: Where Are Viewers Falling Off?

    First quartile, midpoint (second quartile), third quartile, and complete views let you map viewer retention across the length of the video. In SBV’s typical 15-second format, the quartile breakdown looks like this:

    • First quartile (0–25%, ~0–4 seconds): This is still largely the hook window. Heavy drop-off here confirms a weak opening.
    • Midpoint (50%, ~7–8 seconds): Drop-off concentrated here usually means the proof or demo section isn’t engaging enough. The hook worked, but the middle didn’t sustain interest.
    • Third quartile (75%, ~11–12 seconds): Loss here often suggests the video ran too long or the pacing slowed. Viewers were engaged but fatigued before the CTA landed.
    • Completes (100%): The full watch-through rate. For 15-second SBV videos, a completion rate around 60% is considered strong. Significantly lower suggests a broad retention problem.

    The quartile data is most useful for diagnosing where a video is losing viewers, which tells you what to fix in the next creative iteration. If two variants have similar 5-second view rates but one has significantly better midpoint retention, the difference is in the proof section, not the hook — and your next test should isolate the middle, not iterate on the opening again.

    Unmutes: The Signal You’re Probably Ignoring

    An unmute is recorded when a shopper actively taps to turn on the audio for an SBV ad. Unmute rate is a relatively low-volume metric — most viewers never bother — but it’s a meaningful signal of engagement quality. A higher-than-average unmute rate indicates that the visual hook was compelling enough to make the shopper want to hear what the ad was saying.

    In the context of hook testing, the unmute rate functions as a secondary confirmation signal. It’s not the primary decision metric, but a variant that significantly outperforms on unmute rate as well as 5-second view rate is providing converging evidence that the hook is generating real curiosity, not just passive retention.

    CTR: Still the Primary Purchase-Intent Signal

    Despite all the diagnostic richness of the engagement funnel, CTR remains the primary signal for hook effectiveness as it relates to purchase intent. A hook can hold attention (high 5-second view rate) without generating clicks. A hook that generates clicks is one that not only stopped the scroll but convinced the shopper they wanted to know more about the product.

    The 2026 SBV average CTR benchmark of 0.89–1.0% is a reasonable baseline. Variants that consistently beat this threshold across a statistically meaningful sample are performing above category average. Variants below 0.6% are worth investigating even if other engagement metrics look acceptable.

    CVR and ACoS: The Downstream Validators

    After CTR, conversion rate (CVR) and Advertising Cost of Sale (ACoS) tell you whether the hook’s promise matched what the shopper found when they clicked through. A high CTR, low CVR combination typically indicates one of two things: the hook made an implicit promise that the product detail page didn’t fulfill, or the hook was attracting shoppers who weren’t actually in-market for the product.

    For the purposes of hook testing, CVR and ACoS are downstream validators. Don’t use them as the primary decision metric during the testing phase — the sample sizes required to get stable CVR data are significantly larger than what’s needed for CTR decisions. Use them to validate that a CTR winner is also a conversion winner before committing to major budget scaling.

    Decision Rules: When to Call a Winner and When to Keep Testing

    One of the most common errors in SBV hook testing is premature conclusion. An operator sees that Variant B has a 1.2% CTR versus Variant A’s 0.8% CTR after five days and declares a winner. The problem: at low impression volumes, those numbers could flip entirely over the next five days. Statistical noise at small sample sizes routinely creates differences that look meaningful but aren’t.

    The Two-Gate Decision Framework

    A more reliable approach applies two mandatory gates before declaring a winner:

    Gate 1 — Volume threshold: Each variant must have accumulated at least 1,000 impressions, and ideally 2,000+ impressions, before any comparison is drawn. This is non-negotiable. Below 1,000 impressions, CTR percentages are not stable.

    Gate 2 — Minimum run time: Tests must run for at least seven days regardless of how fast impressions accumulate. This guards against day-of-week effects, keyword auction fluctuations, and platform delivery patterns that can create artificial performance differences on any given day or two.

    Only after both gates are cleared should you compare variant performance. At that point, look for differences in 5-second view rate and CTR that are meaningful in magnitude — not just technically present. A 0.85% versus 0.90% CTR difference with 1,200 impressions per variant is not a meaningful finding. A 0.75% versus 1.1% CTR difference with 2,000+ impressions per variant is a signal worth acting on.

    What a “Winner” Actually Means

    Calling a winner in a hook test doesn’t mean the losing variants are failures. It means the winning hook outperformed under this specific set of conditions: these keywords, this landing page, this product, this season, these competing bids. That context matters because winning hooks are not universally portable. A problem hook that outperforms on high-intent keywords like “best insulated water bottle” may not win on broader discovery terms like “water bottle.”

    A truly rigorous testing operation maintains a hook library — a documented record of which hook types won under which conditions — rather than simply rotating to the current winner across all campaigns. The library becomes a compounding asset as your catalog and keyword sets grow.

    Inconclusive Results: What to Do When No Clear Winner Emerges

    If, after the two-gate thresholds are met, no variant shows a meaningful performance difference, there are three possible explanations:

    1. The hook types you tested are genuinely equivalent for this product and audience — in which case, you can pick either and move on to testing a different element (the midpoint, the CTA, the landing page).
    2. The variants weren’t different enough from each other — you tested two variations of the same hook archetype rather than meaningfully different approaches.
    3. You don’t have enough data yet — particularly if you’re in a low-volume keyword set. Run longer or increase budget temporarily to accelerate impression accumulation.

    Scaling the Winner: From Validated Hook to Maximum Reach

    Three-phase SBV hook testing winner scaling process — test, validate, scale with budget reallocation

    A validated hook winner is not just an ad to keep running — it’s an asset to be deployed systematically across your broader advertising infrastructure. Scaling correctly means more than raising the budget on the winning campaign.

    Phase 1: Immediate Budget Reallocation

    The first scaling move is straightforward: pause or reduce budget on the losing variants and redirect that spend to the winner. If you were running three variants at $30/day each ($90 total), consolidate to $75–80/day on the winning hook. The incremental spend on a proven, higher-CTR creative almost always delivers better efficiency than split-testing at equal allocation once you’ve identified a clear winner.

    Phase 2: Keyword Expansion

    A validated hook that performs on your initial test keyword cluster can typically be extended to adjacent keyword sets — but test that expansion rather than assuming it. The hook that wins on exact-match high-intent keywords may perform differently on broad match terms that attract a more heterogeneous audience. Build a new campaign or ad group for the expanded keyword set and treat it as a validation test of its own, using the same two-gate decision framework.

    The sequence matters: test the hook on your highest-confidence keyword set first. Validate performance. Then expand to adjacent terms. Don’t skip straight to broad targeting just because the hook won on a tight keyword set — you may be extrapolating beyond what the data supports.

    Phase 3: Cross-Format Deployment

    A winning SBV hook is also a validated creative concept — and concepts are portable beyond SBV. The opening frame, the messaging angle, or the visual approach that won in Sponsored Brands Video can often be adapted for:

    • Sponsored Display video: Shorter formats (6 seconds) can use the winning hook as the entire creative.
    • Streaming TV and online video: For brands with access to Amazon DSP, the validated hook provides a tested starting point for full-length video creative.
    • Off-Amazon channels: The hook that stopped the scroll on an Amazon search result page can frequently be adapted for TikTok Shop, Meta, or YouTube Pre-Roll, though platform-specific tuning will be required.

    The key discipline here is treating cross-format deployment as an adaptation, not a copy-paste. The aspect ratio, audio expectations, and platform norms differ meaningfully. But the validated messaging angle transfers — and that’s the part that took real budget and time to discover.

    Silent-First Creative Production: Building Videos That Work Without Sound

    Silent-first SBV creative production checklist — product visible in 2 seconds, benefit in 5 seconds, text overlays for all key claims

    Most video production briefs are written with the assumption that audio is present. The voiceover narrates the story. The music sets the emotional tone. The sound design punctuates the product reveal. When those creative decisions are made before the SBV context is accounted for, you end up with a video that works in a screening room and fails on a muted phone screen.

    Building for silent-first viewing requires rethinking the brief from the hook outward.

    Text Overlay as the Primary Narrative Vehicle

    In a silent SBV, text overlays are not supplementary — they’re the main communication channel. Every claim, benefit, and call to action that the voiceover would carry needs a text counterpart on screen. This doesn’t mean covering the visual with text; it means purposeful placement of the most essential information at moments when the viewer is most likely to be reading rather than simply watching.

    The practical checklist for silent-first SBV production:

    • Product visible within 2 seconds. Amazon’s own guidance mandates this. The product should be recognizable at a glance on a small screen.
    • Primary benefit communicated in 5 seconds via visual or text overlay. The shopper should understand what the product does before the hook window closes.
    • All key claims have visual counterparts. Any claim delivered via voiceover needs an on-screen text version. Don’t rely on audio alone for any critical information.
    • Captions or subtitles for spoken elements. If your video includes on-screen talent or voiceover that shoppers might want to read, caption it.
    • CTA is text-prominent, not just spoken. The final seconds of the ad should display the call to action in text on screen, not just state it verbally.

    The Mute Test

    Before any SBV goes live, every operator running a disciplined testing framework should perform what practitioners call the mute test: watch the video with no audio and ask whether a shopper with no prior product knowledge could understand what the product is, what it does, and why they might want it — all within the first five seconds. If the answer is no, the creative needs revision before it enters a test cycle.

    Running a mute-failing video in a hook test doesn’t generate data about hooks — it generates data about what happens when the context in which the ad will be served isn’t accounted for in production. That’s not useful information.

    Visual Pacing for Mobile Attention

    Mobile viewers on Amazon are not in a lean-back content consumption mode. They’re actively searching, comparing, and evaluating. Visual pacing for SBV needs to reflect that: cuts every two to three seconds in the hook window, kinetic text that appears and disappears cleanly rather than hovering for too long, and product shots that are tight and clear rather than stylized and atmospheric.

    The premium aesthetic that works in a brand campaign on YouTube often fails on Amazon search results. The product-forward, information-dense aesthetic that might feel “too commercial” in a brand context is exactly what the SBV placement rewards.

    Beyond the Hook: Testing the Middle 10 Seconds and the Close

    Once you’ve validated a winning hook through the framework above, the obvious next question is: what else can be optimized? The hook testing framework doesn’t end at the three-second mark — it just starts there. The same isolation principle applies to the middle section and the closing CTA.

    Testing the Proof Section

    The body of an SBV (seconds 3–12 in a 15-second format) is typically where social proof, product demonstration, and key differentiators are communicated. Once you’ve locked in a winning hook, run the same controlled-variable test on this section: keep the hook and CTA constant, change the middle section between variants.

    Common middle-section hypotheses to test:

    • Demo-first (show the product operating) vs. proof-first (show reviews, ratings, or results)
    • Single feature focus vs. three-feature rapid sequence
    • Lifestyle context (product in use) vs. product-only (clean product footage)
    • Before/after comparison vs. side-by-side competitive demonstration

    The middle section primarily affects viewer retention (measured by midpoint and third quartile view rates) and CVR. A better middle section can increase conversion without changing click volume — which improves ACoS without changing CTR.

    Testing the CTA Close

    The final two to three seconds of an SBV are the action trigger. Most operators run a single static end card with logo, product image, and a “Shop Now” or “Learn More” overlay. Very few test this element deliberately. But the close can have a measurable impact on CVR even when CTR is equivalent across variants.

    CTA testing variables worth isolating include:

    • CTA copy: “Shop Now” vs. “See All Colors” vs. specific benefit claim
    • Visual close: product on white background vs. product in use
    • Urgency framing: no urgency vs. “Limited Stock” vs. promotional pricing shown
    • Social proof in the close: star rating visible in final frame vs. no social proof

    The sequence of what to test is important: hook first, then middle section, then CTA close. Each phase of optimization should be validated before moving to the next. Testing all three simultaneously collapses the ability to attribute performance differences to specific creative decisions.

    Common Mistakes That Corrupt SBV Test Results

    Six common SBV hook testing mistakes that corrupt test data — infographic with warning labels

    The framework described in this post is not complicated in principle. It’s controlled experimentation applied to video creative. What makes it hard in practice is the number of ways that control conditions get compromised — often without the operator realizing it.

    Testing Multiple Variables Simultaneously

    The most common error. If Variant B has a different hook and a different middle section and is targeting one additional keyword, you cannot attribute any CTR difference to the hook change. The test is contaminated before it starts. Discipline here requires resisting the temptation to “improve” challengers in multiple ways at once.

    Deciding on Under-Threshold Data

    A variant with 400 impressions showing 1.4% CTR versus a control at 0.9% looks compelling. It is not statistically meaningful. Running the two-gate framework (1,000+ impressions, 7+ days) is non-negotiable if the conclusions are going to drive real budget decisions. Premature decisions based on small samples waste creative resources and can push budget toward hooks that look good by noise, not by signal.

    Allowing Budget Imbalance Between Variants

    If Variant A runs at $20/day and Variant B runs at $35/day, any CTR comparison is confounded by delivery differences. Higher-budget campaigns may hit different auction dynamics, serve at different times of day, or reach different impression depths into the keyword set. Equal daily budget per variant is a hard requirement for a valid test.

    Ignoring the Sound-Off Context During Creative Review

    Internal creative reviews almost always happen in an environment with audio. The team watches the video with sound, evaluates the narrative flow, and approves it based on how it works in that context. Then it goes live on Amazon where the majority of first-view impressions are muted. The mute test is mandatory before any creative enters a live test, not optional.

    Applying the Same Hook Archetype Across Every Category

    The problem hook that dominated performance for a cable organizer is not necessarily the right starting hypothesis for a premium skincare product. Hook archetype selection should be informed by category dynamics — where shoppers are in their decision process, what level of category awareness exists, and what the competitive creative landscape looks like in the placement. Treating the best-performing archetype from one product as the default across an entire catalog is a category error, not a testing strategy.

    Skipping the Midpoint Analysis

    Stopping at CTR comparison misses a significant portion of the available diagnostic information. Operators who skip quartile and midpoint analysis don’t see whether hooks with equivalent CTR are generating different retention profiles — which affects not just video performance but how Amazon’s algorithm evaluates creative quality signals over time. Run the full funnel comparison for every test cycle.

    Building a Repeatable Testing Cadence: The Operating Rhythm That Compounds

    The SBV hook testing framework delivers its full value not from a single well-executed test, but from the operating cadence that makes testing systematic. One test produces a data point. A quarterly cadence produces a library. A two-year cadence produces a compounding creative advantage that compounds with the catalog.

    The Quarterly Testing Cycle

    A practical operating rhythm for most brands running active SBV campaigns looks like this:

    Month 1 — Hook testing cycle: For each major product or product cluster, launch a three-variant hook test on the primary keyword set. Run for a minimum of two weeks. Document results in a hook performance log.

    Month 2 — Winner scaling and middle-section testing: Redirect budget to hook winners. For products where the winning hook is now established, launch a two-variant midpoint test using the validated hook. Run for two weeks.

    Month 3 — CTA testing and library expansion: For mature campaigns with validated hooks and midpoints, run CTA tests. Simultaneously, prepare new hook variants to test in Month 1 of the next cycle — incorporating learnings from what won and what didn’t.

    This three-month cycle keeps the testing cadence moving without creating creative production bottlenecks. Not every product needs to be in active testing simultaneously — prioritize by revenue contribution or strategic importance.

    The Hook Performance Library

    Every test cycle should feed into a documented hook performance library. At minimum, this log should capture:

    • Product and category
    • Keyword cluster tested against
    • Hook archetype and description
    • 5-second view rate
    • CTR
    • CVR
    • ACoS
    • Test duration and impression volume
    • Winner or loser designation
    • Key learnings note (what did this test tell you about what works for this product/audience?)

    After six to twelve months of consistent testing, this library becomes one of the most valuable creative assets in your operation. It tells you which hook archetypes consistently outperform by category, which messaging angles resonate with specific search intents, and what creative patterns to prioritize when launching new products.

    When to Refresh vs. When to Let Winners Run

    A common question: how long should a validated winner run before being retested? The answer depends on creative fatigue indicators. If CTR on a winning hook starts declining over a four-to-six week window despite stable bidding and budget, that’s a signal of creative fatigue — the shopper population cycling through your impression reach has seen the hook enough times that novelty has worn off.

    When fatigue signals appear, don’t abandon the hook archetype — that’s the thing that was validated. Instead, produce a creative refresh within the same archetype: a different product shot, a different text overlay framing, a different opening visual — but the same structural hook type that won. This often restores CTR performance while preserving the strategic insight the original test generated.

    Conclusion: The Creative Testing Advantage Most SBV Advertisers Leave on the Table

    Amazon Sponsored Brands Video is one of the few ad formats that gives operators a relatively controlled creative testing environment within a high-intent, high-conversion placement. The traffic is search-driven, which means intent signals are strong. The format is short, which means production costs for test variants are manageable. The engagement metrics are rich enough to diagnose performance at a granular level. And the performance delta between a weak hook and an optimized hook is large enough — often multiples of CTR rather than marginal improvements — that systematic testing generates real, measurable returns.

    The framework in this post is not sophisticated in a technical sense. Isolate one variable. Hold everything else constant. Accumulate sufficient impressions. Read the full engagement funnel, not just CTR. Document what you learn. Build on validated winners. These are the principles of any well-designed experiment, applied specifically to the structure of a 15-second video ad in a muted autoplay context.

    What makes the approach rare in practice is the discipline to actually execute it consistently — to resist the temptation to change multiple things at once, to wait for real statistical weight before declaring winners, to build the library even when it feels tedious, and to treat every SBV campaign as a source of creative knowledge rather than just a source of clicks.

    The operators who build that discipline don’t just get better hooks. They get a progressively sharper understanding of what their specific shoppers respond to, in their specific categories, at their specific search intents. That understanding is the compounding advantage. The test framework is how you build it.

    Key Takeaways:

    • The first three seconds of an SBV are the entire hook window. Every other optimization is downstream of this.
    • Design tests with one variable changed — the hook — and everything else held constant: same keywords, bids, budget, schedule, and landing page.
    • Use Amazon’s engagement funnel metrics (5-second view rate, quartile views, unmutes) to diagnose where creative is failing, not just whether it is.
    • Don’t declare winners until each variant has cleared 1,000+ impressions and a 7-day minimum run time.
    • Scale winners by reallocating budget first, then expanding keyword sets, then adapting the validated concept to adjacent formats.
    • Build and maintain a hook performance library — this is the compounding asset that most SBV advertisers never create.
    • Perform a mute test on every creative before it enters a live test cycle. If the hook doesn’t communicate on a muted screen, it needs revision.
  • The EU AI Act’s Moving Deadlines: What the Revised Timeline Actually Means for Your Business Right Now

    The EU AI Act’s Moving Deadlines: What the Revised Timeline Actually Means for Your Business Right Now

    EU AI Act enforcement timeline infographic showing key dates from 2025 through 2028

    If you have been tracking the EU AI Act, you have noticed a pattern: the deadlines keep shifting. This is not paranoia or misreading of legal text — it is a documented feature of a regulatory process that is genuinely difficult to execute at EU scale, across 27 member states, governing technology that evolves faster than parliamentary procedure. The latest round of changes, primarily driven by the so-called Digital Omnibus package negotiated in early 2026, moved several of the most consequential compliance deadlines by 16 months or more.

    The natural instinct for compliance teams — and especially for the executives who fund them — is to interpret each delay as breathing room. And for certain categories of AI system, particularly standalone high-risk applications, the extensions are real and substantive. But that reading collapses the moment you look at the full picture. The August 2, 2026 enforcement date that governs general-purpose AI models, prohibited practice bans, transparency obligations, and national enforcement powers has not moved. The penalties attached to those rules have not changed either — up to €35 million or 7% of global annual turnover for the most serious violations.

    This post is not a summary of dates. Plenty of those exist. Instead, it takes a harder look at what the revised timeline actually reveals about where regulatory pressure sits right now, where the false sense of security is forming, and what specific obligations are active and enforceable regardless of the deadline reshuffling happening around them. It also addresses the readiness gap, which by multiple survey measures remains staggering, and walks through what a realistic compliance posture looks like given the landscape that actually exists in mid-2026.

    The Timeline in Full: Original Promises vs. Current Reality

    Side-by-side comparison of EU AI Act original and revised deadlines after the Digital Omnibus

    To understand what changed, you first have to understand what was originally promised. When the EU AI Act was published in the Official Journal on July 12, 2024, the phased rollout schedule looked like this:

    • February 2, 2025: Prohibited AI practices (Article 5) enter into force.
    • August 2, 2025: General-purpose AI (GPAI) model obligations begin. AI literacy duties apply. National competent authorities must be designated.
    • August 2, 2026: The Act applies broadly — enforcement powers activate for GPAI, high-risk systems under Annex III, transparency rules under Article 50, penalty mechanisms become fully operational.
    • August 2, 2027: High-risk AI embedded in regulated products under Annex I must comply.

    What the Digital Omnibus Actually Changed

    The Digital Omnibus package — a legislative bundle intended partly to reduce regulatory burden on European businesses competing with US and Chinese AI development — introduced targeted amendments. The most significant were to the high-risk AI deadlines:

    • Annex III standalone high-risk systems (AI used in hiring, credit scoring, education, law enforcement, biometric identification, etc.) moved from August 2, 2026 to December 2, 2027 — a 16-month extension.
    • Annex I product-embedded high-risk systems (AI built into machinery, medical devices, vehicles, and similar regulated products) moved from August 2, 2027 to August 2, 2028 — a 12-month extension.
    • A narrower extension on machine-readable watermarking under Article 50 pushed that specific technical obligation to December 2, 2026 for AI systems already on the market before August 2, 2026.

    What Did Not Change

    This is where many compliance summaries fall short. The Digital Omnibus did not touch:

    • The February 2025 banned practices — those are already law.
    • The GPAI obligations that have applied since August 2025.
    • The August 2, 2026 enforcement date for transparency duties, penalty mechanisms, and the Commission’s oversight powers over GPAI providers.
    • The national AI literacy obligations that member states must implement.

    The net effect is a two-track enforcement reality. For companies using AI in HR, lending, education, or law enforcement, there is genuinely more time to build compliant systems. For companies building or deploying general-purpose AI, generating synthetic content, or running AI systems that interact with people, the August 2026 wave is here and fully active.

    What Has Been Banned Since February 2025 — And Why It Still Gets Overlooked

    Infographic showing 8 prohibited AI practices already banned under EU AI Act Article 5 since February 2025

    The deadline conversation has largely eclipsed the fact that the EU AI Act’s most dramatic provisions — its outright bans — have been in force for over a year. Article 5 applied from February 2, 2025. That is not a transitional or preparatory milestone. It is an active prohibition.

    The Eight Prohibited Practices

    The following AI uses are currently illegal in the EU, full stop:

    1. Subliminal or deceptive manipulation — AI systems that use techniques below the threshold of conscious awareness, or deliberately deceptive methods, to materially distort a person’s behavior in ways that cause or are likely to cause significant harm.
    2. Exploitation of vulnerabilities — AI that targets specific groups (children, people with disabilities, those in difficult economic circumstances) and exploits those vulnerabilities to influence behavior in harmful ways.
    3. Social scoring by public authorities — Governments and public bodies cannot use AI to evaluate citizens across multiple contexts and then use that score to discriminate against them in unrelated settings.
    4. Real-time biometric surveillance in public spaces — Remote biometric identification systems operating in real time in public settings are prohibited, with narrow and tightly conditioned exceptions for specific law enforcement purposes.
    5. Emotion recognition in workplaces and educational institutions — AI systems designed to infer the emotional state of workers or students based on biometric data are banned in these contexts.
    6. Biometric categorization by sensitive characteristics — Inferring race, political opinion, trade union membership, religious belief, or sexual orientation from biometric data is prohibited.
    7. Predictive policing based on profiling — AI systems that assess an individual’s risk of committing a crime based solely on profiling, personality traits, or past criminal history without a concrete causal link to actual criminal activity.
    8. Scraping of facial recognition databases — Building or expanding facial recognition databases by untargeted scraping from the internet or CCTV footage.

    Why Companies Are Still Getting This Wrong

    The reason these bans get overlooked is partly structural. Compliance programs have naturally focused on the preparation work for the larger August 2026 implementation wave. The February 2025 bans arrived before most compliance functions were even fully stood up. And because enforcement at the national level has been uneven — more on that shortly — there has been no high-profile enforcement action to trigger widespread awareness.

    But legal exposure does not depend on whether enforcement has been exercised. Companies deploying AI systems that even superficially resemble these prohibited practices — particularly emotion recognition tools, dark-pattern recommendation engines, or biometric categorization features — face genuine legal risk today, regardless of the broader deadline discussion.

    August 2, 2026: The Enforcement Inflection Point That Actually Matters

    If there is one date that the Digital Omnibus did not change and that deserves primary attention right now, it is August 2, 2026. This is when the EU AI Act transitions from a phased preparation period into a fully operational enforcement regime for a wide range of obligations.

    What Became Enforceable on August 2, 2026

    Several interconnected rules moved into active enforcement:

    General-purpose AI model obligations — GPAI providers (think the major foundation model developers and their downstream licensees) had to meet transparency, copyright compliance, and safety documentation requirements since August 2025. The difference from August 2026 onwards is that the Commission’s formal enforcement powers over those providers are now fully activated. Investigation procedures, penalties, and market access controls are all live.

    Transparency duties under Article 50 — This is the article that most businesses had been quietly ignoring, and it now applies directly. Any system that interacts with humans in ways that could reasonably mislead them into thinking they are talking to a person must disclose its AI nature. AI systems generating synthetic audio, video, or image content must include disclosures. Deepfake content requires explicit labeling.

    National enforcement infrastructure — National competent authorities in each member state now have full investigative and sanctioning powers. The AI Office at EU level has coordination and oversight authority. The full penalty regime — up to €35 million or 7% of global annual turnover for prohibited practice violations, up to €15 million or 3% for high-risk AI violations, and up to €7.5 million or 1.5% for providing incorrect information — is operational.

    AI literacy obligations — Providers and deployers of AI systems are required to take measures to ensure that their staff and other persons dealing with AI systems on their behalf have sufficient AI literacy. This is not a vague aspiration — it is a documented obligation that can be tested in a regulatory inquiry.

    What the August 2026 Date Does Not Cover

    It is equally important to be precise about what August 2, 2026 does not trigger. Because of the Digital Omnibus extensions, the full compliance requirements for high-risk Annex III systems — the detailed documentation, conformity assessments, human oversight requirements, registration in the EU database, and post-market monitoring — are not yet mandatory for most standalone high-risk applications. Those obligations arrive in December 2027 for Annex III systems and August 2028 for product-embedded AI.

    This creates a genuinely complex situation: the enforcement machinery is running, but some of the substantive rules it will eventually enforce are still on the way. The practical consequence is that companies in the August 2026 zone (GPAI, transparency, prohibitions) face immediate operational compliance pressure, while companies focused on high-risk Annex III applications have more time — but still need to be building toward the 2027 standard now, because 16 months is not as long as it sounds when conformity assessment processes are involved.

    The Digital Omnibus Deep Dive: What Was Actually Traded Away for More Time

    The Digital Omnibus did not simply push dates backward without conditions. Understanding what was added alongside the deadline extensions helps explain the regulatory logic and reveals where the future pressure points will concentrate.

    New Substantive Rules Added by the Omnibus

    Two new prohibitions were introduced alongside the deadline extensions, and they are targeted specifically at generative AI:

    Non-consensual intimate content (NCII) — AI systems that generate non-consensual synthetic intimate imagery, commonly referred to in press coverage as deepfake pornography, now face explicit prohibition. This was not in the original Article 5. Its addition as part of the Omnibus reflects the political weight that this issue had accumulated across multiple member states, and it underscores that the Omnibus was not purely deregulatory — it traded some delay in high-risk deadlines for sharper prohibitions in areas with clearer societal harms.

    Child sexual abuse material (CSAM) — The Omnibus added an explicit AI-specific ban on systems designed or used to generate AI-produced CSAM, complementing existing criminal law frameworks across member states.

    SME and Small Mid-Cap Relief

    The Omnibus also expanded access to simplified compliance pathways. Previously, SME-style lighter-touch processes were available only to companies meeting the EU’s standard SME definition (fewer than 250 employees, less than €50 million turnover). The Omnibus extended simplified compliance access to what it terms “small mid-caps” — companies that fall just outside traditional SME thresholds but are not major enterprises. This is a meaningful concession for the broad middle tier of European businesses that use AI without developing it, and it should change the compliance planning calculus for companies in that size range.

    Sandbox Expansion

    Regulatory sandboxes — controlled environments where companies can test AI systems under regulatory supervision before full deployment — were expanded and made more accessible under the Omnibus. National competent authorities are now expected to have operational sandboxes, providing a development pathway for companies that want to move toward high-risk AI applications without betting the entire compliance program on legal interpretations that have not yet been tested by regulators.

    GPAI Models: The Clock That Didn’t Move

    If one area of the EU AI Act has been most misread in the context of the Omnibus deadline changes, it is general-purpose AI. A significant number of compliance communications in early 2026 referenced the Omnibus extensions without clearly distinguishing that GPAI obligations were not included in those extensions.

    What GPAI Obligations Look Like in Practice

    The EU AI Act defines general-purpose AI models as AI models — including large generative models — trained on broad data at large scale, capable of competently performing a wide range of distinct tasks. The key rules that apply to providers of these models include:

    • Technical documentation — Providers must maintain documentation about the model, its training process, capabilities, and limitations sufficient for downstream providers to build compliant applications on top of it.
    • Copyright transparency — Summaries of the training data must be published, allowing rights holders to assess whether their content was used.
    • Acceptable use policies — GPAI providers must publish policies governing permissible downstream use.
    • Safety obligations for systemic-risk models — Models above a computational training threshold of 10²⁵ FLOPs are designated systemic-risk models and face additional obligations including adversarial testing, incident reporting to the AI Office, and cybersecurity measures.

    These obligations have applied since August 2025. The difference from August 2, 2026 onward is that the Commission’s investigative and enforcement powers over GPAI providers are now fully operational. Non-compliance is no longer a documentation gap — it is an active enforcement exposure.

    Who Is Actually a GPAI Provider Under the Act?

    This is a question that many businesses using foundation models from third-party providers have not fully worked through. The distinction matters because the obligations for GPAI providers are different from — and in some respects more extensive than — those for deployers of AI systems. A company that fine-tunes a foundation model and offers it as a commercial product may qualify as a GPAI provider under the Act’s definition, not merely a deployer. The determination turns on questions of training scale, task generality, and commercial distribution, and it is not always obvious without a careful legal analysis of how the company’s AI products are built and sold.

    Article 50 Transparency: Deepfakes, Chatbots, and the Watermarking Split

    Article 50 is the provision that most directly affects everyday product and marketing decisions for companies using AI in customer-facing applications. As of August 2, 2026, this article is fully in force — with one narrow carve-out that requires careful reading.

    What Article 50 Requires Right Now

    There are several distinct transparency duties bundled under Article 50:

    AI interaction disclosure — Providers of AI systems designed to interact directly with natural persons must ensure those systems disclose their AI nature at the start of any interaction, unless this is obvious from context. This applies to chatbots, virtual assistants, AI customer service agents, and similar products.

    Deepfake disclosure — Any deployer using an AI system to generate or manipulate image, audio, or video content that constitutes a deepfake — meaning content that portrays real people doing or saying things they did not do or say — must label that content as artificially generated or manipulated in a clear and prominent manner. This obligation applies from August 2, 2026, with no grace period.

    AI-generated synthetic content disclosure — More broadly, content generated by AI systems (including text, audio, images, and video) must be identifiable as such, with technical markers that enable automated detection.

    The Watermarking Grace Period: What It Covers and What It Doesn’t

    The narrower grace period introduced by the Omnibus affects the machine-readable marking or watermarking requirement for generative AI outputs. Specifically, AI systems that were already placed on the market before August 2, 2026 have until December 2, 2026 to implement the technical watermarking required for automated detection of synthetic content.

    This is a much narrower relief than it sounds. It does not affect the human-visible disclosure requirement for deepfakes — that applies immediately. It does not affect chatbot disclosure requirements. It covers only the technical, machine-readable marking of synthetic content for systems that were already on the market before the August 2 date. Any system launched after August 2, 2026 must meet the full watermarking requirement from day one.

    For product teams managing content generation features — AI image tools, video synthesis, voice cloning, AI writing assistants — the practical implication is immediate: if your product creates synthetic content using a pre-existing model, you have until December 2026 to implement technical watermarking, but you must already be providing human-visible disclosures where deepfake content is produced.

    The Enforcement Patchwork: Why National Readiness Is the Wild Card

    The EU AI Act is EU-wide legislation, but it is enforced primarily through national competent authorities (NCAs) in each member state. The architectural choice to rely on national enforcement infrastructure — rather than a fully centralized EU enforcement body — creates a de facto patchwork that significantly affects how the regulation lands in practice.

    The NCA Designation Crisis

    Member states were required to designate their NCAs by August 2, 2025. According to tracking data from spring 2026, fewer than one-third of EU member states had completed the formal designation and notification process by that deadline. Countries that had made clear progress included Spain, Ireland, Italy, Germany, Lithuania, Finland, and Cyprus. Significant gaps remained in others.

    This matters operationally. An NCA that has not been formally constituted with adequate staffing, legal powers, and technical expertise cannot meaningfully investigate potential violations or assess conformity assessments. Where NCAs are not yet operational, enforcement is effectively suspended at the national level — even though the AI Office at EU level retains oversight authority, particularly over GPAI providers.

    What This Means for Companies

    The enforcement patchwork creates an asymmetric risk environment. Companies operating primarily in member states with well-resourced, operational NCAs face genuine near-term enforcement exposure. Companies in member states with limited NCA capacity face lower immediate enforcement probability — but not lower legal liability. The obligations exist regardless of enforcement capacity.

    There is also a cross-border dimension. Because AI systems typically operate across multiple member states simultaneously, a company based in Germany can be subject to the NCA of any member state where it deploys AI systems. And the AI Office at EU level — which has direct enforcement authority over GPAI providers — operates independently of national readiness.

    The strategic risk of treating uneven enforcement capacity as tacit permission to delay compliance is significant. NCAs are building capacity now. The enforcement gap in 2026 is a timing artifact, not a structural limitation. Companies that use the NCA readiness window to delay compliance work rather than accelerate it are accumulating liability against an enforcement infrastructure that will eventually mature.

    The Readiness Gap: What 78% Unprepared Actually Looks Like Inside Organizations

    EU AI Act readiness gap infographic showing 78% of organizations unprepared and only 3% fully ready

    Multiple surveys conducted in the first half of 2026 point to a compliance readiness picture that is, by any reasonable standard, alarming. Approximately 78% of enterprises had not taken meaningful steps toward EU AI Act compliance as of the surveys’ reference dates. One study found that only 3% of enterprises considered themselves fully ready. Among providers of high-risk AI systems specifically — the organizations for whom compliance stakes are highest — only 18% indicated they could demonstrate conformity today.

    What the Operational Gaps Look Like

    The readiness surveys do not just report aggregate unpreparedness — they identify specific operational gaps that illuminate where organizations are failing:

    83% lack a formal AI system inventory. This is the most fundamental gap, and it is also the most consequential. You cannot classify a system’s risk level, assign compliance obligations, or build governance around it if you do not know it exists. Many large organizations are discovering AI systems in procurement, HR, finance, customer service, and IT that were deployed at department level without central visibility. Shadow AI adoption during the rapid expansion of enterprise AI tooling in 2024 and 2025 has created an inventory problem that compliance teams are only beginning to map.

    74% have no designated internal owner or governance body for AI compliance. AI Act compliance spans legal, technical, procurement, HR, and executive functions. Without a named owner with cross-functional authority and budget, the obligations stall in organizational ambiguity. The gap here reflects a broader governance immaturity — many companies have AI ethics principles or responsible AI statements but no operational function that owns day-to-day compliance work.

    61% lack technical documentation processes. For high-risk AI systems, the Act requires detailed technical documentation covering the system’s purpose, capabilities, limitations, training data sources, development methodology, and performance metrics. Building these processes after the fact — retrofitting documentation onto systems that were built without it — is significantly harder than building documentation requirements into the development pipeline from the start.

    The Median Readiness Score Problem

    One benchmarking study of 50 organizations conducted in Q2 2026 found a median readiness score of 38% — meaning the typical organization in the sample had addressed roughly a third of its relevant compliance obligations. This figure is more informative than binary “ready/not ready” measures because it reflects partial progress. Many organizations have done something. They have run an internal awareness session, engaged a law firm for a preliminary assessment, or identified their highest-profile AI deployments. But partial progress is not the same as compliance, and the gap between 38% and full compliance represents months of structured, cross-functional work.

    Why Deadline Extensions Worsen the Readiness Gap

    There is a counterintuitive dynamic at work: each time a deadline extension is announced, a meaningful portion of enterprise compliance programs deprioritizes or pauses their AI Act work. The extension signals that urgency has decreased, even when the actual legal obligations have not changed. This has happened at least twice with the EU AI Act’s high-risk provisions, and the result is that organizations are farther behind in absolute preparation time even as the deadline nominally extends.

    The August 2, 2026 obligations were not extended. But the organizational attention required to address them has been diluted by the narrative around the Omnibus high-risk extensions. Teams working on AI compliance inside enterprises report that leadership often treats any deadline movement as evidence that the overall regulatory pressure is easing — a reading that simply does not hold up against the text of what is now enforceable.

    The Risk Classification Problem: Where Does Your AI Actually Sit?

    EU AI Act four-tier risk classification pyramid showing minimal, limited, high-risk, and prohibited AI categories

    One of the most common sources of mis-assessment in EU AI Act compliance programs is incorrect risk classification. The Act’s tiered risk model — prohibited, high-risk, limited-risk, and minimal-risk — sounds straightforward in principle. In practice, it is one of the most contested and ambiguous aspects of the regulation, and getting it wrong in either direction creates problems.

    The Annex III High-Risk List Is More Specific Than It Looks

    High-risk AI under the EU AI Act is not a catch-all category for any AI system that handles important decisions. It is defined by a list of specific use cases in Annex III, which covers eight domains:

    • Biometric identification and categorization
    • Critical infrastructure (road traffic, water, gas, electricity, digital infrastructure)
    • Education and vocational training (access, assessment, monitoring)
    • Employment and workers management (recruitment, termination, task allocation, monitoring)
    • Access to essential private and public services and benefits (credit scoring, social benefits)
    • Law enforcement (individual risk assessment, polygraph-equivalent tools, crime prediction)
    • Migration, asylum, and border control management
    • Administration of justice and democratic processes

    Whether a specific AI system falls into one of these categories requires more than a surface-level reading of the use case description. The Act specifies that a system qualifies as high-risk when it is intended to be used as a safety component of a product, or as a product covered by specified EU legislation, and the product undergoes third-party conformity assessment under that legislation. Not every AI system that touches these domains is high-risk. The qualification requires a careful analysis of intended purpose and deployment context.

    The Provider/Deployer Distinction Is Doing Heavy Lifting

    Perhaps the most practically significant classification question is not risk tier but role. The EU AI Act assigns obligations differently depending on whether an organization is a provider (who places an AI system on the market or puts it into service under their own name or trademark), a deployer (who uses an AI system in the course of a professional activity), an importer, or a distributor.

    For many enterprise users of third-party AI tools, the default assumption is deployer status — and in many cases that is correct. But it can be wrong in ways that create significant unmet obligations. A company that takes a foundation model, fine-tunes it for a specific application, and markets that application commercially may be a provider. A company that uses a third-party AI model in a way not covered by the original provider’s conformity assessment steps into provider-like obligations for those use cases. Getting this analysis wrong means either assuming fewer obligations than actually apply, or investing heavily in compliance work that is actually the provider’s responsibility.

    Minimal-Risk Assumptions Are Being Tested

    At the other end of the spectrum, some companies have assumed that because their AI use cases seem obviously minimal-risk — using AI for product recommendations, internal document search, content summarization — they have no meaningful compliance work to do. This assumption is becoming harder to sustain as the transparency obligations of Article 50 apply across risk tiers. AI interaction disclosure, for example, applies to any system that interacts with humans, regardless of whether that system is classified as high-risk. A customer service chatbot that confidently tells users it is a person is not shielded from Article 50 simply because it handles low-stakes queries.

    What to Actually Do Right Now: The Compliance Action Plan

    EU AI Act compliance action plan checklist for businesses in 2026

    The deadline changes create an opportunity to sequence compliance work strategically — addressing the obligations that are already fully enforceable first, while building the operational infrastructure for the high-risk requirements that arrive in 2027 and 2028. The following action framework reflects the obligations that are currently live and the preparation work that matters most for what comes next.

    Step 1: Build Your AI Inventory — Without Exceptions

    This is the step that 83% of organizations have not completed, and it is the prerequisite for everything else. An AI inventory for EU AI Act purposes needs to capture every AI system in production use across the organization, including systems embedded in third-party software tools (not just systems the organization built itself), systems used in HR, finance, customer service, and IT operations, AI features embedded in enterprise SaaS platforms, and models used by third-party vendors who process data on the organization’s behalf.

    The inventory does not need to be technically sophisticated to start. A structured register that captures each system’s name, function, vendor (if applicable), data processed, decision types supported, and estimated user population is sufficient for the initial triage phase. The goal is to move from “we do not know what we have” to “we have a documented list of every AI system in scope.”

    Step 2: Screen for Prohibited Practices First

    Before classifying systems by high-risk or limited-risk status, run every system through a prohibited practices screen. The eight Article 5 prohibitions described earlier in this post are your checklist. Any system that even partly resembles a banned practice needs immediate legal review — not a note in a project plan for 2027. The banned practices have been in force since February 2025.

    In practice, the systems most likely to trigger this screen are emotion recognition tools used in HR or education contexts, recommendation systems that use dark-pattern techniques to influence consumer behavior, and any system that uses biometric data for categorization purposes. Vendors sometimes describe these functions using softer language (“sentiment analysis,” “engagement optimization,” “behavioral profiling”) that can obscure the underlying mechanism. The legal assessment should look at what the system does, not what the marketing materials call it.

    Step 3: Classify Risk Tier and Confirm Your Role

    For each system in your inventory, conduct a risk tier classification using the Annex III checklist, and separately determine your organization’s role for each system. These are separate analyses that need to be done in parallel. A company can be a deployer of a minimal-risk AI system and simultaneously a provider of a different high-risk AI system — each with different obligations that must be managed separately.

    For borderline classifications — systems that might or might not fall into Annex III — document your reasoning. Regulators and courts will look at whether organizations made reasonable, good-faith assessments of their obligations, and documented reasoning is evidence of that good faith even when the outcome of the assessment proves to have been incorrect.

    Step 4: Address Article 50 Compliance for Customer-Facing Systems

    For any system that interacts with end users — chatbots, virtual assistants, AI-generated content features, voice synthesis tools — conduct an Article 50 compliance check immediately. The questions to answer are:

    • Does the system disclose its AI nature at the start of each interaction?
    • If the system generates deepfake content, is that content labeled prominently?
    • For AI-generated synthetic content (images, audio, video, text), is there a mechanism for users to identify it as AI-generated?
    • If the system was placed on the market before August 2, 2026, is a machine-readable watermarking solution in development for the December 2026 deadline?

    Product teams building customer-facing AI features should embed Article 50 requirements into their feature development and design review process as a standing requirement, not a one-time audit.

    Step 5: Audit Vendor Contracts for AI Act Obligations

    The EU AI Act creates a chain of responsibility that runs through the supply chain. Where a deployer relies on a provider’s AI system, the Act expects the provider to supply the information and technical capabilities needed for the deployer to meet their own obligations. If your vendor contracts do not address this — and most contracts signed before 2025 do not — you may have gaps in your ability to meet documentation, incident reporting, and human oversight requirements.

    A focused AI Act vendor audit should identify every AI provider or vendor whose products or services you classify as AI systems under the Act, check whether existing contracts address the AI Act obligations at all, and where they do not, determine whether renegotiation is warranted or whether alternative sourcing is needed for systems with high compliance stakes.

    Step 6: Appoint a Compliance Owner and Build the Governance Structure

    The 74% of organizations without a designated AI compliance owner are exposed in a specific and recurring way: without a named owner, compliance work gets fragmented across legal, IT, and procurement teams without anyone accountable for the overall program. This is not just an organizational efficiency issue — it is a risk management failure that becomes visible the moment a regulator asks who in the organization is responsible for AI Act compliance and what they have done.

    The AI compliance owner does not need to sit in the legal department. In many organizations, a Chief Data Officer, Chief Risk Officer, or Head of Technology Governance is a more natural fit. What matters is that the role has cross-functional authority, a defined mandate that covers the full scope of AI Act obligations, and a reporting line that ensures executive visibility.

    Building Toward the 2027 High-Risk Deadline Now

    Even with the December 2027 deadline for Annex III systems, organizations should be building their compliance infrastructure for those requirements today. Conformity assessments, technical documentation, quality management systems, and human oversight mechanisms take substantial time to develop — particularly in organizations that are starting from limited compliance maturity. Sixteen months sounds comfortable. In the context of building a full conformity assessment program across multiple high-risk AI deployments, it is not a large buffer.

    The Bigger Picture: Why the Moving Deadlines Reflect a Deeper Regulatory Tension

    The EU AI Act’s serial deadline adjustments are not primarily a sign of regulatory dysfunction, though that framing has been popular in some technology industry circles. They reflect a genuinely difficult political balancing act: the EU is trying to be the first jurisdiction in the world to comprehensively regulate AI, while simultaneously trying not to drive European AI development offshore or slow the adoption of AI by European businesses competing against US and Chinese counterparts operating under less demanding regulatory conditions.

    The Digital Omnibus extensions for high-risk AI were a direct response to industry feedback that the original 2026 deadlines were not achievable — not because companies lacked motivation to comply, but because the technical and documentation requirements for high-risk AI conformity assessments require the development of standards, testing methodologies, and notified body capacity that simply did not exist at the scale needed. Pushing the deadline to December 2027 acknowledges that fact without abandoning the underlying regulatory framework.

    What this means for businesses is that the EU AI Act is not going away and is not being gutted. The Omnibus is calibration, not retreat. The core risk-based architecture, the prohibited practices, the GPAI obligations, and the transparency duties are all intact. What has been adjusted is the sequencing of when the most complex conformity requirements become mandatory — an adjustment that serves regulators as much as industry, because it gives the standards-setting bodies (CEN/CENELEC) and notified bodies time to build the infrastructure that enforcement actually depends on.

    The companies that will navigate this period well are those that treat the extended timeline for high-risk compliance not as permission to delay, but as structured time to build the foundations — inventory, governance, vendor contracts, technical documentation, and internal expertise — that the eventual conformity requirements will rest on.

    Conclusion: What the Deadline Chaos Is Actually Telling You

    The EU AI Act’s timeline has moved again. It will likely continue to be refined as standards develop, member state readiness matures, and the first enforcement actions produce precedents that clarify the regulation’s practical reach. That is the nature of a live regulatory framework governing a technology that does not sit still.

    But beneath the timeline adjustments, several things are fixed and not subject to further revision: the prohibitions that have been in force since February 2025, the GPAI obligations that have applied since August 2025, and the transparency and enforcement infrastructure that became fully operational on August 2, 2026. For most businesses using or building AI in any meaningful way, at least one of these already-active obligations applies directly.

    The practical lesson from the readiness data — 78% unprepared, 83% without an AI inventory, only 3% fully ready — is not that the EU AI Act is impractical. It is that most organizations underestimated how much internal change the regulation requires. This is not primarily a legal documentation challenge. It is a governance, inventory, and operating model challenge that runs deeper than any single compliance team can manage alone.

    The revised timeline gives organizations with exposure to high-risk AI applications a genuine opportunity to build properly. What it does not offer is an excuse for continuing to ignore the obligations that are already active and already enforceable. The enforcement machinery is running. The penalties are on the books. And the next deadline is not moving.

    Key Takeaways:

    • The Digital Omnibus extended high-risk AI (Annex III) deadlines to December 2, 2027, but left GPAI, transparency, and prohibited practice obligations unchanged.
    • Article 5 bans have been in force since February 2, 2025 — and many companies still have not screened their AI systems against them.
    • August 2, 2026 marked full enforcement activation for GPAI rules, Article 50 transparency duties, and the national NCA penalty regime.
    • 78% of enterprises were not meaningfully prepared for EU AI Act compliance as of mid-2026 surveys.
    • The most critical immediate steps are building an AI inventory, screening for prohibited practices, and achieving Article 50 compliance for all customer-facing AI interactions.
    • Deadline extensions reduce near-term compliance pressure for high-risk applications — they do not reduce legal liability or remove the need to build compliance infrastructure now.
  • Amazon Image Guidelines in 2026: The Seller’s Self-Audit Checklist Before Your Listing Goes Dark

    Amazon Image Guidelines in 2026: The Seller’s Self-Audit Checklist Before Your Listing Goes Dark

    Amazon listing compliance 2026 — suppressed listing vs compliant listing comparison infographic

    Nobody gets a warning shot. One day your ASIN is live and generating sales; the next it has vanished from search results, your ad spend is wasted on a listing that won’t convert, and the suppression notice in Seller Central traces back to a product image that looked perfectly fine to you. That is the reality of Amazon’s image enforcement in 2026 — faster, more automated, and far less forgiving than it was even eighteen months ago.

    Amazon’s image guidelines have always existed, but the gap between “technically on the books” and “actively enforced” is closing at speed. Sellers who have not revisited their image stacks recently are operating on assumptions that may already be out of date. The rules around resolution, background purity, AI-generated content, category presentation, and A+ module compliance have all shifted in ways that don’t always make the front page of seller forums until after listings start disappearing.

    This post is not about creative strategy or conversion rate optimization — there are other places for that. This is an operational self-audit. It covers every dimension of Amazon’s current image requirements that can get a listing suppressed, every category-specific trap that catches experienced sellers off guard, and the specific new compliance layer introduced in July 2026 around AI-generated imagery. Work through it section by section against your own catalog and address every gap before Amazon’s automated scanner does it for you.

    Why Image Compliance Is Now a Revenue Risk, Not Just a Quality Issue

    For years, image guidelines felt like a background consideration — something you attended to at launch, then filed away. That mental model no longer holds. Amazon’s image review system has become significantly more automated, operating closer to real-time than the old batch-review process sellers were used to. The practical consequence is that a non-compliant image uploaded today can trigger a suppression notice within hours, not days or weeks.

    What “Suppressed” Actually Means Commercially

    When Amazon suppresses a listing for an image violation, the product is removed from search results. It does not appear in organic rankings, it does not appear in Sponsored Products placements, and it cannot win the Buy Box. Any active PPC campaigns attached to the ASIN continue to consume budget in some configurations while delivering zero impressions — meaning the ad spend damage compounds the revenue loss.

    The suppression persists until a compliant image is uploaded and processed. Amazon’s help documentation states that the listing remains removed from search until a compliant main image is in place. For sellers in competitive categories with tight inventory cycles, a multi-day suppression during a peak period can set back ranking velocity in ways that take weeks to recover from, not just the days the listing was dark.

    The Enforcement Shift: Automated and Continuous

    The structural change in 2026 is not a single dramatic policy rewrite. It is a gradual but significant tightening of how existing rules are applied. Multiple seller community reports and agency audits published in the first half of 2026 describe Amazon’s image-review system as conducting more frequent, pixel-level checks — catching background purity failures, frame-fill insufficiency, text overlays, and resolution issues that human reviewers would previously have passed.

    This matters for sellers who have large legacy catalogs. An ASIN that was uploaded three years ago with an image that would have passed review then may not pass the automated checks running today. The risk is not just new listings — it is the entire catalog, including ASINs that have been live and selling quietly for years.

    Compliance as a Catalog Management Function

    The practical implication is that image compliance needs to move from a launch-time checklist into an ongoing catalog management function. Sellers with hundreds or thousands of ASINs need a systematic way to audit image stacks against current requirements, flag violations before Amazon does, and prioritize fixes by revenue at risk. The sellers who will avoid suppression events in the second half of 2026 are the ones who have already built that process — not the ones who are relying on their memory of what the rules said when they launched.

    Amazon main image compliance checklist infographic showing 85% frame fill, pure white background, no text overlays or watermarks

    The Core Main Image Rules That Still Trip Up Experienced Sellers

    Amazon’s main image requirements are the most strictly enforced and the most commonly violated. They are also the area where seller knowledge tends to be most inconsistent — the rules sound simple until you get into the specific technical definitions, which is where the violations actually live.

    The Pure White Background Standard

    Amazon requires main product images to have a pure white background. The specific value is RGB 255, 255, 255. This sounds straightforward but causes consistent problems in practice because near-white is not white. A background that reads as white to the human eye at a glance may test at RGB 240, 240, 240 or similar values — a shade that human reviewers historically let pass but that automated image analysis is increasingly catching.

    The most common sources of near-white backgrounds in practice: lightbox photography with insufficient lighting calibration, JPEG compression that introduces background noise, photos shot against an off-white seamless, and AI editing tools that add subtle gradients or shadows to the background during object isolation. If you are using automated background-removal tools in your image workflow, verify the output value with a color picker — do not assume the tool is hitting exactly 255, 255, 255 on every export.

    Product Fill: The 85% Frame Rule

    Amazon guidance consistently describes the product as needing to fill approximately 85% of the image frame. This means the product should be large, centered, and dominant within the square image space. The violations that trigger this rule are typically: products shot from too far back, excessive negative space around small items, and products positioned off-center.

    The fill requirement also interacts with the white background rule in a specific way — a product that fills only 60% of the frame leaves a large expanse of background that must be genuinely white, and any imperfection in that background becomes more visible and more likely to be flagged. Maximizing frame fill reduces background surface area and gives you less to get wrong.

    The Prohibited Overlay List

    The main image must show only the product being sold. Amazon prohibits the following on main images: text of any kind (including brand names, model numbers, promotional copy, and size callouts), logos and watermarks, props that are not included in the sale, multiple units when a single unit is listed, packaging-only shots for items where the product itself should be shown, and inset graphics or secondary images-within-images. These rules are not new, but sellers regularly add text overlays to main images in the belief that they are in secondary image slots, or upload packaging shots for consumables where Amazon expects the product itself to be visible.

    Format and File-Naming Requirements

    Amazon accepts JPEG (the recommended format), PNG, TIFF, and non-animated GIF. JPEG is preferred for file size efficiency and consistent rendering. Images must be named according to Amazon’s convention: the product identifier (typically the ASIN or UPC), followed by a period, the variant code, another period, and the file extension. Files that deviate from this naming convention may upload without an error message but can cause processing issues or prevent the image from being associated correctly with the listing variant.

    The New AI Synthetic Performer Disclosure Rule (July 2026)

    This is the single biggest new compliance requirement added to Amazon’s image framework in 2026, and many sellers are not yet aware of it. Starting in late July 2026, Amazon began notifying third-party sellers about a new disclosure requirement for product listing images, videos, and A+ content that contain photorealistic AI-generated people.

    Amazon AI synthetic performer disclosure rule infographic showing contains-synthetic-performer XMP metadata requirement for AI-generated people in listing images

    What Triggered This Rule

    The requirement originates from New York State’s synthetic performer disclosure law, which took effect in June 2026. The law requires disclosure when AI-generated photorealistic human likenesses substitute for real human performers in advertising contexts. Amazon has indicated it is aligning its platform requirements with this law, and has rolled it out globally across its stores — meaning sellers in all markets, not just those selling in New York, are subject to the requirement.

    CNBC reported that Amazon communicated the requirement to sellers in late July 2026, describing it as applying when listing images or videos contain photorealistic AI-generated people. This is a narrow but important definition — it applies specifically to photorealistic AI-generated human likenesses, not to real people whose images have been edited using AI tools, and not to cartoon characters, illustrated figures, or non-human AI-generated content.

    The Technical Requirement: Metadata, Not a Visible Label

    The disclosure is not a visible badge or overlay on the image itself. It is embedded in the image file’s metadata before upload. Sellers must add the exact keyword contains-synthetic-performer to the XMP dc:subject field of the image file using a metadata editor. Tools that support this include Adobe Bridge (via the IPTC Keywords or Subject field), ExifTool (command-line), and some batch image-processing tools that support XMP write operations.

    The specific technical steps: open the image in a metadata editor, navigate to the XMP data section, locate the dc:subject field (sometimes labeled “Subject” or “Keywords” depending on the tool), add contains-synthetic-performer as a keyword value, save the file, and then upload to Seller Central. The metadata must be embedded before the upload — Amazon’s system reads it at ingestion time.

    Who This Affects and What the Risk Is

    This rule is directly relevant to any seller who has used AI image generation tools — Midjourney, DALL-E, Stable Diffusion, Adobe Firefly, or commercial product photography services that use AI models — to create listing images that feature a person. This has become increasingly common as AI-generated lifestyle photography has dropped in cost and improved in quality. Sellers who used AI model imagery to avoid hiring human models are now required to tag those images before they can be used on the platform.

    The enforcement consequence is consistent with other image violations: Amazon may remove the non-disclosed image and, if no compliant main image remains, may suppress the listing from search. For A+ content, the module containing the non-disclosed AI image may be rejected or removed. If you have used AI-generated models in your listing imagery and have not added the metadata tag, this should be the first item you address in your audit.

    What Is Explicitly Excluded

    Amazon’s framing explicitly excludes several cases that sellers may be concerned about: real human models whose photos have been retouched, color-corrected, or otherwise edited using AI tools do not require the disclosure. AI-generated product images without any people do not require it. Illustrated or cartoon figures do not require it. The scope is specifically photorealistic AI-generated human likenesses — meaning images where the person depicted was entirely synthesized by an AI system and does not correspond to a real individual who was photographed.

    Category-Specific Rules Most Sellers Get Wrong

    Amazon’s core main image rules apply universally, but individual categories carry additional or different requirements that override general guidance. These category-specific rules are documented in Seller Central’s category-specific image standards pages, but they are easy to miss — particularly for sellers who expanded into new categories without re-reading the image standards for those categories specifically.

    Amazon category-specific image rules comparison for apparel, jewelry, and food — ghost mannequin, white background jewelry, and labeled packaging requirements

    Apparel: The Model and Mannequin Rules

    Apparel is the category with the most distinct main image requirements. For adult clothing, Amazon generally requires main images to show the garment either on a live model or on a ghost mannequin (also called an invisible mannequin). Flat-lay presentation — garments photographed laid flat on a surface — is generally not accepted for adult apparel main images, though it may be used in secondary image slots.

    The exception is children’s and baby clothing, where flat-lay or off-model presentation is more commonly accepted and in some subcategories is preferred. The distinction matters because sellers who cross-list styles across adult and children’s categories cannot use a single image approach for their entire catalog — they need category-appropriate presentation for each product.

    For model images in apparel, the model must be standing (not sitting or in motion in most cases), the garment must be the primary subject, and the background must still be pure white. Apparel sold as a set must show the complete set — not just the top or the bottom in isolation.

    Jewelry: Specifics That Catch Sellers Out

    Jewelry main images require the product on a pure white background with no props, hands, or mannequin parts visible. This catches many jewelry sellers who default to hand or wrist models for rings, bracelets, and watches — that presentation, which is standard in editorial jewelry photography, is not compliant for the main image slot on Amazon. It can be used in secondary image positions, but the main image must show the piece in isolation on white.

    For jewelry presented on a stand or bust (common for necklaces), the stand or bust itself needs careful evaluation — Amazon’s guidance indicates that props that are not part of the item being sold should not appear, and display props occupy a grey area that is increasingly being flagged. The safest approach for necklace main images is to show the piece on a flat white surface or hanging against white, rather than on a jewellery bust.

    Food and Grocery: Labeling Visibility

    Food and grocery products must show the actual product, not a lifestyle arrangement or serving suggestion on the main image. For packaged food, the product label must be fully visible and legible — partially obscured packaging is a common violation. The product must be shown as it would arrive to the customer, which means an item sold in a box should show the box (with label visible), not the contents plated or styled.

    Food listings also carry specific restrictions around claims in imagery — images suggesting health benefits, comparative claims, or third-party endorsements that are not substantiated are more likely to trigger A+ and secondary image rejections in the food category than in general merchandise categories.

    Electronics and Multi-Pack Listings

    Electronics main images should show the actual unit — not a render, not an out-of-box arrangement with multiple accessories, and not the retail box only (unless the box is specifically what’s being sold). Multi-unit or multi-pack listings should show all units that are included in the sale, which sometimes conflicts with the frame-fill requirement — sellers must balance showing all included items while keeping the image composition clean and the product(s) visually dominant.

    The Resolution and Zoom Standard Gap: Where the Official Minimum Falls Short

    Amazon’s official technical requirement sets the minimum image size at 500 pixels on the longest side. This figure appears in Seller Central help documentation and represents the absolute floor below which Amazon will not accept an image. But meeting that minimum in 2026 is functionally insufficient in almost every competitive category, and understanding exactly why matters for sellers who are auditing existing catalog images against current standards.

    Amazon image resolution comparison infographic showing 500px minimum vs 1000px zoom threshold vs 1600-2000px recommended best practice, with mobile zoom quality comparison

    The Zoom Activation Threshold

    Amazon’s product image zoom feature — the ability for shoppers to hover over or tap an image to see a magnified view — activates when the image is at least 1,000 pixels on the longest side. Below that threshold, zoom does not function and the shopper sees only the base image at whatever size it renders in the listing. This is not a new requirement, but it means that any image between 500 and 999 pixels is technically compliant but practically degraded — it passes the policy check but delivers a worse shopping experience and, by extension, a worse conversion rate.

    For competitive categories where multiple sellers are competing for the same clicks, the inability to zoom because you uploaded a 700-pixel image is a meaningful commercial disadvantage. The correct minimum for any seller who wants zoom capability is 1,000 pixels on the longest side.

    Why 1,600–2,000 Pixels Is the Practical Standard in 2026

    Most seller guides, agency standards, and professional product photography studios have converged on 1,600 to 2,000 pixels on the longest side as the practical target for 2026. The reasons are layered. First, at 1,000 pixels, zoom quality is adequate but not impressive — the image enlarges to roughly 2x but detail sharpness is limited. At 1,600 pixels and above, zoom quality becomes genuinely informative for high-detail products like electronics, textiles, and jewelry. Second, Amazon displays images at varying sizes across device types and screen resolutions, and a 2,000-pixel source image renders cleanly on high-DPI mobile displays in ways that a 1,000-pixel image does not. Third, Amazon’s own image quality assessment tools score images in part on resolution, and higher-resolution images tend to score better in those assessments.

    The upper limit Amazon imposes is 10,000 pixels on the longest side. Uploading images above that threshold causes upload failure. Somewhere in the 1,600 to 3,000 pixel range delivers the optimal combination of quality, zoom performance, file size, and upload reliability for most product types.

    Auditing Your Existing Image Resolution

    When auditing an existing catalog, the resolution check requires looking at the source file dimensions — not how the image renders on the listing page. A 700-pixel image that looks acceptable on a desktop display may be technically non-compliant for zoom and visually degraded on mobile zoom. Check the actual pixel dimensions of every main image file in your catalog and flag anything below 1,000 pixels for replacement. Anything below 1,600 pixels should be assessed against your competitive landscape — if your category competitors are all running 2,000-pixel images and your listings are at 1,000 pixels, you are at a disadvantage even though you’re technically above the zoom threshold.

    Secondary Images, Infographics, and Lifestyle: Where the Lines Now Are

    The restrictions on Amazon’s main image slot are strict. Secondary image slots — positions two through nine in the listing image carousel — operate under a different and considerably more permissive set of guidelines, but there is a common seller misconception that secondary slots are unregulated. They are not, and enforcement against secondary image violations has become more consistent in 2026.

    What Secondary Slots Allow

    Amazon’s secondary image positions allow: lifestyle photography showing the product in use, infographic-style images with text callouts highlighting product features, dimensional diagrams, comparison charts between variants, packaging or unboxing imagery, and close-up detail shots. Text overlays, logos, and icons are permitted in secondary slots when they are used to communicate product information rather than promotional claims.

    This is the correct zone for content that would be prohibited on the main image: size comparison references, material callouts, “what’s in the box” compositions, and in-context lifestyle shots. Sellers who have been putting this content on their main images (a common mistake) should move it to secondary positions rather than removing it entirely — it has real conversion value in the right slot.

    What Secondary Slots Prohibit

    Even in secondary image positions, Amazon prohibits several types of content that are consistently flagged in 2026 enforcement. These include: any content that makes health claims that are not substantiated and compliant with Amazon’s health claim policies, references to competitor products or brands, claims of Amazon’s endorsement or best-seller status (using Amazon’s trademarks or ranking badges), time-sensitive promotional pricing or urgency claims (“Limited Time Offer”, countdown timers), and any content that would mislead the buyer about what is included in the sale.

    Unsubstantiated superlatives — “The Best”, “#1 Rated”, “Premium Quality” — in secondary images are increasingly being flagged, particularly in health, beauty, and dietary supplement categories where claim scrutiny is highest. If your secondary images contain language like this without specific, documented substantiation, they are a compliance risk.

    The 2026 Enforcement Pattern for Secondary Images

    The shift in 2026 is not that Amazon has created new secondary image rules. It is that enforcement is now happening at the individual image level rather than only at the overall listing level. Previously, a listing might pass review even if one secondary image contained borderline content, because the review was holistic. Current reports indicate more granular, image-slot-level enforcement — meaning a single non-compliant secondary image can trigger that image’s removal while the rest of the listing remains live. This is actually a more targeted form of enforcement than wholesale listing suppression, but it creates catalog management complexity for sellers who need to track compliance at the individual image position level.

    A+ Content Image Rules: Module-Level Rejection Is the New Normal

    A+ Content (formerly Enhanced Brand Content) operates under its own content policies that overlap with but are distinct from the main listing image guidelines. The significant shift in 2026 is the move to module-level rejection — where individual A+ modules within a page can be rejected or removed without the entire A+ submission being declined.

    What Triggers A+ Module Rejection

    Amazon’s A+ content review process in 2026 is flagging module-level issues in several categories. The most commonly reported rejection triggers are: comparative claims that reference competitor ASINs or brands (even implicitly), health or efficacy claims that are not substantiated in compliance with Amazon’s content policies, images with unreadable text (text too small or low-contrast to read clearly), reuse of images that have already been rejected in previous A+ submissions, references to time-limited pricing or promotions, and images that fail resolution standards (A+ module images have their own size requirements, typically specified at the module level in the A+ builder).

    For the AI disclosure requirement: A+ content that contains photorealistic AI-generated people is subject to the same contains-synthetic-performer metadata requirement as main listing images. The metadata must be embedded in the image file before it is uploaded to the A+ builder.

    The Resolution Requirements Inside A+ Builder

    A+ Content modules have specific image dimension requirements that vary by module type. The A+ Content builder in Seller Central shows the required dimensions for each module as you build the page. These requirements are not the same as main image requirements — some A+ modules require wider, landscape-format images rather than square images, and the minimum pixel requirements for each module are defined by the module’s display dimensions. Uploading an undersized image to an A+ module will produce a quality warning in the builder, and if the image is significantly below specification, it may render poorly enough to trigger review rejection.

    Practical A+ Compliance Steps

    Check all active A+ pages in your brand catalog against current content standards. Pay particular attention to pages that were built before 2025 — older A+ content is more likely to contain language or comparative claims that have since become more strictly enforced. Any A+ module that includes a photorealistic AI-generated person needs the metadata disclosure added to the source image file before the page goes through its next review cycle. And review your A+ image resolutions against the builder’s specified requirements for each module type — do not assume that the images you uploaded are still rendering correctly if the module templates have changed since the content was built.

    The Automated Scanner: How Amazon’s Image Review System Actually Catches Violations

    Understanding what Amazon’s automated image review system is actually checking helps sellers understand why certain violations get caught quickly and others take longer. While Amazon does not publish a technical specification for its image-review systems, the pattern of violations that are caught quickly versus those caught during manual review cycles tells a consistent story about how automated enforcement works.

    What Gets Caught Fast

    Violations that automated systems catch most rapidly tend to be measurable, pixel-level issues. Background non-compliance (non-white background values), insufficient image resolution (images below minimum pixel counts), and image files that don’t conform to accepted format specifications are all checks that a computer vision system can perform in milliseconds. These violations are typically caught at upload time or very shortly after, often within minutes to a few hours of the image appearing on the listing.

    Text detection on main images is another area where automated enforcement appears highly effective. Optical character recognition tools can scan images for text content at scale, flagging main images that contain text overlays, watermarks, or promotional callouts. Sellers who have added even small text elements to main images — a brand name in the corner, a “New” badge, a size callout — are likely to have those violations caught quickly in the current environment.

    What Goes Through Manual Review

    More nuanced violations — claims substantiation issues in secondary images, borderline lifestyle props in main images, complex compositional judgment calls — are more likely to enter a manual review queue rather than being caught by automated scanning. This explains why some sellers report violations being flagged weeks after an image was uploaded, rather than immediately. The automated layer catches technical violations fast; the manual layer catches content policy violations on a slower cycle.

    The AI synthetic performer disclosure — the contains-synthetic-performer metadata requirement — appears to be enforced through a combination of automated metadata reading (checking for the presence or absence of the required tag) and potentially AI-based image analysis that identifies photorealistic human figures. This suggests it will be enforced on a faster cycle as the metadata-reading component is straightforward to automate.

    The Re-Upload Risk

    An important operational note: when you replace an image on an existing listing, the new image goes through the same review process as a new upload. Sellers sometimes assume that because a listing has been live for a long time, image changes will pass through faster or with less scrutiny — that assumption is incorrect. Every image replacement triggers a fresh compliance check, which means updating one image in a set can result in a compliance action on the new image even if the image it replaced was never flagged. This is not a reason to avoid updating images, but it is a reason to ensure replacement images are fully compliant before uploading rather than uploading quickly and fixing later.

    Mobile Thumbnail Optimization: The Invisible Conversion Lever

    More than 70% of Amazon shopping sessions happen on mobile devices. On mobile, the first thing a customer sees for any given product is a thumbnail image — a small, square crop of the main product image rendered at roughly 80 to 120 pixels in the search results grid. Whether that thumbnail generates a click is the first conversion decision in the purchase funnel, and most image audit processes completely ignore it.

    Amazon mobile thumbnail optimization infographic showing compliant vs non-compliant product thumbnail appearance in mobile search results

    The Thumbnail Test

    Take your main product image and reduce it to 80 pixels square in any image editor. What you see at that size is what your customer sees when they scan mobile search results. Is the product clearly identifiable? Is it centered and prominent in the frame? If the product is small, positioned in a corner, or blending into other elements, it is losing clicks to competitors whose thumbnails are bolder and more immediately clear.

    The 85% frame fill requirement that Amazon specifies for main images is also the key driver of good thumbnail performance. A product that fills most of the image frame at full size will still be clearly recognizable when the image is scaled down to thumbnail dimensions. A product that occupies 50% of the frame at full size will be hard to identify in the thumbnail grid. This is one area where compliance and commercial performance are perfectly aligned — meeting Amazon’s frame-fill requirement also gives you the best possible thumbnail performance.

    Color and Contrast Considerations

    Products that are white or light-colored face a specific thumbnail challenge: on a pure white background, a light-colored product can disappear at thumbnail scale, blending into the background in ways that make the listing appear blank or uninteresting at a glance. This is not a compliance issue — white products on white backgrounds are compliant — but it is a commercial issue that sellers of white, cream, or light-grey products need to address.

    The compliant solution for light-colored products is to ensure the product has enough definition, shadow, or surface texture to distinguish it clearly from the white background at small sizes. Subtle drop shadows (permitted in some secondary image positions but not on the main image), very precise lighting that creates depth on the product surface, and careful composition that ensures the product’s edges are clearly defined all help. If your white or light-colored product genuinely disappears against the white background at thumbnail size, this is worth a targeted photoshoot to resolve.

    Speed of Visual Recognition

    Shoppers in mobile search results are scrolling fast. Research on visual attention in e-commerce contexts consistently shows that product images have a fraction of a second to register. Images that require cognitive effort to parse — cluttered compositions, ambiguous subject positioning, products that are too small in frame — lose that attention moment. The simplest mobile thumbnail optimization is also the most compliant one: one product, centered, filling most of the frame, on clean white. No ambiguity, no clutter, no competition with supporting elements for visual attention.

    Building a Pre-Upload Image Audit Process for Your Catalog

    An effective image audit process for a live catalog needs to be systematic enough to cover every ASIN but light enough to be repeatable without consuming excessive operational resources. The following structure works for catalogs of any size, from a few dozen SKUs to tens of thousands.

    Step 1: Inventory Your Current Image Stack

    Start with a complete inventory. Use Seller Central’s inventory reports or a third-party catalog management tool to export a list of all active ASINs, their current image URLs, and their image counts. For each ASIN, you need to know: how many images are in the listing, what is the current main image, and what are the secondary image positions. Flag any ASIN with fewer than four images — the image slots you have not filled are conversion opportunities left on the table, and they are often a sign of a listing that has not been maintained.

    Step 2: Technical Compliance Check

    For the main image of each ASIN, run the following checks:

    • Pixel dimensions: Flag anything below 1,000 pixels. Prioritize fixing anything below 500 pixels (which should not exist in a live catalog but does occasionally appear in older listings).
    • Background value: Sample the background with a color picker tool and confirm RGB 255, 255, 255. Flag anything with a background value below 250 in any channel.
    • Frame fill: Estimate or measure the product’s coverage of the frame. Flag anything below 75% as a likely compliance and conversion risk.
    • Prohibited elements: Manually review each main image for text, logos, watermarks, props, and other prohibited content. This cannot be fully automated without specialized image-analysis tools, but a visual scan at scale is possible with organized review workflows.
    • AI synthetic performer: If your image production workflow has used AI image generation tools that produce human figures, identify those images and verify the contains-synthetic-performer metadata tag is embedded before upload.

    Step 3: Category Compliance Review

    Group your ASINs by category and review main images against category-specific requirements. This is most critical for apparel (model/mannequin rule), jewelry (no hands/props on main), and food (product as sold, label visible). Build a simple category-by-category compliance matrix that lists the category-specific requirements alongside your current image presentation for each group, and flag the gaps.

    Step 4: Secondary Image and A+ Review

    Review secondary images for prohibited claims, competitor references, and resolution compliance. Review all active A+ pages for outdated content, claims that no longer meet current standards, and any AI-generated human imagery that requires the metadata disclosure. Prioritize A+ pages for your highest-revenue ASINs — a rejected module on a best-seller’s page has significantly more commercial impact than a rejection on a slow-moving SKU.

    Step 5: Prioritization and Scheduling

    Not everything can be fixed at once. Build a prioritization matrix that ranks ASINs by: current sales revenue (highest revenue = highest priority), violation severity (suppression-risk violations first, optimization opportunities second), and fix complexity (simple re-crops and background fixes first, full re-shoots later). Create a fix schedule with assigned ownership and deadlines, and track progress against it. Review the queue weekly until it is clear.

    How to Recover a Suppressed Listing Fast

    If suppression has already happened, speed of recovery determines how much revenue damage you sustain and how quickly your ranking signals recover. The process is straightforward but each step needs to happen in the right sequence.

    Amazon listing suppression recovery flowchart showing step-by-step process from identifying suppressed ASIN to reinstatement within 24-72 hours

    Identify the Exact Violation

    In Seller Central, navigate to Inventory → Manage Inventory → Suppressed. The suppressed listings view will show you which ASINs are affected. Amazon typically provides a reason code or description for the suppression — read it carefully. Common image-related suppression reasons include “Main image does not meet our image standards,” “Image contains prohibited content,” and “Product image is missing.” The reason code determines your fix path — a background violation needs a different fix than a resolution violation or an overlay violation.

    If the reason is unclear or generic, compare your current main image against the complete compliance checklist above. In most cases, the violation will be identifiable visually once you know what you’re looking for.

    Prepare the Replacement Image

    Fix the specific violation identified — do not simply upload a different version of the same image if the problem hasn’t been corrected. If the background was near-white, get it to true 255, 255, 255. If the image had text, remove it. If the resolution was below minimum, source a higher-resolution file. If the AI disclosure metadata is missing, embed it before uploading. Verify the replacement image against the full technical checklist before uploading — the goal is to upload once and have it pass, not to iterate through multiple uploads while the listing remains suppressed.

    Upload and Monitor

    Upload the replacement image via Manage Inventory → Edit → Images. After uploading, allow 15–30 minutes for initial processing. After that window, check whether the listing has reappeared in search. Amazon’s help documentation indicates listings are typically reinstated relatively quickly once a compliant image is in place, but processing times vary. In practice, most image-related suppressions resolve within 24 to 72 hours of a compliant image upload.

    If the listing has not been reinstated after 48 hours and your replacement image is genuinely compliant, contact Seller Support with your case. Document the compliance of the new image (screenshot with color picker values, pixel dimensions, absence of prohibited elements) and request a manual review of the reinstatement. Having that documentation ready speeds up the support interaction considerably.

    Post-Recovery: Assess the Ranking Impact

    After reinstatement, monitor your keyword rankings for the affected ASIN over the following two weeks. A suppression of even two to three days can cause organic ranking positions to drop as the listing stops accumulating click and conversion signals during the suppression window. If rankings have declined materially, consider a targeted PPC boost on key terms to accelerate the recovery of ranking velocity while organic signals rebuild.

    What to Watch for in the Rest of 2026

    The image compliance landscape is not static. Several developments in the second half of 2026 are likely to affect sellers who are not monitoring the policy environment.

    Continued AI Disclosure Scope Expansion

    The contains-synthetic-performer requirement currently applies to photorealistic AI-generated people. As AI-generated content becomes more prevalent and as more jurisdictions adopt synthetic media disclosure laws, it is reasonable to expect Amazon to expand the scope of its disclosure requirements over time. Sellers who are building AI-generated image workflows should design those workflows with disclosure infrastructure built in from the start — retrofitting metadata tagging across a large image library is considerably more painful than including it in the production process.

    Higher Resolution Expectations

    The market standard for image resolution keeps moving upward. The 2,000-pixel recommendation that is common today in seller guidance is likely to continue migrating toward 2,500 or 3,000 pixels as display technology advances and as higher-resolution source images become the norm in competitive categories. Sellers who invest in high-resolution photography now are building an asset that will remain compliant and competitive longer than those who continue to meet the minimum and no more.

    Video and Interactive Media Compliance

    Amazon’s video content policies for product listings are becoming more aligned with the image compliance framework. The AI synthetic performer disclosure applies to videos as well as images, and the same technical metadata approach is required. As video adoption on listings continues to grow, expect video-specific compliance requirements to receive the same enforcement attention that image compliance has received in 2026.

    Automated Compliance Monitoring Tools

    The operational burden of maintaining image compliance across large catalogs is driving adoption of third-party image compliance monitoring tools that connect to the Amazon API, periodically scan listing images against compliance rules, and alert sellers to violations before Amazon’s own systems trigger suppression. These tools are maturing rapidly and are becoming cost-effective even for mid-sized catalogs. If you are managing more than 200 ASINs and doing image compliance audits manually, evaluating these tools is worth time in the second half of 2026.

    The Bottom Line: Run the Audit Now, Not After the Suppression

    Amazon’s image compliance environment in 2026 is characterized by faster, more automated enforcement against a set of rules that have not fundamentally changed but are being applied far more rigorously than they were even eighteen months ago. The sellers who will avoid suppression events are those who treat image compliance as an ongoing operational function rather than a one-time launch checklist.

    The self-audit structure above covers every dimension that matters: core main image technical requirements, the new AI synthetic performer disclosure that took effect in July 2026, category-specific rules for apparel, jewelry, and food, the resolution gap between Amazon’s official minimum and what actually performs in the market, secondary image and A+ content compliance, mobile thumbnail performance, and the recovery process when suppression does occur.

    Run this audit against your catalog this week. Prioritize by revenue at risk. Fix the suppression-risk violations first and the optimization gaps second. And build the review into a recurring cycle — not because Amazon’s fundamental rules are changing dramatically, but because your catalog is always changing, your image production workflow is always evolving, and the enforcement environment is always tightening.

    Key Takeaways for Sellers

    • Main image background must be RGB 255, 255, 255 — near-white is not white and is actively being caught by automated scanners.
    • The AI synthetic performer disclosure (contains-synthetic-performer XMP metadata) is required for all listing images, videos, and A+ content containing photorealistic AI-generated people — enforcement began July 2026.
    • Minimum 1,000px for zoom activation; 1,600–2,000px is the practical standard for competitive listings in 2026.
    • Category-specific rules for apparel (model/mannequin), jewelry (no hand props on main), and food (product as sold, label visible) are enforced separately from general image standards.
    • A+ Content is now subject to module-level rejection — individual non-compliant modules can be removed without the whole page being taken down.
    • Secondary image violations are increasingly caught at the individual image-slot level, not just at the listing level.
    • Suppression recovery is straightforward but time-sensitive — each hour of suppression means lost Buy Box access, lost ranking signals, and potentially wasted ad spend.
    • Build a repeating image compliance audit into your catalog management calendar — not just at launch.
  • Amazon’s 2026 Image Compliance Checks: What Actually Triggers Suppression (And How to Fix It Before It Costs You)

    Amazon’s 2026 Image Compliance Checks: What Actually Triggers Suppression (And How to Fix It Before It Costs You)

    Amazon image compliance 2026 — laptop showing Seller Central suppression warning with compliance checklist items

    One morning your listing is ranking. By afternoon it’s gone. No email. No policy violation notice in Account Health. Just — gone. You check Seller Central and find the word Suppressed sitting next to your best-selling ASIN, and the only clue is a vague reference to “image quality standards.”

    This is the reality of Amazon’s 2026 image compliance environment. The checks are faster, the enforcement is more automated, and the consequences cascade further into your catalog health than most sellers realize. What used to be a straightforward set of pixel rules has become a layered compliance system — one that now includes AI-generated content disclosure requirements, stricter background purity enforcement, and a tighter link between image status and your overall listing quality score.

    The challenge isn’t that the rules are secret. Amazon publishes most of them. The challenge is understanding which violations get caught automatically and which require human review, how long suppression actually lasts before it starts doing structural damage to your ranking, and where sellers consistently stumble despite thinking they’ve checked every box.

    This guide works through all of it — the technical pipeline behind Amazon’s checks, the specific violations most likely to trigger suppression in 2026, the new AI disclosure rules that came into effect in July 2026, category-specific differences, the real suppression-to-recovery timeline, and a practical audit workflow you can run on your catalog before Amazon finds the problem first.

    How Amazon’s Image Compliance System Actually Works

    Flowchart showing Amazon's automated image compliance pipeline: upload, CV scan, policy match, pass or suppressed

    Most sellers imagine Amazon’s image review as something like a human reviewer glancing at their photos. The reality is far more automated, and far faster than that.

    Amazon’s image compliance pipeline operates as a multi-stage automated system. When a seller uploads an image to Seller Central — whether through the Manage Inventory interface, a flat file feed, or a third-party integration — the file enters an automated review queue almost immediately. The system checks the image against a structured set of technical requirements and policy rules before the asset is accepted into the catalog. Images that fail hard technical requirements, such as an unsupported file format or a file that exceeds the size ceiling, are blocked from upload entirely. Images that pass technical intake but may violate policy rules proceed into a secondary compliance layer.

    The Role of Computer Vision

    Amazon’s image moderation infrastructure is built on computer vision tooling closely related to the services available through Amazon Web Services (AWS). Amazon Rekognition, AWS’s image and video analysis service, provides the underlying capability for detecting objects, scenes, unsafe content, and image attributes at scale. Amazon applies a similar stack to Seller Central image review — using automated models to analyze uploaded images for compliance signals: background color purity, the presence of text or graphic overlays, watermarks, logos, and whether the product occupies sufficient frame space.

    These models don’t review images the way a human would. They analyze pixel data, detect color values, identify regions of the frame that are occupied by the product versus empty or background space, and flag anomalies against a compliance ruleset. The process is largely instantaneous for standard checks. Edge cases — images where the automated system can’t make a confident determination — are escalated to human review, which is where timelines extend from minutes to days.

    The Two-Layer Enforcement Model

    It helps to think of Amazon’s enforcement model as having two distinct layers. The first is pre-upload validation: technical format checks that happen the moment a file is submitted. This layer catches issues like wrong file types, files that are too small in pixel dimensions, or filename formats that don’t match Amazon’s identifier-based naming convention. These rejections happen before your image ever appears in the catalog.

    The second layer is post-upload compliance review: the more consequential checks that examine whether an accepted image actually meets policy standards. A listing can appear live for hours or days before this layer catches a violation, which is why sellers are often blindsided. The image uploaded fine, the listing went live, and then the automated compliance pass — which may run on a scheduled cycle rather than real-time — flags the image and triggers suppression.

    This second-layer timing is one of the most commonly misunderstood aspects of how Amazon enforces image standards. Compliance isn’t a single gate at upload. It’s an ongoing check that can surface violations in images that have existed in your catalog for months.

    The Main Image Rules That Trigger Automatic Suppression

    Split-screen comparison of compliant vs non-compliant Amazon main product images highlighting the 5 main violations

    The main product image — the first image shoppers see in search results and at the top of the detail page — carries the strictest compliance requirements of any image type in Amazon’s catalog. Most suppression events in 2026 trace back to main image violations, and the majority of those violations cluster around five recurring failure modes.

    1. Background Purity: Pure White or Nothing

    Amazon’s product image requirements are unambiguous on this point: the main image background must be pure white, defined as RGB (255, 255, 255). Not off-white. Not eggshell. Not a very-light gray that looks white on a laptop screen. Pure white — the exact hex value #FFFFFF.

    This is the single most common source of automated suppression in 2026. Off-white or slightly gray backgrounds often enter catalogs through photographers shooting on white seamless paper that picks up color from studio lighting, or through background removal tools that replace the original background with a near-white rather than a true white. The images look correct to the human eye, but Amazon’s automated checks read the RGB values precisely. A background that registers as RGB (250, 250, 250) or (245, 245, 248) fails the standard, even though it’s visually indistinguishable from compliant white in most display environments.

    Drop shadows that extend to the edges of the image create a similar problem. A subtle shadow below a product — one that fades out before reaching the edge — is generally acceptable. A shadow gradient that bleeds into the background and pulls it away from pure white is not. The same applies to vignettes, subtle gradients, and edge blurring effects used by some photography workflows to create depth.

    2. Frame Fill: The 85% Minimum

    Amazon’s guidelines state that the product should occupy approximately 85% of the image frame. In practice, this means the product needs to be close-cropped and large within the image canvas. A product image where the item sits small in the center of a large white expanse will fail. This rule exists partly for visual consistency across search results and partly because the zoom function on product detail pages requires sufficient pixel density around the product itself to function effectively.

    Frame fill violations commonly occur when sellers use images originally produced for other channels — websites, print catalogs, trade show materials — that were composed with generous white space around the product. Resizing the image without recomposing it doesn’t solve the problem; the product-to-frame ratio stays the same regardless of pixel dimensions.

    3. Text, Logos, Watermarks, and Graphics

    Main images must show the product, and only the product. No text overlays. No brand logos. No promotional badges — not “New Arrival,” not “Best Value,” not an award badge from a trade publication. No watermarks, including copyright watermarks. No borders, frames, or decorative graphic elements.

    This rule is well-known but still routinely violated, most often by sellers who inherit images from manufacturers or brand partners whose standard creative assets include a logo watermark or a brand name superimposed in a corner. The violation isn’t intentional, but Amazon’s automated system doesn’t distinguish between deliberate and inadvertent. The flag fires the same either way.

    4. Resolution and Pixel Dimensions

    Amazon requires images to be at least 500 pixels on the longest side, but sellers operating at this floor are taking unnecessary risk. For a listing to support Amazon’s built-in product zoom feature — which has a measurable positive effect on conversion — images should be at least 1,000 pixels on the longest side, and ideally 2,000 pixels or higher. Images below the zoom threshold won’t be suppressed, but they will underperform. Images that fall below the absolute minimum are blocked at upload.

    Amazon also enforces an upper ceiling of 10,000 pixels on the longest side. Files exceeding this aren’t a common problem, but some high-end photography and brand asset workflows produce extremely large files that need resizing before upload.

    5. Image Accuracy and Product Misrepresentation

    Amazon’s guidelines require that the main image shows the actual product being sold, as it would be received by a customer. This means no props that aren’t included in the purchase, no lifestyle context that makes a single product appear to be a bundle, and no rendering or illustration used in place of an actual product photo — unless the category specifically permits it (electronics and some home goods categories allow high-quality renders for main images).

    The misrepresentation check is more complex than a pixel-level scan. It involves cross-referencing the visual content of the image with the listing’s product type, category, and ASIN attributes. This is one of the areas where human review plays a more significant role, particularly when the automated system flags a potential mismatch but can’t make a confident determination from image analysis alone.

    The New AI-Generated Image Disclosure Requirement (July 2026)

    Amazon July 2026 AI synthetic performer disclosure requirement showing the contains-synthetic-performer metadata tag requirement

    The most significant new compliance requirement of 2026 has nothing to do with background color or pixel dimensions. In July 2026, Amazon announced a new disclosure requirement for product images, videos, and A+ Content that feature photorealistic AI-generated people. This requirement represents a structural shift in how image compliance intersects with creative production — and most sellers using AI imagery tools haven’t accounted for it yet.

    What the Policy Actually Requires

    Amazon’s July 2026 guidance, which was reported widely and tied to New York’s synthetic-performer disclosure law that took effect in June 2026, requires third-party sellers to add a specific metadata keyword to qualifying image and video files before upload. The required keyword is: contains-synthetic-performer.

    This tag must be embedded in the file’s IPTC/XMP metadata in the dc:subject field — not added as a listing text field, not included in the product description, but embedded directly in the image file’s metadata before the file is uploaded to Seller Central. Amazon says it will surface a disclosure indicator to shoppers on qualifying listings where the tag is present and validated.

    The requirement applies to any image or video that contains a photorealistic AI-generated person. This includes lifestyle product images featuring AI-generated human models, A+ Content module images featuring AI-generated people, and product videos that include synthetic human performers.

    What the Policy Does Not Cover

    The boundaries of this requirement are as important as the requirement itself. Amazon has confirmed the disclosure rule does not apply to:

    • Real people whose images have been edited with AI — if a real human model was photographed and their image was subsequently retouched or modified using AI tools, the contains-synthetic-performer tag is not required.
    • Fictional characters — animated characters, illustrated figures, and non-photorealistic digital art don’t qualify as synthetic performers under this framework.
    • Images with no people — product-only images, lifestyle shots without human models, and images featuring only hands or product-adjacent props (without a recognizable human figure) are not in scope.
    • TV, video game, or movie characters — content already governed by other IP and disclosure frameworks is carved out of this requirement.

    The Operational Compliance Challenge

    The compliance burden here is genuinely new for most catalog and creative teams. Embedding metadata in image files before upload isn’t part of a typical product photography or image processing workflow. Most photo editing software — Adobe Photoshop, Lightroom, Capture One — supports IPTC/XMP metadata editing, but doing it consistently across a large catalog of assets requires either a manual per-file process or an automated tagging step built into the pre-upload workflow.

    For sellers using AI image generation tools to create lifestyle imagery with human models — a practice that expanded dramatically as these tools became more accessible in 2024 and 2025 — this requirement means auditing the existing catalog for qualifying assets and retrofitting metadata tags before enforcement catches up with non-compliant files. Amazon has not published a hard enforcement start date for penalties against non-compliant assets at time of writing, but the metadata disclosure requirement is active, and enforcement cadence typically follows a policy announcement within 60 to 90 days.

    Category-Specific Rules: Where the Baseline Doesn’t Apply

    Amazon’s core image requirements provide a baseline that applies across the marketplace, but several major categories operate under supplemental rules that differ meaningfully from the standard. Understanding where your category diverges from the baseline is critical — what works for listing a kitchen gadget won’t necessarily work for listing an apparel item or a supplement.

    Apparel and Footwear

    Apparel is the most significant category departure from the standard white-background rule. For most clothing items, Amazon actually requires or strongly prefers that the main image feature a live model wearing the garment, or alternatively a ghost mannequin shot (an invisible mannequin technique that shows the garment’s fit and shape without a visible model). Flat-lay photography — the product laid out on a flat surface — is generally acceptable for some accessory and basic apparel categories but is less preferred and may underperform in search results for fashion-forward or fit-sensitive categories.

    The purpose is practical: apparel shoppers make purchase decisions based on fit and drape, and a model or ghost mannequin image communicates fit information that a flat product image simply cannot. Amazon’s image compliance checks for apparel therefore include an additional assessment of whether the presentation appropriately represents how the garment would be worn.

    Jewelry

    Jewelry main images typically follow a stricter product-only standard — no model, no lifestyle context, no props. The product itself, centered on a pure white background, filling the frame at the correct ratio. Jewelry categories benefit from high-resolution images even more than most product types because the zoom function matters significantly to shoppers evaluating texture, finish, and detail at the level a physical examination would provide. Images below 2,000 pixels on the longest side leave conversion on the table in this category even when they clear the compliance minimum.

    Beauty and Personal Care

    Beauty categories follow the standard white-background rules for main images, but face particularly strict scrutiny on one dimension that’s distinct from other categories: image-to-product accuracy. Amazon’s compliance checks in beauty cross-reference visible label claims on the product in the image with the claims made in the listing. If the product packaging visible in the image conflicts with listing attributes — different size, different formulation claim, different featured ingredient — this can trigger a suppression or a more serious policy review.

    Beauty sellers who use “hero” product images that were photographed for a previous packaging version and not updated after a reformulation or rebrand face meaningful suppression risk under this cross-referencing check. The image doesn’t need to look wrong; it needs to accurately represent the specific product being sold today.

    Dietary Supplements and Health Products

    Dietary supplement images are reviewed with an additional layer of scrutiny tied to Amazon’s broader regulated products compliance framework. Images of supplement products that feature visible label text with structure/function claims — statements about what the product does for the body — are cross-referenced with the listing’s product description and bullet points. Discrepancies can trigger compliance holds. Amazon also applies automated checks for label readability and accuracy in this category, making it one of the few product types where the text visible within the product image (on the label) is part of the compliance check, not just the decorative elements around the image.

    Secondary Images and A+ Content: Different Standards, Distinct Risks

    Main image requirements get the most attention from sellers and compliance guides, but the secondary image slots and A+ Content modules operate under their own distinct rule sets — and violations in these areas carry real consequences even though they don’t immediately suppress a listing the way a main image violation does.

    Secondary Images: More Flexibility, Same Scrutiny

    Secondary images — the additional product photos displayed in the image carousel on a detail page — have significantly more flexibility than main images. Lifestyle photography, in-use shots, size comparison images, product detail close-ups, and infographic-style images with text overlays are all permitted in secondary slots. Props that aren’t included in the purchase are allowed. Background colors other than white are permitted. This creative latitude is where sellers can show product context, demonstrate use cases, and communicate the features a pure product shot can’t convey.

    However, secondary images aren’t a compliance-free zone. They must still accurately represent the product. They cannot include false or misleading claims — price claims, performance guarantees, unsubstantiated comparative statements, or regulatory claims that Amazon’s policies prohibit. Lifestyle images must not depict scenarios that imply the product does something it doesn’t.

    The minimum technical requirements for secondary images include: supported formats (JPEG is recommended; PNG and TIFF are accepted), a minimum of 1,000 pixels on the longest side for zoom functionality, and sRGB color space. Secondary images don’t require a white background, but they do require that the product being sold is clearly identifiable in the image.

    A+ Content: Stricter Technical Rules, Unique Content Requirement

    A+ Content images have their own technical specification that differs from the standard listing image requirements. Amazon’s A+ Content guidelines require:

    • Static images only — no animated GIFs, no moving elements
    • Supported formats: JPEG, PNG, or BMP
    • Color space: RGB only — CMYK files are not supported and will fail on upload
    • File size: under 2 MB per image
    • Minimum resolution: 72 dpi
    • No watermarks, QR codes, hyperlinks, or animated elements
    • No pricing or promotional claims embedded in images

    One compliance requirement that catches sellers and agencies off guard: A+ Content images and text must be unique to A+. Amazon’s guidelines state that you should not reuse images already present in the standard product image gallery within A+ Content modules. This is both a content quality requirement and a compliance issue — A+ is intended to add value beyond the standard listing, not replicate it.

    The CMYK color space issue is particularly common when A+ Content is designed by an agency or design team that works primarily with print materials. Print workflows default to CMYK; digital workflows default to RGB. An asset that looks identical on a design monitor can fail on upload purely due to the embedded color profile, with no visual indication that anything is wrong until the upload error appears.

    The Real Suppression-to-Recovery Timeline

    Timeline showing Amazon image suppression recovery from 0 minutes suppression through 2-3 weeks full ranking recovery

    Understanding the mechanics of suppression is one thing. Understanding how long it actually takes to recover — and what the recovery looks like in terms of real sales and ranking impact — is something sellers often underestimate until they’ve lived through it.

    The Suppression Event

    When Amazon’s automated compliance system flags a main image violation, suppression can be near-immediate. Seller reports from 2026 describe listings disappearing from search results within minutes of a compliance flag firing — sometimes during a peak sales period with no advance warning. The listing technically still exists in the catalog, but it’s been removed from search and browse indexing, which means it generates zero organic traffic until the violation is resolved.

    Amazon does not reliably send proactive notification of image suppression at the moment it occurs. Sellers who monitor their Account Health dashboard or use third-party listing management tools that poll Seller Central status will catch it faster. Sellers who check their account weekly might not notice for days — by which point they’ve lost significant revenue and the suppression may have begun affecting ranking signals.

    The Recovery Window

    Recovery timelines vary based on the type of violation and whether the case involves automated or manual review. Seller experience and 2026 guidance consistently points to three distinct scenarios:

    Fast-track recovery (15 minutes to 24 hours): Straightforward technical violations — background color, frame fill, resolution — that can be resolved by uploading a compliant replacement image. Once a valid compliant image is in the system, Amazon’s review cycle typically re-evaluates and restores the listing’s search eligibility within this window. Some sellers report restoration in under an hour for simple fixes.

    Standard recovery (24 to 72 hours): The most common outcome for most image compliance violations. After uploading a corrected image, sellers should expect to wait one to three days for Amazon to process the change, update the listing status, and allow re-indexing to propagate through search. During this window, the listing remains suppressed even though the compliant image has been submitted.

    Extended review (3 to 14 days or more): Cases that involve Amazon’s manual review process — typically triggered by content violations, suspected misrepresentation, AI disclosure issues, or repeat violations on the same ASIN — take significantly longer. These cases may require escalation through Seller Support, and the outcome isn’t always restoration without additional documentation or account-level review.

    Traffic and Ranking Recovery Lag

    Here’s the part most guides don’t cover: even after a listing is reinstated — the suppression cleared, the image accepted, the ASIN back in search results — the ranking and traffic don’t recover immediately. Data from seller experience and 2026 field reports suggests that traffic normalization takes three to seven days after reinstatement. Full ranking recovery, particularly for ASINs that were suppressed during a high-sales period or for long enough to accumulate a negative sales velocity signal, can take two to three weeks.

    This recovery lag matters because it shapes how sellers should think about the cost of suppression. The direct revenue loss during the suppressed period is the visible cost. The indirect cost — the slower organic recovery, the paid traffic required to compensate while ranking rebuilds, the potential loss of category rank position to competitors who filled the gap — is often larger than the direct loss and much harder to recover from quickly.

    How Image Violations Interact With Catalog Health

    In earlier years, image compliance was largely treated as a listing-level issue: a problem with an individual ASIN that was resolved when the image was fixed. In 2026, the relationship between image violations and broader catalog health metrics is more complex and consequential.

    The Listing Quality Dashboard Connection

    Amazon’s Listing Quality Dashboard has become an increasingly central tool for sellers managing large catalogs. The dashboard scores ASINs on attribute completeness, content quality, and compliance status. ASINs with image violations feed into this scoring in a way that wasn’t consistently present in earlier versions of the dashboard. A catalog with multiple suppressed or non-compliant images will see its aggregate listing quality score decline, which can affect how Amazon treats the catalog’s organic performance more broadly.

    Field data from July 2026 indicates that ASINs falling below a 65% attribute completeness score — a threshold that image violations contribute to — lost an average of 4.2 organic positions over a 21-day period. In regulated and competitive categories, the threshold for Buy Box suppression based on listing quality concerns appeared around the 60% mark. These numbers underscore that image compliance isn’t just about individual listing status — it’s about how your catalog signals quality and trustworthiness to Amazon’s ranking and eligibility systems.

    Account Health Rating (AHR): The Indirect Effect

    Image compliance violations don’t directly lower your Account Health Rating in the same way that policy violations, late shipment rates, or order defect rates do. AHR is driven by a distinct set of performance metrics. However, the relationship is indirect rather than absent. Repeat image violations on the same ASIN, particularly if they involve suspected misrepresentation or prohibited content rather than purely technical issues, can escalate from a listing-level suppression to a policy warning that does register in Account Health.

    More practically: a suppressed listing reduces sales velocity on affected ASINs, which can cascade into revenue-per-session metrics, conversion rate signals, and category rank position — all factors that influence how Amazon’s systems allocate organic visibility across the catalog. The account health impact is indirect but real, especially for sellers where suppressed ASINs represent a meaningful share of catalog revenue.

    Building an Operational Image Compliance Audit Workflow

    6-step Amazon image compliance audit workflow flowchart showing export, scan, flag, remediate, re-upload, and document steps

    The difference between sellers who get hit repeatedly by image suppression and those who don’t usually comes down to process — specifically, whether they have a proactive audit workflow or a reactive one. The following six-step process represents the operational standard for managing image compliance at catalog scale in 2026.

    Step 1: Export and Organize Your Catalog by ASIN

    Start with a full catalog export from Seller Central. Use the Inventory Report or the Listing Quality Report to pull your complete ASIN list with current status. Organize assets by ASIN, with each ASIN’s image URLs captured and mapped to image slot position (main image, image 2, image 3, etc.). For large catalogs, this is best handled with a spreadsheet or catalog management tool rather than manually browsing Seller Central.

    At this stage, flag any ASINs already showing a “Suppressed” or “Inactive” status for immediate priority remediation. These are the fires burning now. The rest of the audit is about finding the smoke before it ignites.

    Step 2: Batch-Scan Main Images for Technical Violations

    Run each main image through a systematic compliance check. The specific checks to prioritize are:

    • Background RGB value — Is it exactly (255, 255, 255)? Tools like Adobe Photoshop’s eyedropper, online color analyzers, or bulk image processing scripts can check this across hundreds of images efficiently.
    • Frame fill estimation — Does the product occupy approximately 85% or more of the frame? This can be checked visually in batches or with automated tools that measure non-background pixel area.
    • Resolution — Is the longest side at least 1,000 pixels (ideally 2,000+)?
    • Text and overlay detection — Are any text elements, logos, watermarks, or graphic elements present in the image?
    • Shadow and gradient audit — Do any shadows or gradients extend to the image edge, pulling the background away from pure white?

    In 2026, a growing number of sellers are using AI-assisted batch image auditing tools — either standalone software or custom scripts built around computer vision APIs — to run these checks at scale without manual image-by-image review. For catalogs under a hundred ASINs, manual review is feasible. For catalogs of several hundred to thousands of SKUs, automated scanning is the only practical approach.

    Step 3: Flag Violations by Severity

    Not all compliance issues carry the same urgency. Categorize flagged issues into three tiers:

    • Critical — Violations that will trigger or are already triggering automated suppression: non-white backgrounds, text/logo overlays on main image, missing AI disclosure metadata on qualifying assets. These need immediate remediation, measured in hours not days.
    • Warning — Violations that may not trigger immediate suppression but create risk: low resolution, borderline frame fill, shadows near the image edge. These need remediation within the current week.
    • Watch — Borderline cases or secondary image issues that don’t meet the threshold for likely suppression but represent quality concerns. Schedule for next review cycle.

    Step 4: Remediate Flagged Assets

    Remediation approach depends on the violation type. Background corrections — converting near-white backgrounds to true white — are straightforward in image editing software and can be batched efficiently. Frame fill issues require recomposing or recropping images, which may need a brief photography or editing session for products where the existing image simply doesn’t contain enough product-fill data to crop correctly without degrading quality.

    Text and overlay removal requires clean editing to preserve the underlying product image, particularly for images where the original photo file without the overlay may not be available. Watermark removal from inherited manufacturer images sometimes requires going back to the manufacturer for clean originals.

    For AI-generated people disclosure: embed the contains-synthetic-performer tag in IPTC/XMP metadata using image editing software or a metadata management tool before re-upload. This is a non-destructive process that doesn’t alter the visual content of the image.

    Step 5: Re-Upload and Monitor Status

    Re-upload corrected images through Seller Central — either individually through the Manage Inventory image editor or in bulk via flat file. After upload, monitor the listing status in Seller Central over the following 24 to 72 hours. A listing that was suppressed due to an image violation should show a status change once Amazon’s system processes the compliant replacement. If the status doesn’t change within 72 hours of uploading a compliant image, escalate through Seller Support with documentation showing the corrected image and the violation that was addressed.

    Step 6: Document Root Cause and Prevent Recurrence

    This step is the one most sellers skip, and it’s why they face the same violations repeatedly. For each remediated violation, document the root cause: where did this image come from? What process or source produced a non-compliant asset? What change is needed to prevent the same issue from recurring in future catalog additions?

    Common root causes include photography vendors who produce near-white rather than true-white backgrounds, design teams working in CMYK for A+ Content, manufacturer-provided images with embedded watermarks, and image generation workflows that produce AI people imagery without a metadata tagging step. Solving the root cause at the source prevents the same compliance review cycle from repeating every quarter.

    The Compliance Mistakes That Fly Under the Radar

    Beyond the high-profile, well-documented violations, a set of subtler compliance mistakes consistently surfaces in seller catalog audits — the kind that don’t trigger immediate suppression but create vulnerability as Amazon’s automated checks become more sophisticated over time.

    The “Looks White to Me” Trap

    Display calibration and ambient lighting conditions mean that an image appearing perfectly white on one monitor looks slightly gray on a calibrated display or in a direct color-value check. Design teams working on uncalibrated monitors or in environments with warm ambient lighting are particularly prone to this. The only reliable check is reading the actual RGB values of the background — not looking at it. Build the RGB check into your standard image QA process and remove reliance on visual judgment for background color.

    Inherited Catalog Images from Brands or Wholesale Suppliers

    Sellers who list products from multiple brands or who operate as wholesale resellers frequently rely on manufacturer-provided or brand-provided images rather than producing their own. These images were not produced for Amazon. They were produced for brand websites, print catalogs, trade shows, or retail display. They routinely have branded watermarks, color backgrounds, insufficient frame fill, or embedded logos. The listing compliance responsibility sits with the seller regardless of image source — and the catalog review cycle doesn’t care who took the photo.

    Seasonal and Promotional Overlays on Main Images

    Holiday promotional images — a product image with a “Great Gift!” badge or a “Limited Edition” holiday banner — are common in the weeks leading up to peak sales periods, particularly Q4. Sellers applying these overlays to main images are in direct violation of the no-text-on-main-image rule. Amazon’s automated checks don’t make exceptions for promotional seasons, and the suppression risk during the highest-revenue period of the year is particularly damaging. Promotional context belongs in A+ Content and Enhanced Brand Content, not the main image.

    Images Updated Elsewhere But Not on Amazon

    Sellers who maintain product imagery across multiple channels — their own website, retail partners, online marketplaces — sometimes update images on those other channels without updating Amazon separately. This most commonly happens when a product undergoes a packaging update: the new packaging goes live on the brand website, but the Amazon listing still shows the old packaging. Over time, this creates a growing gap between what Amazon shows and what the customer receives — a gap that Amazon’s cross-referencing checks are increasingly capable of detecting in regulated categories.

    A+ Content Duplicate Images

    Uploading the same images from the standard listing gallery directly into A+ Content modules is a compliance violation under Amazon’s uniqueness requirement — and it undermines the conversion purpose of A+ Content simultaneously. Build A+ assets as purpose-built module images, not repurposed versions of images already in the image carousel.

    A Practical Compliance Checklist: Run This Before Amazon Does

    The following checklist consolidates the compliance requirements covered in this guide into an actionable reference. Run this against your catalog on a regular cadence — quarterly at minimum, monthly for high-velocity or rapidly-growing catalogs.

    Main Image Checklist

    • ☐ Background is pure white: RGB (255, 255, 255) — verified by color value check, not visual inspection
    • ☐ Product fills approximately 85% or more of the image frame
    • ☐ No text, logos, watermarks, or graphic overlays present
    • ☐ No borders, vignettes, or shadows reaching the image edge
    • ☐ Longest side is at least 1,000 pixels (2,000+ recommended for zoom support)
    • ☐ Image accurately represents the product as currently sold — no outdated packaging
    • ☐ File format is JPEG, PNG, TIFF, or non-animated GIF
    • ☐ File is named with the product identifier (ASIN, UPC, or EAN) followed by the variant code
    • ☐ For categories requiring model presentation (apparel): model or ghost mannequin present

    AI Disclosure Checklist

    • ☐ Does the image contain a photorealistic AI-generated person? If yes:
    • ☐ Has the contains-synthetic-performer keyword been embedded in the file’s IPTC/XMP dc:subject metadata field before upload?
    • ☐ Has the A+ Content or video asset been similarly tagged if applicable?
    • ☐ Real people edited with AI, fictional characters, and images without people: confirm these are NOT tagged (incorrect tagging creates its own compliance signal)

    Secondary Images and A+ Content Checklist

    • ☐ A+ Content images are in JPEG, PNG, or BMP format — not CMYK, not animated GIF
    • ☐ A+ files are under 2 MB each
    • ☐ A+ images are unique to A+ — not duplicated from the standard image carousel
    • ☐ No QR codes, hyperlinks, or pricing/promotional claims embedded in A+ images
    • ☐ Secondary images don’t include unsubstantiated performance claims or prohibited regulatory statements
    • ☐ Secondary images accurately represent the product (no bundle implication for single-unit listings)

    Conclusion: Compliance as a Proactive Discipline, Not a Reactive Fix

    Amazon’s 2026 image compliance environment is more automated, more integrated with catalog health scoring, and more consequential than most sellers have historically treated it. A listing that goes dark due to a background color check failing is a solvable problem. A catalog where multiple ASINs have accumulated image compliance risk, where suppression events have quietly accumulated ranking damage over weeks, and where new creative workflows are producing AI-generated imagery without proper disclosure metadata — that’s a structural problem that doesn’t resolve itself when you fix one image.

    The July 2026 AI synthetic performer disclosure requirement is the clearest signal that Amazon’s image compliance framework is no longer just about technical image quality. It now intersects with regulatory law, content authenticity, and buyer transparency in ways that require creative teams, catalog managers, and compliance functions to coordinate in ways they previously haven’t had to.

    The sellers who are least affected by image compliance enforcement are the ones who treat it as a proactive, recurring operational discipline rather than a problem they address after Seller Central flags them. That means scheduled catalog audits, documented image quality standards for every creative source in the workflow, root-cause remediation for violations rather than just fixing the symptom, and a clear internal process for new content types — including AI-generated imagery — that builds compliance into the creation step rather than bolting it on at the end.

    Suppression will happen. Amazon’s systems catch things that human QA processes miss. The goal isn’t to eliminate every possible compliance event — it’s to catch them yourself first, fix them faster when they do occur, and prevent the same root causes from generating the same violations repeatedly across your catalog.

    The core principle is straightforward: compliance isn’t what you do when Amazon catches you. It’s what you build into the workflow so that Amazon’s check is a confirmation, not a surprise.

  • What Rufus Actually Sees When It Looks at Your Listing Images

    Most Amazon sellers still treat their listing images as marketing assets — pictures you design to persuade a human shopper to click “Add to Cart.” That mental model made perfect sense for the first twenty years of the platform. The shopper scrolled, the image caught their eye, the bullet points closed the sale.

    Rufus changed that equation. Not slowly, not partially — fundamentally. Amazon’s AI shopping assistant now sits between your listing and millions of shoppers, answering questions, making comparisons, and surfacing recommendations based on what it can understand about your product. And what it can understand increasingly comes from your images, not just your text.

    The problem is that most sellers have no clear picture of what Rufus actually extracts from a product photo. They know vaguely that “images matter for AI” — but that’s like knowing vaguely that “keywords matter for SEO.” Without understanding the mechanism, you’re guessing at best and optimizing backwards at worst.

    This article is about the mechanism. Specifically: the three-layer system Rufus uses to read product images, what it successfully extracts from each image type in your gallery, where it fails completely, and the image-text alignment signal that the vast majority of sellers are leaving on the table right now. The goal isn’t a generic “optimize your images” checklist — it’s a clear-eyed look at what the system actually does so you can make decisions with real information.

    One important framing note before diving in: Amazon has not published a full technical specification for how Rufus processes product images. What follows is built from Amazon’s own public disclosures, AWS engineering documentation, and the consistent findings of practitioners who have tested Rufus behavior across categories. Where the evidence is directional rather than definitive, that’s noted explicitly.

    Amazon Rufus AI scanning and analyzing a product listing page on a smartphone, with data extraction callouts showing OCR text detection, use-case context, and product attributes

    The Three-Layer System Rufus Uses to Read Images

    Rufus doesn’t look at your product photos the way a shopper does. It doesn’t perceive beauty, style, or visual appeal in any human sense. Instead, it runs your images through a layered technical pipeline designed to extract structured information — the kind of information that can be matched against a shopper’s query in milliseconds.

    That pipeline has three distinct layers, and understanding each one is the foundation for everything that follows.

    Layer 1: Computer Vision

    The first pass is object and scene recognition using computer vision models. These models look at the raw pixel data in your image and answer a set of foundational questions: What category of object is this? What are its visual properties — color, shape, material, form factor? Is this a product in isolation or a product in context? What scene elements are present around the product?

    Computer vision at this stage is doing classification work. It’s mapping what it sees to a category taxonomy — “this is a blender, specifically a countertop blender, likely in the personal-use segment based on size.” It’s also reading visual attributes that may not be written anywhere in your copy: the color is matte black, not glossy; the form factor is compact, not full-sized; the material appears to be stainless steel on the base.

    For sellers, the practical implication here is that your product’s visual identity needs to be unambiguous. If the computer vision layer can’t confidently classify what it’s looking at — because the image is low-resolution, cropped awkwardly, or cluttered with props — the signals it generates downstream are weaker. Garbage in, garbage out applies just as much to AI image processing as it does to data pipelines.

    Layer 2: OCR (Optical Character Recognition)

    The second pass is text extraction. Amazon’s system reads text that appears directly inside your images — including labels, feature callouts, ingredient lists, certifications, specification overlays, size charts, and any other written content you’ve embedded in the image itself.

    This is a critically underappreciated signal. Sellers spend enormous effort writing their bullet points and title, but many of them embed completely separate text inside their infographic images — text that Rufus reads independently and uses when forming answers to shopper questions. If your infographic says “BPA-free, dishwasher safe” but your bullets don’t include that phrase, Rufus may still surface that claim when a shopper asks about material safety. Conversely, if your infographic text is too small, uses a decorative font, or has low contrast against the background, the OCR layer may miss it entirely.

    The practical upshot: every word you put inside an image is potentially being read by a machine, not just a human. Design your image text for OCR legibility, not just visual appeal.

    Layer 3: Vision-Language Models (VLMs)

    The third and most sophisticated layer is where image content and language meaning get fused. Vision-language models take the outputs of computer vision and OCR and combine them with the broader context of your listing — the title, bullets, A+ content, reviews, Q&A — to build a unified semantic understanding of what this product is, what it does, and what kinds of shopper intents it’s relevant to.

    This is the layer that allows Rufus to answer questions like “Would this work for a dorm room?” or “Is this a good gift for a teenage girl who likes fitness?” — questions that have no direct keyword match in your listing. The VLM infers the answer by reading all available signals together, including visual context from your lifestyle images, OCR text from your infographics, and natural-language content from your copy.

    Infographic diagram showing Amazon Rufus multimodal AI stack with computer vision, OCR engine, and vision-language model layers feeding into a shared embedding space for product matching

    The Shared Embedding Space: Why Images and Text Become the Same Thing

    The concept that ties all three layers together is the shared embedding space. It’s also the reason why “images are treated as data” isn’t just a metaphor — it’s a description of what literally happens inside the system.

    In a traditional keyword-matching system, images and text live in separate worlds. Text is searchable; images are visual assets. They contribute to different parts of the shopping experience but don’t interact at a machine-readable level.

    In a multimodal AI system like Rufus, that separation disappears. Both images and text are converted into numerical vectors — long lists of numbers that represent semantic meaning in a high-dimensional space. The key is that images and text are encoded into the same space, using models trained specifically to align the two modalities. This means that a product photo of a blue waterproof hiking jacket and a shopper query for “outdoor gear that can handle heavy rain” can be directly compared by their vector positions — no keyword match required.

    What This Means for Product Discovery

    The shared embedding space changes the discovery problem for sellers fundamentally. In a keyword world, your listing surfaces when a shopper types a phrase you’ve indexed for. In an embedding world, your listing surfaces when the overall semantic meaning of your content — including visual content — is close to the shopper’s intent vector.

    That means a listing with strong, context-rich images can surface for queries that its text never explicitly addresses. A fitness supplement that shows lifestyle images of early-morning gym sessions might rank for “motivation gifts for gym-goers” without that exact phrase appearing anywhere in the copy. The visual context contributes to the semantic vector, which then competes in the same space as the shopper’s intent query.

    Conversely, a listing with weak or generic images — plain white-background shots with no contextual information — contributes almost nothing to the semantic vector beyond the basic product classification. It can only compete on the strength of its text, which is a narrower and more crowded competitive space.

    Why 250 Million Users Makes This Matter Right Now

    Rufus had more than 250 million customer interactions in the past year, with monthly active users up 140% year-over-year and interactions rising 210% over the same period. Shoppers who engage with Rufus during a shopping session are 60% more likely to complete a purchase. Sensor Tower analysis puts the conversion multiplier for heavy Rufus users even higher — approximately 2.74 times the rate of non-Rufus shoppers.

    These aren’t fringe users — they’re your highest-intent buyers. And they’re increasingly making their purchase decisions based on how well Rufus can answer their questions about your product. If your images aren’t giving Rufus enough to work with, you’re underperforming exactly where conversion matters most.

    What Rufus Extracts From Your Main Image

    The main image is the first thing Rufus processes from your listing, and it has a specific and limited role in the system. Understanding that role clearly prevents a common mistake: trying to make the main image do too many jobs.

    Split-screen comparison showing what Rufus extracts from a clean white-background main product image versus what it misses in a cluttered lifestyle shot with no text overlays

    The Main Image Is a Classification Signal

    Rufus uses your main image primarily for confident product classification. The white background requirement that Amazon enforces isn’t just about visual consistency in search results — it’s also algorithmically useful. A product photographed cleanly on white gives the computer vision layer a clear, unambiguous subject to classify. No distracting background elements, no competing objects, no contextual noise to parse around.

    What the system extracts from a well-shot main image includes: the product category (with high confidence), dominant color attributes, approximate size relative to the frame, form factor, and primary material signals from surface texture and finish. It also reads the product’s label or packaging if one is visible — which is particularly important for consumables, supplements, or branded hardware.

    What the Main Image Cannot Do Alone

    The main image tells Rufus what the product is. It tells the system almost nothing about who it’s for, how it’s used, what problems it solves, or what makes it different from similar products. Those are the signals that matter for intent-matching — the kind of shopper questions Rufus is most commonly asked.

    This is why sellers who invest heavily in a single, beautiful hero image but neglect secondary images are leaving most of Rufus’s analytical capacity unused. The hero image fills the classification role. Everything else — use-case matching, feature communication, compatibility confirmation, comparison differentiation — has to come from the secondary gallery.

    Main Image Best Practices for AI Readability

    Amazon’s policy requirements and AI readability requirements are largely aligned for the main image. Keep the background pure white (RGB 255,255,255 — not off-white or grey). Fill 85% or more of the image frame with the product. Show the product in its primary orientation. If labels or text are visible on the product itself, make sure they’re facing the camera and legible — that text may be extracted by OCR and used as a product identifier.

    Avoid angles that obscure key product features. A slightly oblique angle that shows both the front face and a side profile often gives the computer vision model more attribute data than a pure front-on shot — though this varies by category. For products where size is a critical purchase signal (bedding, furniture, luggage), shoot the main image at an angle that communicates scale, even without explicit measurement overlays.

    What Rufus Extracts From Secondary Images

    Secondary images are where the real Rufus optimization work happens. This is where you control the depth of semantic information Rufus has access to about your product — and where most sellers are significantly under-optimizing.

    Each image type in a well-structured gallery serves a different function in the AI’s understanding. Let’s walk through what each one contributes.

    Infographic diagram showing the ideal Amazon image slot strategy for Rufus AI, with six labeled slots for infographic, lifestyle, size/scale, comparison chart, close-up detail, and in-box accessories images

    Infographic Images: The OCR Workhorse

    Infographic images are the highest-value image type for Rufus’s OCR layer. They’re explicitly designed to contain readable text — feature callouts, specification values, certification logos, material claims, and usage instructions. When Rufus receives a shopper query about product specifications or features, the answers it generates can be grounded in the text it extracted from your infographic images.

    The design rules that matter for OCR success are more specific than most sellers realize. Text should be rendered in a clean, sans-serif font at a minimum effective size of 16 pixels in the final uploaded image (at Amazon’s recommended resolution of 1,000px or above per side). High contrast between text and background is non-negotiable — white text on a dark background or dark text on white performs significantly better than text placed over gradient overlays, product photography, or patterned backgrounds.

    Feature callouts should be explicit and specific rather than vague. “Ultra-light: 1.2 lbs” is far more useful to Rufus than “Lightweight design.” The system can extract a specific numerical claim and use it to answer “how heavy is this?” with confidence. A vague adjective gives it nothing anchored to match against.

    Certification logos deserve particular attention. If you display an FDA registration badge, a UL certification mark, an organic certification seal, or similar credentials in your infographic, the combination of OCR (reading any accompanying text) and object recognition (identifying the certification logo’s visual form) can help Rufus answer trust and compliance questions — the kind of questions that matter enormously in health, baby, pet, and food categories.

    Lifestyle Images: Use-Case and Audience Signals

    Lifestyle images serve the vision-language model’s context inference function. When a shopper asks Rufus “Is this good for outdoor use?” or “Would this work for a college student?” — questions about who uses the product and in what setting — the system draws heavily on what it can infer from lifestyle imagery.

    The computer vision layer reads the scene: what environment is this? Indoor or outdoor? Kitchen, bedroom, gym, office, camping? What kind of person appears in the image, and what are they doing with the product? These visual signals combine with your text to build what might be called a contextual fingerprint — a semantic representation of the product’s use case and audience that Rufus uses when matching against intent-based queries.

    Lifestyle images work best when they’re specific rather than aspirational. A product shot in a minimalist studio with soft lighting conveys almost no contextual information. The same product photographed on a trail, in a kitchen, on a workbench, or at a child’s birthday party conveys an enormous amount of scene data that enriches Rufus’s understanding of where and how the product belongs in a shopper’s life.

    One practical implication: for products that span multiple use cases, consider dedicating separate lifestyle images to each distinct context. A versatile bag might warrant one lifestyle shot in a gym setting, one in an office environment, and one on a weekend trip. Each image contributes a different contextual signal that can help Rufus surface the listing for a wider range of intent queries.

    Size and Scale Images: The Compatibility Layer

    Size and compatibility questions are among the most common queries Rufus handles. “Will this fit in a standard kitchen cabinet?” “Is this big enough for a queen bed?” “Can I fit this in my carry-on?” These questions cannot be answered by copy alone — shoppers often don’t read measurement specs, and when they do, they struggle to translate abstract numbers into spatial reality.

    Scale reference images solve this problem for both shoppers and Rufus simultaneously. An image showing the product next to a common reference object — a hand, a coin, a standard household item — gives the computer vision model enough comparative data to infer relative size with reasonable confidence. A mattress protector photographed on an actual made bed gives both the human shopper and the AI system an intuitive sense of coverage. A lunch bag shown next to a typical laptop communicates workspace compatibility far more effectively than any measurement table.

    Dimension overlay images — those that show the product with measurement lines and explicit numerical dimensions — combine size communication with OCR-readable data in the most machine-friendly format. The numbers are extractable as text, and the product outline provides the spatial context that gives those numbers meaning. For furniture, storage, and any product where fit is a purchase prerequisite, these images are among the most Rufus-effective assets you can create.

    Comparison Images: Differentiation Signals

    Comparison images — typically formatted as feature-versus-feature grids comparing your product to a category-generic “standard” alternative — are the most direct way to communicate competitive differentiation to Rufus’s vision-language model.

    When a shopper asks “What’s the difference between this and a regular [product]?” or “Why is this better than similar products?”, Rufus needs differentiation data to form a useful answer. If that data exists only in your copy as general marketing language (“superior quality,” “advanced formula”), it gives the VLM very little to work with. But if it exists in a structured visual comparison table with specific attribute names and explicit checkmarks or values, the system has clean, extractable differentiation signals it can actually use.

    The most effective comparison images are category-specific rather than generic. Don’t compare against a vague “standard version” — compare against the actual attribute dimensions that matter in your category. For an air purifier, those might be CADR rating, coverage area, noise level, and filter replacement cost. For a skincare product, they might be active ingredient concentration, fragrance-free status, dermatologist testing, and cruelty-free certification. The more specific the attribute list, the more useful the comparison image is as an AI signal.

    Image-Text Alignment: The Signal Most Sellers Don’t Know They’re Missing

    If there’s one concept in this article that should change how you think about your listing, it’s image-text alignment. It’s not glamorous, it’s not a new image format, and it doesn’t require a design overhaul — but it’s likely the highest-leverage optimization available to most sellers right now.

    Diagram showing image-text alignment for Amazon Rufus AI, with a green checkmark for high-confidence signal when image text, bullet points, and A+ content all say the same thing, and a red warning for low confidence when they conflict

    What Alignment Actually Means

    Rufus doesn’t evaluate your images and your listing text as separate inputs that are independently scored. It processes them together, and one of the things it’s assessing — implicitly — is consistency. When the same claim appears in your image text, your bullets, and your A+ content, the system has high confidence that this claim is true and central to the product. When a claim appears only in one place — say, only in an infographic image and nowhere in the copy — the system has lower confidence and is less likely to surface that claim when answering a shopper’s question.

    This means that every important product claim you make in an image should also appear somewhere in your listing text, and vice versa. Not word-for-word identical — search engines and AI systems alike are sophisticated enough to recognize semantic equivalence — but substantively consistent. “BPA-free” in an image badge should have a corresponding “free from BPA” or “made without BPA” in the bullets. A “lifetime warranty” infographic callout should have a warranty statement in the product description or A+ content.

    The Confidence Signal Framework

    Think of it as a confidence signal framework. Rufus is essentially running a fact-checking process across your listing’s multiple content layers. Each place a claim appears — image OCR, bullet copy, A+ text, Q&A, reviews — is a vote that the claim is true and attributable to this product. More votes equal higher confidence. Higher confidence means a greater likelihood of that claim being surfaced in a Rufus answer when a shopper asks a relevant question.

    Sellers who accidentally create discrepancies — say, an image that shows “ships in 24 hours” as a callout when that’s no longer accurate, or a size chart in an image that doesn’t match the specification table in the A+ module — are actively hurting their alignment score. Rufus isn’t just aggregating your signals; it’s assessing their consistency. Conflicting signals degrade confidence, and degraded confidence means your product is less likely to be cited as a confident answer to shopper questions.

    The Alignment Audit Most Sellers Have Never Done

    Practically, this means performing a cross-reference audit of your listing: for each claim in your images, verify it appears in your text. For each key claim in your text, verify it’s visually supported somewhere in your gallery. For products where specific technical specifications are central to the purchase decision — dimensions, weight, capacity, compatibility, certifications — verify those numbers are consistent across every place they appear.

    This audit is particularly important after any listing update. If you update your bullets but forget to update an infographic image that references old specifications, you’ve introduced a misalignment that Rufus may interpret as conflicting information — and in any AI system trained to distrust conflicting signals, that’s a problem worth fixing immediately.

    A+ Content and Brand Story as Machine-Readable Visual Systems

    A+ Content has always been valuable for conversion — richer imagery, better storytelling, and a more polished brand presentation all improve the shopper experience. But in the Rufus era, A+ modules also function as machine-readable data inputs, and that changes how they should be designed and written.

    What Rufus Can Access in A+ Modules

    Based on publicly available evidence and practitioner testing, Rufus appears to read both the text content and, to varying degrees, the visual content of A+ modules. The text is clearly the higher-confidence signal — module headlines, body copy, and comparison charts in text format are reliably extractable and indexable. The images within A+ modules are subject to the same visual processing described earlier: computer vision for scene and object recognition, OCR for embedded text, and VLM for contextual inference.

    A key practical point: Amazon has been moving toward AI-generated image descriptions for A+ content in certain markets, reducing seller control over what text is associated with A+ images in the system. This makes the text content of A+ modules — the module headlines, body paragraphs, and comparison tables — more important as a reliable signal source than any single image within those modules.

    Brand Story as Entity Data

    Brand Story modules are increasingly worth thinking about as entity data inputs rather than just branding exercises. The brand name, founder context, origin story, and brand mission that you express in the Brand Story module contribute to Rufus’s understanding of the brand entity behind your product — which becomes relevant when shoppers ask brand-comparison questions or want to know about the company before purchasing.

    For brand-sensitive categories — personal care, supplement, pet food, baby products — shoppers increasingly ask Rufus questions that are more about brand trust than product specs. “Is this brand reputable?” “Is this made in the USA?” “Is this a family-owned company?” Strong Brand Story content that addresses these trust vectors can help Rufus formulate more confident, affirmative answers to brand-level questions, which in turn affects purchase decisions by the high-intent shoppers most likely to convert.

    Module Structure Matters for Machine Readability

    When building or updating A+ modules, prioritize machine-readable structure alongside visual appeal. Use comparison chart modules with explicit column headers and numerical values rather than purely visual feature grids. Write module headlines that contain the specific product claim, not just a creative brand line. A headline that reads “Filters out 99.97% of Airborne Particles” is OCR-extractable and gives Rufus a specific, citable claim. A headline that reads “Breathe Better. Live Better.” gives it essentially nothing to work with as structured data.

    What Rufus Cannot Read — And What to Do About It

    Knowing what the system can extract is only half the picture. Knowing where it fails is equally important — because designing around those failure points prevents you from inadvertently hiding your most important product information behind visual elements that Rufus simply cannot process.

    Visual diagram showing what Rufus cannot read in Amazon listing images, including decorative fonts, low-contrast text, tiny specs, watermark logos, and dark images with poor visibility

    Decorative and Script Fonts

    OCR models are trained primarily on standard typefaces — the kinds of fonts used in books, documents, and product labels. Highly stylized script fonts, handwritten-style typefaces, and heavily distorted decorative lettering are consistently problematic for OCR extraction. If your brand uses a signature script logo font for display purposes, that’s fine — but don’t put critical product information in that font. Any specification, claim, or feature you need Rufus to read should be in a clean, readable sans-serif or serif typeface.

    Low-Contrast Text Overlays

    Text placed over product photography — particularly text over complex, multi-toned backgrounds — is a consistent OCR failure point. The model needs clear contrast to distinguish letterforms from background pixels. White text over a light product photo, or dark text over a shadowed background, degrades OCR accuracy dramatically. Even text placed inside colored badges or boxes can fail if the contrast ratio falls below the threshold the model requires.

    The practical rule: before uploading any image with text, view it in grayscale. If the text is difficult to read in grayscale — where only contrast, not color, distinguishes it from the background — it will likely fail OCR extraction. A contrast ratio of at least 4.5:1 (the WCAG AA standard for accessible text) is a useful target for OCR-readable image text.

    Very Small Text

    The minimum legible text size for reliable OCR in product images is typically around 16 pixels in the rendered image at Amazon’s resolution requirements. Many sellers pack dense specification tables or ingredient lists into their infographic images at much smaller text sizes — readable to a human looking at the original file, but below the OCR threshold when processed at scale by an AI system. If you include detailed specification tables or multi-ingredient lists in your images, make sure the text is large enough to survive machine extraction, not just human reading.

    Text Embedded in Video Thumbnails

    While video content is increasingly supported in Amazon listings, Rufus’s current image processing pipeline targets static images. Text and information that exists only in a video — including video thumbnails where text appears as part of the frame — is generally not extractable by the same OCR and computer vision systems that process your product gallery images. Any claim that’s important enough to appear in a video should also appear in your static image gallery and listing copy.

    Implicit Claims Without Visual Evidence

    Rufus’s VLM layer is sophisticated, but it’s not telepathic. If you claim your product is “the most durable option on the market” but your images show no evidence of durability testing, material quality, or construction detail, the system has no visual grounding for that claim. Abstract superiority claims that lack any visual support signal low confidence — the VLM can note that the claim exists in the text, but without corroborating visual evidence, it won’t cite it confidently when a shopper asks about durability. Close-up material shots, drop-test imagery, or certification badges provide the visual grounding that makes durability claims credible to both humans and AI.

    The Image Slot Strategy: A Framework for Each Position

    Amazon allows up to nine image slots per listing — the main image plus eight secondary slots. Most sellers fill these on an ad hoc basis, uploading whatever images they have available. A deliberate, purpose-built slot strategy can significantly increase the depth of AI-readable signal your listing contains.

    Here’s how to think about each position in terms of what it contributes to Rufus’s understanding.

    Position 1 (Main Image): Classification and Trust

    As discussed, the main image’s job is confident product classification and initial trust signaling. Clean, well-lit, compliant white background. Product fills 85%+ of the frame. Any visible labels, logos, or packaging text should be forward-facing and legible. No competing products, no props, no text overlays. If your product has a clearly recognizable brand mark or certification badge visible on packaging, make sure it’s readable in the shot.

    Position 2: The Feature Infographic

    Position two is your OCR anchor — the image that gives Rufus the most direct, readable text-based product data. Lead with your three to five most important feature claims, each stated as a specific, quantified assertion. Include any certifications or compliance marks. Use clean sans-serif typography at large scale. The background can be brand-colored as long as text contrast remains high. This image should directly mirror the most important content in your top three bullet points.

    Position 3: Primary Lifestyle Image

    Position three establishes use context. Show the product in its primary use scenario — the setting, the user archetype, and the action. Make the context specific enough to answer “who is this for?” and “where does this get used?” without text labels if possible. If your product spans age groups or demographics, show your primary audience clearly. The VLM will extract scene, demographic, and context signals from this image that contribute to intent-matching.

    Position 4: Size, Scale, or Compatibility Reference

    Size and compatibility questions are perennial high-volume Rufus queries. Position four should directly address the “will this fit?” question for your category. This might be a dimension-overlay shot with measurement callouts, a scale comparison with a common object, or a compatibility demonstration (e.g., the bag fitting in an overhead compartment, the shelf bracket mounted on a standard stud wall). Make the measurement numbers large and OCR-readable if they appear in the image.

    Position 5: Comparison or Differentiation Image

    Position five is where you answer “why this instead of that?” A structured comparison grid with specific attributes and explicit values gives Rufus differentiation signals it can cite when answering comparison questions. Avoid marketing language in comparison tables — use specific, verifiable attributes that a shopper could independently confirm. This image type directly supports the consideration-stage shopper behavior that Rufus interactions tend to reflect.

    Position 6: Close-Up Detail or Material Image

    Material and construction quality are visual claims that text struggles to communicate credibly. A close-up of stitching, weave, surface finish, joint quality, or ingredient texture provides both human reassurance and computer vision material signals. This image tells Rufus’s classification model something about the product tier — premium materials have recognizable visual signatures that the model can distinguish from budget alternatives in the same category.

    Positions 7–9: Supporting Evidence

    Remaining slots can carry: secondary lifestyle images in different use contexts, in-box accessory shots (which answer “what do I get?” — a common Rufus query), packaging detail images, or secondary specification infographics. The principle is the same throughout: each image should serve a clear informational function, contribute text or context that Rufus can extract, and align with what your listing copy says about the same topic.

    Testing Whether Rufus Is Actually Reading Your Images

    Given that Amazon has not published a diagnostic tool for Rufus image indexing, sellers need to do their own testing. The methodology is straightforward and replicable.

    Four-step flowchart showing how sellers can test whether Rufus is reading their Amazon listing images, with a mobile phone mockup showing a Rufus chat interface and a 60% purchase completion stat callout

    The Image-Only Claim Test

    Identify a specific claim that appears only in one of your images — not in your bullets, title, or A+ text. It should be something a shopper might plausibly ask about. For example, if your secondary infographic shows “compatible with iOS and Android” but your copy only says “smartphone compatible,” use the more specific claim as your test case.

    Open the Amazon app on a mobile device, navigate to your listing, and open Rufus by tapping the chat icon. Ask a natural-language question that can only be correctly answered using the image-specific claim: “Does this work with iPhones specifically?” If Rufus correctly references iOS compatibility (which you haven’t stated in text), the image claim is being extracted. If it says “smartphones” generically, the image text is likely not being parsed — or not being parsed with enough confidence to use as a citation.

    The Context-Only Query Test

    For lifestyle images, test scene inference. If you have a lifestyle shot showing the product being used in a kitchen during meal prep, ask Rufus: “Is this good for cooking-related tasks?” or “Would someone who cooks a lot find this useful?” Rufus should be able to draw on the visual context of the lifestyle image to form a more affirmative and specific answer than it could from text alone. Vague or generic answers suggest the lifestyle imagery isn’t contributing meaningfully to the VLM’s context modeling.

    The Consistency Test

    Ask Rufus the same question twice using slightly different phrasing — once in a session where you’ve just viewed the product page, once without having viewed it. Compare the answers for consistency and specificity. Inconsistency may indicate that Rufus is drawing on different evidence sources (sometimes text, sometimes images) rather than a coherently integrated understanding of your listing.

    Iteration Based on Test Results

    If your tests reveal that Rufus isn’t surfacing information from a specific image, the most likely causes are: text is too small or low-contrast to OCR successfully, the claim is not reinforced anywhere in listing text (low confidence signal), the image quality is insufficient for reliable computer vision processing, or the content is embedded in a format the pipeline doesn’t read (video, A+ image with no text, decorative graphic).

    Fix the most likely cause, wait 48–72 hours for indexing, and retest. This iterative approach — not a one-time image overhaul — is how you progressively improve your Rufus signal quality over time. Track which image changes correlate with changes in Rufus answer quality and adjust your image strategy accordingly.

    The Mobile-First Reality of Rufus Image Processing

    One dimension of Rufus image optimization that deserves its own attention is the mobile context. Rufus is primarily a mobile experience — the shopping assistant is integrated into the Amazon app, and the overwhelming majority of Rufus interactions happen on smartphones rather than desktop browsers.

    This has direct implications for image design. Images that look polished and readable on a 27-inch monitor may be nearly illegible on a 6-inch phone screen at standard resolution. Text overlays sized for desktop viewing can shrink to unreadable scales in the mobile thumbnail view. Infographic layouts designed for horizontal viewing may lose critical information when rendered in mobile’s portrait orientation.

    Design for the Smallest Screen First

    The most practical mobile-first rule for Rufus image optimization is to view every image on an actual smartphone screen before uploading it. Specifically, view it in the Amazon app’s product gallery — not just in a browser preview. Text that’s large enough to read easily on your desktop becomes your quality threshold only if it’s also legible on mobile. If anything is unclear at mobile size, it’s not effectively contributing to Rufus’s OCR extraction.

    This is particularly critical for infographic images that try to communicate many features simultaneously. Dense, multi-column infographics optimized for desktop can collapse into unreadable noise at mobile scale. A better mobile-first infographic strategy is fewer claims per image, larger text, and higher contrast — trading density for readability. You have multiple image slots; use them rather than trying to cram everything into a single complex graphic.

    Vertical Composition for Portrait Viewing

    While Amazon specifies square (1:1) or near-square image aspect ratios for the main image and most secondary positions, the composition within that square matters for mobile readability. Important text overlays should be centered or in the upper third of the frame, where they’re least likely to be obscured by UI elements in the mobile app. Product images where the key visual subject is in the frame’s corners or extreme edges tend to perform worse at mobile thumbnail size.

    Your Listing Images Are Now Product Data — Here’s How to Treat Them That Way

    The most important reframe that comes out of understanding how Rufus reads images is this: your product photography budget and your content strategy budget are now the same budget. You’re not buying pictures — you’re creating machine-readable structured data that happens to be encoded as visual files.

    That reframe has practical consequences for how sellers should approach image production, quality control, and ongoing optimization.

    Information Architecture Before Visual Design

    Historically, the creative brief for a product photoshoot started with aesthetics — mood, color palette, lifestyle setting, brand feel. Those elements still matter for human conversion, but in a Rufus-era listing, the brief should start with information architecture. What specific questions does each image need to answer? What text does it need to contain for OCR extraction? What scene context does it need to establish for VLM inference? What claim does it need to visually substantiate?

    Once the informational requirements are clear, the visual design fills in around them — not the other way around. This shift doesn’t make your images less beautiful; it makes them more purposeful. An image that’s both visually compelling and machine-readable is better than an image that’s only one of those things.

    Version Control for Image Assets

    Because images now carry semantic data that Rufus indexes, they need the same version control discipline as your listing copy. When you update a product formulation, specification, or compatibility claim, the update has to propagate to three places simultaneously: your bullets, your A+ content, and your images. Missing one creates the misalignment problem described earlier, which degrades Rufus’s confidence in your claims.

    Sellers managing catalogs of dozens or hundreds of SKUs should build image versioning into their listing management workflow. Know which image file contains which claims, maintain a spec document that maps image content to listing text, and run an alignment check whenever any product attribute changes. Treating images as living data assets — not static visual files — is the operational shift that separates sellers who benefit from Rufus’s multimodal understanding from those who don’t.

    The Competitive Opportunity Right Now

    It’s worth being clear-eyed about where most sellers are in this transition. The majority are still operating on the old mental model — images as marketing assets, optimized for human eyeballs, with no systematic attention to what an AI system can or can’t extract from them. That gap is an opportunity.

    Sellers who invest now in AI-readable image architecture — proper text contrast, OCR-legible infographics, purposeful lifestyle context, tight image-text alignment, and full slot utilization — are building a position that will compound as Rufus usage continues to grow. The 140% year-over-year increase in Rufus monthly active users isn’t a plateau; it’s an adoption curve in progress. The sellers who figure out how to feed Rufus good signal today will be the ones whose listings surface most reliably as that curve continues upward.

    Conclusion: Stop Designing for Eyes and Start Designing for Inference

    Rufus reads your listing images the way a data scientist reads a dataset — looking for structured, consistent, extractable information that can be used to answer specific questions. It doesn’t experience visual appeal. It doesn’t respond to brand aesthetics. It doesn’t reward elaborate creative concepts that don’t translate into extractable signal.

    What it does reward is clarity. Specific, readable, well-contrasted text in your infographics. Scene-specific, purposeful lifestyle shots that answer “who is this for and where do they use it?” Size and scale references that answer “will this fit?” Comparison structures that answer “why this instead of that?” And — critically — consistent alignment between what your images say and what your listing text confirms.

    The three-layer system — computer vision, OCR, and vision-language models — gives Rufus the ability to read your product gallery as a richly structured document. Whether it actually gets that richness depends entirely on how well you’ve designed the document. Most sellers right now are handing Rufus a blurry, inconsistent, information-sparse document and wondering why Rufus doesn’t mention their product in the answers that matter.

    Start with the audit: pull up each of your listings and ask what a machine would extract from each image, what claims it could cite with confidence, and where the gaps between your images and your copy create uncertainty. Then fix the highest-impact gaps first — typically image text legibility and image-bullet alignment — before moving to the more granular optimizations.

    Rufus processes your images every time a shopper asks a question about your category. The question is whether your images are giving it something worth saying.

    Key Takeaways:

    • Rufus uses computer vision, OCR, and vision-language models in a three-layer pipeline to extract structured data from every image in your product gallery.
    • The main image’s job is product classification and trust — not feature communication. Feature communication happens in secondary slots.
    • OCR-readable infographic text is among your highest-leverage Rufus signals. Design for contrast, font clarity, and specific quantified claims.
    • Lifestyle images contribute use-case and audience context to the vision-language model. Specific scene context outperforms generic aspirational aesthetics.
    • Image-text alignment — the consistency between what your images say and what your copy confirms — directly affects how confidently Rufus cites your product’s claims.
    • Identify what Rufus cannot read (decorative fonts, low-contrast text, tiny specs, video-only content) and ensure those claims appear in extractable text formats elsewhere in your listing.
    • Test your listings directly through Rufus using image-only claim queries and context-only queries to verify what’s being extracted and what isn’t.
    • Treat your image production as a data architecture exercise, not just a creative one. Information structure first, visual design second.
  • Why Orchestration Is Now the Enterprise Software Stack — Not Just a Layer On Top of It

    Why Orchestration Is Now the Enterprise Software Stack — Not Just a Layer On Top of It

    Enterprise AI orchestration layer diagram showing the orchestration control plane connecting memory, MCP tool access, A2A agent coordination, and governance layers

    For the past three years, the enterprise AI debate has been almost entirely about models. Which model is best? Which vendor do you trust? How do you fine-tune? How do you keep costs down per token?

    That debate hasn’t disappeared — but it’s being quietly overtaken by a different question, one that matters far more to the teams actually trying to run AI at scale: how do you coordinate everything the model touches?

    The answer, increasingly, is orchestration. And in 2026, that word no longer means what it used to mean. It no longer describes a scheduling layer, a workflow tool, or a category of middleware you bolt onto an existing SaaS stack. Orchestration has moved to the center of the architecture. It has become the control plane — the runtime engine that sequences agents, manages state, enforces governance, routes tool calls, and decides when a human needs to step in.

    This is a structural shift, not a product update. The architecture itself has inverted. Where enterprises once built around applications and used orchestration to connect them, they are now building around the orchestration layer and treating applications as components beneath it. That’s a different operating model, a different vendor map, and a different set of failure modes to manage.

    This piece lays out exactly how that inversion has happened, what the new stack actually looks like layer by layer, which protocols and frameworks are doing the real work, where things break in production, and what it means for teams making architecture decisions right now.


    The Architecture That Broke First

    To understand why orchestration is ascendant, it helps to understand what it is replacing — and specifically, where the previous model started failing.

    The enterprise software stack that emerged from the 2010s was fundamentally application-centric. You bought point solutions: a CRM for customer data, an ERP for operations, a BI tool for reporting, a workflow automation platform to string together approvals, an analytics layer to make sense of outputs. Each tool owned a domain. Integrations happened at the edges — via APIs, webhooks, ETL pipelines, and increasingly, iPaaS platforms that tried to paper over the gaps.

    It worked well enough when the work was structured, predictable, and domain-contained. A sales rep triggers a contract process; a webhook fires; the CRM updates; an email goes out. Linear, deterministic, auditable.

    Where the Model Breaks Down

    The cracks appear the moment you try to do something that doesn’t fit neatly inside one domain’s boundary — which is almost everything interesting. A customer support escalation that requires pulling order history, checking inventory, applying a discount policy, drafting a response, and logging the outcome is not one system’s job. It crosses five systems, requires contextual judgment at multiple steps, and takes a human fifteen minutes if done manually.

    Early AI attempts at this problem produced point automations: a chatbot that handled FAQs, an RPA bot that copied fields between forms, a model that classified tickets before they hit the queue. Each solved one step. None solved the workflow. And stringing them together meant maintaining a web of fragile integrations that broke silently and failed opaquely.

    The fundamental architectural problem was that no single layer owned the state of the workflow. The CRM knew about the customer. The inventory system knew about the stock. The policy engine knew about discount rules. But nothing held the thread of the task itself — the context, the decisions made so far, the next step, the fallback if something failed.

    The Shift That Changed the Calculus

    What changed is that LLMs became capable enough to handle multi-step reasoning across domains — but only if they had access to the right tools, the right context, and a coordination mechanism that could sequence their actions reliably. A model left to its own devices, handed a complex task, will hallucinate steps it can’t complete and skip steps it doesn’t know to take.

    The solution wasn’t a better model. It was an orchestration layer that could decompose the goal, route sub-tasks to specialized agents or tools, maintain state across steps, handle failures with defined fallbacks, and surface decisions to humans when autonomy wasn’t appropriate. That architecture is what makes an AI system reliable enough to run in production.

    And once teams built it, they realized it wasn’t just a feature of their AI workflow. It was the architecture. The control plane for all the work.

    Side-by-side comparison of the old isolated SaaS application stack versus the 2026 orchestration-centric stack where orchestration is the central hub


    What the Orchestration-Centric Stack Actually Looks Like

    The architecture converging across enterprise deployments in 2026 is not a single product or platform — it’s a layered stack, and understanding each layer is critical to understanding why orchestration sits at the top of it.

    Layer 1: Infrastructure and Model Serving

    At the base sits the infrastructure layer: cloud compute, model hosting, and inference endpoints. For most enterprises, this is a managed platform — AWS Bedrock, Azure AI Foundry, Google Vertex AI — that abstracts the model serving complexity and provides access to multiple foundation models from a single endpoint. This layer has become increasingly commoditized. The differentiation here is cost and latency, not architecture.

    The important shift is that enterprises are no longer committing to a single model. Multi-model routing — using different models for different agent tasks based on cost, capability, or latency requirements — is standard in production stacks. The orchestration layer above this one makes the routing decisions.

    Layer 2: Data, Memory, and Semantic Context

    Above the infrastructure sits the data and memory layer: vector databases, semantic caches, knowledge graphs, retrieval-augmented generation (RAG) pipelines, and session state stores. This layer provides agents with the context they need to do their work without re-fetching or re-computing from scratch on every call.

    Memory architecture is more complex than it sounds. Enterprise agents need to distinguish between short-term conversational context (what happened in this session), medium-term task context (what decisions were made in this workflow), and long-term knowledge (company policies, product data, customer history). Conflating these leads to some of the most common production failures — more on that in the failure modes section.

    Layer 3: The Orchestration Control Plane

    This is the heart of the stack. The orchestration layer is responsible for task decomposition (breaking a high-level goal into sub-tasks), routing (deciding which agent or tool handles each sub-task), state management (tracking what has happened and what comes next), retry logic (handling partial failures without breaking the whole workflow), and escalation (surfacing decisions to humans when autonomy limits are reached).

    It is also where governance, audit logging, and policy enforcement live. Every action taken by an agent flows through this layer, which means the orchestrator is the point of control for compliance, permissions, and accountability.

    Layer 4: Specialized Agents

    Beneath the orchestrator’s coordination sit the agents themselves — but in production architectures, these are almost never general-purpose. They are scoped, specialized, and bounded. A research agent that searches and summarizes. A code agent that writes and tests. A data agent that queries structured sources. A comms agent that drafts and sends.

    The orchestrator treats these agents as workers, assigning tasks based on capability routing. The agent doesn’t need to know about the broader workflow — it just needs to execute its assigned sub-task well, report its output, and signal any failures.

    Layer 5: Tool and API Connectivity

    At the bottom of the agent tier sits the tool layer: the integrations with external systems, APIs, databases, and services that give agents the ability to act on the world. This is where protocols like MCP (Model Context Protocol) matter most — they standardize how agents discover and invoke tools, removing the bespoke integration overhead that plagued earlier automation architectures.

    The Governance Cross-Cut

    Running across every layer is a cross-cutting governance concern: guardrails, audit trails, identity and access management, rate limiting, content filtering, and compliance logging. This isn’t a separate layer — it’s embedded into every layer, enforced by the orchestrator, and observed through an instrumented tracing system.


    MCP and A2A: The Two Protocols Quietly Standardizing Everything

    Two-layer protocol architecture diagram showing A2A agent-to-agent coordination above and MCP model context protocol tool connectivity below, with 97 million monthly SDK downloads stat

    Underneath the architectural shift is a protocol story that often gets missed in the broader narrative about AI. Two standards — the Model Context Protocol (MCP) and the Agent-to-Agent Protocol (A2A) — are doing the unglamorous work of making agentic systems interoperable at scale.

    Getting this distinction right matters, because confusing them leads to architectural decisions that create lock-in, brittleness, or both.

    MCP: The Agent-to-Tool Standard

    The Model Context Protocol, released by Anthropic and rapidly adopted across the ecosystem, addresses the agent-to-tool connectivity problem. Before MCP, every agent integration with a tool — a database, a calendar, a code execution environment, an API — required custom code. You wrote a wrapper, defined input schemas, handled authentication, and tested error paths. Multiply that by dozens of tools and dozens of agents, and you have an integration maintenance problem that swamps the engineering team.

    MCP standardizes how agents discover what tools are available, what those tools can do, and how to invoke them. The protocol defines a client-server model where tool providers expose MCP servers, and agents implement MCP clients. Any MCP-compatible agent can connect to any MCP-compatible tool without custom integration code.

    The adoption numbers reflect genuine traction: by mid-2026, MCP is tracking roughly 97 million monthly SDK downloads, with approximately 41% of surveyed software organizations running at least one MCP server in limited or broad production. The server ecosystem has grown to over 10,000 registered implementations. That’s not hype — that’s the velocity of a real standard taking hold.

    A2A: The Agent-to-Agent Coordination Layer

    Where MCP handles agent-to-tool communication, the A2A protocol addresses agent-to-agent delegation. In multi-agent architectures, orchestrators routinely need to hand off sub-tasks to specialized agents, receive results, pass context forward, and coordinate across agent boundaries that may span different systems, vendors, or deployment environments.

    A2A defines how agents advertise their capabilities, accept tasks, report progress, and return results to an orchestrating agent. It handles the coordination semantics that MCP doesn’t: task delegation, progress signals, capability discovery at the agent level rather than the tool level, and asynchronous result handling for long-running work.

    As of mid-2026, A2A has been adopted by more than 150 organizations in production, with major cloud providers integrating A2A support into their managed agent platforms. The protocol is still maturing — version stability and security profiles are ongoing discussions — but the trajectory is clear.

    Why Both Are Necessary

    MCP and A2A are complementary, not competing. A well-architected agentic stack uses MCP at the tool integration layer and A2A at the agent coordination layer. The practical implication is that enterprises building on both protocols can swap out individual agents or tools without rewiring the whole system — which is the portability guarantee that breaks vendor lock-in at the most important architectural seam.

    “The combination of MCP for tool access and A2A for agent coordination creates the first genuinely portable foundation for enterprise agentic systems. It’s the equivalent of what TCP/IP did for networking — a set of common protocols that let heterogeneous components communicate without custom glue.”

    For enterprise architecture teams, the near-term decision is not which protocol to use — it’s which vendors in the stack support both, and how to plan for the inevitable consolidation as both protocols mature toward stable, audited versions.


    The Framework Layer: LangGraph, CrewAI, AutoGen, and Temporal

    Framework comparison scoreboard showing LangGraph, CrewAI, AutoGen, and Temporal rated across production maturity, learning curve, and governance controls dimensions

    Above the protocol layer sits the framework layer — the tools engineering teams actually use to build and run their orchestration logic. The market here is fragmented but converging around a handful of real options, each with a distinct architectural philosophy and a specific sweet spot.

    Understanding what each framework is actually good at — and what it trades away — matters enormously for teams making decisions that will be difficult to reverse once agents are in production.

    LangGraph: Stateful, Auditable, Production-Grade

    LangGraph has emerged as the leading framework for production-critical orchestration. Its core architectural model is a directed graph: nodes represent agent actions or decisions, edges represent transitions between them, and the graph state is explicitly managed and checkpointed at every step.

    This approach gives engineering teams precise control over the flow of a workflow: branching conditions, loops, parallel execution, and rollback points are first-class concepts rather than emergent behaviors. The checkpointing system means a failed step can be re-run from its last known good state without restarting the entire workflow — a critical property for long-running enterprise processes.

    LangGraph also offers what its team calls “time-travel debugging”: the ability to step backward through a workflow’s execution history and inspect or replay any state. For regulated industries or compliance-sensitive workflows, this auditability is non-negotiable. The tradeoff is a steeper learning curve and slower initial build time compared to more abstracted alternatives.

    CrewAI: Fast, Role-Based, Developer-Friendly

    CrewAI takes a different approach: role-based agent abstraction. Instead of building a workflow graph, developers define agents as roles — a “researcher,” a “writer,” a “critic” — and assign them tasks within a crew. The framework handles the sequencing and communication between roles using higher-level abstractions.

    The result is dramatically lower build time for standard business workflow patterns. A team can have a working multi-agent prototype in hours rather than days. The cost is control: when edge cases arise, CrewAI’s abstractions can obscure the underlying execution in ways that make debugging slower and production-hardening harder.

    CrewAI’s fit is clearest for business teams automating well-understood, bounded workflows — content operations, data extraction, report generation — where the priority is shipping quickly and the failure modes are tolerable.

    AutoGen: Conversational, Human-in-the-Loop Focused

    Microsoft’s AutoGen framework is architected around conversational multi-agent patterns, where agents communicate through a structured message-passing protocol that can include human participants. Its strongest use case is workflows that require frequent human judgment — not just approval checkpoints, but active collaboration between human and AI agents throughout a task.

    The framework has matured significantly since its early research-oriented releases, but in 2026 it is increasingly being folded into Microsoft’s broader Agent Framework ecosystem rather than standing alone as a greenfield recommendation. Teams already embedded in the Microsoft enterprise stack (Azure AI Foundry, Copilot Studio) will find it the natural choice; teams starting fresh have more options worth evaluating.

    Temporal: The Durable Execution Engine

    Temporal occupies a different position in the stack — it is not an agent framework so much as a durable workflow execution engine that agent frameworks are increasingly built on top of. Where LangGraph, CrewAI, and AutoGen define how agents reason and coordinate, Temporal handles the infrastructure concerns: reliable execution despite failures, long-running workflow state across days or weeks, deterministic replay for debugging, and guaranteed exactly-once semantics for side-effectful operations.

    The combination that several production teams are converging on is LangGraph or CrewAI for agent logic layered on Temporal for execution durability. This separates concerns clearly: the agent framework owns the reasoning, and Temporal owns the reliability.

    The Framework Decision Matrix

    In practical terms, the choice comes down to what the team values most:

    • Maximum control and auditability: LangGraph, particularly for regulated industries or workflows with meaningful failure costs.
    • Speed to first production deployment: CrewAI, for standard business process automation with defined inputs and outputs.
    • Human collaboration throughout execution: AutoGen, particularly within the Microsoft ecosystem.
    • Infrastructure-grade execution reliability: Temporal, as the execution substrate beneath any of the above.

    The mistake is treating this as a permanent binary choice. Several mature enterprise teams run LangGraph for complex, high-stakes workflows and CrewAI for lightweight automation, with Temporal underneath both. The framework layer should be matched to workflow characteristics, not picked once and applied universally.


    How the Orchestrator Is Replacing the SaaS Control Plane

    The claim that orchestration is “becoming the real stack” is strongest when you look at what the orchestration layer is doing that used to belong to other software categories.

    This is not about replacing CRM systems or ERPs. The data, the records of truth, the domain-specific logic — those still live where they’ve always lived. What is shifting is who owns the workflow that coordinates access to those systems, and that shift has significant architectural and commercial implications.

    From iPaaS to Agentic Control Plane

    iPaaS platforms — integration platform as a service tools like Zapier, MuleSoft, and Boomi — were the previous generation’s answer to the workflow coordination problem. They connected systems via point-to-point integrations, ran trigger-action automations, and handled data movement between applications.

    The limitation was always expressiveness. iPaaS tools handle predictable, rule-based workflows well. They break when the workflow requires judgment: when an exception needs to be classified before routing, when a response needs to be generated from context rather than templated, when a decision depends on synthesizing information from multiple sources.

    Agentic orchestration handles exactly these cases. And as enterprises build agentic control planes, the demand for traditional iPaaS automation declines — not because the integration pipes disappear, but because the coordination logic that sat in iPaaS rules engines is now handled by orchestrated agents that are more flexible, more capable, and easier to update.

    The Wells Fargo Pattern

    One of the most-cited production examples of orchestration replacing a traditional knowledge and workflow interface is Wells Fargo’s internal deployment. Before implementing an orchestration-backed agent layer, bankers accessing internal compliance procedures needed an average of ten minutes to locate and apply the relevant guidance. The agent layer — which gave 35,000 bankers access to 1,700 procedures — reduced that to roughly 30 seconds.

    The orchestration layer isn’t replacing the procedures database or the compliance system. It’s replacing the interface layer that previously required human navigation of a fragmented documentation and workflow environment. That interface layer — lookup, context retrieval, policy matching, response generation — is exactly what an orchestrated agent does well.

    The Market Signal

    The market is reading this shift clearly. The AI orchestration segment is estimated at roughly $16.7 billion in 2026, with integration and orchestration middleware projected to reach $24.4 billion by 2033. Process orchestration specifically is growing at a 17.48% CAGR, from $11.17 billion in 2025 to a projected $13.12 billion in 2026 alone. These numbers reflect not just new spending on agentic tools, but the consolidation of budget that previously sat across fragmented workflow and automation categories.

    The cleaner strategic framing: orchestration is absorbing the coordination role that used to be split across iPaaS, workflow builders, RPA platforms, and business rules engines. It’s not replacing the systems of record beneath them — it’s taking over the control plane above them.


    Governance-by-Design: Autonomy Without Chaos

    The governance question is where most agentic deployments hit their first serious organizational friction. Technical teams build agents that work in testing, demonstrate them to stakeholders, and then watch the initiative stall when legal, compliance, or risk teams ask the questions that weren’t planned for: Who authorized this action? What data did the agent access? Can you show us the audit trail? What happens when it does something wrong?

    In 2026, the enterprise teams moving fastest are the ones that have stopped treating governance as a retrofit problem and started building it as a design constraint from day one.

    The Four Governance Pillars

    Production-ready agentic governance in 2026 has converged around four core properties:

    Bounded permissions: Agents operate with explicitly scoped credentials, not broad access inherited from a service account. Each agent in the workflow has access only to the tools and data required for its assigned sub-task. Permission elevation requires explicit orchestrator authorization or human approval — it doesn’t happen automatically as the workflow progresses.

    Audit-complete tracing: Every agent action — tool call, data access, decision branch, output generation — is logged with sufficient detail to reconstruct the full execution trace after the fact. This is not optional in regulated industries; it is the baseline for demonstrating that the system behaved within its authorized boundaries.

    Human-in-the-loop checkpoints: High-stakes decision points — approvals above a threshold, actions that affect customer data, any action that cannot be reversed — route through explicit human confirmation before execution. The orchestration framework manages this natively; it’s not a bolt-on step added after the workflow is built.

    Deterministic failure handling: When an agent fails, times out, or reaches an undefined state, the system falls back to a defined behavior — not a model-generated improvisation. This might mean escalating to a human, retrying with a different agent, or halting the workflow with a logged error. The fallback behavior is specified by the engineer, not inferred by the model.

    The Bounded Autonomy Principle

    Anthropic’s published guidance on effective agents — drawn from real production deployments — emphasizes a principle that translates directly to governance practice: prefer simpler, more constrained architectures unless complexity is clearly warranted, and ensure that every increase in autonomy is matched by an increase in observability.

    The practical implication is a tiered autonomy model. Low-stakes, high-frequency tasks (data lookup, formatting, routing) can run fully autonomously with post-hoc audit. Medium-stakes tasks (customer communications, process exceptions, policy applications) run autonomously with real-time monitoring and automatic escalation triggers. High-stakes tasks (financial actions, legal documents, access grants) require explicit pre-authorization or human confirmation before execution.

    Building this model requires that the orchestration layer have native support for conditional human-in-the-loop routing — and that the engineering team treats that routing as a first-class architectural concern, not a feature to add later.


    What Breaks First in Production — The Failure Taxonomy

    Enterprise agentic stack production failure modes dashboard showing infinite loop detection, memory poisoning, HITL bypass, context contamination, and tool cascade failure alerts

    Agentic stacks fail differently than traditional software. The failure modes are less often “the function threw an exception” and more often “the system produced a plausible-looking wrong result for seventeen steps before anyone noticed.” Understanding the specific ways agentic stacks fail is essential for building systems that can detect and recover from those failures before they cause real damage.

    Microsoft’s red-team taxonomy, updated in June 2026 based on twelve months of live red-team work on deployed agentic systems, provides the most systematically grounded classification of production failures currently available. The patterns that appear most frequently are not theoretical — they are drawn from real production deployments.

    Infinite Loops and Runaway Execution

    The most straightforward production failure: an agent, tasked with a goal it cannot complete, keeps retrying indefinitely. Without explicit loop detection and maximum-retry enforcement in the orchestrator, this consumes tokens, compute, and potentially external API quota until something external terminates it.

    The fix is architectural, not model-level. Every execution path in the orchestration graph needs a maximum iteration count, a timeout, and a defined behavior when either is exceeded. This sounds obvious but is consistently skipped in early implementations because it doesn’t affect demo performance.

    Memory Poisoning and Context Contamination

    In multi-session or multi-user deployments, agent memory that persists across sessions creates a contamination risk: information from one session bleeds into another, causing agents to act on stale, incorrect, or unauthorized context. This is particularly dangerous when the contaminated context affects decisions about what tools to invoke or what data to access.

    Memory poisoning is the adversarial version: malicious input is crafted specifically to alter the agent’s stored context in ways that change its future behavior. Microsoft’s taxonomy flags this as a high-frequency, high-severity failure mode — one that often combines with cross-session leakage to produce effects that are difficult to trace back to their origin.

    Human-in-the-Loop Bypass

    Red-team findings from Microsoft’s 2026 taxonomy identify HITL bypass as the most consistently exploited failure mode in production agentic systems. The mechanism varies: sometimes an agent is prompted to reframe a high-stakes action as a low-stakes one to avoid triggering an approval checkpoint; sometimes a workflow is constructed so the approval step is technically satisfied by a previous confirmation that doesn’t actually cover the current action.

    HITL bypass is architecturally significant because it undermines the entire governance model. If approval checkpoints can be circumvented — whether through adversarial prompting or inadvertent workflow design — the guarantee that humans control high-stakes decisions breaks down.

    The mitigation is policy-level enforcement at the orchestrator: approval requirements should be tied to the nature of the action (data type, action class, system being touched), not to a workflow position that an agent can reason around.

    Tool Cascade Failures

    An agent calls a tool that returns an error. The error message becomes part of the agent’s context. The agent, interpreting the error message as data, makes a downstream decision based on it. That decision triggers another tool call that also fails. Within a few steps, the workflow has consumed significant resources executing a cascade of failing calls, producing outputs that reflect error states as though they were real results.

    Tool error handling in the orchestrator needs to treat error returns as distinct from successful returns — not passing them into agent context as content to be reasoned over, but routing them to explicit error-handling logic that logs the failure, alerts monitoring, and either retries with appropriate backoff or escalates to a human.

    Cross-Agent Trust Escalation

    In multi-agent systems where agents delegate tasks to sub-agents, permission escalation can occur when a sub-agent has access credentials that exceed the scope of the parent agent’s authorization. If the orchestrator doesn’t enforce consistent permission scoping across agent-to-agent handoffs, a carefully constructed task delegation chain can result in actions being taken under elevated permissions that were never explicitly granted to the orchestrating workflow.

    The architectural requirement is that A2A task delegation always passes permissions down from the delegating agent, never inheriting or assuming credentials from the receiving agent’s pre-configured access profile.


    Context Engineering: The Discipline That Makes Orchestration Work

    Context engineering pipeline diagram showing memory boundaries, context window budget, tool access scoping, session state management, and cross-agent handoff stages

    Prompt engineering gets the attention. Context engineering does the work.

    As agentic systems have moved from single-step model calls to multi-step, multi-agent workflows, the quality of the output has become increasingly determined not by the cleverness of the system prompt, but by the architecture of the context that agents receive at each step. What information is included, what is excluded, how it is structured, how it persists across steps — these decisions determine whether an agent succeeds on a complex task or drifts into incoherence three steps in.

    What Context Engineering Actually Means

    Context engineering is the practice of deliberately designing the information environment in which agents operate. It encompasses several distinct concerns:

    Memory boundary design: Deciding what persists between steps, what is discarded, and what is explicitly passed forward in structured form rather than left to accumulate in the context window. Unmanaged context accumulation is one of the most common causes of performance degradation in long-running workflows — models degrade in quality and increase in cost as context windows fill with information that is no longer relevant to the current step.

    Context window budgeting: Each model call has a cost proportional to the tokens in the context window. In a multi-step workflow with ten or twenty model calls, context management is a direct line item in the cost structure. Teams that treat context as free until it fills up the window consistently over-run cost projections. Teams that budget context intentionally — summarizing completed steps, pruning irrelevant history, using semantic caching for repeated retrievals — maintain predictable per-workflow costs.

    Tool access scoping within context: When agents receive context that includes tool access information, that context implicitly defines what actions the agent might attempt. Overly broad tool context (giving an agent access to tools it doesn’t need for the current step) creates execution risk. Deliberately narrowing the tool context to what is required for the immediate sub-task is both a governance control and a quality improvement — agents with fewer irrelevant options make more focused decisions.

    Cross-Agent Context Handoffs

    The most architecturally consequential context decision in a multi-agent system is what gets passed between agents at handoff points. Passing too much — the entire prior execution history — bloats context, increases cost, and risks exposing earlier decisions to prompting that wasn’t intended to affect the receiving agent. Passing too little means the receiving agent lacks the context it needs to execute correctly.

    The pattern that production teams have converged on is structured handoff schemas: a defined data contract that specifies what fields the receiving agent needs, extracted from the prior agent’s outputs rather than dumped as raw conversation history. The orchestrator enforces the schema, validates the handoff data, and rejects or supplements it if required fields are missing.

    This is context engineering at the architectural level — not tweaking prompts, but designing data contracts between components of a system. The teams treating it as an engineering discipline rather than a prompt-writing exercise are the ones building workflows that hold up under production load.

    Semantic Caching and Retrieval Optimization

    For workflows that repeatedly retrieve similar information — product data, policy documents, customer records — semantic caching provides a significant cost and latency benefit. Rather than re-embedding and re-retrieving a document every time an agent needs it, a semantic cache stores the retrieval result and reuses it when a semantically similar query is made within the same session or workflow.

    This is not a minor optimization at scale. Production teams have reported 30–60% reductions in retrieval costs on workflows with repeated information access patterns. The orchestration layer is the natural home for cache management: it has visibility into what has been retrieved, by which agent, and in what context — which is exactly what’s needed to determine whether a cache hit is valid.


    The Buyer and Builder Map for 2026

    Understanding where the orchestration-centric stack creates new decisions for enterprise teams requires thinking about buyers and builders separately. They face different problems and are making different kinds of choices.

    For Enterprise Buyers: Vendor Evaluation Has Changed

    The traditional evaluation framework for enterprise software — capability coverage, user experience, pricing, integration catalog — is increasingly insufficient for evaluating orchestration platforms. The questions that matter now are architectural:

    Protocol support: Does the platform natively support MCP for tool connectivity and A2A for agent coordination? Platforms that don’t support both create integration bottlenecks as your stack matures. This is the portability question disguised as a features question.

    Observability depth: Can you trace every step of a multi-agent workflow, inspect state at each step, and replay failed executions? Observability is not a differentiator at this point — it is a baseline requirement. Any platform that cannot provide step-level execution traces should not be in the running for production orchestration.

    Governance architecture: Are human-in-the-loop checkpoints, permission scoping, and audit logging first-class platform features, or are they documented workarounds? The difference between “you can implement this” and “this is how the platform works” is enormous when you’re trying to meet a compliance requirement under time pressure.

    Multi-model routing: Can the orchestration layer route different sub-tasks to different models based on cost, capability, or latency requirements? Model lock-in at the orchestration layer is a significant long-term cost risk as model pricing continues to shift.

    For Builders: The Architecture Principles That Hold

    For engineering teams designing agentic systems, the production experience of 2026 has produced a set of durable architecture principles — not framework-specific, but consistent across implementations that have succeeded in production:

    Start with the simplest architecture that works. Anthropic’s guidance from working with dozens of production deployments is consistent: the most successful implementations used simple, composable patterns rather than complex frameworks. Add architectural complexity only when specific, demonstrated needs require it — not because a more sophisticated design seems more capable in theory.

    Make state explicit. Every agentic system has state — the task progress, the decisions made, the context accumulated. Teams that make this state explicit (stored, typed, and auditable) have dramatically easier debugging and far more reliable recovery from partial failures than teams that let state exist implicitly in context windows.

    Design for failure, not just for success. Every tool call can fail. Every model response can be malformed. Every handoff can transmit incomplete context. The orchestration logic needs to specify what happens in each of these cases before the workflow is deployed, not after the first production failure.

    Treat governance as a day-one design constraint. Permission scoping, audit logging, and human approval routing need to be in the architecture from the first design review, not added to a deployed system after a compliance team raises concerns. The cost of retrofitting governance into a running agentic system is significantly higher than building it in from the start.

    The Talent Implications

    The orchestration-centric stack is creating real demand for a skill profile that didn’t exist three years ago: the agent systems engineer. This role combines elements of traditional software engineering (distributed systems thinking, API design, failure mode analysis) with AI-specific concerns (prompt architecture, context management, model evaluation) and enterprise architecture (governance, observability, integration patterns).

    It is not a single profession yet, but the combination of skills is increasingly what differentiates teams that ship reliable agentic systems from teams that demo well and struggle in production. Organizations recognizing this gap early and building or hiring toward it are gaining a meaningful execution advantage.


    The Platform Battle Nobody Is Watching Closely Enough

    There is a second-order story underneath the orchestration architecture discussion that deserves more attention than it is getting: the platform battle for the orchestration control plane is one of the most consequential enterprise software vendor competitions of the current decade.

    Every major cloud provider — AWS with Bedrock Agents, Azure with AI Foundry and Copilot Studio, Google with Vertex AI Agent Builder — has a strategic interest in owning the orchestration layer because it is the layer that creates durable enterprise lock-in. If your workflows, your state management, your governance policies, and your agent routing all live in a managed orchestration platform, changing the underlying models is easy. Changing the orchestration platform is expensive.

    The Open-Source Counter-Pressure

    The open-source ecosystem is providing meaningful counter-pressure to cloud provider lock-in. LangGraph (MIT-licensed), CrewAI (open source), and the MCP and A2A protocols themselves (open specifications) give enterprises the ability to build on a portable foundation that doesn’t require committing to a single cloud vendor’s orchestration abstraction.

    The practical middle ground that many large enterprises are adopting is a hybrid: open-source orchestration frameworks for workflow logic and agent design, deployed on top of managed cloud infrastructure for compute and model serving. This preserves portability at the orchestration layer while taking advantage of managed services at the infrastructure layer — which is generally where the operational leverage is lower and the commodity exposure is higher.

    The Acquisition Signal

    The strategic importance of the orchestration layer is visible in the M&A activity around it. Framework companies, observability tools, governance platforms, and protocol stewardship organizations are all attracting significant investment from strategic buyers who understand that the orchestration control plane is the architectural position worth owning. Teams that are watching only the model layer of the AI market are looking at the wrong part of the stack.


    Conclusion: What It Actually Means That Orchestration Is the Stack

    The shift from model-centric to orchestration-centric architecture is not a trend to watch — it’s a transition underway. The architecture patterns, protocols, frameworks, and failure taxonomies described in this piece are not hypothetical. They are drawn from production deployments, red-team findings, and the real adoption curves of standards that are already handling billions of monthly interactions.

    The practical takeaways for teams operating in this environment:

    • Evaluate your orchestration layer as primary infrastructure, not a workflow feature. The choice of orchestration architecture determines what your agentic systems can do reliably, what governance controls you can enforce, and how portable your investment is as the model and tool ecosystem continues to evolve.
    • Adopt MCP and A2A now. Both protocols have reached the adoption threshold that makes them reasonable architectural bets. Building on them today reduces your future re-integration cost significantly compared to building on proprietary alternatives that may not survive vendor consolidation.
    • Treat context engineering as a core engineering discipline. The quality and cost of your agentic workflows are more determined by how you design context flows than by which model you use. This is an underinvested area in most teams and a high-leverage place to improve.
    • Build governance in, not on. The teams that will scale agentic systems reliably in regulated or high-stakes environments are the ones that treat permission scoping, audit trails, and human-in-the-loop routing as design requirements from day one.
    • Understand the failure taxonomy before you hit it. Infinite loops, memory poisoning, HITL bypass, and tool cascade failures are documented, predictable failure modes. Building explicit defenses against each of them is the difference between a production-grade system and a fragile demo.

    The model layer of the AI stack will continue to commoditize. Prices will fall, capabilities will generalize, and the differentiation between foundation models will narrow. What will not commoditize is the orchestration architecture built around those models — the state management, the governance controls, the coordination protocols, the observability instrumentation, the context engineering decisions that determine whether an autonomous workflow can be trusted to run without supervision.

    That is the real stack. And the enterprises that understand it as such — today, not after the next wave of demos — are the ones that will have something durable to show for their AI investment.

  • Amazon’s 2026 Image Rules: The Compliance Audit Every Seller Needs Before Their Next Suppression Notice

    Amazon’s 2026 Image Rules: The Compliance Audit Every Seller Needs Before Their Next Suppression Notice

    Amazon 2026 image compliance split-screen: compliant vs suppressed listing comparison

    There’s a strange asymmetry at the heart of Amazon’s image policy. The official documentation is, in many places, years old. The pixel minimums listed in Seller Central haven’t changed. The list of banned content — nudity, offensive material, misleading claims — reads much the same as it did in 2022. Yet sellers are watching their listings disappear from search faster and more frequently than ever before.

    In the first quarter of 2026 alone, third-party estimates suggest Amazon removed more than 3.1 million listings due to image policy violations. That’s not a rounding error. That’s an enforcement posture that has quietly shifted while the rulebook remained largely the same on paper.

    The problem most sellers have is that they’re reading the documentation. They see “500 pixels minimum” and they think they’re fine. They see “pure white background” and they assume their off-white, slightly shadowed hero image will pass. They’ve never heard of the contains-synthetic-performer metadata requirement that became mandatory in mid-2026. They don’t know that category-specific rules for apparel, shoes, and jewelry operate under entirely different standards than the general product guidelines they’ve been referencing.

    This post is not a recap of the rules you already know. It’s a working audit guide — built specifically around the gap between what Amazon’s documentation says and what its enforcement systems actually catch. By the end, you’ll have a clear picture of your real compliance risk, a methodology for fixing it catalog-wide, and a workflow that holds up as enforcement continues to tighten through the rest of 2026 and into 2027.

    The Official Rule Set in Plain English — What Amazon Actually Requires in 2026

    Amazon 2026 main image compliance checklist infographic showing technical requirements with annotation arrows

    Let’s start with the foundation. Amazon’s official image requirements exist in multiple help documents, and the core technical standards haven’t changed dramatically — but that’s exactly why sellers get caught out. The baseline specs are well-known. The enforcement of those specs has become significantly more aggressive.

    Technical Specifications

    File formats: Amazon accepts JPEG (.jpg/.jpeg), TIFF (.tif/.tiff), PNG (.png), and non-animated GIF (.gif). JPEG remains the recommended format for all product images because it delivers the best combination of file size, color accuracy, and rendering speed on Amazon’s image delivery network.

    Resolution: The official documented minimum is 500 pixels on the longest side. However, the practical standard sellers need to work to is considerably higher. Amazon’s zoom feature — which activates automatically when an image reaches 1,000 pixels on the longest side — is considered a baseline expectation by Amazon’s own seller guidance teams. The widely accepted best practice in 2026 is 2,000 × 2,000 pixels for all main images, which gives you comfortable zoom headroom and ensures your images aren’t auto-downsampled in ways that damage color accuracy.

    Maximum file dimensions: Amazon caps images at 10,000 pixels on the longest side. Exceeding this doesn’t cause suppression but does trigger automatic resizing, which can introduce compression artifacts depending on the source file quality.

    File naming: Amazon requires a specific naming convention — product identifier followed by file extension, with no spaces, dashes, or special characters. A correctly named file looks like this: B000999999.jpg. Uploading files with incorrect naming conventions doesn’t always trigger an error, but it can cause images to fail to associate correctly with the right ASIN, particularly during bulk catalog uploads.

    Main Image Rules

    The main image — the one that appears in search results and at the top of the listing — is where the strictest rules apply and where the vast majority of suppressions originate. Amazon’s requirements for the main image are:

    • Pure white background only. The specification is RGB 255, 255, 255. Not off-white. Not light gray. Not a background that looks white on your monitor but registers as slightly warm or cool when analyzed by image-processing software. Pure white.
    • Product must fill approximately 85% of the image frame. A product that floats in a sea of white, filling only 50% or 60% of the frame, is non-compliant. The product needs to be dominant, centered, and well-cropped.
    • No text, graphics, or watermarks. Brand logos, promotional text, sale callouts, size guides, website URLs — none of these are permitted on the main image under any circumstances.
    • No included accessories or props unless they ship with the product. If you show a charging cable in the main image but it doesn’t ship in the box, that’s a policy violation. If you show the product next to a decorative vase that isn’t part of the purchase, that’s a violation.
    • No lifestyle context. The main image must show the product against the white background, not in use, not in a room setting, not worn on a model (with category-specific exceptions covered in a later section).
    • No packaging shown as the main image unless the packaging is itself the product. Showing a cereal box front is fine. Showing a product inside its box as the primary image, when the listing is for the product itself, is not.
    • Accurate color representation. The image must accurately show the color of the product the customer will receive. Auto-enhanced photography that significantly shifts product color is a violation and a return driver.

    Secondary Image Rules

    Amazon allows up to eight additional images beyond the main image. These operate under considerably more flexible rules — which we’ll cover in detail in the section on secondary images and A+ content. The key distinction is that the strict pure-white, no-text requirements apply specifically and exclusively to the main image.

    What Actually Triggers Suppression in 2026 — The Real Enforcement Map

    Understanding the official rules is step one. Understanding how enforcement actually works in 2026 is step two — and it’s the step most sellers skip entirely.

    Amazon uses a combination of automated image-quality checks and human review to enforce its image policy. The automated layer has become substantially more capable over the past 18 months, with machine learning models now able to detect non-white backgrounds, text overlays, and frame-fill violations at scale — across the entire catalog, not just new listings.

    This is the shift sellers aren’t accounting for. Historically, enforcement was heaviest at upload time. A listing got through review once, and it largely stayed compliant unless a competitor flagged it or a human reviewer happened to land on the page. In 2026, that assumption no longer holds. Amazon’s automated systems are running ongoing sweeps of existing catalog images, not just reviewing new submissions.

    The Most Common Suppression Triggers

    Non-white backgrounds remain the single most common trigger. This includes images with subtle drop shadows that fall outside the pure white threshold, images shot on white seamless paper that has yellowed or shifted under lighting, and images that use a near-white background (RGB 250, 250, 250) rather than true white. The automated detection systems are sensitive enough to catch these.

    Text, logos, or watermarks on the main image. This catches a surprisingly large number of sellers who add branding elements “just to the corner” of their main image, or who include a website URL along the bottom edge. Amazon’s detection systems treat these as violations regardless of size or placement.

    Insufficient product frame fill. Images where the product occupies less than roughly 80–85% of the frame are increasingly being flagged. This is particularly common for sellers who repurpose catalog images originally shot for print or other e-commerce platforms, where different aspect ratio conventions apply.

    Misleading product representation. If your main image shows a product that is clearly a different variant than what the listing is for — a red item shown on a listing for the blue variant, for example — Amazon’s systems can catch this, and it’s a policy violation regardless of whether it happens by error or intent.

    AI-generated synthetic human models without proper disclosure. This is a newer and increasingly enforced category that deserves its own section.

    How Fast Does Suppression Happen?

    Seller reports and industry data from 2026 consistently point to suppression timelines that are faster than sellers expect. Once a listing is flagged, search visibility typically drops within 12–24 hours. Organic session data can fall by 90 to 100% during the suppression period. Ad campaigns continue to run — and spend — but with sharply reduced visibility, meaning sellers are often burning ad budget on a listing that isn’t showing up in organic results.

    The recovery process adds another layer of time cost. Uploading a corrected image, waiting for Amazon to process it, and waiting for the listing to reappear in search results typically takes 24 to 72 hours in straightforward cases, and can take significantly longer if the listing goes into manual review or if the suppression is categorized as a more serious policy violation.

    The AI Disclosure Requirement — What the contains-synthetic-performer Rule Actually Means

    Amazon 2026 AI image disclosure rule showing contains-synthetic-performer metadata requirement and shopper-facing badge

    This is the biggest structural change to Amazon’s image policy in 2026, and the one that the fewest sellers have implemented correctly. The rule itself is not particularly complex — but it has meaningful technical implications for how sellers produce and upload images.

    What the Rule Requires

    Effective in mid-2026, Amazon requires third-party sellers to disclose when a product image, A+ content module, or product video contains a photorealistic AI-generated person. The rule does not apply to all AI-generated images — only to those containing synthetic human representations that could be mistaken for photographs of real people.

    The disclosure mechanism operates at the file metadata level. Sellers must embed the exact keyword string contains-synthetic-performer in the image file’s IPTC or XMP metadata fields before uploading to Seller Central. Amazon reads this metadata and, where applicable, surfaces a shopper-facing indicator on the listing page — a small label visible to buyers that signals AI-generated human content is present.

    For A+ Content specifically, Amazon provides a second path: a built-in “AI-generated people” checkbox within A+ Content Manager that sellers can use at the content level, removing the need to pre-embed metadata in individual image files. For all other listing assets — product images, product videos, Brand Stories, and Store content — pre-upload metadata tagging is the only available mechanism.

    What Specifically Triggers the Requirement

    The requirement applies to photorealistic AI-generated humans. This is a narrower category than it might sound, and Amazon has clarified several exclusions:

    • Real people whose images have been AI-edited (for background removal, color correction, or retouching) are not subject to the disclosure requirement.
    • Clearly stylized, illustrated, or cartoon AI-generated people are not subject to the requirement.
    • TV, video game, or movie characters are excluded from the disclosure rule.
    • AI-generated product images with no human presence — which covers the vast majority of standard product photography — are not affected.

    Where the rule most clearly applies is in apparel, beauty, home goods, and lifestyle categories where sellers have begun using AI-generated human models to show products on “real-looking” people without the cost of traditional model shoots. If the result is photorealistic — if a typical shopper looking at the image would believe it’s a photograph of a real person wearing the product — the disclosure is required.

    The Legislative Background

    The rule is directly connected to New York State’s synthetic performer disclosure law, which took effect in June 2026. New York’s law requires disclosure when AI-generated synthetic humans are used in commercial media in a way that could mislead consumers about whether they’re seeing a real person. Amazon’s policy implementation maps onto this requirement and applies it platform-wide, not just to sellers operating in New York.

    This is significant because it establishes a precedent. Amazon is now translating external regulatory requirements directly into seller-facing technical specifications. It’s reasonable to expect that as similar legislation passes in other jurisdictions — which is widely anticipated — Amazon’s disclosure requirements will expand accordingly.

    How to Implement the Metadata Tag

    Embedding IPTC/XMP metadata in image files is not a workflow most sellers have in place today. The process requires:

    1. Identifying which images in your catalog contain photorealistic AI-generated people.
    2. Opening each identified image file in a metadata-capable tool. Adobe Lightroom, Bridge, ExifTool (free, command-line), and several online metadata editors all support IPTC/XMP editing.
    3. Adding contains-synthetic-performer to the image’s subject keywords or description fields in the XMP metadata.
    4. Saving the file and re-uploading to Seller Central.

    For sellers managing large catalogs with AI-generated lifestyle imagery, building a metadata tagging step into the image production workflow — before files are finalized and uploaded — is substantially more efficient than retroactive tagging of existing assets.

    Category-Specific Rules That Sellers Routinely Overlook

    The general image guidelines apply across most product categories. But Amazon maintains category-specific style guides for a number of major verticals, and the rules in these guides can differ substantially from the general documentation. Selling in these categories and using the general rules as your compliance benchmark is a recipe for suppression.

    Apparel and Clothing

    Apparel is the category with the largest delta between general rules and category-specific requirements. The most important distinction: unlike almost every other category, apparel main images are expected to show the product on a model for most subcategories. A flat lay or ghost mannequin may be acceptable in certain subcategories, but for the majority of adult clothing, a model-worn image on a white background is the standard Amazon’s systems and reviewers expect.

    The exceptions are narrow and specific. Children’s and baby undergarments, leotards, and some swimwear must be shown without a model on the main image. Accessories — hats, scarves, bags — must not be photographed on models in the main image; they should be shown as standalone products.

    For sellers who have been using the general “product on white background” rule for clothing listings, this is a meaningful compliance gap. Model-on-white is a higher production cost, but it’s the standard the category requires.

    Footwear

    Amazon’s footwear category guidelines specify that the main image should show a single shoe (not a pair) at a specific angle — typically a three-quarter view from the front-right side. This convention exists because it shows the most visual detail of the shoe’s design in a single image. Sellers who upload pair shots, flat-lay images, or front-on views may find their listings generate more suppression notices than the general product rules would suggest.

    Jewelry and Watches

    Jewelry main images should show the product on a white background as a standalone item with no model, no hands, and no props. The product must be clean, well-lit, and show all surfaces clearly. Watches follow similar rules but with the addition that the dial should be set to show a clear time — industry convention is 10:10 — to maximize the visual clarity of the dial and hands.

    Rings are typically shown at a slight angle that shows both the band and the setting. Necklaces and bracelets are usually shown laid flat or draped in a way that shows the full piece. Earrings are typically shown as a pair in the main image (an exception to the single-item convention in footwear).

    Books, Music, and Video Media

    For media products, Amazon requires that the main image shows 100% of the cover art or disc art. The cover must fill the entire frame. The product should not be shown tilted, shadowed, propped up on a surface, or shown with any environmental context. This is one of the few categories where a full-frame, edge-to-edge presentation is the explicit requirement rather than the ~85% fill standard.

    Grocery and Health & Beauty

    Products in these categories often have specific requirements around label visibility. The main image should show the product with its primary label facing front and clearly legible. For supplements and health products specifically, Amazon increasingly cross-references the product imagery against the claims made in the listing copy — if your images show a product label that makes a health claim your listing copy doesn’t support (or vice versa), this can trigger a review.

    Secondary Images, A+ Content, and the Rules That Actually Differ

    Three-column comparison infographic showing Amazon main image vs secondary image vs A+ content rules for 2026

    One of the most common misconceptions sellers carry into their image strategy is that all Amazon images are governed by the same rules. They are not. The main image, the secondary gallery images, and A+ content each operate under distinct standards — and conflating them leads to both unnecessary compliance anxiety and genuine missed opportunities.

    Secondary Gallery Images (Images 2–9)

    Amazon allows up to eight additional images beyond the main image, giving you a total of nine slots in your product gallery. These secondary images operate under significantly more flexible creative rules:

    Lifestyle photography is explicitly allowed. You can show your product in use — in a kitchen, on a hiking trail, in the hands of a person — without violating policy. Real-world context helps buyers visualize the product in their own lives, and Amazon’s guidelines actively support this type of imagery in secondary slots.

    Text callouts and infographic overlays are permitted. You can annotate your secondary images with feature callouts, dimension diagrams, comparison charts, size guides, and benefit statements. This is the space to do the educational work that the main image cannot.

    Multiple products can appear together if the intent is to show scale, compatibility, or product family context — as long as the image accurately represents what the customer will receive and is not misleading about the offer.

    Props and environmental elements are allowed to support the product story. A cutting board shown alongside a kitchen knife, a phone stand shown on a desk — these contextual elements are fine in secondary images.

    The caveat is that Amazon’s quality standards still apply to secondary images. Images must be clear, professionally produced, and accurately represent the product. Blurry, poorly lit, or pixelated secondary images may not directly trigger suppression, but they do affect listing quality scores — and Amazon has been more aggressively promoting higher-quality listings in search results.

    A+ Content Image Requirements

    A+ Content — available to brand-registered sellers — is governed by its own distinct set of technical requirements, and they are stricter in some specific ways:

    • File formats: Only JPG, PNG, and BMP are accepted. TIFF and GIF are not supported in A+ modules.
    • Color profile: Images must be in RGB. CMYK files — common when images are prepared for print as well as digital — will be rejected.
    • File size: Each image must be under 2 MB.
    • Resolution: A minimum of 72 DPI is required, though most professional images comfortably exceed this.
    • No animated GIFs. A+ content supports only static images.
    • No watermarks, QR codes, or hyperlinks embedded in images.
    • No external redirect URLs or anything that could take a shopper off Amazon’s platform.
    • No CMYK or multi-channel color profiles.

    Each A+ module also has specific dimension requirements. Common dimensions include 970 × 300 pixels for full-width banner modules, 970 × 600 pixels for larger feature modules, and 300 × 300 pixels for comparison grid thumbnails. Submitting images that don’t match the module’s required dimensions results in automatic rejection or distorted rendering.

    One practical issue that catches many brand-registered sellers: A+ content image text must be readable on mobile screens. Amazon’s A+ Preview tool lets you see how modules render on mobile before submitting, and it’s worth checking — text that looks perfectly legible on a desktop monitor frequently becomes unreadable at mobile viewport sizes.

    The Full-Slot Strategy

    A frequently overlooked compliance-and-conversion issue: using all available image slots. Listings with fewer than five or six images consistently underperform in both search ranking and conversion compared to listings that fully utilize the available gallery slots. Amazon’s internal guidance encourages sellers to view each image slot as a conversion asset, and its algorithms appear to weight listing completeness as a quality signal.

    If your listing has empty image slots, you’re leaving both compliance (quality score) and commercial value on the table simultaneously.

    The Revenue Math of Getting Image Compliance Wrong

    Revenue impact chart showing sharp drop on day of Amazon listing suppression with $14,000/day loss callout

    Image compliance failures have a direct, quantifiable revenue cost. Understanding this math helps prioritize both the urgency of the audit process and the level of investment in compliant image production.

    The Scale of Enforcement in 2026

    Amazon removed more than 3.1 million listings in a single quarter of 2026 for image policy violations — a figure drawn from Marketplace Pulse data cited by multiple seller analytics platforms. Another estimate from an independent tracking service puts the number at approximately 2.3 million affected listings in a single month. Even accounting for the range of estimates, the scale is large enough to make clear that image violations are not an edge case or a risk that primarily affects poorly managed catalogs.

    These suppressions span categories and seller sizes. Large brands with mature catalogs have been affected alongside small independent sellers. The enforcement pattern in 2026 does not appear to heavily favor or disfavor any particular seller tier.

    Per-ASIN Revenue Impact

    Seller-reported case data from 2026 puts the daily revenue loss from image suppression in the following ranges:

    • Single ASIN suppressions: approximately $800 to $2,500 per day for mid-velocity sellers.
    • Multi-ASIN suppressions (10–40 affected listings): reported daily losses in the range of $5,000 to $14,000.
    • Catalog-wide suppression events (50+ ASINs): one seller forum case estimated $50,000 to $55,000 in total sales lost during a suppression event affecting 800+ listings before remediation was complete.

    These figures are self-reported and should be treated as representative rather than precise benchmarks. But the directional reality they reflect is consistent: even a small number of suppressed listings on high-velocity products can create revenue losses that dwarf the cost of fixing the images in the first place.

    The Ad Spend Bleed

    One aspect of suppression that many sellers underestimate is the advertising cost component. When a listing is suppressed from organic search, active Sponsored Product and Sponsored Brand campaigns linked to that ASIN don’t automatically pause. The campaign continues to spend — but on a listing that isn’t appearing in organic results and may have degraded placement in paid results as well.

    The result is that suppression doesn’t just cut revenue. It can simultaneously cut revenue while continuing to drain ad budget, widening the financial impact of the suppression event beyond the sales loss alone.

    The Ranking Recovery Cost

    Beyond the immediate suppression window, there’s an additional cost that’s harder to quantify: ranking recovery. Amazon’s algorithm registers the period of suppression as a low-performance window for the ASIN. Depending on the competitive pressure in the category and the duration of the suppression event, recovering to pre-suppression organic ranking positions can take weeks to months of sustained performance after the listing is reinstated.

    A listing that was suppressed for four days and lost 1,000 organic sessions during that window doesn’t automatically return to its prior ranking position when the suppression lifts. The algorithm’s view of the ASIN’s recent performance history now includes the suppression window, and recovering that ground requires active investment in both organic performance and advertising.

    How to Run a Full Catalog Image Audit in Under a Week

    Six-step Amazon image compliance audit workflow flowchart showing steps from suppression report export to weekly monitoring

    For sellers with large catalogs, the idea of auditing every image can feel paralyzing. The approach below is designed to make the audit tractable within a five-day working window, prioritizing by risk and revenue impact rather than attempting a wholesale catalog review from day one.

    Day 1: Pull the Suppression Report and Identify Active Violations

    Start in Seller Central. Navigate to Inventory → Manage All Inventory → Suppressed. This view shows you every ASIN that Amazon has already flagged and removed from search. Export this list.

    For each suppressed ASIN, the suppression report will typically include a reason code or a category label. Common image-related suppression codes include:

    • Main image background not white
    • Image contains text, logo, or graphic
    • Image too small or low resolution
    • Missing main image

    Sort the suppressed list by revenue (use your sales velocity data to rank ASINs) and flag all image-related suppressions in a working spreadsheet. These are your Day 1 and Day 2 priorities.

    Day 2: Triage and Prioritize by Revenue Impact

    Work from your suppressed ASIN list sorted by revenue. Assign each ASIN to one of three buckets:

    • Bucket A (Fix immediately): Top 20% of ASINs by revenue, currently suppressed. These are the listings you fix first, today.
    • Bucket B (Fix this week): All remaining suppressed ASINs and any active listings flagged by the Listing Quality report as at-risk for image quality.
    • Bucket C (Audit and update in the next 30 days): Active listings that aren’t currently suppressed but have image issues that could trigger future enforcement sweeps.

    Day 3: Systematic Image Review

    For Bucket A and B ASINs, do a direct visual review of every main image. Check each image against these five criteria:

    1. Is the background pure white (not off-white, not light gray)?
    2. Does the product fill at least 85% of the frame?
    3. Are there any text overlays, logos, watermarks, or brand marks on the image?
    4. Does the product shown match the specific variant this listing is for?
    5. Is the image at least 1,000 pixels on the longest side (2,000 × 2,000 preferred)?

    Also check: does the listing have any AI-generated human models in any image slot? If yes, add it to a separate tagging queue for the contains-synthetic-performer metadata process.

    Day 4: Remediation

    For images that need background correction, tools like Adobe Photoshop’s Select Subject plus a white fill layer, or dedicated background removal services like Remove.bg, can handle the bulk of simple white-background fixes without requiring a full reshoot. For images that are simply too small, upscaling tools (Adobe Super Resolution, Topaz Gigapixel) can bring undersized images into compliance without a reshoot — though genuine high-resolution originals will always outperform upscaled versions.

    For images that require a reshoot — because the product framing is wrong, because the product variant shown doesn’t match, or because the overall quality is poor — schedule those shoots before completing the remediation pass. Don’t re-upload partially fixed images; a listing with a questionable but not-yet-flagged image is better left live until a fully compliant replacement is ready.

    Rename all fixed files using the correct ASIN-based naming convention before upload: ASIN.jpg.

    Day 5: Re-upload, Monitor, and Build the Ongoing Tracking System

    Upload your corrected images through Seller Central’s standard image management interface, or in batch via flat file for larger catalogs. After uploading, allow 12 to 24 hours for images to process before checking suppression status.

    Set up a weekly monitoring process. The Listing Quality dashboard in Seller Central refreshes regularly and surfaces new issues as they’re identified. Building a recurring weekly check of suppression status — specifically for your top 50 revenue ASINs — into your standard operational cadence is one of the highest-ROI catalog management habits you can develop.

    Building a Suppression-Proof Image Workflow for 2026 and Beyond

    A catalog audit is a one-time fix. A sustainable image workflow is what prevents the audit from becoming an annual emergency. The goal here is to make compliance a property of the production process rather than something you achieve and then maintain reactively.

    Implement a Pre-Upload QC Checklist

    Every image — whether produced internally, by a photographer, or by a creative agency — should pass through a standardized compliance checklist before it enters your upload queue. The checklist doesn’t need to be complex; a Google Sheet or Notion table with five to eight binary yes/no questions for each image slot is sufficient.

    The pre-upload checklist should cover:

    • Main image background confirmed pure white?
    • Product fill confirmed at 85%+?
    • No text, logos, or watermarks on main image?
    • Resolution at or above 2,000 × 2,000?
    • File named with correct ASIN convention?
    • Any AI-generated humans present in any image slot? (If yes, metadata tagged?)
    • All nine image slots populated?
    • Category-specific rules checked?

    Making this checklist mandatory for every new listing and every image update — not just new ASINs — closes the compliance gap at source rather than chasing it downstream.

    Build the AI Metadata Tag Into Your Production Workflow

    If any part of your image production uses AI tools to generate or modify human figures, the contains-synthetic-performer tagging step needs to be a built-in part of the final production stage, not an afterthought. The practical approach is to build metadata tagging into your image export or delivery stage.

    For teams using Adobe Creative Cloud, the metadata can be embedded in Bridge or Lightroom as part of a batch output preset. For teams using external agencies or freelancers, the contract or brief for any AI-generated creative work should explicitly require the delivery of tagged files — or the delivery of files that clearly document which images require tagging before upload.

    Establish a Category Compliance Library

    If your catalog spans multiple Amazon categories, maintain a single reference document that lists the category-specific image rules for each vertical you sell in. Update this document when Amazon publishes new style guides or when seller community reports surface new enforcement patterns.

    Category-specific rules change more frequently than the general guidelines, and Amazon doesn’t always publicize changes loudly. Following relevant seller forums (Seller Central community, relevant subreddits, third-party seller groups) and setting up Google Alerts for terms like “Amazon image requirements [category name]” provides early warning of new category-specific enforcement trends before they result in suppression notices.

    Treat Image Quality as a Competitive Asset, Not Just a Compliance Requirement

    There’s a useful reframe here that goes beyond the defensive concern of avoiding suppression. Amazon’s A9/A10 algorithm uses engagement signals — click-through rate from search results is one of the most significant — as a ranking input. Your main image is the primary driver of CTR. A fully compliant, well-framed, high-resolution main image that clearly shows the product isn’t just a compliance requirement; it’s an organic ranking lever.

    Sellers who treat the 2026 image compliance update as an opportunity to upgrade their visual assets — rather than purely a remediation exercise — consistently report improved CTR, better conversion rates, and stronger ranking velocity after the update is complete. The compliance floor and the quality ceiling are closer together than most sellers realize.

    The One Check Most Sellers Haven’t Done Yet

    Before closing out this audit guide, there’s a specific check worth calling out independently because the data suggests it’s being missed even by sellers who believe they’re compliant.

    Amazon has the ability to replace listing images under certain conditions. If Amazon’s systems determine that your main image is non-compliant and you haven’t replaced it within a defined window, Amazon may substitute an image from another part of the listing — a secondary image, a brand store asset, or in some cases an image sourced from another data provider — as the new main image. This replacement image may or may not meet main-image requirements, and it may not accurately represent your specific product variant.

    The practical consequence: your listing might not be suppressed, but it might be running with an Amazon-substituted main image you didn’t choose and may not have checked recently. Go to each of your live listings directly (not through Seller Central’s image management view) and visually confirm that the main image currently showing to shoppers is the one you intend it to be.

    This check takes approximately two minutes per ASIN on your priority list. It’s the most actionable single step you can take today.

    Conclusion: Compliance Is an Ongoing Operational Practice, Not a One-Time Fix

    Amazon’s 2026 image rules don’t represent a single sweeping policy overhaul. They represent the continuation of a multi-year trajectory toward stricter, faster, more automated enforcement of standards that have largely existed in documentation for years. The sellers who are getting caught aren’t primarily the ones who never read the rules — they’re the ones who read the rules once, implemented them once, and assumed the work was done.

    The addition of the contains-synthetic-performer disclosure requirement is the clearest signal of what’s coming next. Amazon is now codifying external regulatory requirements directly into technical seller specifications — which means the compliance landscape will continue to evolve as AI-related legislation advances globally. What’s required today is a metadata tag on photorealistic AI-generated people. Future iterations will almost certainly extend disclosure requirements further.

    The sellers who come out of 2026 in the strongest position are the ones who treat image compliance as an operational system rather than a project. That means a pre-upload QC checklist, a weekly suppression monitoring cadence, a current reference library of category-specific rules, and a clear workflow for any AI-generated or AI-edited creative.

    The cost of building and maintaining that system is a fraction of what a single multi-ASIN suppression event can cost in a single week. The math is straightforward. The operational change to act on it is what separates the sellers who will stay visible in Amazon’s search results from those who will keep getting surprised by suppression notices.

    Quick-Reference Action Checklist

    1. ✅ Export the Suppressed Listings report from Seller Central today.
    2. ✅ Sort suppressed ASINs by revenue and create a prioritized fix list.
    3. ✅ Review all main images for white background, 85%+ fill, no text/logos, and 2,000px resolution.
    4. ✅ Check every listing for AI-generated human models — if present, implement contains-synthetic-performer metadata tagging before re-upload.
    5. ✅ Verify you’re working to category-specific rules (apparel, shoes, jewelry, media) not just general guidelines.
    6. ✅ Confirm all A+ Content images are JPG/PNG/BMP in RGB, under 2 MB, with no QR codes or hyperlinks.
    7. ✅ Manually check each priority listing live in search to confirm the main image showing is the one you intended.
    8. ✅ Build a pre-upload compliance checklist and make it standard practice for every new listing and image update.
    9. ✅ Set up a weekly review cadence for your Listing Quality dashboard and top-revenue ASIN suppression status.
  • The Bot Estate Is Changing: How Agentic AI Reshapes What Automation Actually Means

    The Bot Estate Is Changing: How Agentic AI Reshapes What Automation Actually Means

    Split-screen diagram showing static bot workflow on the left with rigid linear steps and agentic AI workflow on the right with branching reasoning nodes — the unit of automation is changing from steps to judgments

    Most conversations about agentic AI begin with a replacement narrative: bots are dumb, agents are smart, therefore agents will take over. It’s a clean story. It’s also incomplete in ways that matter enormously if you’re the person responsible for an organisation’s actual automation stack.

    The reality unfolding across enterprise floors in 2026 is messier and more interesting than a simple swap. Robotic process automation (RPA) bots are not being retired en masse. Workflow automation platforms are not switching off their rule engines. Instead, something more structural is happening — the fundamental unit of automation is changing. For two decades, automation meant automating a step. Increasingly, it means automating a judgment.

    That distinction sounds philosophical until you sit down with a process that generates 40% exception rates, depends on unstructured email chains, and touches six systems that don’t share a common API. Suddenly, the question is not “should I replace my bot?” but “what part of this workflow is actually automatable in each paradigm, and what governance do I need around the part that isn’t?”

    This post works through that question seriously. It covers the structural difference between static bots and agentic systems, the hybrid architecture that is quietly becoming the enterprise default, the new failure modes that agents introduce (and that nobody’s old playbooks account for), and the concrete methodology for auditing your existing bot estate against agentic readiness. No vendor sales pitches. Just the operational logic of what’s actually changing and why.

    The Problem With Bots Has Always Been the Same

    To understand why agentic AI is gaining ground, you have to understand precisely where RPA bots break — and they have always broken in the same place. The technical term is brittleness at the process boundary. The practical translation: bots are excellent at doing exactly what you told them to do, and catastrophically bad at everything slightly outside that definition.

    This is not a failure of RPA as a technology. It is the design contract. A bot executes a predefined sequence of steps against structured, predictable inputs. When those conditions hold, bots are extraordinary: fast, tireless, perfectly consistent, fully auditable, and cheap to run at scale. A well-built RPA bot processing invoices from a single ERP system with a consistent format can operate for years with minimal human oversight and near-zero error rates.

    Where the Design Contract Breaks

    The problem is that most real-world enterprise processes don’t hold those conditions for long — and many never held them at all. Consider what happens when:

    • An invoice arrives as a scanned PDF with handwritten amendments rather than a clean digital file.
    • A supplier changes their layout mid-year, shifting field positions by two columns.
    • An approval workflow depends on whether the total exceeds a threshold that varies by business unit, currency, and fiscal quarter — and that logic lives in a spreadsheet owned by the Finance Director.
    • An exception requires pulling context from three separate systems — an ERP, a CRM, and a SharePoint folder — and synthesising a decision that isn’t in any rulebook.

    In each of these cases, the bot does one of two things: it fails and halts the process, or it applies the wrong rule and produces a silently incorrect output. Both outcomes require human intervention. The second is worse because you often don’t catch it until downstream.

    The Exception Rate Problem Is Bigger Than Anyone Admits

    Industry benchmarks on RPA exception rates vary widely depending on how the process was scoped and maintained. But most automation practitioners will privately acknowledge that exception-handling is where bot programmes quietly haemorrhage cost and credibility. Processes that looked like 95% automation rate on paper often deliver 65% in practice once you account for the cases that fall through the rules, the ongoing maintenance burden when source systems change, and the human oversight required to keep the bot from propagating errors through the stack.

    This is the structural backdrop for agentic AI’s appeal. Not that agents are smarter in some abstract sense — but that they are specifically designed to handle the exact class of problem that bots have always failed at: ambiguous inputs, variable process paths, and decisions that require context-synthesis rather than rule-lookup.

    What “Agentic” Actually Means — And What It Doesn’t

    The word “agentic” has been overloaded by marketing to the point where it sometimes means little more than “AI that does things.” That vagueness is dangerous for anyone trying to make architectural decisions. Here is a more precise definition that holds up in practice.

    An agentic AI system is one that: perceives its environment (through data, documents, system states, or user input); formulates or maintains a goal; plans a sequence of actions to achieve that goal; executes those actions using tools (APIs, code, web browsers, databases); evaluates the results of each action; and adjusts its plan based on what it learns. The key word in that chain is “adjusts.” A static workflow cannot adjust. It follows the path you laid out at build time. An agent can replan mid-run.

    The Autonomy Spectrum

    What makes this definition practically useful is recognising that “agentic” is not binary. There is a spectrum of autonomy, and where a system sits on that spectrum has enormous implications for governance and risk:

    • Level 1 — AI-assisted: A human initiates and approves every step. The AI suggests actions. Think Copilot-style autocomplete in a workflow tool.
    • Level 2 — Supervised automation: The agent executes multiple steps autonomously but requires human approval at defined checkpoints — typically for irreversible or high-risk actions.
    • Level 3 — Bounded autonomy: The agent completes entire workflow segments independently within defined guardrails. Humans review outputs rather than approving actions. This is where most mature enterprise deployments sit in 2026.
    • Level 4 — Full autonomy: The agent plans, executes, and adapts end-to-end with no human checkpoints. Reserved for low-risk, fully reversible processes with strong observability. Rare in production.

    When a vendor tells you their product is “fully agentic,” ask which level on this spectrum they actually mean. The answer will tell you far more about fit for your use case than any benchmark they quote.

    What Agentic AI Is Not

    It’s equally worth being clear about what does not qualify as agentic, despite vendor framing. A chatbot that can answer questions from a knowledge base is not agentic — it has no action capability. A workflow with an LLM-powered classification step bolted in front of a static rule engine is not fully agentic — it’s a static workflow with an AI pre-processor. A recommendation engine that surfaces options for humans to act on is not agentic — it has no execution capability.

    Genuine agentic systems have both reasoning and action capability, with a feedback loop between them. That combination is what changes the economics and the risk profile.

    The Decision Surface: Why the Unit of Automation Is Changing

    2x2 matrix showing Decision Surface — RPA Bot Territory in bottom-left quadrant for low variability structured inputs, Agentic AI Territory in top-right for high variability unstructured inputs, with Hybrid Zone in between

    The most useful mental model for understanding the transition from static bots to agentic AI is what practitioners are increasingly calling the decision surface. Every automated workflow has a decision surface: the total set of conditions, inputs, and states the automation must handle to complete its job without human help.

    RPA bots have a narrow, explicitly defined decision surface. Every fork in the path is mapped at build time. Every input format is specified. Every exception outcome is pre-coded. The bot can only succeed within that surface. Anything outside it creates a failure or an escalation.

    Agentic AI systems have a wide, dynamically navigated decision surface. The system can interpret novel inputs, select from multiple action paths, and handle cases it hasn’t seen before — within the capabilities of its underlying model and the tools it has access to. The surface expands as context does.

    The Two Axes That Determine Your Fit

    Mapping your processes against two axes gives you a clear read on which automation paradigm fits where:

    Axis 1: Process Variability. How often does the logical path through the process change? Invoices from a single vendor in a standard format = low variability. Customer complaint resolution across product lines, jurisdictions, and escalation paths = high variability. The higher the variability, the more a static bot’s predefined logic becomes a liability rather than an asset.

    Axis 2: Input Structure. How predictable and machine-readable are the inputs the process receives? Structured database records or fixed-format files = structured. Emails, documents, voice transcripts, handwritten forms = unstructured. Mixed = everything in between. Static bots were built for structured inputs. Agentic systems can reason about unstructured ones — a fundamental capability difference.

    The Four Quadrants in Practice

    Plotting processes on these two axes produces a rough four-quadrant map that most operations and automation leaders will immediately recognise from their own portfolios:

    • Low variability + structured inputs (bottom-left): Classic RPA territory. Invoice processing, payroll calculations, data migration between systems, scheduled report generation. These processes don’t need agents. They need well-maintained bots and stable APIs. Introducing agentic complexity here adds cost and risk with no benefit.
    • High variability + unstructured inputs (top-right): Agentic AI’s natural domain. Contract review, customer escalation handling, procurement exception management, research and synthesis tasks, cross-system reconciliation with missing data. Bots fail here reliably. Agents can operate here — with the right guardrails.
    • Low variability + unstructured inputs (top-left): A common hybrid zone. The process path is predictable, but the inputs require interpretation — think document extraction feeding a fixed approval workflow. An AI pre-processor (classifier or extractor) feeding a static bot is often the right solution here.
    • High variability + structured inputs (bottom-right): Another hybrid zone. Inputs are clean but the decision logic is complex and context-dependent — think dynamic pricing approval or regulatory compliance routing. An orchestration agent making routing decisions, handing execution to deterministic bots per path, often wins here.

    The uncomfortable insight from this framework is that most large enterprises have concentrated the majority of their bot estate in the bottom-left quadrant — and parked their hardest operational problems in the top-right, managing them with humans. Agentic AI opens the top-right quadrant for automation. That is where the real productivity opportunity lives.

    Three Classes of Work and Which Approach Fits Each

    Beyond the two-axis model, it helps to think in terms of three fundamental classes of enterprise work — each of which has a distinct automation fit profile in 2026.

    Class 1: Execution Work

    Execution work is deterministic, repeatable, and fully specifiable in advance. It has a known input format, a defined logical path, and a predictable output. Examples: transferring data between two systems on a schedule, generating a standard report, updating a record when a trigger fires, sending a notification when a threshold is crossed.

    The right tool for execution work is still, overwhelmingly, static automation — whether that’s RPA, a workflow automation platform, a scheduled script, or an API integration. Adding an AI layer here is engineering complexity with no upside. The work is already being done correctly and cheaply. Don’t touch it.

    Class 2: Interpretation Work

    Interpretation work requires understanding inputs that don’t come in a standardised format. Reading a contract and extracting key terms. Classifying inbound customer emails by intent and urgency. Parsing a vendor proposal and comparing it against internal criteria. Summarising a long document thread into a decision brief.

    This is where AI augmentation of static workflows often pays off first. An LLM-powered extraction or classification step converts unstructured input into structured data — then a static bot or simple workflow handles the rest. The AI does interpretation; the deterministic logic handles execution. This class of work has the fastest, most predictable ROI in the current wave of enterprise AI adoption, because it solves a real bottleneck without requiring full agentic autonomy.

    Class 3: Judgment Work

    Judgment work involves ambiguous goals, incomplete information, multi-step reasoning, and action sequences where the right path can’t be fully specified in advance. Customer dispute resolution. Procurement exception handling. Incident triage and response. Strategic research and synthesis. These are processes where experienced humans make calls that can’t be reduced to rules without losing too much nuance to be useful.

    This is where genuine agentic AI starts to show its value — not by replacing human judgment wholesale, but by operating semi-autonomously on the clear cases while escalating the genuinely ambiguous ones to humans, with full context prepared. A well-designed agent in this space can handle 60–75% of cases end-to-end at current maturity levels, with that number improving as models and tooling improve. For high-volume judgment work, that number represents enormous operational leverage.

    The Hybrid Architecture Nobody Shows You in the Vendor Decks

    Three-tier hybrid architecture diagram showing AI Orchestration Layer on top reasoning and routing, Integration and API Mesh in the middle, and RPA Bots and Legacy Execution at the bottom — agents sit above bots, they don't replace them

    The vendor narrative tends toward a clean before/after: you had bots, now you have agents, life is better. The actual architecture emerging in mature enterprise deployments is considerably more layered — and considerably more useful once you understand it.

    The pattern that is quietly becoming the default for complex workflows is a three-tier automation stack. Each tier has distinct responsibilities and distinct technology fits.

    Tier 1: The AI Orchestration Layer

    At the top sits the intelligence layer. This is where agentic AI operates: perceiving incoming work, interpreting context, planning action sequences, routing to the appropriate execution resources, handling exceptions, and deciding when to escalate to humans. The orchestration layer is not executing individual steps — it’s coordinating them. It understands the goal and adapts the path to reach it.

    In 2026 architectures, this layer is typically built on foundation model APIs (GPT-4o, Claude, Gemini, or enterprise-deployed open models) with an orchestration framework managing tool calls, memory, and multi-agent coordination. LangChain, LlamaIndex, Microsoft AutoGen, and proprietary vendor platforms like Salesforce Agentforce and ServiceNow AI Agents are all operating at this layer.

    The orchestration layer is increasingly described by practitioners as the new product layer — the place where business logic lives in a form that’s readable, auditable, and adaptable, rather than buried in hard-coded bot scripts that only the original developer fully understands.

    Tier 2: The Integration and API Mesh

    The middle tier is the connective tissue: the integration layer that manages authentication, state, data transformation, and routing between the orchestration layer and the execution systems below it. This is where iPaaS platforms (MuleSoft, Boomi, Workato) and API management infrastructure sit.

    The integration layer is often the unglamorous blocker that limits how much the orchestration layer can actually do. An agent can only act on systems it has clean API access to. Where APIs don’t exist — in legacy systems, on-premises platforms, or vendor tools that never opened their interfaces — you’re dependent on the execution layer to bridge the gap.

    Tier 3: RPA Bots and Legacy Execution

    At the bottom of the stack, doing what they have always done well, are RPA bots and other deterministic execution tools. In the hybrid architecture, these are not competitors to agentic AI — they are the execution arm that the orchestration layer delegates to when the target system requires UI automation or when the task is fully structured and the path is known.

    This is the insight that most vendor decks bury: agents don’t replace bots; they instruct them. A well-designed hybrid system uses the agent to decide what needs to happen, the integration layer to route the instruction, and the RPA bot to carry out the action against a legacy system that still doesn’t have a clean API.

    Why the Layering Matters for Investment Decisions

    Understanding this three-tier model changes the investment calculus significantly. Organisations that have invested heavily in RPA don’t necessarily need to write that off. If the bots are running stable, structured execution tasks, they may well have a long life ahead of them in the execution tier. What the organisation needs to add is the intelligence layer above them — along with the governance infrastructure to manage the whole stack safely.

    The question to ask is not “should I retire my bots?” but “do my bots have clean enough interfaces to receive instructions from an orchestration layer, and do I have the observability tools to supervise the full stack end-to-end?”

    The New Failure Modes That Replace the Old Ones

    Warning diagram showing five new agentic AI failure modes: Runaway Loops, Context Drift, Silent Partial Failure, Prompt Injection, and Cascading Tool Errors — none of which existed with static bots

    Static bots have well-understood failure modes. They halt when inputs deviate from the expected format. They produce incorrect outputs when rules are applied to edge cases they weren’t designed for. They break when source system UIs change. These failures are annoying but visible — they tend to generate loud errors, empty output files, or human escalations. You know something went wrong.

    Agentic AI introduces a different class of failure modes, and the most dangerous ones are the ones that don’t announce themselves. Every operations or technology leader deploying agents in 2026 needs to understand these failure modes before they encounter them in production.

    Runaway Loops and Retry Storms

    An agentic system that encounters an obstacle — an API that returns an ambiguous response, a tool call that fails with a retryable error, a step that produces an output the model isn’t sure is correct — may decide to try again. And again. And again. Without explicit termination conditions and token budgets built into the orchestration layer, an agent can consume enormous compute resources, rack up substantial API costs, and still produce no useful output. The technical term is a “retry storm.” In practice, it looks like an agent that ran for six hours and spent $340 in API calls to do nothing.

    Context Drift in Long Multi-Step Runs

    Large language models have finite context windows, and even with extended context lengths, they can lose coherence over very long runs. In a multi-step workflow where the agent is managing dozens of tool calls and keeping track of intermediate results across a complex process, the model can begin to lose the thread of its original goal. It may start optimising for a proxy of the goal rather than the goal itself. It may begin treating intermediate results as final outcomes. The workflow “completes” but the output is wrong in ways that are subtle enough to pass casual review.

    Silent Partial Failures

    One of the most operationally dangerous failure modes is a workflow that appears to complete successfully but has actually failed partway through. An agent updating records across three systems might successfully update two and fail on the third — but report overall success because its tool call returned a 200 status code from a system that silently queued the update rather than executing it. Unlike a static bot that fails loudly when a step doesn’t complete, an agent may evaluate a partial state as “good enough” and move on. The downstream consequences don’t surface until much later.

    Prompt Injection and Tool Misuse

    Because agentic systems act on instructions derived from their inputs, they are vulnerable to a class of attack that static bots are not: prompt injection. A malicious or accidental payload embedded in an input document — an email, a web page the agent browses, a document it reads — can cause the agent to execute unintended actions. The attacker doesn’t need code execution access to the system. They just need to get the right text in front of the agent’s context window.

    Tool misuse is a closely related failure mode: the agent calls a tool with incorrect parameters, misidentifying what the tool does or passing the wrong arguments. In a system with broad tool permissions, this can have significant consequences — sending emails to the wrong recipients, updating records with incorrect data, or initiating transactions that weren’t intended.

    Cascading Tool-Call Errors

    In a multi-step workflow, each tool call depends on the outputs of previous ones. An error at step three — even a subtle one, like a slightly malformed data structure — can propagate through the rest of the workflow, corrupting every downstream step. Unlike a static bot where you can replay from a known checkpoint, an agentic workflow may not have clean rollback semantics. Undoing cascaded errors across multiple systems can be significantly harder than fixing a single failed step.

    The Governance Implication

    All of these failure modes have a common thread: they require observability infrastructure that didn’t exist in most RPA deployments. You need complete, structured logs of every tool call, every intermediate output, every decision the agent made and why. You need alerting on runaway cost and latency. You need idempotency and rollback mechanisms for irreversible actions. You need sandboxed permissions that limit what tools an agent can call and what data it can access. And you need eval frameworks that continuously test agent behaviour against expected outputs in your specific process context.

    Without this infrastructure, deploying agentic AI in production is not brave — it’s negligent.

    Measuring What Actually Matters in Agentic Workflows

    One of the places enterprise agentic AI deployments go wrong is measurement. Teams apply the metrics they used for RPA (automation rate, process cycle time, cost per transaction) to agentic systems and get confusing results that don’t capture the real performance picture. Agentic workflows need a different measurement framework.

    The Metrics That Matter

    Task completion rate (end-to-end). What percentage of initiated workflows reach a successful end state without human intervention? This is the top-line metric. Mature agentic deployments in enterprise settings are targeting 90%+ task completion rates. Early-stage deployments typically see 60–75%. Below 60% suggests the process scope is too broad for current agent capability, or the observability and error handling are insufficient to catch and recover from failures.

    Human intervention rate (by type). When the system does require human help, why? There is a critical difference between a human intervention that handles a genuinely novel edge case (healthy — this is the expected escalation path) and one that’s correcting an agent error (unhealthy — this is a system quality signal). Tracking intervention by type tells you whether your automation rate is improving because your process is actually getting more autonomous, or because you’re silently excluding hard cases from the agent’s scope.

    Tool-call correctness rate. What percentage of tool calls produce the expected output with the correct parameters? This is the agent’s equivalent of step accuracy in an RPA bot. A low tool-call correctness rate usually points to either model capability limits, poor tool documentation in the system prompt, or ambiguous context in the inputs.

    Hallucination and plan-adherence rate. Does the agent follow its intended reasoning path, or does it take unexpected detours? This is harder to measure but critical for compliance-sensitive workflows. You need eval datasets that represent your actual process scenarios — not generic benchmarks — to get meaningful read on this.

    Cost per completed workflow. Unlike RPA bots, which have relatively flat marginal costs once deployed, agentic workflows have variable costs driven by model inference, tool call frequency, and compute. A workflow that costs $0.80 per completed case in month one may cost $0.40 in month three as prompt engineering improves — or $2.20 if the agent starts spawning unnecessary sub-tasks. Track this carefully alongside task completion rate. An agent that achieves 92% task completion at $4.00 per case may be less economically attractive than one that achieves 85% at $0.60.

    The Metric You Should Stop Using

    Stop reporting raw automation rate as though it means what it used to mean. An automation rate that excludes all the cases that were quietly routed to humans before the agent even saw them is not an automation rate — it’s a cherry-picking rate. Report end-to-end task completion rate against the full intended process scope. That number will be lower and more honest, and it will tell you where your agent actually needs more work.

    The Bot Estate Audit: How to Map What You Have Against What’s Coming

    Bot estate audit grid showing three example processes — Invoice Processing kept as RPA, Contract Review with agent layered above, Customer Escalation Routing rebuilt as agentic — with columns for variability, exception rate, input type, and verdict

    Before any organisation can make rational decisions about where agentic AI fits in their automation architecture, they need a clear picture of what they actually have. Most enterprises with more than two years of RPA deployment have a bot estate that evolved faster than it was documented — a mix of well-maintained production bots, half-finished pilots, legacy automations nobody wants to touch, and processes that were automated once and never revisited.

    A structured bot estate audit is the foundation for making sound architectural decisions rather than reactive purchases.

    Step 1: Inventory Every Automated Process

    Create a complete register of every automated process in the estate. For each, capture: the business process it serves, the systems it touches, the volume of transactions it handles per month, who owns it operationally, when it was last updated, and what happens when it fails. This step alone often surfaces bots that have been quietly broken for months, automations running at a fraction of their original volume, and processes nobody can explain anymore because the person who built them left two years ago.

    Step 2: Score Each Process on the Two Axes

    For each process in the register, score it on the two dimensions from the decision surface model: process variability (1–5, where 1 is entirely deterministic and 5 is highly variable) and input structure (1–5, where 1 is fully structured and 5 is entirely unstructured). Add a third score: current exception rate — the percentage of cases that require human intervention. This is usually the most revealing number in the whole exercise, because it is the direct measure of where the existing automation is actually failing.

    Step 3: Classify Each Process Into One of Four Verdicts

    Using the scores from Step 2, assign each process one of four verdicts:

    • KEEP AS-IS: Low variability, structured inputs, exception rate below 5%. These bots are working. They need maintenance, not reinvention. Don’t introduce AI complexity to a process that doesn’t need it.
    • ADD AI PRE-PROCESSING: Low-to-medium variability, unstructured or mixed inputs, exception rate between 5–20%. The process logic is sound but the front-end interpretation is failing. Add an AI classification or extraction step upstream; keep the downstream bot logic. Fastest ROI class in the current environment.
    • LAYER ORCHESTRATION AGENT ABOVE: Medium-to-high variability, mixed inputs, exception rate between 20–50%. The process needs dynamic routing and context-aware decision-making, but still has deterministic execution steps that RPA handles well. Build an orchestration agent that delegates to existing bots for structured execution. Don’t rebuild from scratch — layer intelligence on top.
    • REBUILD AGENTIC: High variability, unstructured inputs, exception rate above 50%. The existing automation is not working at a useful level. The process requires end-to-end agentic handling. Retire the bot, design the process for agentic execution, and build with governance and observability from day one.

    Step 4: Prioritise by Value at Stake

    Not every process in the “REBUILD AGENTIC” or “LAYER ORCHESTRATION” categories should be addressed at once. Prioritise by multiplying the monthly transaction volume by the current exception rate by the cost per human-handled exception. This gives you a rough dollar value of the automation gap — the money being spent on human handling of cases that should be automated. Build your roadmap around closing the highest-value gaps first.

    Step 5: Assess Integration Readiness

    For every process selected for agentic migration, assess whether the systems it touches have APIs that an agent can call. No APIs means the integration tier needs to be built before the orchestration layer can function — a significant cost that must be factored into the business case. Many organisations discover during this step that their biggest agentic opportunities are locked behind legacy systems with no API surface. That doesn’t kill the project, but it redefines the implementation sequence.

    The Workforce Recomposition Nobody Is Talking About Honestly

    Split illustration showing the Bot Builder Era from 2022 to 2024 with RPA Developer and Automation Engineer roles on the left, and the Orchestration Era from 2026 onward with AI Orchestration Engineer, Agent Lifecycle Manager, and AI Governance Lead roles on the right, connected by a bridge labeled Skills Transfer Not Elimination

    No discussion of agentic AI replacing static bots is complete without addressing the workforce dimension — and most public discourse on this topic sits at one of two unhelpful extremes. Either it’s breathless job-loss projections that treat every automation advance as a direct headcount reduction, or it’s reassuring “humans will always be needed” talking points that ignore the real reshaping that’s underway.

    The honest picture in 2026 is more nuanced than either narrative — and it has concrete implications for technology leaders managing both technical and human capital.

    What Is Actually Being Compressed

    The work categories most directly affected by agentic AI are the ones that sit at the intersection of interpretation and routing — the cognitive labour that has been too ambiguous to automate with bots but too repetitive to be a growth career. Customer service triage, document processing review, first-line compliance checking, basic research and data synthesis, and junior process analysis roles are all seeing meaningful pressure as agents improve at handling Class 2 and Class 3 work.

    Within technology teams, routine bot-building work is compressing. The work of creating a simple RPA automation — mapping the process, configuring the tool, testing the steps — is increasingly being absorbed into lower-code platforms and AI-assisted development tools. The “junior automation developer” role that was thriving in 2021–2023 is under genuine pressure in 2026.

    What Is Growing

    The demand picture on the other side of this transition is genuinely strong, but it requires different skills. The fastest-growing role categories in automation in 2026 are:

    • AI Orchestration Engineers: People who design and maintain multi-agent systems, manage tool call architecture, handle memory and state, and build the orchestration layer that sits above existing automation. This requires depth in both AI systems and enterprise integration — a combination that is genuinely scarce.
    • Agent Lifecycle Managers: Practitioners responsible for the ongoing health of agentic systems in production — monitoring performance, managing model updates, running continuous evaluations, handling failure mode analysis, and managing the escalation paths between agents and humans.
    • AI Governance Leads: Specialists managing the policy, audit, compliance, and risk dimensions of autonomous AI systems. As agents gain more action capability and broader system access, governance is not a nice-to-have — it’s a regulatory requirement in a growing number of jurisdictions.
    • Workflow Architects: Generalists who can map business processes against the three-tier automation stack, identify the right combination of static and agentic components for each workflow, and design systems that humans can actually oversee and trust.

    The Skills Transfer Problem

    The uncomfortable gap in this picture is that the skills being compressed (configuring RPA tools, mapping linear workflows, managing bot scripts) do not translate directly into the skills that are growing (AI orchestration, agent observability, governance architecture). The tooling is different. The mental models are different. The debugging approaches are different.

    For organisations managing large automation teams, this means that a reskilling investment — not just a rebranding of job titles — is required to retain the institutional process knowledge that experienced automation practitioners carry while building the new technical capabilities the agentic layer demands. The organisations getting this right are running structured reskilling programmes alongside their agentic AI deployments, not waiting until the workforce gap becomes a delivery problem.

    What Gets Retired, What Gets Layered, and What Gets Rebuilt

    Grounding all of this in practical decision-making: when faced with a specific automation in your estate, the question is always which of three paths it should take. Each has a different cost profile, risk profile, and timeline.

    What Gets Retired

    Bots that should be retired are those that are failing to deliver useful automation (exception rate above 50%), touching processes that have been redesigned since the bot was built, running on systems that are being decommissioned, or serving a business need that no longer exists at the same scale. Retiring a bot is not a failure — it is recognising that the automation was either wrong for the process or has reached the end of its useful life.

    The trap is keeping failing bots running because decommissioning feels like admitting a sunk cost. Bad bots that generate constant exceptions, require regular human intervention, and sit on technical debt are not “something” compared to “nothing.” They are an active cost, a support burden, and often a source of subtle data quality problems in downstream systems.

    What Gets Layered

    The largest category in most mature bot estates is processes where the execution logic is sound but the intelligence layer is missing. These processes should neither be retired nor fully rebuilt — they should have an orchestration or AI pre-processing layer added above them. This is the fastest route to value in most organisations because it preserves sunk investment in working bot logic while adding the judgment capability that closes the exception gap.

    Layering requires clean interfaces between the new intelligence layer and the existing bots. If your existing bots are black-box scripts with no structured input/output contracts, you’ll need to add that interface work before you can layer effectively. Budget for it — it’s typically 20–40% of the total implementation effort but it’s foundational.

    What Gets Rebuilt

    Processes with high variability, unstructured inputs, and exception rates that make the existing automation economically useless should be rebuilt from scratch using an agentic design. Rebuilding is the highest-cost option in the short term, but it is also the option that creates the most durable value — because an agentic system designed from the ground up for the process it serves will outperform a retrofitted hybrid in both capability and maintainability.

    Rebuilding decisions should be paired with a serious conversation about process scope. The temptation when designing an agentic system is to give it a broad remit — handle everything. The better approach is to define tight boundaries for the initial deployment (bounded autonomy at Level 2 or 3), demonstrate performance on that scope, and expand incrementally as the system earns trust and as observability confirms it is behaving correctly.

    The Real Transition: Not a Swap, a Re-Architecture

    The frame of “agentic AI replacing static workflow bots” is not wrong — but it is incomplete in ways that lead to bad decisions. It implies a substitution: one thing in, another thing out. The actual transition is more demanding and more rewarding than that. It is a re-architecture of the entire automation stack, from the execution layer through to the intelligence layer, with a new governance and observability infrastructure running through all of it.

    Gartner’s projection that 40% of enterprise applications will embed task-specific AI agents by the end of 2026 — up from under 5% at the start of 2025 — is not a prediction that 40% of existing bots will be retired. It is a prediction that intelligence will be woven into processes that previously ran on deterministic logic alone. Most of the time, the bot underneath will still be there, executing structured steps. What changes is the layer above it.

    The Organisations Getting This Right

    The common thread among organisations that are successfully navigating this transition is not that they picked the right vendor or the best foundation model. It is that they did the structural thinking first. They audited their process estate. They classified work by type rather than by system. They built the observability infrastructure before they needed it. They designed governance and escalation paths into their agentic systems at the architecture stage rather than bolting them on after a production incident.

    They also resisted the pressure to frame this as a bot-versus-agent binary. The most capable teams are running RPA bots, AI pre-processors, orchestration agents, and human-in-the-loop workflows within the same operational stack — choosing the right tool for each layer of each process, rather than standardising on one paradigm because the vendor relationship is comfortable or the technology is new and exciting.

    The Timeline Is Not Linear

    One final reality check: this transition is not on a smooth curve. Current agentic AI systems are genuinely capable in certain bounded domains and genuinely unreliable in others. Task completion rates of 60–75% for general-purpose agents across complex enterprise workflows means 25–40% of cases still need human handling. That’s not good enough for mission-critical processes with low tolerance for error.

    The implication is that the transition from static bots to agentic systems will proceed at different speeds for different process classes. Interpretation work with a deterministic execution back-end is ready for AI augmentation today, at scale. Fully autonomous judgment work across critical business processes will take longer — and should take longer. The organisations trying to compress this timeline by giving agents too much autonomy too fast are the ones generating the governance incidents that slow adoption across the whole industry.

    Build for bounded autonomy now. Build the observability. Build the evaluation frameworks. Expand the autonomy as performance data justifies it. That is not a cautious strategy — it is the strategy that produces durable, compounding value rather than a pilot that looked great and then failed in production three months later.

    Key Takeaways: Making Practical Decisions in 2026

    If you are responsible for an organisation’s automation architecture in 2026, here are the decisions that will define your outcomes over the next 18 months:

    1. Do the bot estate audit before you buy anything. Map every automated process against the variability and input-structure axes. Score exception rates. Classify into the four verdict categories. That exercise will save you from both the mistake of retiring working bots and the mistake of defending broken ones with new technology labels.
    2. Distinguish between the three classes of work. Execution work stays with deterministic automation. Interpretation work gets an AI pre-processing layer. Judgment work gets an agentic architecture. Don’t apply the same solution to all three.
    3. Adopt the three-tier stack as your mental model. Orchestration layer, integration mesh, execution bots. Design the interfaces between the tiers. Invest in the integration layer — it is the most underestimated cost and the most common blocker.
    4. Build observability before you build autonomy. You cannot govern what you cannot see. Complete tool-call logging, cost monitoring, intervention rate tracking, and eval frameworks must be in place before you expand agent scope in production.
    5. Understand the new failure modes and design against them. Runaway loops, context drift, silent partial failures, prompt injection, and cascading tool errors are all preventable with the right architectural choices. Design for them; don’t discover them in production.
    6. Run the workforce recomposition as a skills programme, not a headcount calculation. The institutional process knowledge that experienced automation practitioners carry is genuinely valuable. The organisations that win this transition will invest in translating that knowledge into the new paradigm rather than treating the transition as a reduction opportunity.
    7. Measure end-to-end task completion rate, not automation rate. The difference between these two numbers is the size of the gap you’re not admitting to yourself. Close that gap, and you’ll know exactly where your agentic investment needs to go.

    The automation era isn’t ending. It’s expanding — into territory that was previously too ambiguous, too variable, and too judgment-dependent to automate at all. The organisations that approach that expansion with structural clarity will build automation stacks that compound in value over time. Those that approach it as a technology replacement cycle will spend the next three years rebuilding pilots that didn’t survive production — and wondering why their competitors keep pulling ahead.