

Your product is live. Your listing looks fine in the backend. Your price is competitive. And yet — sales have flatlined, impressions have cratered, and your listing is generating exactly zero organic traffic. You check your inventory. Nothing’s wrong. You check your ads. They’re running. Then, buried in a notification you almost missed, you spot it: Search Suppressed.
Image suppression is one of the most financially damaging and least understood problems facing ecommerce sellers in 2026. It’s not just an Amazon issue. It’s showing up across Shopify stores, WooCommerce catalogs, Google image search, and even social media feeds where product images quietly disappear from algorithmic reach without any warning. The seller never knows. The customer never finds the product. Revenue evaporates.
What makes 2026 categorically different from prior years is the technological depth at which suppression now operates. Platforms aren’t just checking image dimensions and file types anymore. Amazon’s updated A9 algorithm now reads hidden C2PA content credentials embedded in your JPEG metadata. Instagram is suppressing posts with third-party watermarks. Google is quietly deindexing images on pages that don’t meet quality thresholds. And Shopify stores are silently hiding products because a catalog visibility toggle flipped wrong during a migration.
This guide doesn’t take a single-platform view. It treats image suppression the way an engineer treats a system failure — as a diagnostic problem that has specific triggers, testable causes, and repeatable fixes. Whether you’re an Amazon FBA seller with a suppressed hero image, a DTC brand watching its Google Shopping images vanish, or a Shopify merchant whose products disappeared from search after an update, this manual walks you through every layer — what’s actually happening, why, and exactly how to fix it.
Understanding How Platform Algorithms Suppress Images in 2026
The first thing sellers need to accept is that image suppression is rarely accidental. Platforms suppress images because their systems — increasingly powered by machine learning — have detected something that violates a policy, a technical standard, or a quality threshold. The suppression is intentional, even when the violation was not.
The Shift to Automated, AI-Powered Enforcement
Two years ago, listing reviews were largely reactive. A human moderator would flag something following a complaint, or a seller could stay under the radar for months with minor compliance failures. In 2026, that era is effectively over. Every major ecommerce and social platform has deployed automated compliance engines that scan images at scale — in real time, or near real time — against a layered set of rules.
Amazon’s A9 algorithm update represents the most aggressive example of this shift. The system now processes not just pixel-level image data, but embedded file metadata — including the increasingly widespread C2PA (Coalition for Content Provenance and Authenticity) tags written into images by Adobe Creative Cloud, Photoshop, and other mainstream editing tools. If your image was touched by a generative AI tool, there is likely a metadata trail that Amazon’s systems can now read. That trail is enough to trigger an automated suppression.
Google operates differently, suppressing images through indexing decisions rather than explicit “suppressed” labels. An image that lives on a low-quality page, lacks descriptive alt text, or is blocked by a robots.txt directive simply doesn’t get indexed — meaning it never appears in Google Image Search or Google Shopping. It’s not flagged; it’s just absent.
Why 2026 Is a Turning Point
Three converging trends have made image suppression a much bigger problem this year than it was even eighteen months ago. First, the explosion of AI-generated and AI-edited imagery has forced platforms to implement detection systems that cast a wide net — and those nets catch legitimate sellers along with bad actors. Second, platform monetization pressures have created incentives to push organic content into paid channels, and image quality enforcement is one lever for doing that. Third, ecommerce competition has intensified to the point where a suppressed listing isn’t just an inconvenience — it’s a revenue emergency, because competitors in the same category are getting the impressions you’re not.
Understanding this context matters because it changes how you approach the problem. Suppression isn’t a bug. It’s a feature — one designed to enforce specific standards that you need to meet precisely if you want visibility.
Amazon Main Image Suppression: The Pure White Problem and Beyond
Amazon’s main image — the one that appears in search results, on the product detail page, and in ads — carries more compliance weight than any other element of your listing. When it fails, the entire listing goes dark. Not just the image. The listing. Understanding exactly what “failure” means in 2026 is the first step toward prevention and recovery.
The Background Rule Is More Precise Than You Think
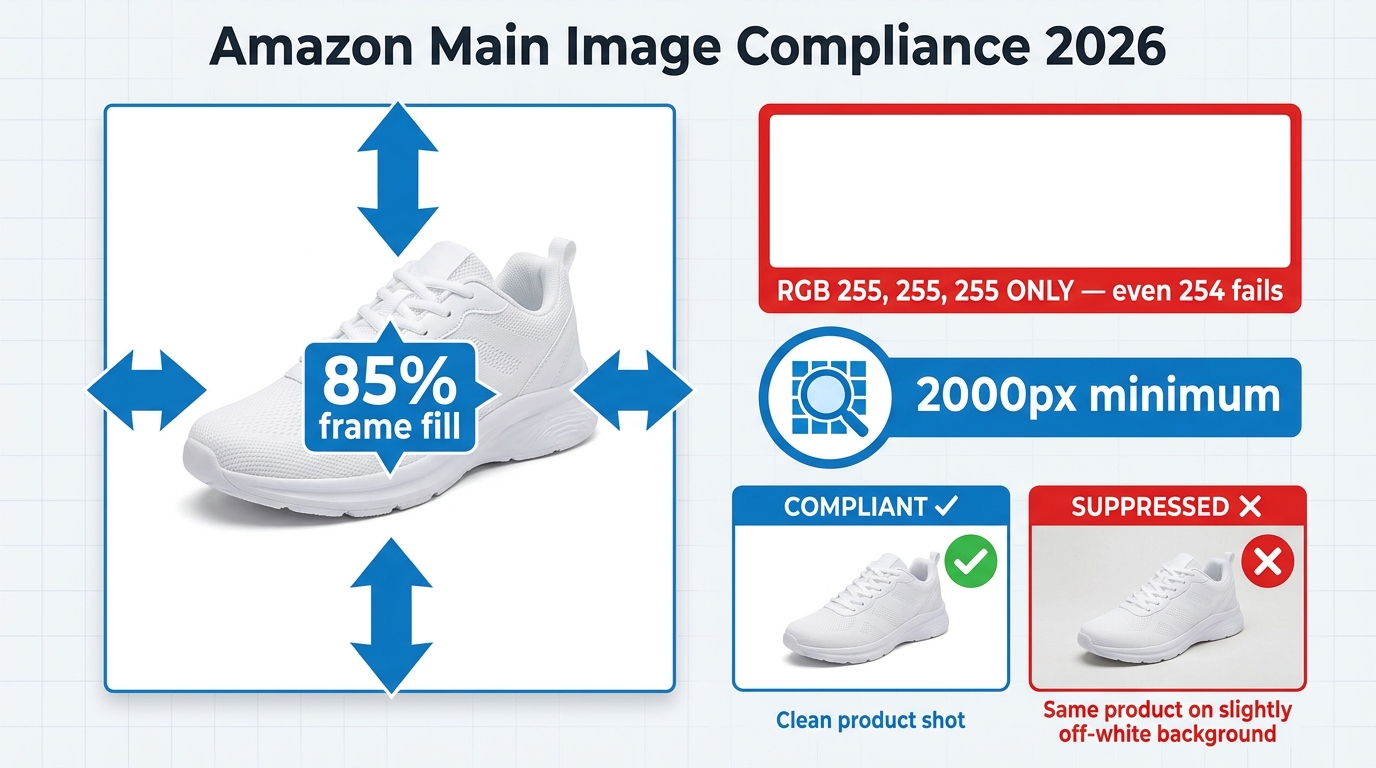
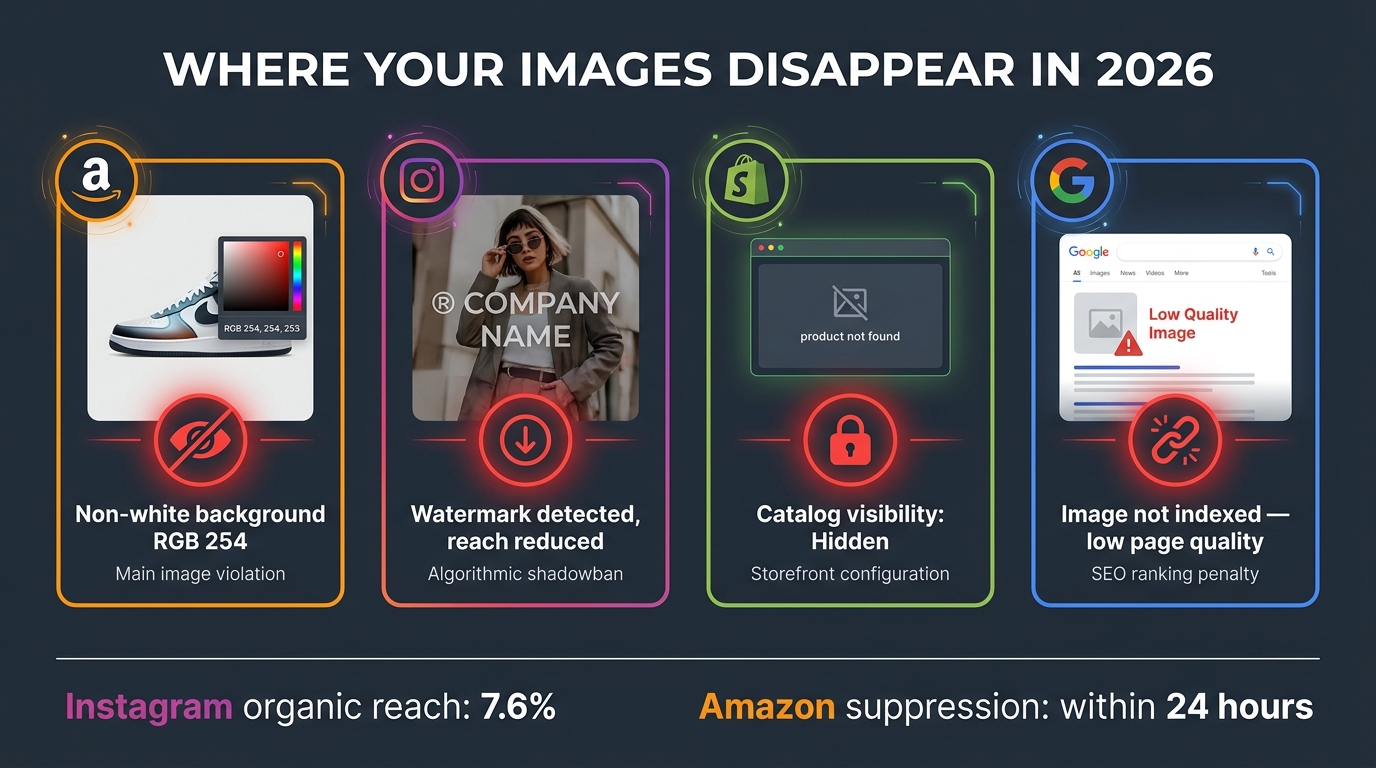
Amazon requires a pure white background on all main images. Most sellers know this. What they don’t know is how precise “pure white” actually is. The specification is RGB 255, 255, 255 — all three color channels at maximum value simultaneously. A background reading RGB 254, 255, 255 is technically off-white. So is 253, 253, 253, which is a common output from auto-white-balance tools and AI background removal apps. Amazon’s 2026 scanning systems detect these deviations at the pixel level.
The problem is compounded by JPEG compression. Even if your image starts at perfect RGB 255, 255, 255, saving it as a JPEG can introduce compression artifacts that push background pixels slightly off-white. This is why professional Amazon photographers either save at maximum JPEG quality (quality 100 in Photoshop) or use PNG files, which are lossless and preserve exact pixel values. If you’re using an AI background removal tool and saving the output as a JPEG at standard quality settings, you may be introducing the very artifacts that are triggering suppression.
The 85% Frame Fill Requirement
Amazon requires the product to occupy at least 85% of the image frame. This isn’t aesthetic guidance — it’s enforced algorithmically. A product that’s too small in the frame will trigger suppression. Common causes include:
- Canvas expansion during editing: When you use a generative AI tool to extend the background, you often inadvertently shrink the product’s proportional footprint in the frame.
- Incorrect cropping: Sellers who resize from lifestyle images sometimes preserve too much negative space around the product.
- Multi-product shots: If you’re showing a product with accessories or packaging, the primary product may be undersized relative to the total composition.
- Tall or wide products on square canvases: A long, narrow product shot on a 1:1 canvas may naturally fall under the 85% threshold if framing isn’t tightly considered.
You can check this manually by overlaying a crop guide in Photoshop that represents 85% of the canvas area — the product should fill it. There are also third-party Amazon compliance checkers (SellerSprite, Pixelcut Pro) that measure this automatically.
Resolution Requirements for Zoom Eligibility
The minimum resolution for Amazon listing images is 1,000 pixels on the longest side. But that minimum is essentially a baseline for publication — not for performance. To enable the product zoom feature that’s proven to increase conversion, you need at minimum 2,000 pixels on the longest side. Amazon’s own published guidance recommends 2,000–3,000 pixels. Listings with images below 1,600 pixels on the longest side are increasingly flagged by the platform’s quality scoring systems, even if they aren’t technically suppressed.
Other Main Image Triggers
Beyond background and resolution, the following elements will also trigger suppression in 2026:
- Text, logos, or watermarks anywhere in the image — including brand logos, “bestseller” badges, or social media handles
- Props, accessories, or additional items not included in the product and not essential to demonstrate its use
- Packaging shown without the product visible (for non-food categories)
- Models or mannequins in adult apparel — certain clothing categories have model requirements, others have model prohibitions
- Shadows that bleed to the image edge — a shadow reaching the frame boundary is interpreted as a non-compliant background element
- Borders, frames, or colored backgrounds of any kind, including pale gray “studio” backgrounds
C2PA Metadata — The Hidden AI Trigger Most Sellers Have Never Heard Of

This is the issue that caught the most sellers off guard in early 2026, and it’s still not widely understood. C2PA stands for Coalition for Content Provenance and Authenticity — an industry standard for embedding information about how an image was created and modified directly into its file metadata. Major adopters include Adobe (across its entire Creative Cloud suite), Google, Microsoft, and dozens of camera manufacturers.
How C2PA Tagging Works
When you open an image in Photoshop and use any generative AI feature — including Generative Fill, Generative Expand, or even the Neural Filters — Photoshop writes C2PA credentials into the image metadata. These credentials describe what tools were used and what modifications were made. They’re invisible to the naked eye but readable by any software that knows to look for them. In 2026, Amazon’s scanning system now looks for them.
The practical consequence is this: a seller who hires a photographer, gets a clean product shot on white seamless paper, then uses Photoshop’s Generative Fill to extend the background slightly — a genuinely minor edit — may now have that image flagged as containing synthetic AI alterations. The metadata says the AI touched it. Amazon’s system reads the metadata. The listing gets suppressed.
Which Tools Write C2PA Tags
As of 2026, C2PA credentials are written by the following commonly used tools:
- Adobe Photoshop — any use of Generative Fill, Generative Expand, or Content-Aware Fill with generative options enabled
- Adobe Firefly — all image generation outputs
- Microsoft Designer and Bing Image Creator
- Some Canon, Nikon, and Sony cameras — hardware-level C2PA signing for authentication (this does not indicate AI alteration; these camera-signed images should be safe)
- Stable Diffusion implementations with C2PA-enabled wrappers
Importantly, C2PA tagging is not universal. Many AI background removal tools (remove.bg, Photoroom, ClipDrop) do not write C2PA tags. The issue is specifically tied to tools that write provenance credentials as part of an industry transparency initiative.
How to Detect and Strip C2PA Metadata
You can check whether an image contains C2PA credentials using the free tool at contentcredentials.org/verify — simply upload your image and it will tell you whether provenance data is present and what it contains.
To remove C2PA metadata before uploading to Amazon:
- In Photoshop, go to File → Export → Export As (not Save As). In the Export As dialog, there is a “Metadata” dropdown — set it to “None.”
- Alternatively, use a dedicated metadata stripping tool like ExifTool (command line:
exiftool -all= yourimage.jpg) which removes all metadata including C2PA credentials. - In Lightroom Classic, export with “Include” set to “Copyright Only” or “None” under the metadata settings.
Once metadata is stripped, re-check the image at contentcredentials.org to confirm it’s clean before uploading. This single step has resolved suppression for many sellers who couldn’t understand why their otherwise-compliant images were being flagged.
Amazon Secondary Images: Lifestyle, Infographics, and Slot-Specific Rules
Sellers often fixate on the main image when troubleshooting suppression, but secondary images (image slots 2 through 7) carry their own compliance requirements — and violations in these slots can affect listing quality scores even when they don’t trigger hard suppression.
What’s Allowed in Secondary Slots
Secondary images have considerably more creative freedom than main images. Lifestyle photography, dimension infographics, feature callout graphics, comparison charts, and instructional use-case images are all permitted and actively encouraged. These slots are where you build conversion — the main image gets the click, and secondary images do the selling.
That said, certain rules still apply in 2026:
- Text density in infographics: Amazon hasn’t published an exact threshold, but enforcement patterns suggest that images where text occupies more than roughly 20% of the image area by pixel count are more likely to be flagged as “text-heavy” and potentially suppressed. Keep callouts concise and use white space strategically.
- Lifestyle image content: Models and contexts must accurately represent the product and its use. Lifestyle scenes that imply product capabilities the item doesn’t have, or that include sexually suggestive content, are suppressed.
- Slot-specific placement: Certain category-specific rules govern which image types belong in which slots. For some categories, size guides are required in a specific slot. Check your category style guide in Seller Central for slot-by-slot requirements.
- Image quality minimums: Secondary images must meet the same resolution minimums as main images (1,000 pixels on the longest side, recommended 2,000+). Blurry, pixelated, or low-resolution infographics will be removed.
The Competitive Intelligence Play
One thing most sellers overlook: Amazon may replace your secondary images with images sourced from other sellers or brand submissions if it determines your secondary content is low quality. This is especially common on shared ASINs where multiple sellers list against the same product. If another seller submits higher-quality images under the same ASIN, their images may take precedence across the listing. The fix is to use Brand Registry to lock control of your content — registered brand owners have considerably more authority over which images display.
Shopify and WooCommerce: Technical Image Failures and Catalog Visibility
Shopify and WooCommerce image suppression operates very differently from Amazon’s algorithmic enforcement. On these self-hosted or SaaS platforms, suppression is almost always a technical misconfiguration rather than a policy violation. The result is the same — invisible products — but the causes and fixes are entirely different.
Shopify Product Images Not Displaying
When Shopify product images fail to appear, the cause usually falls into one of these categories:
Product status set to Draft or Unlisted. This is the single most common cause of invisible Shopify products. A product in “Draft” status is not published to any sales channel. Navigate to Products → All Products, find the product, and check the “Status” field in the top right. Change from Draft to Active, and ensure the “Online Store” sales channel is checked under the “Sales channels” section.
Online Store sales channel not enabled. Even with an active product, if the Online Store sales channel hasn’t been enabled for that specific product, it won’t appear on your storefront. This is a common consequence of bulk imports where channel assignment settings weren’t configured correctly.
Image file type or size issues. Shopify supports JPEG, PNG, GIF, and WebP files up to 20MB. Images above this threshold fail silently — they show as uploaded in the admin but don’t actually display on the frontend. This catches sellers who are uploading high-resolution RAW conversions or oversized TIFFs converted to JPEGs without compression.
CDN caching delays. Shopify serves images through its CDN (Content Delivery Network). After uploading or replacing an image, there can be a delay of up to several hours before the new image propagates through the CDN globally. If you’re testing from the same browser or device repeatedly, hard refresh with Ctrl+Shift+R (or Cmd+Shift+R on Mac) to bypass your local cache.
Theme-level CSS conflicts. Some custom theme modifications or third-party app injections can accidentally hide image containers via CSS. Open your browser developer tools (F12), inspect the image element, and check for display: none, visibility: hidden, or opacity: 0 CSS rules being applied by your theme or apps.
WooCommerce Image Suppression Causes
WooCommerce stores have a different set of common culprits:
Catalog visibility set to “Hidden.” In WooCommerce, every product has a “Catalog Visibility” setting found under Products → Edit Product → Product Data → Advanced. Options include “Shop and search results,” “Shop only,” “Search results only,” and “Hidden.” A product set to “Hidden” won’t appear in any automatic listing or search. This setting is easy to accidentally set during imports or bulk edits.
Image regeneration needed after theme switch. When you switch themes in WordPress, the theme may use different image sizes than your previous theme. Products that had images uploaded under the old theme may display broken or missing images until you regenerate image thumbnails. Use the Regenerate Thumbnails plugin (or WP-CLI command wp media regenerate) to rebuild image sizes for all your products.
Featured image not set. WooCommerce uses the “featured image” (set in the product editor’s sidebar) as the primary product image. If a product was imported with gallery images but no featured image designation, it may show a placeholder or nothing at all on the shop page. Always verify the featured image is set for every product.
Plugin conflicts. Image display issues in WooCommerce are frequently caused by incompatibilities between plugins — particularly image optimization plugins, page builder plugins (Elementor, Beaver Builder), or lazy loading plugins that interfere with WooCommerce’s image rendering. Systematically deactivate plugins one at a time to isolate the conflict, then update or replace the offending plugin.
Permissions and server-level file access issues. On self-hosted WordPress, image files need correct file permissions (typically 644 for files, 755 for directories) and must be accessible by the web server. Misconfigured permissions following a server migration or security hardening can cause images to display as broken links even though the files exist in the uploads folder.
Social Media Image Reach Suppression: Meta, TikTok, and Platform Rules
Social media image suppression differs from ecommerce suppression in a fundamental way: the image isn’t removed or flagged with an error. Instead, the platform’s algorithm simply stops distributing it. Your post exists. You can see it. Your followers can find it if they come to your profile. But it’s not being served in feeds, explore pages, or recommendation engines — which is where discovery actually happens. This is reach suppression, and in 2026 it’s more systematic than ever.
Instagram and Facebook in 2026
Meta has implemented several changes in 2026 that significantly affect how image posts are distributed:
Third-party watermarks and platform logos. Posts containing watermarks from other platforms — notably the TikTok logo, YouTube branding, or even visible Canva or Adobe Express watermarks — are systematically deprioritized by Meta’s algorithm. The platform treats these as reposted content from competitors and reduces distribution accordingly. Instagram’s average organic reach already sits at approximately 7.6% of followers per post in 2026; posts with detected cross-platform watermarks may receive significantly less than that baseline.
External link indicators in images. Meta has become increasingly aggressive about suppressing content it perceives as driving traffic off-platform. Images with visible URLs, “link in bio” callouts, or QR codes pointing to external sites are experiencing reduced algorithmic distribution. This is part of a broader Meta strategy that restricts clickable external links on business pages unless the account is subscribed to Meta Verified.
Non-original and reposted content. Meta’s 2026 content originality systems can identify duplicate or near-duplicate image content. If you’re posting the same image across multiple accounts, reposting images originally published elsewhere, or sharing stock imagery used widely across the platform, you’ll experience compressed reach. Original photography, especially content that was generated or captured for that specific account, consistently outperforms.
TikTok Image and Product Image Rules
TikTok Shop product images have their own suppression mechanisms. Product listings with low-quality main images — blurry, text-heavy, or featuring competitor branding — are deprioritized in TikTok Shop’s browse and search features. TikTok’s product image guidelines are broadly similar to Amazon’s (clean backgrounds, product prominence, no misleading imagery) but are enforced with different consistency and different speed. TikTok’s enforcement tends to be more inconsistent but can result in product removal from the Shop entirely when violations are severe.
For standard TikTok video thumbnails (not Shop product images), images featuring excessive text, inflammatory content, or misleading clickbait framing are algorithmically suppressed before a video even gets its initial distribution push — meaning suppression happens at upload, not after performance data is collected.
Google Image Indexing Issues: What’s Really Blocking Your Product Images
Google doesn’t suppress images in the way Amazon does. There’s no “search suppressed” flag, no notification, and no appeal process. When Google stops indexing your product images, the only evidence is the absence of traffic from Google Image Search and Google Shopping — both of which can be significant sources of discovery for physical products.
Why Google Stops Indexing Images
Low page quality. Google evaluates images in the context of the page they’re on. If a product page has thin content — minimal description, no reviews, no structured data — Google may index the page itself but decline to index the images on it. This is increasingly common on DTC Shopify stores with auto-generated product pages that contain only a product title, price, and one-line description.
Technical crawl blocks. Images served from a subdomain or CDN URL that’s blocked in robots.txt will not be indexed regardless of how strong the surrounding page content is. Check your robots.txt for any rules that disallow Googlebot from crawling your image CDN paths. This is surprisingly common on Shopify stores where older robots.txt configurations blocked CDN subdomains.
Missing or weak alt text. Alt text is the primary signal Google uses to understand what an image depicts. An image with no alt text, or with generic alt text like “product-image-1,” gives Google nothing to work with. In competitive niches, images with strong descriptive alt text — including the product name, key features, and relevant modifiers — consistently outperform in Google image search rankings.
Image file format and size issues. Google strongly prefers WebP format for image indexing in 2026, citing faster loading and better Core Web Vitals scores. JPEG and PNG are still indexed, but oversized images (above 3–5MB) on pages that load slowly may be deprioritized in indexing queues. Modern image CDNs and Shopify’s built-in image optimization already handle WebP conversion — but self-hosted WooCommerce stores often need to implement this manually via plugins like Imagify or ShortPixel.
Structured data not implemented. Product schema markup with an image property significantly increases the likelihood of your product images appearing in Google Shopping and rich results. Pages without structured data are less likely to have their images surfaced in visual search. In 2026, with Google’s March Core Update tightening rich result eligibility, properly implemented JSON-LD Product schema with image URLs is essentially table stakes for product image visibility.
Your Image Audit Framework: A Platform-by-Platform Checklist

Before you touch a single image, you need to know exactly what you’re dealing with and on which platform. The audit phase is where sellers usually cut corners, and it costs them — they fix one thing, upload new images, and get suppressed again for a different violation they didn’t catch the first time. A systematic audit catches all violations at once.
Amazon Image Audit Checklist
For every product on Amazon, work through the following before touching any images:
- Go to Seller Central → Inventory → Manage Inventory → Suppressed. This filtered view shows you every listing currently in suppressed status. Note the suppression reason listed for each — this tells you which specific policy is being violated.
- Download all images for the affected listing via the listing editor or your image hosting source.
- Check main image background: Open in Photoshop. Use the eyedropper tool (set to “3 by 3 average” sample size) and click on multiple points of the background. The Color Picker should show exactly 255, 255, 255 for all channels. Alternatively, use the Histogram panel — a pure white background should show a sharp spike at the far right of the histogram with no clipping on the edge. Any gray or colored pixels constitute a failure.
- Check product frame fill: In Photoshop, create a new layer filled with a contrasting color and set to 85% of canvas dimensions. Place it centered on the canvas. Your product should extend beyond this guide frame in all directions.
- Check resolution: Go to Image → Image Size. Confirm the longest side is at minimum 1,000 pixels (ideally 2,000+).
- Check for C2PA metadata: Upload the image to contentcredentials.org/verify. If credentials are detected, strip them using ExifTool or Photoshop’s Export As (metadata: None) before re-uploading.
- Check for prohibited elements: Zoom into the image at 100% and look for any text, logos, watermarks, borders, or frame-edge shadows.
Shopify Audit Checklist
- Check all product statuses in Products → All Products. Filter by “Draft” to find unpublished products.
- Verify Online Store sales channel is enabled for each affected product.
- Confirm image file sizes are under 20MB and in a supported format (JPEG, PNG, WebP).
- Test the product URL in an incognito browser window to isolate caching issues.
- Open browser developer tools and inspect image containers for CSS display or visibility overrides.
- Check theme/app update log for any recent changes that might have broken image display.
WooCommerce Audit Checklist
- Check each affected product’s catalog visibility setting (Products → Edit → Product Data → Advanced).
- Verify featured image is set for all products — not just gallery images.
- Run the Regenerate Thumbnails plugin to rebuild image sizes after any theme change.
- Check file permissions on the wp-content/uploads directory via FTP or cPanel File Manager.
- Deactivate all non-essential plugins and test; reactivate one by one to identify conflicts.
- Test in the WordPress default theme (Twenty Twenty-Four) to confirm the issue is theme-related.
Google Image Indexing Audit
- Use Google Search Console → URL Inspection for your product page URL. Check whether the page itself is indexed, and look at the “Page fetch” section for any resource loading failures.
- Review your robots.txt file for any rules blocking image directories or CDN subdomains.
- Check alt text across all product images — use a crawler like Screaming Frog to audit at scale.
- Verify Product schema markup using Google’s Rich Results Test tool.
- Check image file sizes using PageSpeed Insights — large images are frequently cited as performance issues that affect indexing priority.
Fixing Suppressed Listings: Step-by-Step Reinstatement Process
With a complete audit in hand, you know exactly what’s broken. The reinstatement process differs by platform and by the type of suppression, but in every case the sequence is: fix, verify, resubmit, monitor.
Reinstating a Suppressed Amazon Listing
The most common Amazon image suppression — background non-compliance — can typically be resolved without any appeal. Fix the image, upload a compliant version, and the algorithm will review and reinstate within 24 to 72 hours in most cases. Here’s the detailed process:
Step 1: Fix the image. Using Photoshop, open your product image. If the background is off-white, create a new layer below the product, fill it with RGB 255, 255, 255 using the Paint Bucket tool, and flatten the image. If the product has been isolated with a feathered mask, the soft edges may still produce off-white anti-aliasing artifacts — switch to a hard-edged mask for the product boundary. Export using File → Export → Export As, set format to JPEG (quality 10/maximum), and set metadata to “None” to strip any C2PA tags.
Step 2: Verify compliance before uploading. Run the exported image through your checklist: background RGB check in MS Paint (eyedropper tool), frame fill estimate, file size verification, and C2PA check at contentcredentials.org.
Step 3: Upload via Seller Central. Go to Inventory → Manage Inventory. Find the suppressed listing, click Edit, and navigate to the Images section. Delete the non-compliant image and upload your fixed version. Save the listing.
Step 4: Monitor for reinstatement. After uploading, allow 24 to 48 hours for Amazon’s systems to review the new image. Check Seller Central notifications and the Suppressed filter daily. Most compliant images are reinstated within this window. If after 72 hours the listing is still suppressed despite a clearly compliant image, proceed to appeal.
Step 5: Appeal if reinstatement doesn’t happen automatically. Contact Seller Support and open a case citing the specific listing (ASIN), stating that the main image has been updated to comply with all main image guidelines. Attach a screenshot of your image with the background color values visible. Escalate to Selling Partner Support if needed. Amazon’s turnaround on image appeals averages 3 to 7 business days.
Restoring Shopify Product Visibility
Shopify fixes are usually immediate. Changing a product from Draft to Active, enabling a sales channel, or re-uploading a correctly formatted image takes effect within minutes. The only exception is CDN caching — if you’ve replaced an image but it still shows the old version in your browser, wait 2 to 4 hours and hard-refresh. If the issue persists after 24 hours, contact Shopify support because the CDN may need a manual cache purge for your specific image URLs.
Recovering WooCommerce Product Images
After fixing the root cause (visibility settings, permissions, plugin conflict, or thumbnail regeneration), force WordPress to clear all caches. If you’re using a caching plugin like WP Rocket, W3 Total Cache, or LiteSpeed Cache, go into the plugin settings and clear all caches manually. Also purge your CDN cache if you’re using one (Cloudflare, BunnyCDN, etc.). Then test in a private browser window — not an incognito tab on a browser that has cached the site — to see clean page loads without cached data.
Prevention: Building an Image Pipeline That Won’t Get Flagged

Suppression is expensive. You lose sales during the time you’re suppressed, you spend time and potentially money fixing the problem, and repeat suppression signals erode your listing’s quality score. The far better investment is building a production process that systematically prevents suppression before it happens.
Set Up a Compliant Photography Workflow
The most reliable way to eliminate background compliance issues is to shoot on actual white seamless paper under controlled lighting — not to rely on AI background removal. A proper product photography setup costs far less than a month of lost sales from a suppressed listing:
- Use white seamless photography paper (available in rolls from photography suppliers) as your background.
- Light the background independently from the product — aim for the background to meter at one to two stops overexposed relative to the product to ensure true white after any exposure adjustments.
- Shoot tethered to a calibrated monitor so you can verify background color in real time during the shoot.
- Export from Lightroom with metadata set to “Copyright only” (which excludes C2PA synthetic alteration tags while preserving legitimate copyright information).
If you are using AI tools for any aspect of image editing, restrict their use to secondary images (slots 2–7) rather than the main image. Lifestyle generation, background scene creation, and infographic design are safer in secondary slots where the compliance rules are less absolute.
Implement a Pre-Upload Verification System
Before any image goes live on any platform, it should pass through a defined verification checklist — not a mental note, but an actual documented checklist that a team member completes and signs off on. For Amazon specifically, this checklist should include background RGB verification, frame fill measurement, resolution confirmation, prohibited element scan, and C2PA metadata check. Treat it like a quality control step, not an afterthought.
There are third-party tools that automate parts of this. SellerSprite’s image compliance tool checks background color and frame fill. Pixelcut Pro includes an Amazon compliance checker. These aren’t replacements for human judgment but they’re useful first-pass filters that catch the most common errors.
Use Brand Registry Proactively
Amazon Brand Registry gives registered trademark holders meaningful control over how images appear on their listings. Brand-registered sellers can submit images through A+ Content and the product listing editor with greater confidence that their submissions will be prioritized over other sellers’ images on the same ASIN. If you’re selling branded products and haven’t enrolled in Brand Registry, image control — not just the other brand-protection benefits — is a compelling reason to do so.
Monitor Suppression Proactively with Automated Alerts
Don’t wait to discover a suppressed listing through declining sales. Set up proactive monitoring:
- Amazon Seller Central: Check the Suppressed filter in Manage Inventory weekly — or daily during peak sales periods. Amazon sends suppression notifications but these can be delayed or buried in seller communications.
- Third-party monitoring tools: Platforms like Helium 10, Jungle Scout, and SellerBoard include suppression monitoring features that alert you via email or dashboard when a listing status changes.
- Google Search Console: Set up email alerts for coverage issues — these will notify you when pages fall out of the index, which may indicate image-related quality issues.
- Shopify inventory: Periodically audit your product list filtering by status to catch products that have accidentally reverted to Draft.
Stay Current on Policy Updates
Platform image policies are not static. Amazon has updated its main image requirements multiple times in the past three years, and the C2PA metadata crackdown in early 2026 caught sellers completely by surprise because there was no advance announcement — just a wave of suppression notifications. Make it a monthly habit to review Amazon’s Style Guides for your categories (found in Seller Central Help), follow Amazon seller communities and forums for early-warning discussions, and subscribe to ecommerce industry publications that track policy changes.
The Business Case for Getting This Right
It’s worth stepping back and quantifying what image suppression actually costs. On Amazon, a suppressed listing generates zero organic impressions — meaning you’re invisible to every customer who doesn’t already know your ASIN. For sellers running Sponsored Products campaigns, ad spend may continue during suppression depending on campaign settings, but with suppressed organic visibility, the total listing performance collapses. A seller generating $50,000 per month from a listing that goes suppressed for just five days loses an estimated $8,000 to $10,000 in revenue — not counting the longer tail of ranking recovery, since Amazon’s algorithm penalizes listings that go dark even after reinstatement.
On DTC channels, the math is different but no less significant. A Shopify product that’s invisible in Google image search and Google Shopping loses an acquisition channel that costs nothing per click. A social media product post that’s algorithmically suppressed doesn’t just fail to reach new customers — it affects your account’s overall reach score, potentially depressing future posts as well.
This is why treating image compliance as infrastructure — rather than a one-time task — is the right frame. The sellers who treat it as a production step built into their workflow, not a problem they address reactively, are the ones who maintain stable visibility while competitors cycle in and out of suppression crises.
Conclusion: Diagnose, Fix, Prevent — in That Order
Image suppression in 2026 is more technically complex than it’s ever been, driven by AI content detection, metadata reading, algorithmic reach suppression, and platform-specific rule sets that change without notice. But it’s also more fixable than sellers realize — because most suppressions stem from specific, identifiable, correctable causes.
The key shift is moving from reactive to diagnostic. When your images disappear, the instinct is to panic, delete everything, and start over. The better approach is to treat it like a system failure: identify which platform is suppressing you, consult the specific failure mode, and apply the targeted fix. Then build the monitoring and production systems that make the next suppression event something you catch before it costs you sales.
Your Action Checklist
- Today: Log into every selling platform and run the Suppressed filter. Identify any active suppressions right now.
- This week: Download all main images from your top five Amazon ASINs. Run them through Photoshop background verification and contentcredentials.org for C2PA check.
- This week: Audit your Shopify and WooCommerce stores for product status, catalog visibility, and image file size compliance.
- This month: Build and document a pre-upload image verification checklist for your team or contractor.
- Ongoing: Set up automated suppression monitoring on Amazon. Schedule a monthly policy review to catch guideline changes before they catch you.
Visibility is the prerequisite for everything else in ecommerce — conversions, reviews, advertising performance, and rank. Image suppression eliminates that prerequisite silently and quickly. With the diagnostic framework laid out in this guide, you have everything you need to find suppression, fix it, and stop it from recurring.
The sellers who win in 2026 aren’t the ones with the best products. They’re the ones whose products can actually be found.
Leave a Reply