
There are two kinds of Amazon sellers who read articles about listing images. The first kind has genuinely poor images — blurry supplier photos, non-white backgrounds, mismatched lighting. They know something is wrong because their conversion numbers tell them so. The second kind has done the homework: they have a clean hero shot on pure white, they’ve filled all seven image slots, their infographics are tidy, and their listing looks professional. And yet, their conversion rate is still underwhelming.
This article is mostly for the second group. Because the gap between compliant images and compelling images is where most Amazon sellers are leaving the most money on the table in 2026.
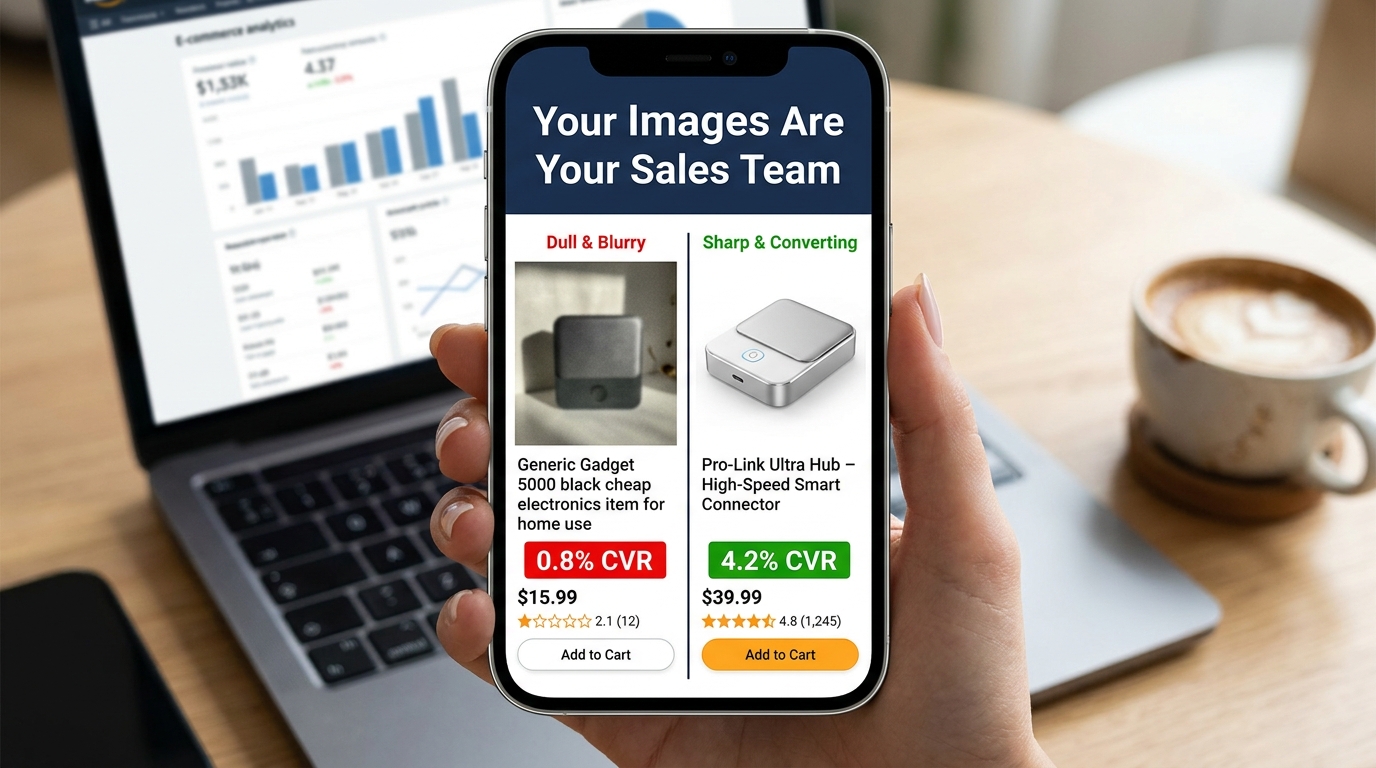
Compliance is table stakes. Following Amazon’s technical specifications gets your listing visible. It does not, by itself, get your listing clicked. It does not move a browsing shopper from passive interest to genuine purchase intent. That shift — from compliant to compelling — requires a completely different mental model. You’re not just satisfying a checklist. You’re constructing a visual sales argument, slot by slot, that answers every doubt a buyer might have before they ever read a single word of your bullet points.
The data backs this up. Professional photography drives 2–3x higher conversion rates compared to listings with amateur or generic visuals. A+ Content with optimized images can increase sales by up to 20% over standard listings. A single main image test can move CTR from 2.1% to 3.4% — a 62% increase — without changing a single word of copy. These are not small numbers in a competitive marketplace.
What follows is a ground-level examination of every image slot, the psychology driving buyer behavior, the specific mistakes that sabotage otherwise solid listings, and the testing infrastructure you need to keep improving. Let’s start at the very beginning: what happens in the buyer’s brain before they’ve consciously decided anything.
The Psychology of 50 Milliseconds: How Buyers Decide Before They Think

Research on visual perception consistently shows that humans form first impressions of visual stimuli in approximately 50 milliseconds. On Amazon, that means a shopper scrolling through search results has already begun evaluating your product — assessing quality, trustworthiness, and relevance — before their conscious brain has processed a single character of your title.
This is not a metaphor. It’s the literal neurological reality of your marketplace. And it has profound practical implications for how you think about your hero image.
The Trust Signal Problem
When a buyer sees a product image, their brain isn’t asking “does this look nice?” It’s running a much more primal calculus: can I trust this? Sharp focus, accurate color reproduction, professional lighting, and a product that fills the frame all function as unconscious trust signals. They communicate that the seller is serious, the product is real, and the brand has invested in quality presentation.
Conversely, a dark photo, an off-white background, a product that looks small and lost in an oversized frame, or any hint of blurriness triggers an equally automatic suspicion response. Shoppers don’t consciously think “this seller looks unprofessional.” They just feel reluctant — and they click somewhere else.
Images as Sensory Substitutes
In a physical retail environment, customers pick things up. They feel the weight, test the texture, open the packaging, press the buttons. Online shopping strips all of that away. The only sensory information available to a potential buyer is what your images provide. This means your image set isn’t just a gallery — it’s a substitute for the in-store experience.
The most effective Amazon image stacks understand this implicitly. They anticipate the specific sensory questions a customer would ask if they were holding the product. How big is this, really? What does the material feel like? How does it work? What does it look like when someone my age uses it? Every image slot is an opportunity to answer one of those questions before the customer has to ask it — or worse, leaves to find the answer on a competitor’s listing.
The Risk Reduction Imperative
Behavioral economics research consistently demonstrates that loss aversion — the fear of making a bad purchase — is a more powerful motivator than the anticipation of gain. Applied to Amazon shopping, this means buyers aren’t just looking for reasons to buy your product. They’re actively scanning for reasons not to buy it. Every unanswered question, every ambiguous image, every detail left to the imagination increases the perceived risk of the purchase.
Your image set’s job is to systematically eliminate that risk. Show the product from every relevant angle. Demonstrate scale unambiguously. Show it in use in a realistic context. Answer the “but what about…” questions before they’re asked. The listing that eliminates the most purchase-blocking doubts wins the conversion.
Your Hero Image: The Click-or-Skip Decision
The hero image — the first image, the one that appears in search results — is functionally a different animal from all your other images. Its job is not to convince. Its job is to get the click. Everything else on your listing handles the convincing. The hero image is purely responsible for getting the shopper off the search results page and onto yours.
This is an important distinction that many sellers blur. They design their hero image to communicate features, highlight benefits, or establish brand identity. Those are all valuable objectives — for images two through seven. The hero image has one objective: click-through rate.
Technical Requirements Are Not Optional
Amazon’s requirements for the main image are strict and actively enforced:
- Background must be pure white at RGB 255, 255, 255. Not off-white. Not light gray. Not 254, 255, 255. Amazon’s image processing bots check pixel values, and deviations — even imperceptible ones to the human eye — can trigger automatic listing suppression.
- The product must occupy at least 85% of the image frame. Images where the product looks small, distant, or surrounded by negative space fail to communicate quality and have reduced thumbnails in search results, where space is already at a premium.
- Minimum resolution of 1,000 pixels on the longest side, with 1,600–2,000+ pixels strongly recommended. Below 1,000 pixels, Amazon’s zoom feature is disabled. Since 66% of shoppers use the zoom feature to inspect products, disabling it is a significant conversion handicap.
- No text, logos, badges, watermarks, or promotional graphics. No “Best Seller” banners, no discount callouts, no lifestyle props. The main image must show the product — and nothing but the product — on that pure white background.
Differentiation Within the Rules
Given that every seller in your category is operating under the same constraints — white background, no text, full product — how do you differentiate? Several levers remain within compliance:
Angle. The default supplier photo usually shows the product from a straight-on, slightly elevated three-quarter angle. Most competitors are using this same perspective. Testing a different angle — a direct front view, a slightly lower perspective that creates more presence, a slightly overhead angle for flat products — can make your thumbnail visually distinct in a sea of identically-shot competitors.
Fill ratio. Aim for maximum allowable product fill. A product that takes up 90%+ of the frame looks more imposing and premium than one at 86%. In a small search result thumbnail, this difference is immediately visible.
Lighting. Subtle shadows and three-dimensional lighting create depth and weight. Flat, shadowless product images often look like PNG cutouts. Careful studio lighting that reveals the product’s form and texture — without adding non-white elements — creates a more premium visual impression.
Variant selection. If your product comes in multiple colors or sizes, your hero image should feature the variant most likely to appeal to your target buyer first. Showing your least-differentiated version in the hero wastes the first impression.
The 7-Slot Framework: Mapping Your Images to the Buyer Journey
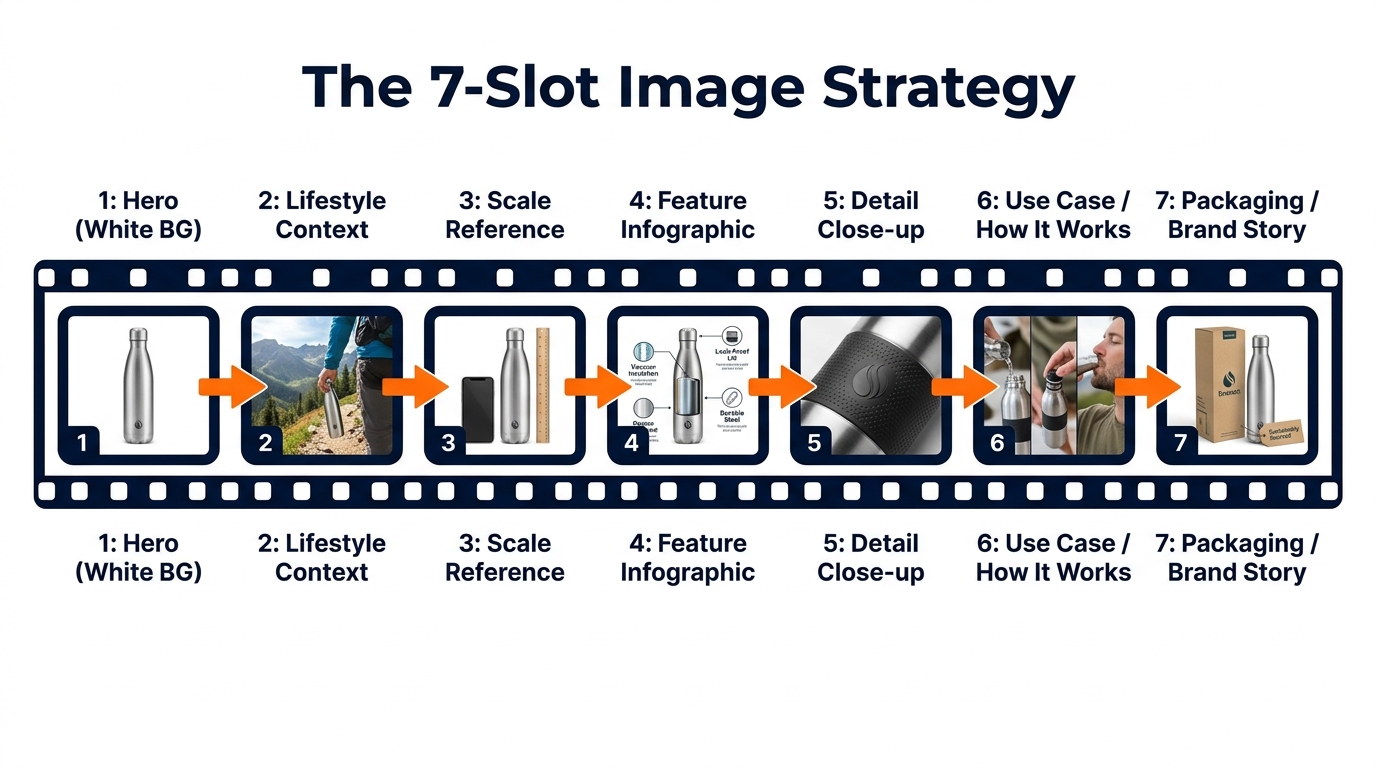
Amazon allows up to nine product images, plus a video. Most successful sellers use all seven primary image slots at minimum. But using all seven slots isn’t the same as using them strategically. The sequence matters. Each image should answer the next logical question a buyer has after viewing the previous one.
Think of the image stack as a visual sales conversation. You’ve captured attention with the hero. Now you have a shopper on your product page who wants to be convinced. Walk them through that journey deliberately.
Slot 1: The Hero (White Background)
As covered above: pure white, 85%+ fill, high resolution, no graphics. Optimized for search result thumbnails and first-impression quality signals.
Slot 2: Lifestyle Context
The first secondary image should immediately answer “what does this look like in the real world?” Show the product being used by a person or placed in an environment that reflects your target customer’s life. This image performs a critical emotional function: it invites the buyer to project themselves into the scene. They stop evaluating the product abstractly and start imagining themselves owning it. Research from Amazon’s own data suggests that contextual images correlate with up to 40% higher conversion rates compared to product-only secondary images.
Slot 3: Scale Reference
Ambiguous size is one of the most common reasons shoppers abandon Amazon purchases and leave negative reviews. Slot 3 should establish scale unambiguously, by showing the product next to a familiar reference object (a hand, a coin, a standard household item) or against a measuring tape. Dimension infographics — the product with labeled measurements overlaid — also work well here. The goal is that after seeing this image, the buyer has zero doubt about how large or small this product actually is.
Slot 4: Feature Infographic
This is where you make the product’s key benefits legible at a glance. Feature callouts, labeled arrows, material specifications, compatibility information. Unlike slots 2 and 3 which build emotional connection and practical understanding, slot 4 speaks to the analytical buyer who wants to verify that the specifications match their needs. Well-designed infographics here can preempt the most common questions and answers submitted on your listing.
Slot 5: Detail Close-up
What is the one detail of your product that competitors can’t match — or that looks significantly better up close than it does at full size? This slot exists to show that detail in its best possible form. Stitching on a bag. The grain of a wood surface. The mechanism of a clasp. The texture of a material. Whatever makes your product worth more than the cheaper version, show it at maximum zoom.
Slot 6: Use Case / How It Works
For products where usage isn’t immediately obvious, or where the purchase decision hinges on whether the product will work for a specific scenario, slot 6 demonstrates the product in action. Before-and-after comparisons work well here if your product solves a problem. Step-by-step visual instructions for products with a learning curve also reduce friction by preempting “will I be able to figure this out?” anxiety.
Slot 7: Packaging / Brand Story
The final slot is where you complete the experience and reduce post-purchase anxiety. Show the product packaging clearly. If the product is frequently gifted, show it gift-ready. If it’s sold with accessories, show the full contents of what arrives. This image answers the final question: “What exactly am I going to receive?” Buyers who know exactly what’s in the box have lower return rates, fewer negative reviews, and higher likelihood of leaving positive feedback.
Infographics That Actually Convert (Not Just Look Good)
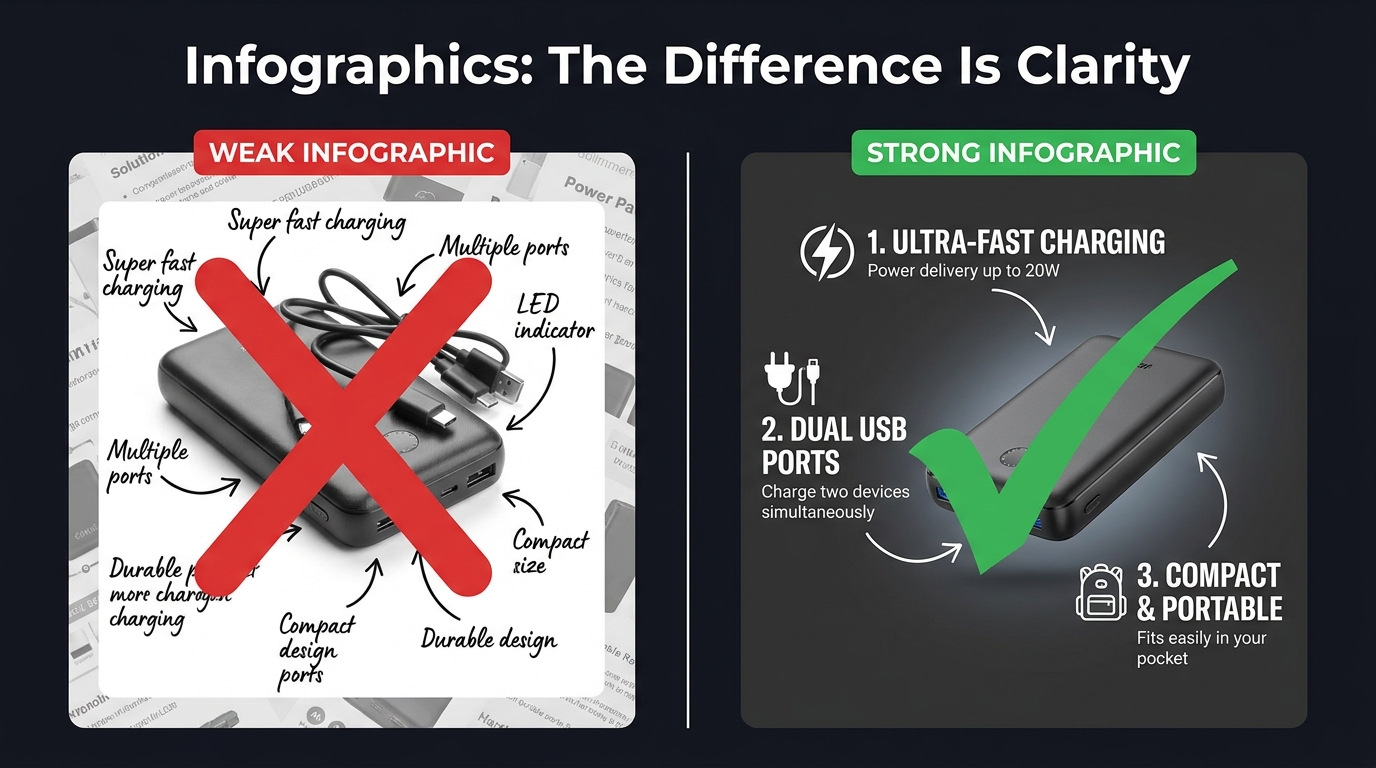
Product infographics have become near-universal among serious Amazon sellers. The problem is that most of them are designed to look comprehensive rather than communicate clearly. They’re cluttered with feature callouts, competing visual elements, decorative design choices that obscure rather than illuminate, and fonts that look beautiful at desktop scale but become completely illegible as a mobile thumbnail.
An infographic that can’t be read is worse than no infographic at all. It signals effort without delivering information — a combination that reads as noise rather than signal.
The Legibility Hierarchy
Effective infographics follow a strict visual hierarchy. The product image itself occupies 50–60% of the frame. Feature callouts are limited to four to six maximum — not because you don’t have more features, but because each additional callout competes for attention with every other callout. When everything is highlighted, nothing is highlighted.
Font size matters more than most sellers realize. At minimum, your largest text elements should be readable when the image is displayed at 100 pixels wide — the approximate size of a mobile search thumbnail. Use clean, geometric sans-serif typefaces. Script and decorative fonts look elegant at full size; they become illegible marks at small sizes.
Rufus AI and Image Text Recognition
There’s a functional reason to optimize infographic legibility beyond human readers. Amazon’s AI assistant Rufus, which handles an increasing share of on-platform product discovery queries, uses OCR (optical character recognition) to read text from listing images. Well-designed infographics with clear, legible text give Rufus more data to index about your product — which can positively influence visibility in AI-driven search results. Cursive fonts, overly decorative typography, and low-contrast text-on-background combinations are invisible to OCR systems. Clean, high-contrast, sans-serif text is fully readable.
“Us vs. Them” Comparison Charts
One of the highest-performing infographic formats on Amazon is the product comparison chart — a table that compares your product against a generic “standard alternative” across a series of features. You cannot name competitors directly, but you can compare against “similar products” or “the competition” using feature checkboxes.
These charts work because they reframe the buying decision. Instead of evaluating your product in isolation, the buyer is now evaluating it against a weaker alternative. The comparison does the persuasion work so your bullet points don’t have to. The most effective versions of these charts are selective: they highlight the specific dimensions on which your product wins, not a comprehensive feature list where your product might be neutral or weaker.
Before-and-After as Proof
For problem-solution products — cleaning supplies, skincare, organization tools, fitness equipment — before-and-after images embedded within an infographic are among the most persuasive visual formats available. They make the benefit concrete. Shoppers don’t have to imagine the outcome; they can see it. The key is that the “after” image needs to be genuinely dramatic enough to justify the format. A subtle improvement shown as a before-and-after signals that the improvement isn’t actually that meaningful.
Lifestyle Images: What Separates Scroll-Stoppers from Stock Photo Clones
Lifestyle photography is arguably the most frequently misunderstood element of an Amazon image stack. Many sellers treat it as decoration — a nice-to-have that makes the listing look more professional. The reality is that lifestyle images perform specific, measurable psychological work, and when that work is done poorly, they actively hurt conversions.
The Aspiration Alignment Problem
The function of a lifestyle image is to allow a shopper to see themselves in the scene. This only works if the scene accurately reflects the aspirational self-image of your actual target customer. Generic lifestyle photography — stock models who don’t look like your buyer, environments that feel staged rather than real, scenarios that don’t match how your customer actually uses the product — creates a psychological disconnect rather than a connection.
A kitchen gadget marketed to home cooks needs lifestyle images that feel like a real kitchen, not a photoshoot kitchen. A travel bag needs lifestyle images from actual travel contexts, not a model posing with a bag in front of a white backdrop. The gap between “this feels like my life” and “this looks like an advertisement” is the gap between a lifestyle image that converts and one that doesn’t.
People in the Frame Increase Conversions
Multiple studies on e-commerce photography have confirmed that images including human subjects — hands, faces, full figures in context — consistently outperform product-only images in secondary listing slots. There are several reasons for this. Human faces direct attention and create emotional resonance. Hands holding or using a product provide unconscious scale reference. People in context model the usage scenario, reducing ambiguity. And humans are simply neurologically interesting to other humans in a way that isolated objects are not.
The key is that the person in your lifestyle image should match your buyer’s demographic as closely as possible. A product targeting middle-aged women that features exclusively 25-year-old male models is producing cognitive friction, not connection.
Environment as a Trust Signal
The background and environment of your lifestyle images communicate as much as the product itself. A clean, well-lit kitchen tells the buyer that your product belongs in quality households. A cramped, cluttered background with poor lighting signals that the product is a budget purchase. The production quality of your lifestyle photography sets a price anchor in the buyer’s mind before they’ve seen the price. Premium environments justify premium pricing.
The Supplier Photo Trap: Why Generic Images Force You Into Price Wars
There is a specific and painful competitive dynamic that happens to sellers who rely on supplier-provided photos. Because supplier photos are typically distributed to every reseller who purchases that product, multiple listings in the same category are showing identical images. The buyer sees the same photo three or four times across different listings. At that point, the only visible differentiator is price.
This is the supplier photo trap: using generic images doesn’t just fail to differentiate you — it actively positions you as a commodity, a price-per-unit proposition. You become interchangeable with every other seller offering the same product. Your only competitive lever is margin erosion.
The Investment Calculation
Professional product photography is frequently cited by sellers as an expensive upfront investment that they’d rather defer. The math, however, rarely supports deferral. A professional product photography session for a single ASIN typically costs between $300 and $800 for a full image set including hero, lifestyle, and infographic components. For a product generating $5,000 in monthly revenue at a 15% conversion rate, a 1 percentage point improvement in conversion rate (from 15% to 16%) — well within the range that professional photography routinely delivers — generates roughly $333 in additional monthly revenue. The photography pays for itself in under three months.
The cost of not investing in professional images — sustained below-market conversion rates, depressed organic ranking (which responds to conversion signals), and the race to the bottom on pricing — compounds indefinitely.
What to Look for in a Product Photographer
Not all product photographers are equally suited for Amazon. The criteria that matter for Amazon specifically are somewhat different from those that matter for brand lookbooks or editorial photography:
- Amazon compliance knowledge. A photographer who knows the RGB 255, 255, 255 rule and how to achieve it reliably in post-processing is worth significantly more than one who doesn’t. Some photographers charge extra to “clean up” backgrounds in editing; others build it into their standard workflow.
- Experience with mobile thumbnail optimization. Ask to see examples of their work in Amazon search results. How does the product look as a small thumbnail? Does the product fill the frame?
- Lifestyle photography capability. Separate from hero shots, lifestyle photography requires scouting or building appropriate sets, coordinating with models, and understanding how to direct “real use” scenarios. Not all product photographers have this skill set.
- Turnaround and revision policy. Listing optimization is iterative. You may need to update images as you gather conversion data. A photographer who charges full rate for every revision is going to slow your optimization cycle.
Mobile-First Image Design: The 6-Inch Screen Test
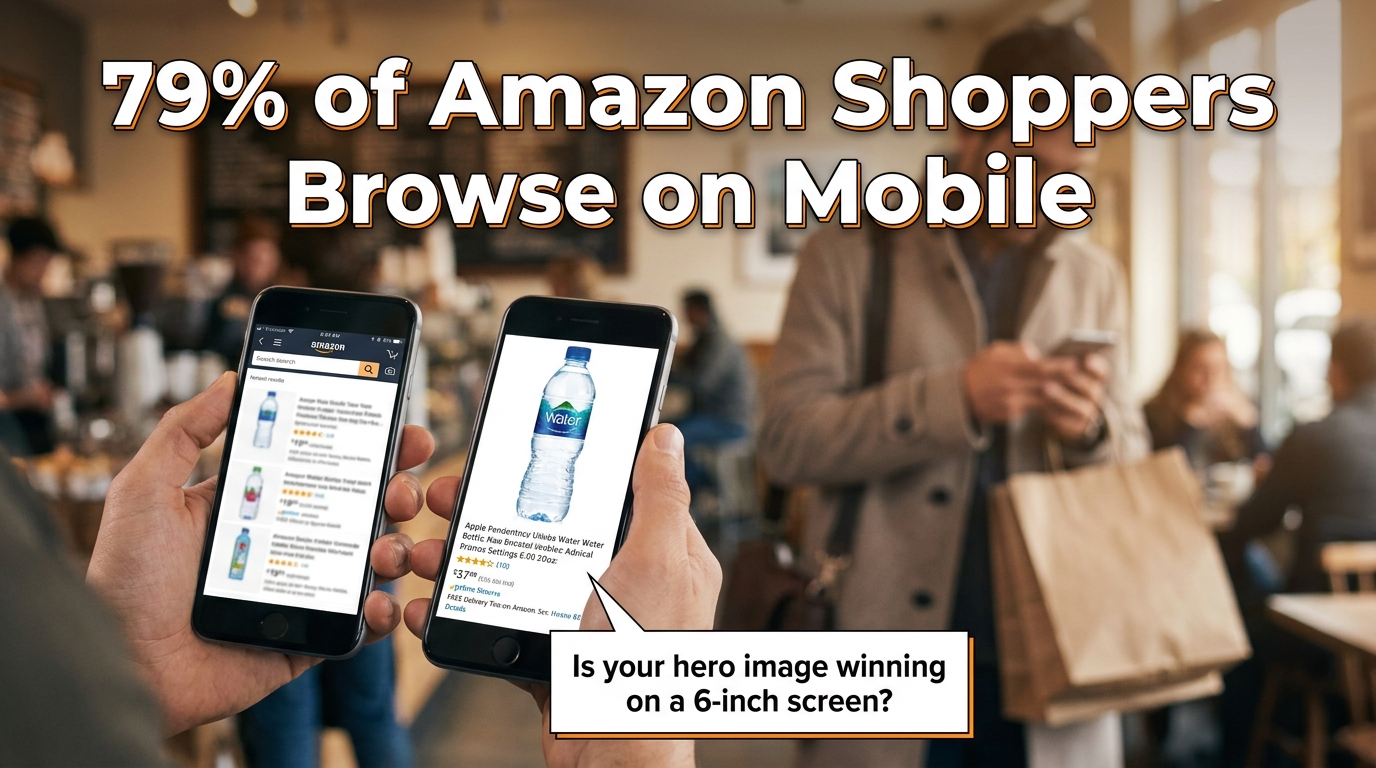
The majority of Amazon traffic in 2026 arrives on mobile devices. Depending on the category, mobile browsing accounts for somewhere between 60% and 79% of Amazon sessions. This isn’t a trend that’s still emerging — it’s been the dominant channel for several years. And yet, a significant number of Amazon sellers are still designing and evaluating their listing images on desktop monitors.
The result is image sets that look excellent on a 27-inch display and are borderline unusable on a 6-inch phone screen. This is a fixable problem, but fixing it requires changing how you evaluate your work.
The Thumbnail Test
Before finalizing any hero image, run what photographers and Amazon optimization specialists call the thumbnail test. Reduce your proposed hero image to 200 pixels wide and evaluate it at that size. Does the product still read clearly? Is it identifiable at a glance? Does it look sharp or pixelated? Does it look larger and more premium than the thumbnails around it in a mock search results grid?
If the product is hard to identify at thumbnail size, or if it looks smaller and less impressive than competitors’ thumbnails, the hero image needs to be reworked regardless of how it looks at full resolution. The hero image will first be seen as a thumbnail. Optimize for the format it will actually appear in.
Text Legibility on Mobile
Infographic text that’s readable at 1,500 pixels wide may become completely illegible at the 400-pixel width of a mobile product image display. The practical rule of thumb: if you cannot read the text when the image is displayed at the width of a typical smartphone screen (roughly 375 to 414 pixels), the text will not be read by most of your buyers.
This has real consequences. An infographic designed to communicate five key benefits actually communicates zero if the text is illegible on the device your buyers are using. The solution is to be ruthless about text size, to limit the amount of text per image, and to rely more heavily on iconography — which scales better than text — for secondary information delivery.
Vertical vs. Horizontal Framing
Amazon’s standard product image ratio is a square (1:1). On mobile, the product detail page displays the main image as a square occupying the full width of the screen. This is actually favorable for product photography — the square format is generous, and a product photographed to fill it well will look impressive on mobile. Where sellers run into trouble is with secondary images that are composed with wide horizontal elements that lose impact when constrained to the square format. Design all secondary images to work within the square frame, with the most important visual information concentrated in the center of the frame where mobile cropping is least likely to affect it.
A/B Testing Your Way to Better CTR with Manage Your Experiments

Most Amazon sellers optimize their images once at launch and leave them alone. The highest-performing sellers treat images as a continuously iterated variable — something to test, measure, and improve on a regular cadence. Amazon’s native A/B testing tool, Manage Your Experiments, makes this process accessible to brand-registered sellers without requiring any third-party tools.
What Manage Your Experiments Actually Tests
Manage Your Experiments allows brand-registered sellers to run controlled split tests on several listing elements including main images, A+ Content, titles, and product descriptions. For image testing specifically, you create two versions of the element you want to test, Amazon splits your traffic between the two versions, and after a statistically significant sample period (typically four to eight weeks), the tool reports which version performed better on key metrics including click-through rate, conversion rate, and revenue per visitor.
The main image is the highest-priority element to test first, because it directly affects CTR from search results — the metric that controls how much organic traffic your listing receives. A CTR improvement is not just a revenue increase; it’s an input into Amazon’s A10 ranking algorithm. A listing that gets clicked more often ranks higher, which generates more traffic, which generates more clicks. The compounding effect of CTR improvement is significantly larger than the immediate revenue impact.
What to Test First
The most productive main image tests focus on variables with the highest potential for differentiation:
Angle and orientation. Test your current standard angle against an alternative perspective. A three-quarter view against a straight front view. An elevated view against an eye-level view. Angle changes often produce the largest CTR differences because they affect how the product appears in thumbnail comparison with competitors.
Single item vs. multi-item context. For some products, showing a single clean unit on white background beats showing the product alongside related accessories. For others, context props (a glass of water next to a supplement bottle, a cutting board next to a knife set) perform better. Without testing, you’re guessing.
Packaging on vs. packaging off. For products where unboxed and boxed presentations are both plausible, test both. Some categories reward the “ready to use” unboxed appearance. Others benefit from the retail packaging shot that signals the product makes a good gift.
Reading the Results Correctly
Manage Your Experiments provides statistical confidence scores along with the performance data. Do not make decisions based on preliminary data before statistical significance is reached. It is extremely common for one variation to appear to be winning decisively after two weeks, then for the results to normalize or reverse as the sample size grows. Wait for Amazon’s confidence threshold — they recommend at least 90% statistical confidence — before treating any result as conclusive.
Also important: document your tests. Keep a running record of what you tested, what won, and by how much. Over time, this record reveals patterns — perhaps angles consistently outperform flat presentations for your product type, or lifestyle contexts in your hero image consistently underperform clean white backgrounds even though conventional wisdom says otherwise. Your accumulated test data is genuinely proprietary competitive intelligence.
A+ Content: Extending the Visual Story Below the Fold
For brand-registered sellers, A+ Content (formerly Enhanced Brand Content) extends the visual real estate of your product listing beyond the seven standard image slots. A+ modules appear below the product description and bullet points, occupying a significant portion of the page before reviews begin. They’re widely treated as secondary to the main image stack, but the data suggests that’s a mistake.
Amazon’s own reporting indicates that Basic A+ Content increases sales by up to 8% on average. Premium A+ Content — available to sellers who have published A+ on a qualifying number of ASINs — can lift sales by up to 20%. Those are meaningful numbers on any ASIN with established revenue, and they’re achievable purely through optimizing content that many sellers either haven’t published or haven’t updated since their initial listing launch.
Treating A+ as Continuation, Not Repetition
The most common mistake sellers make with A+ Content is repeating information already communicated in the main image stack. If your slot 4 infographic already covers the key features, restating those same features in your A+ modules adds length without adding value. Shoppers who scroll to A+ Content have already seen your main images. They’re looking for something new — deeper information, greater detail, reassurance on a point the main images couldn’t fully address.
Effective A+ Content strategies use the expanded visual space for:
- Brand narrative. Who makes this product, why does it exist, what’s the philosophy behind it? A+ is where brand story can be told with enough visual depth to feel authentic rather than promotional.
- Comparison tables. Product comparison modules within A+ allow structured comparison of multiple SKUs in your line, or comparisons against non-specific generic alternatives. These are particularly valuable for product lines where buyers commonly ask “which version should I buy?”
- Deep feature explainers. Technical products, products with unique mechanisms, or products with complex usage protocols benefit from the expanded space A+ provides for detailed explanation. Where a main image infographic is limited to four or five bullet points, A+ can support a full feature breakdown with larger imagery and richer detail.
- Social proof integration. Some A+ templates allow the incorporation of quote-style testimonials or user scenario imagery that reinforces the lifestyle messaging from your main image stack.
Premium A+ Content: When It’s Worth It
Premium A+ Content unlocks interactive modules including video embeds, interactive hotspot images (where buyers can click areas of a product image to reveal feature details), and larger format imagery. The interactive hotspot module in particular represents a meaningful evolution in on-page conversion tools — it transforms a static product image into an exploratory experience that keeps buyers engaged on your listing longer.
Longer time-on-page is a positive signal in Amazon’s ranking algorithm. A listing that holds buyer attention — through interactive A+ modules, video, and a compelling image sequence — will rank above an identical listing with lower engagement metrics. The relationship between listing quality and organic visibility is circular: better content drives better engagement, better engagement drives better ranking, better ranking drives more traffic.
Image Mistakes That Trigger Suppression, Cost Rankings, and Kill Sales
Beyond the strategic considerations, there are specific technical and compliance errors that do immediate, measurable damage to listing performance. Some of these trigger automatic suppression — Amazon removes your listing from search results until the issue is corrected. Others are more subtle, degrading conversion rates without triggering any alerts.
Immediate Suppression Triggers
- Non-white backgrounds on the main image. Even a background that appears white to the human eye can be slightly off the required RGB 255, 255, 255 value. Always verify the background color value in image editing software, not by visual inspection.
- Promotional text on the main image. “Sale,” “Best Seller,” discount percentages, “Free Shipping” badges — any of these on the primary image will trigger suppression.
- Images below 1,000 pixels on the longest side. This is the minimum for display; in practice, images below this threshold may not trigger immediate suppression but will degrade zoom functionality and perceived quality.
- Showing products not included in the listing. If your listing is for a single item and your main image shows two items, that’s a suppression trigger. The main image must accurately represent what the buyer will receive.
Non-Suppression Errors That Still Cost Sales
- Using supplier stock photos. As discussed, not a compliance violation but a serious strategic mistake that commoditizes your listing.
- Insufficient image variety. Running five images when nine are available is leaving persuasion tools on the table.
- Misaligned lifestyle imagery. Lifestyle images that don’t reflect your actual target demographic create psychological friction rather than connection.
- No video. Amazon allows one video on standard listings and multiple videos for Brand Registry members. Listings with product videos have meaningfully lower return rates — some sources cite up to 30% reduction in returns for categories where product mechanics are demonstrated — and higher conversion rates because video is the closest simulation of actually using the product before purchase.
- Infographics with low-contrast or decorative fonts. Illegible infographics don’t communicate features — they communicate visual noise, and they’re invisible to Rufus AI’s OCR indexing.
- Ignoring image order. The sequence in which Amazon displays secondary images is controlled by the seller. Many sellers upload images in whatever order they happened to be processed, rather than the strategic sequence that follows the buyer journey. Audit your current image order and resequence if necessary.
The “Newly Updated” Image Risk
A less-discussed hazard: updating images on a high-performing listing without testing the new version first. Sellers who redesign their entire image stack and replace it wholesale — without A/B testing — frequently experience conversion rate drops from perfectly compliant, professionally produced new images that simply communicate less effectively than the previous version. The old images had accumulated organic performance data. The new images, whatever their aesthetic quality, are unproven.
The correct protocol for image updates on existing listings is: test the new version against the existing one using Manage Your Experiments before replacing anything. Only replace the existing images if the test data confirms the new version performs better.
The Amazon Image Audit: A Section-by-Section Checklist
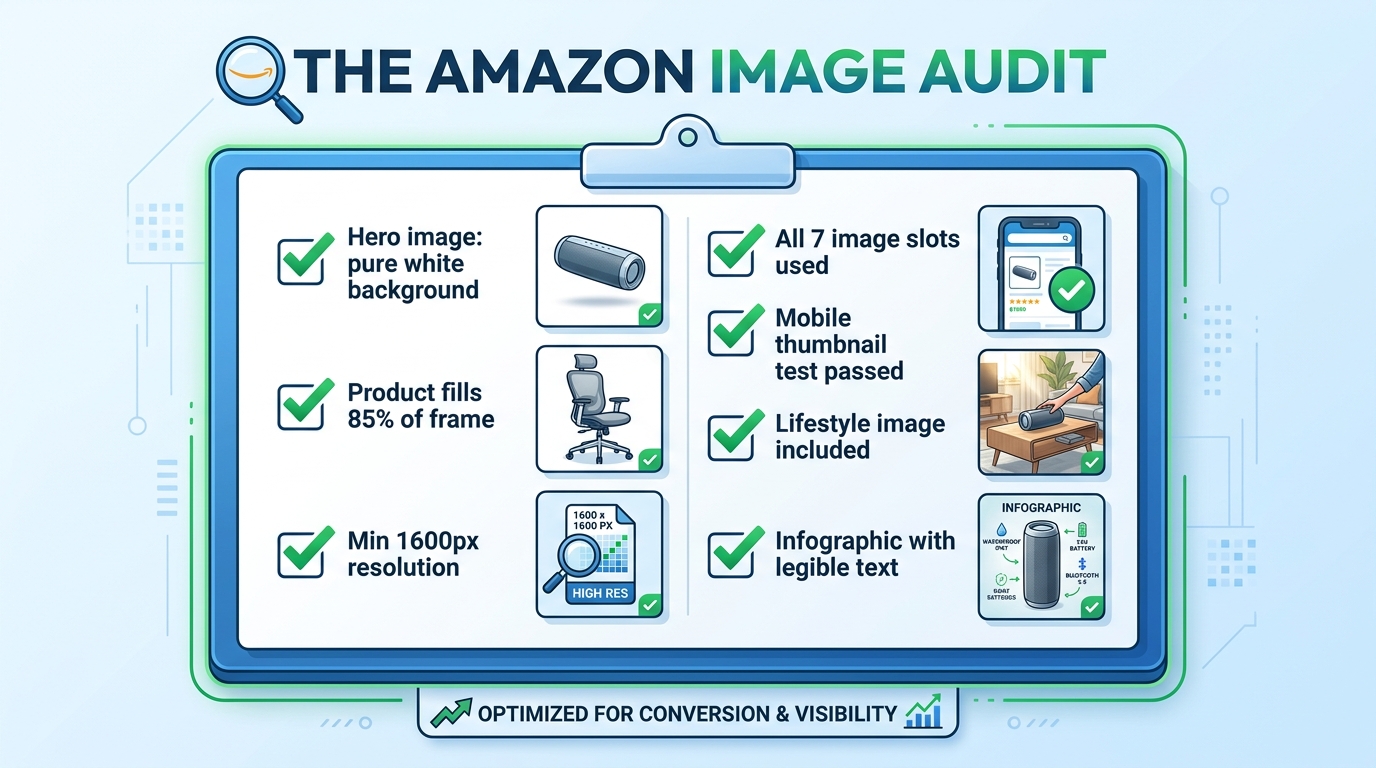
Rather than leaving the “what to do next” question abstract, here is a practical audit framework to assess the current state of any listing’s image set. Work through this systematically on every ASIN in your catalog.
Hero Image Audit
- Verify background RGB value is exactly 255, 255, 255 in image editing software
- Measure product fill ratio — is the product occupying at least 85% of the frame?
- Check image dimensions — is the longest side at least 1,600 pixels?
- Confirm no text, watermarks, props, or logos are present
- Run the thumbnail test — reduce to 200px wide and evaluate clarity
- Compare your thumbnail against the top three competitors in your search result — are you visually distinct?
Secondary Image Audit
- Count your current images — are you using all available slots?
- Evaluate the sequence — does the order follow a logical buyer journey progression?
- Assess lifestyle image demographic match — does the person/environment reflect your actual target buyer?
- Check scale reference — is there an image that unambiguously communicates product size?
- Review infographic text legibility — display at 400px wide and verify all text is readable
- Check for video — is at least one product video uploaded?
A+ Content Audit
- Is A+ Content published on this ASIN?
- Does the A+ Content add new information not already in the main image stack?
- Is the A+ imagery consistent in style and quality with the main images?
- Are comparison modules present to help buyers choose between variants or understand relative value?
- Have Premium A+ modules been evaluated for eligibility?
Testing Cadence
- Is an active Manage Your Experiments test currently running on the hero image?
- Are test results documented and archived?
- Is there a scheduled review date for secondary image performance?
Work through this audit once per quarter at minimum. High-volume ASINs — those generating significant revenue or ad spend — merit more frequent review, especially when competitive dynamics in the category change. A competitor launching with a dramatically better image set is a signal to accelerate your own testing cadence.
Bringing It All Together: Your Images Are a System, Not a Collection
The most important conceptual shift in this entire article is this: your Amazon listing images are not seven separate photographs. They are a single, sequenced visual argument for why a buyer should choose your product over every alternative available to them in that moment.
Every slot has a defined job. The hero image earns the click. The lifestyle image earns the emotional connection. The scale reference removes a common purchase blocker. The infographic validates the analytical buyer. The close-up justifies the price premium. The use-case demonstration eliminates usage anxiety. The packaging shot completes the transaction mentally before the buyer has added to cart.
When any slot is absent, or when it’s doing a job that belongs to a different slot, the system breaks down. Buyers fall through the gaps — they reach the end of your image stack with an unanswered question, and they go find the answer on a competitor’s listing. Often, they buy there instead.
The sellers who understand this — who approach every image as a strategic tool within a larger system — convert at rates that make their competitors wonder what they’re doing differently. The answer is usually not that they have better products. It’s that they’ve built a visual argument systematic enough to close the sale before the buyer even gets to the bullet points.
Start with the audit. Fix the compliance issues first. Then address the strategic gaps. Then test. Then improve. The compound effect of iterating through that cycle — audit, fix, test, improve — is the only sustainable path to conversion rates that hold up regardless of what competitors do next.
Leave a Reply