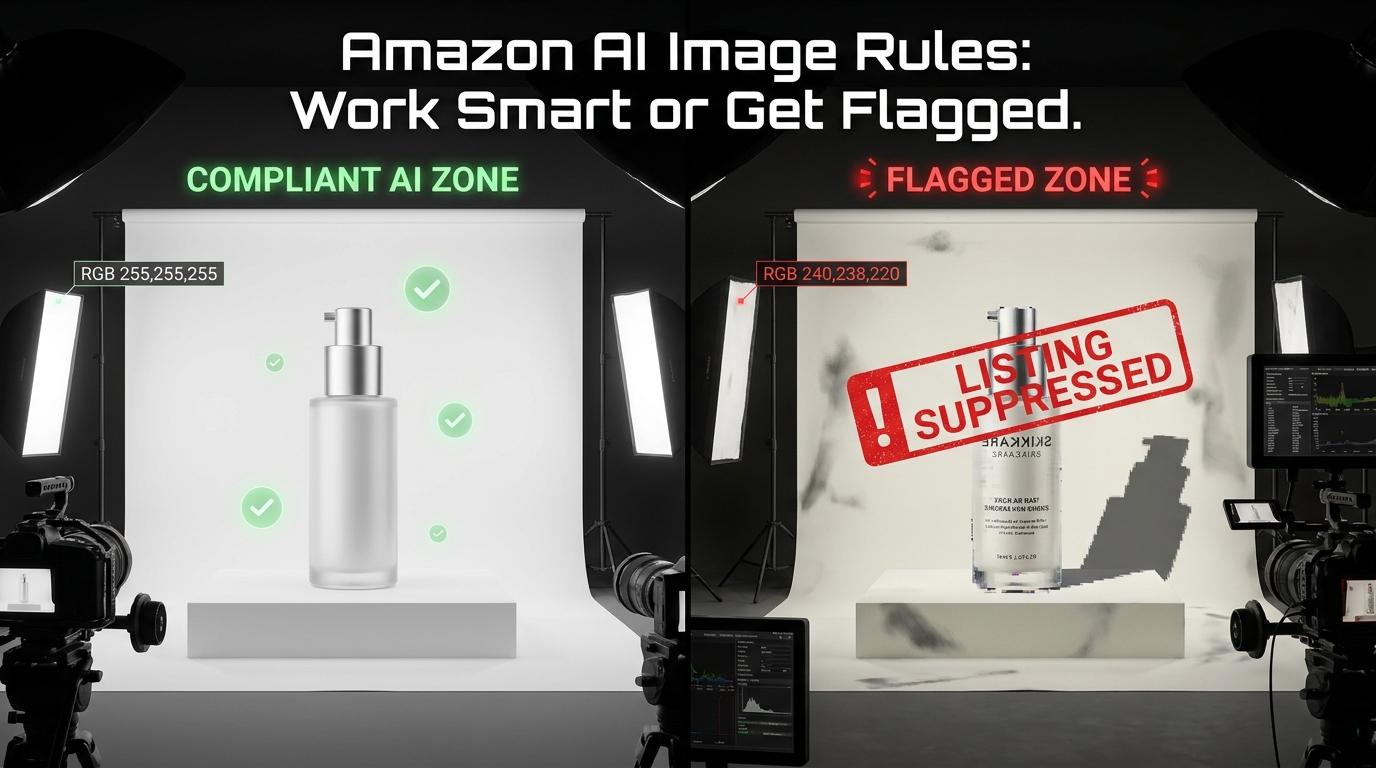
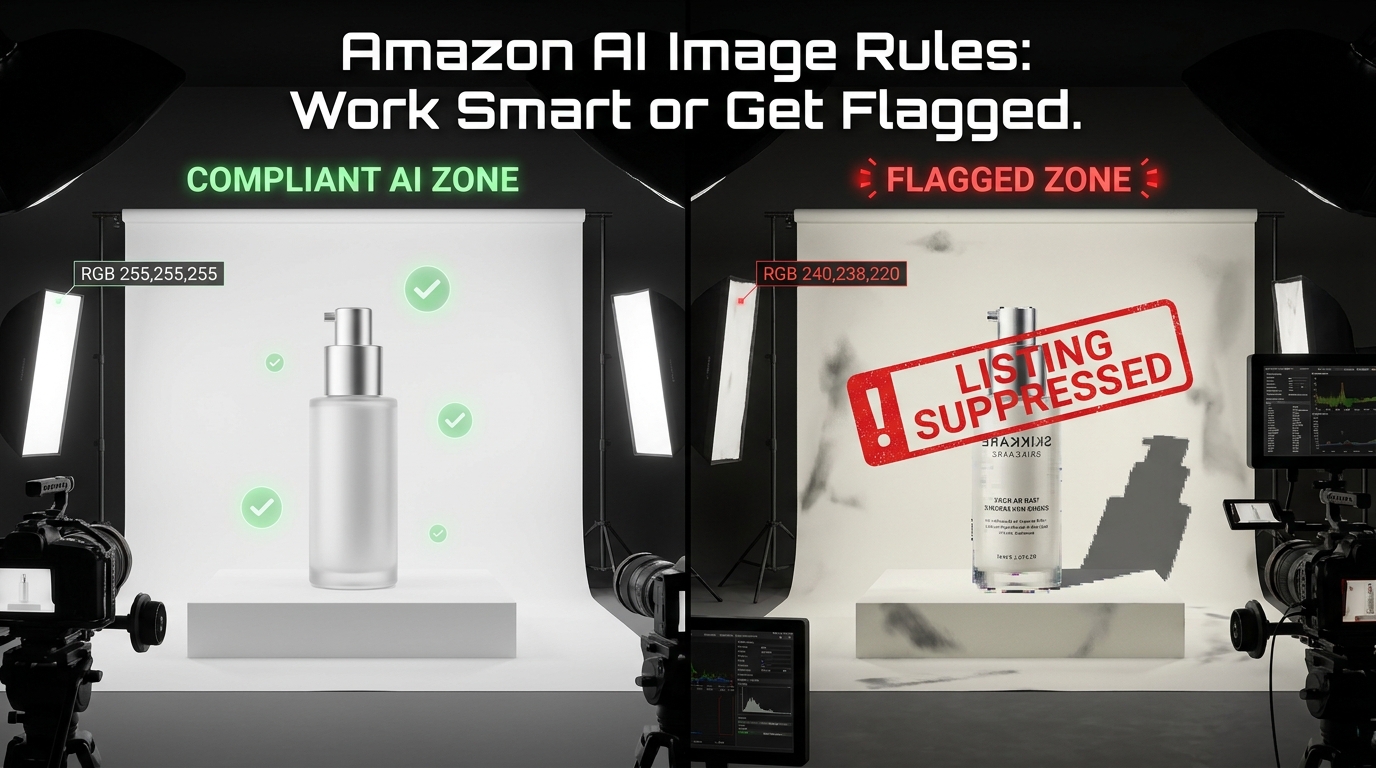
Amazon’s AI image rules aren’t complicated. They’re available in writing, summarized by a thousand seller blogs, and reinforced by category-specific style guides that have existed for years. And yet listings still get flagged every single day — not because sellers don’t know the rules, but because they don’t have a system that applies the rules consistently at every stage of the image production pipeline.
That’s the distinction almost every guide on this topic misses. Knowing a rule and operationalizing it are completely different problems. A seller can recite Amazon’s image requirements verbatim and still push a suppressed ASIN live, because the issue isn’t knowledge — it’s the gap between knowing and doing under the real-world pressures of a fast-moving catalog.
This post is not about what the rules say. It’s about how to build the workflow intelligence that makes compliance automatic — where flags become rare events rather than routine recoveries. We’ll cover how to allocate AI usage across image types, what specifically triggers Amazon’s automated scanning systems, how to stress-test images before submission, and how to use Amazon’s own tools in a way that’s both compliant and genuinely performant.
If you’re already familiar with Amazon’s policies and you’re still getting burned, this is the post for you. The goal isn’t to survive Amazon’s enforcement — it’s to make compliance your production standard so that enforcement is never a factor.
The Three-Tier Image Framework: Where AI Can and Cannot Touch Your Listing
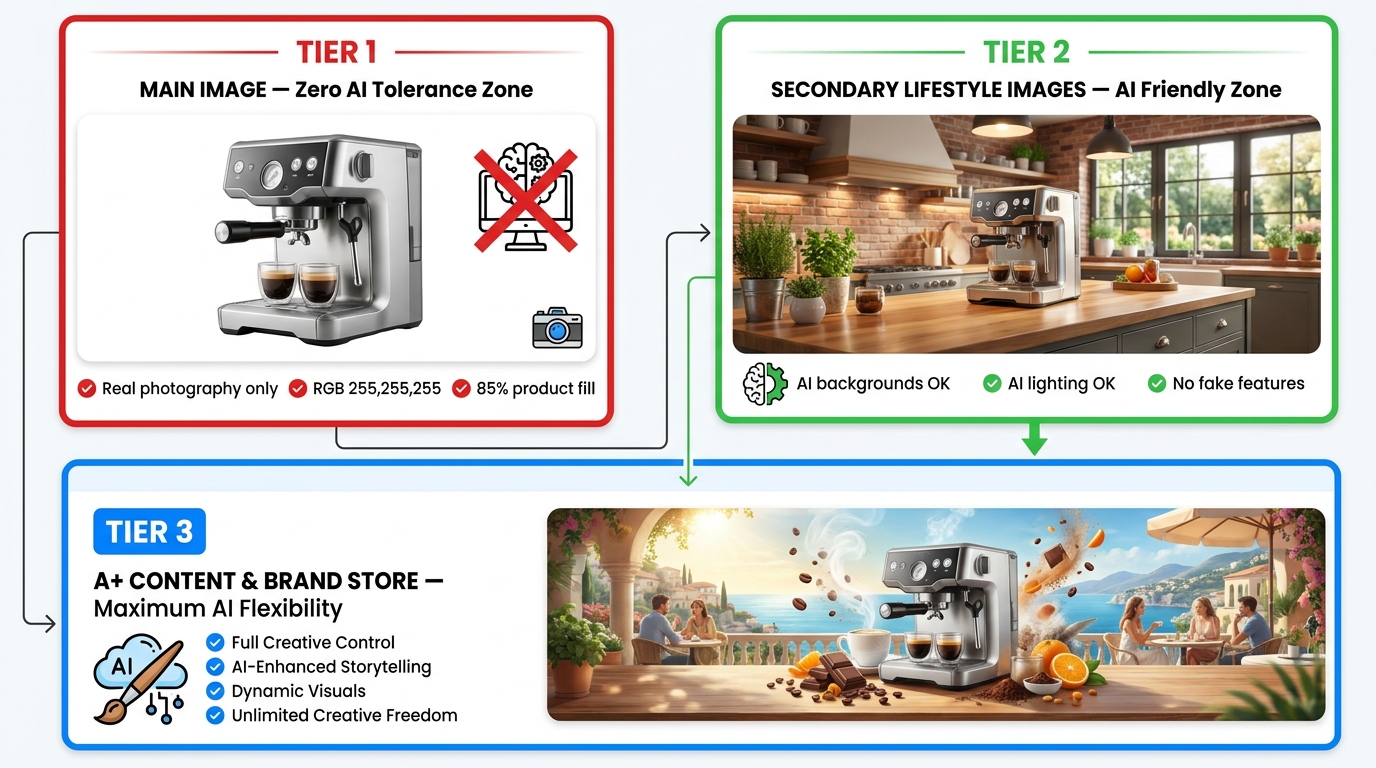
The first operational decision every seller needs to make — before touching any AI tool — is understanding that Amazon’s listing doesn’t have one image standard. It has three distinct image zones, each with its own risk profile, compliance ceiling, and AI-use rules. Treating them as uniform is where most multi-image catalog problems originate.
Tier 1: The Main Image — A Near-Zero AI Tolerance Zone
The main image slot is the strictest position in any Amazon listing. Amazon’s requirements here are well-documented and tightly enforced: pure white background (RGB 255,255,255 — not near-white, not off-white, not a 97% white that “looks the same”), product filling at minimum 85% of the image frame, no props, no additional items not included in the purchase, no text overlays, no logos, no watermarks. Resolution minimum is 1,000 pixels on the longest side, but most experts now recommend 2,000px as a practical floor given zoom functionality and future-proofing against re-spec changes.
AI’s role in Tier 1 is almost entirely limited to post-processing cleanup — and even then, cautiously. Background removal tools and AI-powered background replacement to pure white are commonly used and generally fine, provided the output is pixel-verified and not gradient-edged. Where sellers get into trouble is using AI image generators to create the main image entirely from scratch. An AI-generated product rendering, however photorealistic, is not a photograph, and Amazon’s enforcement systems — which now incorporate ML-based artifact detection — are increasingly able to identify renders vs. real photography, particularly on hero shots where lighting consistency and shadow physics are readily compared.
The practical rule for Tier 1: photograph the physical product, then use AI for cleanup only. Any AI that touches the product itself — its shape, color, scale, or implied features — is a compliance risk.
Tier 2: Secondary/Lifestyle Images — The AI-Friendly Zone (With Boundaries)
This is where AI earns its place in a seller’s workflow. Images 2 through 9 in the standard listing carousel are subject to much more lenient standards. Amazon’s core requirement for these slots is accuracy — that the images don’t misrepresent what the product is, what’s included, or what the product can do. Within that constraint, AI-generated backgrounds, environments, lifestyle scenes, and visual enhancements are broadly permitted.
In practice, this means you can use AI to place your product in a kitchen, on a hiking trail, in a premium hotel bathroom, or on a café table — as long as the product itself is accurately rendered and the context doesn’t imply functionality the product doesn’t have. You can use AI to adjust lighting, improve scene quality, add models, and create seasonal variants. This is where most of the performance gains from AI imagery are realized, and it’s where Amazon’s own tools (covered in detail below) are explicitly designed to operate.
Tier 3: A+ Content and Brand Store — Maximum Creative Latitude
At the A+ Content and Brand Store level, Amazon’s creative latitude is at its widest. Here, sellers and brand-registered vendors can use AI-generated imagery, banner compositions, infographic overlays, comparison charts, and environmental scenes with relatively few restrictions beyond the core “not misleading” standard. The focus shifts from product-accurate photography to brand storytelling and conversion-focused content design.
Critically, the AI-detection enforcement that operates on listing images is significantly less aggressive in A+ Content, where compositional complexity makes automated artifact detection harder. That said, the “accuracy” principle still applies: you cannot use A+ Content images to claim a product feature that doesn’t exist or to imply inclusion of items not sold with the product.
The Specific AI Artifacts That Trigger Amazon’s Automated Scanners
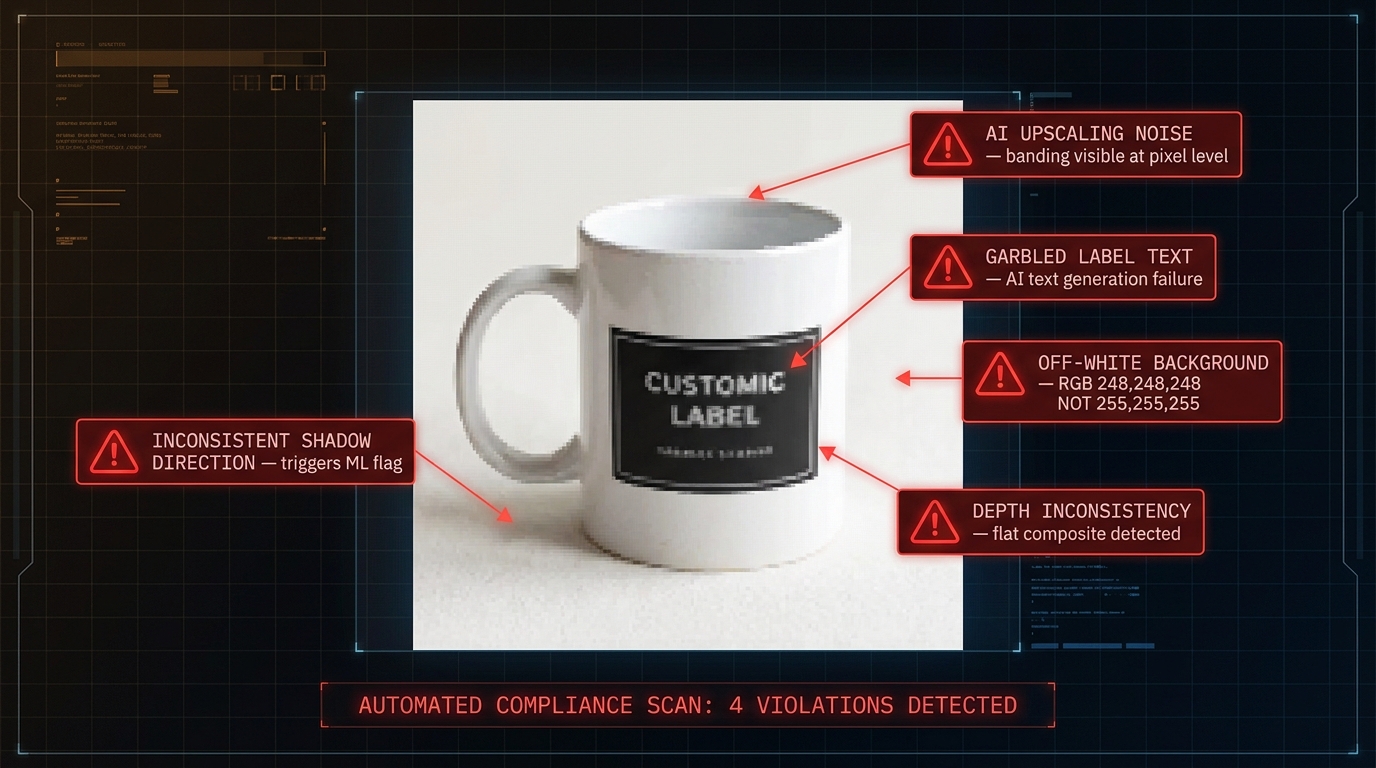
Understanding what Amazon’s automated systems are looking for is the most direct path to understanding what not to do. Amazon deploys ML-based image scanning across its catalog, and the signals that trigger automated suppression or manual review flags fall into several well-documented categories.
Background Compliance Signals
The most common automated flag on main images is background non-compliance. Amazon’s system doesn’t evaluate background color visually — it runs pixel-level analysis. An image that looks white to the human eye can register as RGB 250,250,250 or lower, and that delta is detectable and actionable. When AI background replacement tools process a product image, they commonly leave “fringe” pixels around the product edge that transition from the original background to white — this gradient zone is a reliable suppression trigger. The fix is not “make it look whiter.” The fix is pixel-sampling the final export to confirm every non-product pixel reads 255,255,255.
AI image upscaling is a specific sub-problem here. Many sellers use AI upscalers to meet Amazon’s resolution requirements on images that were originally photographed at lower resolution. These tools frequently introduce compression-style banding or noise, particularly in flat background areas, that creates measurable deviation from the pure white standard. If you’re upscaling, verify the background explicitly — don’t assume the tool handled it correctly.
Shadow and Lighting Inconsistency
Amazon’s ML systems are trained to detect lighting inconsistencies that signal composite imagery — specifically, cases where a product has been photographed in one lighting environment and placed into a different one without correcting the shadow direction, intensity, or color temperature. This is common when AI tools auto-place products into lifestyle backgrounds and the product shadow doesn’t match the scene’s apparent light source.
For secondary lifestyle images this generally won’t cause suppression, but it will degrade the visual credibility of the image in ways that affect conversion rates. For main images, a composite where shadows suggest the product was photographed under studio lighting but the background is a lifestyle scene is an almost certain flag. The rule of thumb: match shadow direction and soft/hard quality to the scene’s light source, or remove product shadows entirely in clean composites.
AI-Generated Text and Label Artifacts
Current AI image generation tools have a well-known weakness with text — rendered product labels, instruction text, brand names, and ingredient lists frequently contain garbled, nonsensical, or malformed characters that are visually obvious at zoom levels. Amazon’s systems scan for text consistency and legibility in product images, and garbled on-image text is both a suppression signal and a customer-experience flag.
The operational fix is to never rely on AI generators to produce readable product label text. Generate the scene without legible label detail, then composite the real product label on top as a post-processing step. Alternatively, shoot the product physically and use AI only for environmental generation, compositing the physical shot into the AI-generated scene. This hybrid approach is the current best practice for AI-enhanced product imagery and eliminates the text artifact problem at source.
Depth and Scale Inconsistency
AI-generated lifestyle scenes frequently produce products that appear visually “pasted” — the scaling relative to scene elements is off, the perspective doesn’t match, or the depth of field blur gradient doesn’t align with where the product sits in the apparent scene depth. These signals are softer than background or text issues in terms of automated enforcement, but they register in Amazon’s image quality scoring systems, and more importantly they register with shoppers in ways that reliably reduce CTR and conversion.
Amazon’s Own AI Tools vs. Third-Party Generators: The Compliance Risk Is Not Equal
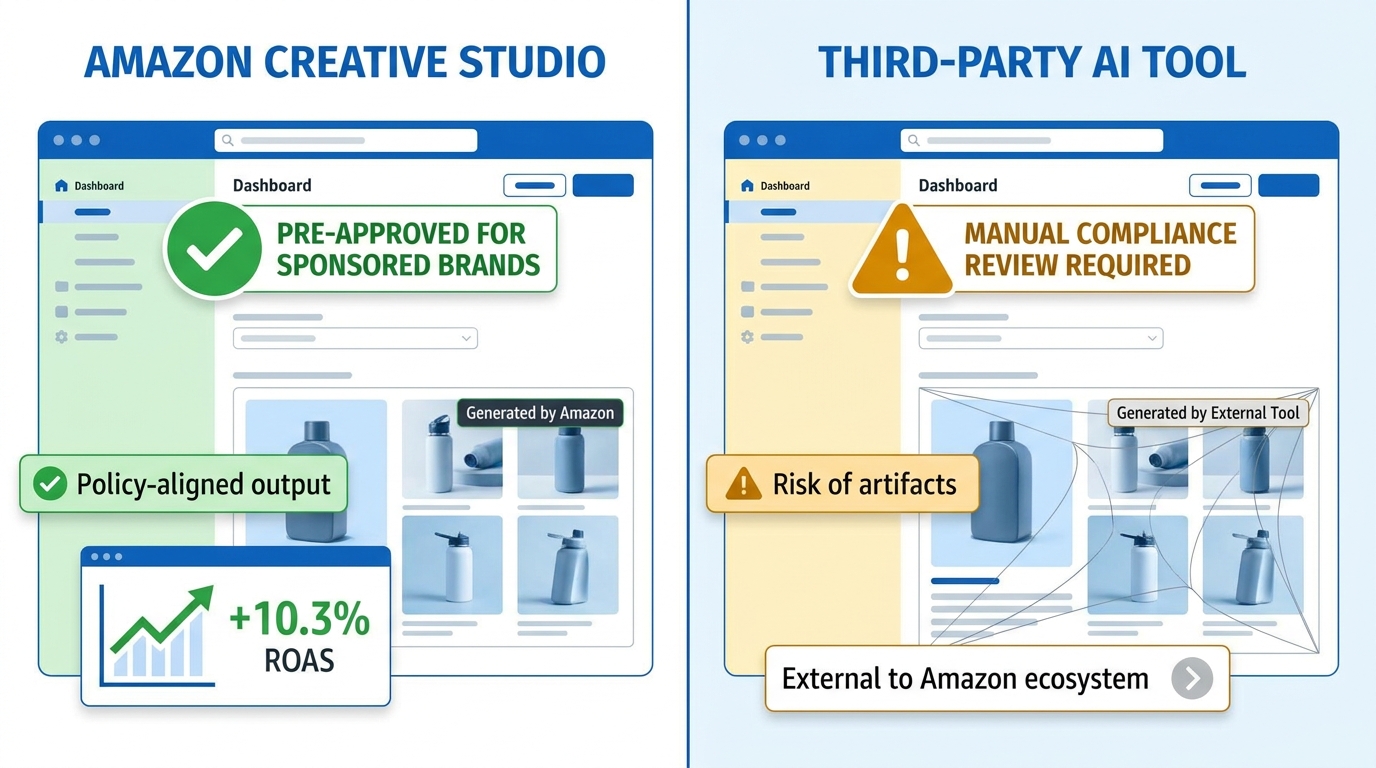
This is a point that gets surprisingly little attention in the seller community: where your AI-generated images come from matters for compliance purposes, not just quality purposes. Using Amazon’s own AI image tools creates a fundamentally different compliance profile than using external third-party generators.
Amazon Creative Studio and the Built-In Policy Alignment Advantage
Amazon’s own image generation tools — accessed via Creative Studio, the Ads console, Sponsored Brands creative flows, and the DSP Responsive eCommerce Creative (REC) system — are built within Amazon’s own policy framework. They generate images from product detail page data, meaning the product representation comes from your existing listing content rather than a generic AI prompt. The scenes they produce are filtered through Amazon’s own compliance guidelines at the generation layer, not the review layer.
Amazon’s internal performance data on these tools is notable: Sponsored Brands campaigns using AI-generated lifestyle images from Creative Studio have shown approximately 10.3% higher ROAS compared to campaigns using standard product-only images, according to Amazon Ads materials. Mobile Sponsored Brands placements using AI-generated creative have shown CTR improvements of up to 40% in some Amazon-reported beta data. These numbers come from Amazon’s own systems and should be read as directionally informative rather than universally guaranteed — your category, price point, and creative quality all affect outcomes — but the direction of the signal is consistent.
More importantly for the compliance discussion: images generated within Amazon’s own Creative Studio are pre-screened against Amazon’s policies before they’re available for use. You are significantly less likely to face an automated flag on a Creative Studio output than on an identical-looking image generated in an external tool, because the output came from a system Amazon controls and trusts.
Third-Party AI Generators: Performance Potential, Compliance Responsibility
External tools — Midjourney, DALL-E, Stable Diffusion, and dozens of purpose-built product photography AI platforms — offer wider creative latitude, more photorealistic outputs for many product types, and more scene variety than Amazon’s native tools. For sellers who invest in learning these tools deeply, the creative output is often significantly higher quality than what Creative Studio currently produces.
The trade-off is that compliance responsibility sits entirely with you. Amazon’s automated systems have no knowledge of what tool produced an image — they evaluate the output against policy standards, and they do so without preferential treatment for any external vendor. The artifact risks described in the previous section are entirely your problem to catch. The solution isn’t to avoid third-party tools — it’s to build a robust pre-submission QA process that catches what Amazon’s systems will catch, before you submit.
A Practical Hybrid Framework
The most effective approach for brand-registered sellers is a split workflow. Use Amazon’s native Creative Studio for advertising creatives and Sponsored Brands images, where the built-in compliance assurance and direct performance data make it a clear default choice. Use third-party AI tools for secondary listing images, A+ Content, and Brand Store assets, where creative quality matters more and compliance risk is lower. Reserve traditional photography for all main images, with AI used only for post-processing background work and color correction — never for primary product rendering.
The Secondary Image Opportunity: Where AI Has Almost No Limits
If the main image is where AI goes to die, the secondary image carousel is where it genuinely performs. The eight available secondary image slots on a standard Amazon listing are chronically underused by most sellers — and the ones who invest in them seriously, particularly with AI-enhanced lifestyle content, see measurable conversion rate improvements that compound directly into organic ranking and paid advertising efficiency.
What Converts in Secondary Images
Research and seller-community data consistently point to the same secondary image patterns that convert: contextual use scenes showing the product in its natural environment, scale reference shots that help shoppers understand size, feature callout images that highlight specific product attributes with clean visual annotation, and lifestyle images showing the product with an aspirational or relatable user.
AI is particularly effective at contextual use scenes, because these are environments that would be expensive and logistically complex to shoot physically. A camping lantern shown in a forest clearing at dusk, a kitchen appliance shown in a premium modern kitchen, a skincare product shown in a spa-like bathroom — these scenes cost thousands of dollars to stage and shoot physically but can be generated and iterated in minutes with AI tools. The compliance check is simply: does the product in the image accurately represent the product being sold, with no features, colorways, or bundled items that aren’t real?
Feature Callout Images and Infographic Overlays
One of the most underappreciated uses of AI in secondary images is not generating entire scenes but generating clean backgrounds and layouts for feature callout images. An AI-generated white or gradient background with your real product photograph composited onto it, combined with clean typographic callouts highlighting key features, is one of the highest-converting secondary image formats on Amazon — and it’s entirely compliant, because the image is transparently informational rather than representational.
The compliance boundary to watch: feature callouts must be accurate. If a callout says “antimicrobial coating” and the product doesn’t have one, that’s not an AI compliance issue — it’s a broader misrepresentation issue that falls under Amazon’s customer-trust policies and can result in far more serious consequences than an image flag.
Comparison and Size Reference Images
AI can generate comparison imagery that helps shoppers make purchase decisions — size comparison against a common object (a coin, a hand, a standard item), before/after effect imagery for consumables, and product variant comparisons showing colorway or size differences. These formats perform particularly well in categories where size misjudgment is a common return driver. Generating these with AI rather than staging them physically saves significant production cost while improving listing quality in one of the highest-ROI secondary image formats.
The Main Image Problem: Why AI Enhancement Often Backfires on Hero Shots
Given the performance stakes of the main image — it’s the most direct driver of search result CTR, which is the most direct driver of organic ranking velocity — it’s worth addressing in detail why AI enhancement of the main image so often creates more problems than it solves.
The False Economy of AI Background Removal
AI background removal tools are reliable enough that many sellers use them as a default step in main image processing. For simple products with clean contours — a book, a box, a bottle — they work well. For products with complex edges — textured surfaces, transparent elements, mesh materials, hair, fur, multiple interlocking components — AI background removal consistently produces visible fringe artifacts, edge halos, and missing product detail that is clearly visible at the zoom levels Amazon shoppers regularly use.
The false economy is this: running a product image through an AI background remover feels like a QA step, but it actually introduces compliance risk that didn’t exist before. A product photographed on a slightly-off-white physical backdrop, processed through a poor AI background removal that leaves artifact fringe, will perform worse and face higher suppression risk than the original image with the “wrong” background color. If you’re going to use AI for background work on main images, invest in pixel-level output verification — specifically, eyedropper-sampling the exported image at multiple background points to confirm RGB 255,255,255. Don’t eyeball it.
The Upscaling Trap
AI upscaling to meet Amazon’s resolution requirements is another common source of hidden compliance problems. The upscaling itself is generally fine — AI super-resolution tools do an excellent job of enhancing perceived sharpness and recovering detail. The problem is what they do to flat background areas. Where a plain white background in a lower-resolution image is genuinely flat (all pixels at 255,255,255), an AI upscaler interpolates between pixels and can introduce subtle variation in what was previously a uniform surface. The result is a high-resolution image that passes visual inspection but fails a pixel-level background uniformity check.
The fix is to run background replacement after upscaling, not before. Upscale the image, then apply background replacement to the upscaled version, then verify RGB. This order of operations prevents the upscaling step from contaminating the background compliance.
When Real Photography Is Non-Negotiable
There are product categories where AI image generation for main images simply cannot produce reliable compliance-safe output in 2026: jewelry (where metal finish, gemstone color, and scale are all high-stakes and easily misrepresented by AI rendering), clothing and apparel (where texture, drape, and fit under real-world light are critical and AI consistently misrepresents them), and complex electronics (where label text, port layouts, and indicator light positions are product-specific details that AI cannot reliably replicate). In these categories, the main image must be a physical photograph. AI belongs in the supporting role, not the principal one.
Pre-Submission QA: The 11-Point Process That Catches Issues Before Amazon Does
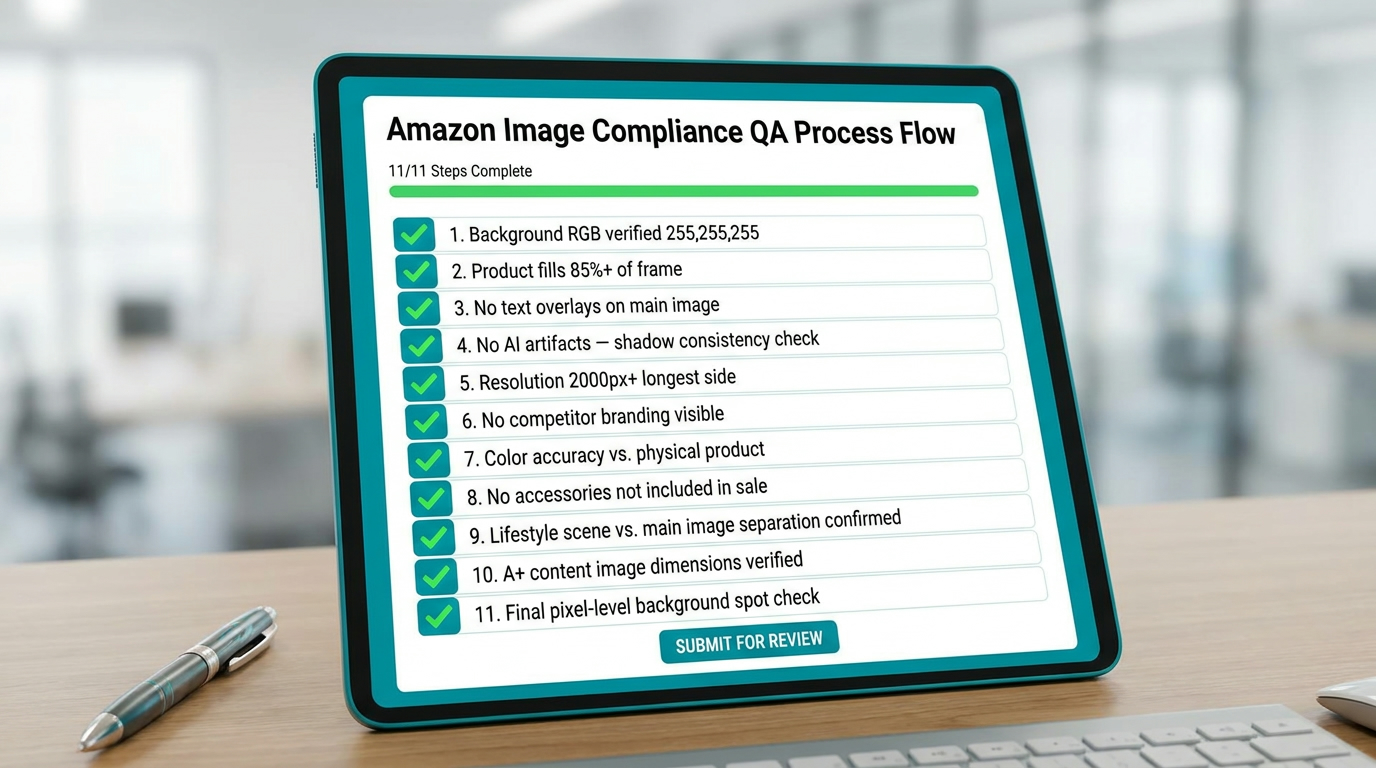
The most cost-effective investment in avoiding listing suppression is a pre-submission QA process that systematically checks every compliance variable before an image ever reaches Amazon’s servers. What follows is a practical, step-by-step process that any seller or agency can implement — with tool suggestions where applicable.
Step 1: Background RGB Verification
Open the final image export in any image editing tool (Photoshop, GIMP, Canva Pro all work). Use the eyedropper or color picker tool to sample at least five background points: four corners and the center. Every point must read R:255, G:255, B:255. One failing sample means the image needs reprocessing before submission.
Step 2: Product Fill Percentage Estimate
The product should occupy approximately 85% or more of the image frame. A quick way to estimate: if the product has clear space of more than roughly 7–8% of the image width on each side, it may be undersized. For compliance-critical catalogs, some sellers use a simple grid overlay in Photoshop to measure this precisely.
Step 3: Text and Overlay Check
Main images cannot contain any text overlays, watermarks, logos (other than on the physical product itself), badges, “new,” “sale,” or promotional indicators, or foreign-language text. Scan the image carefully — AI-generated images sometimes include environmental text (a street sign in the background, text on a surface) that isn’t intentional but will trigger an overlay flag.
Step 4: Shadow Consistency Analysis
Identify the apparent light source direction from the product shadows. Confirm that the shadow direction, softness, and length are consistent with a single light source. Multiple competing shadow directions are an AI composite indicator.
Step 5: Product Label and Text Legibility
Zoom in on any text visible on the product — label copy, instruction text, brand name, ingredient lists, warning text. Every character must be legible and match the physical product. If AI-generated imagery produced this text area, it almost certainly needs to be replaced with a composited version from the real product.
Step 6: Resolution Confirmation
Check the pixel dimensions of the export. Minimum 1,000px on the longest side for listing; aim for 2,000px or higher for main images to enable full zoom functionality. JPEG export quality should be at 80%+ to avoid compression artifacts in background areas.
Step 7: Color Accuracy Check Against Physical Product
Place the digital image next to the physical product (or next to a color-accurate photograph of the physical product) and compare. AI-generated imagery can subtly shift color tones, especially in lighting conditions that don’t match the product’s actual surface properties. A blue product rendered 10% more saturated than it really is will generate returns and negative reviews from customers who feel misled.
Step 8: Included Items Verification
Every item visible in the image must be included in the purchase, or clearly labeled as a prop not included. This is an easy mistake in AI lifestyle imagery where a generated scene might include a complementary product (a glass next to a blender, a phone next to a charging stand) that isn’t part of the bundle. Amazon’s policies treat this as a misrepresentation of what the customer receives, and complaints generate flags faster than automated systems do.
Step 9: Lifestyle vs. Main Image Slot Verification
Confirm the right image type is in the right slot. A lifestyle image with a non-white background in the main image position will trigger an automated suppression. Double-check image slot assignments before batch uploading — this is one of the most common and most preventable suppression causes.
Step 10: A+ Content Dimension Verification
A+ Content images have specific dimension requirements that differ from listing images. Amazon will reject or auto-crop A+ images that don’t meet its module-specific size specs. Verify dimensions against the current A+ Content module requirements before uploading, particularly if images were generated for a different format and adapted.
Step 11: Pixel-Level Background Spot Check on Final Export
This is a repeat of Step 1 performed specifically on the final-format export — the actual file you’ll upload, not the working file. Color profiles can shift on export, particularly between RGB and sRGB, and what reads as 255,255,255 in your working file can sometimes shift on export if the color profile isn’t properly managed. Save in sRGB, export as JPEG, sample the background of the exported file before uploading.
Testing Your Images Without Risking Suppression: Smart Experimentation on Amazon
Image optimization is an ongoing process, not a one-time task. The sellers who extract maximum performance from their listings treat image selection as a testable hypothesis — not an opinion — and run structured experiments to identify which visuals drive better CTR and conversion. Doing this safely and compliantly requires understanding the testing infrastructure Amazon provides and where its limits are.
Manage Your Experiments: The Compliant Testing Ground
Amazon’s Manage Your Experiments (MYE) tool, available to Brand Registry sellers, is the only fully Amazon-sanctioned method for A/B testing listing content including images. The tool runs a 50/50 traffic split between two versions of a listing element — main image, title, bullet points, A+ Content — and runs until statistical significance is reached at approximately the 95% confidence level. Standard test duration ranges from 4 to 10 weeks depending on traffic volume.
The MYE tool matters for compliance because images in an active experiment are explicitly covered under Amazon’s testing framework, meaning you’re not at risk of suppression for having a non-standard variant in test during the experiment period. However, this protection applies to the testing framework, not to images that violate hard policy rules — an image with a non-white background will still get flagged even inside an experiment.
What to Test and How to Structure Hypotheses
The most valuable image tests follow a principle of genuine differentiation — testing fundamentally different visual concepts rather than minor iterations of the same idea. Testing a studio shot with white background vs. the same photo with a slight vignette is not a meaningful test. Testing a pure product shot vs. a product-in-use contextual shot is a meaningful test that generates learnable signal about how your audience makes purchase decisions.
Common high-ROI test structures: main image hero angle vs. three-quarter angle, product-only vs. product-with-scale-reference, single-product vs. multi-unit value proposition, studio lighting vs. natural light aesthetic. Each of these tests a different hypothesis about buyer psychology and generates results that are applicable across your catalog, not just the ASIN under test.
Using Advertising Data as an Image Pre-Test
Before committing to a full MYE test cycle, many experienced sellers use Sponsored Products and Sponsored Brands advertising data as a faster, lower-commitment signal on image quality. By running two separate campaigns with identical targeting but different image creatives, you can get directional CTR signal in 7–14 days rather than the 4–10 weeks required for a full MYE test. The data isn’t as clean — ad context differs from organic listing context — but it’s significantly faster for filtering out clearly underperforming images before they consume a full experiment cycle.
When You Do Get Flagged: A Practical Recovery Protocol
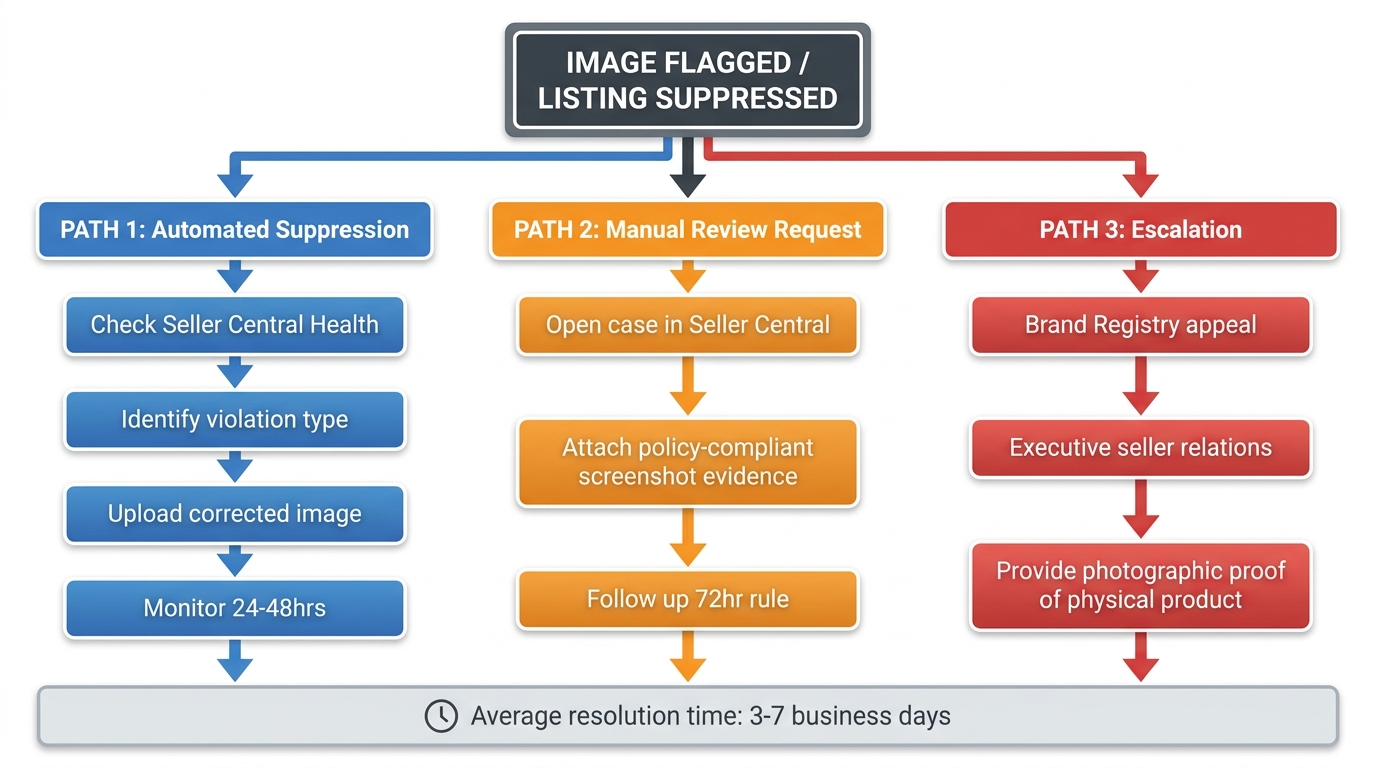
Despite best efforts, image flags happen. When they do, the speed and quality of your response determines how much revenue impact you take. The sellers who handle suppression most effectively are those who have a documented recovery protocol ready to execute — not those who start troubleshooting from scratch every time.
Step 1: Diagnose Before You Act
The first action when a suppression notice appears is diagnosis, not immediate re-upload. Amazon’s suppression notices often specify the violation type — background non-compliance, prohibited content, resolution failure, missing image requirement. Read the notice carefully before doing anything else. Acting on incorrect assumptions about what was flagged (and uploading a “fix” that doesn’t address the actual violation) extends the suppression and wastes the case-opening window.
Access your Account Health dashboard in Seller Central and cross-reference the suppression notice with the specific ASIN and image slot affected. Identify whether the suppression is automated (immediate, policy-rule-based) or manual (involves a human review and is usually accompanied by more specific language). These require different response paths.
Step 2: Prepare and Upload the Corrected Image
Once the violation type is confirmed, prepare a corrected image that definitively addresses it — ideally using a physically photographed product image for main image violations to eliminate any residual AI artifact risk. Run the corrected image through your full pre-submission QA checklist before uploading. Uploading a corrected image that has a different compliance issue is a common and costly mistake that extends resolution time significantly.
For automated suppression of main images, uploading a compliant replacement is often sufficient to trigger automatic reinstatement within 24–48 hours. Amazon’s systems re-scan uploaded images against compliance criteria, and a clean upload resolves the vast majority of automated flags without further intervention needed.
Step 3: Open a Seller Central Case When Automated Resolution Stalls
If a compliant replacement image doesn’t resolve the suppression within 48 hours, open a Seller Support case. The case should include: the specific ASIN, the image slot affected, a screenshot of the suppression notice, and explicit confirmation of what you’ve done to address the cited violation. Be precise and factual — Seller Support cases resolved via vague descriptions take significantly longer than cases with specific, documented evidence.
If the suppression involves a Brand Registry listing, use the Brand Registry support channel rather than standard Seller Support. Brand Registry cases are typically handled by a more specialized support team and resolve faster for image compliance issues.
Step 4: Escalation for Complex Cases
For suppressions that persist beyond 5–7 business days despite compliant image uploads and active support cases, escalation options include Brand Registry executive seller relations, Amazon Vendor Central pathways for hybrid sellers, and for high-volume sellers, escalation via an Amazon Account Manager if one is assigned to the account. Escalation cases require physical product evidence — photographs or videos of the actual product demonstrating the compliance of the re-submitted image — so have this documentation ready before escalating.
Category-Specific Nuances: One Policy, Many Interpretations
Amazon’s image policies are written as universal standards, but their enforcement and practical interpretation vary meaningfully by product category. Understanding these category-specific nuances prevents sellers from applying a one-size-fits-all approach that may be unnecessarily restrictive in some contexts and dangerously loose in others.
Apparel and Softlines
Apparel has among the strictest main image requirements of any Amazon category, with additional rules around product presentation on models vs. flat-lay vs. ghost mannequin formats. Amazon’s category style guide for apparel specifies which product types require a model, which may use flat-lay presentation, and size requirements for model photography. AI-enhanced apparel photography carries high risk — fabric texture, drape, and fit under real lighting conditions are almost always misrepresented by AI rendering, and the return rate signal from misrepresented apparel is a category-level metric Amazon monitors closely.
Health and Beauty
The Health and Beauty category has heightened sensitivity around before/after imagery, result claims in images, and anything that implies medical benefit. AI-generated imagery in this category that includes a “before/after” comparison showing health or beauty results will be flagged for claims review independent of technical compliance. Secondary images in H&B need to be particularly clean on the “accuracy” dimension — anything that implies a clinical or medical outcome needs to be supported by the product’s actual claims and Amazon’s health claims policy.
Consumables and Grocery
Grocery and consumables ASINs are subject to close scrutiny on serving size representation, portion accuracy, and packaging claims. AI-generated imagery that shows a serving or portion that doesn’t accurately represent the product’s actual content per package will generate customer complaints that escalate to catalog-level reviews. This category is also subject to stricter label legibility standards, since incorrect nutritional or ingredient information in product images carries regulatory risk beyond Amazon’s internal policies.
Home and Furniture
Furniture and large home goods are a category where AI lifestyle imagery is particularly well-suited — the scale and staging costs of physical furniture photography are enormous, and AI-generated room scenes are both more practical and often higher quality than physical staging. The compliance watch point in this category is scale accuracy — furniture product images must represent the actual dimensions of the product, and AI-generated room scenes frequently misrepresent furniture scale relative to the room, generating returns from customers whose pieces don’t fit the space they expected based on the image.
Building Your Compliant AI Image Stack: Tools, Workflow, and Team Roles
Pulling together everything covered in this post into a functioning workflow requires both the right tools and clearly defined team roles. The sellers and agencies who execute this consistently well are those who’ve turned what could be ad-hoc creative decisions into a documented, repeatable production system.
The Recommended Toolchain
Photography: Physical photography remains the foundation for main images across all categories. Smartphone photography at 4K resolution with a proper light box and white backdrop is sufficient for most product categories — you don’t need a professional studio if you have adequate light control and a stable setup.
Background processing: For main image background removal and replacement, tools like Adobe Photoshop’s Remove Background, Canva Pro’s background removal, or dedicated tools like Pixelcut and Clipping Magic work well — but always follow with pixel-level RGB verification of the exported file.
AI lifestyle scene generation: For secondary image lifestyle scenes, Amazon’s own Creative Studio is the recommended primary tool for advertising creatives. For listing secondary images, dedicated AI product photography platforms like Pebblely, Booth.ai, or StudioAI (purpose-built for e-commerce product photography) produce more reliable compliance-safe outputs than general-purpose generators like Midjourney or DALL-E, because they’re designed specifically for product imagery conventions.
AI upscaling: Topaz Photo AI or Upscale.media for resolution enhancement when original photography is below 2,000px. Always re-verify background RGB after upscaling, not before.
A+ Content design: Canva Pro or Adobe Express for A+ Content layout work, with AI-generated background scenes composited in from your preferred generator tool. These tools handle the dimension requirements and export profiles for A+ Content formats reliably.
Team Roles and Decision Points
In a small seller operation, a single person handles the entire image workflow. The risk there is that the same person who generates images also approves them, which eliminates the independent QA check that catches the compliance issues a creator naturally becomes blind to. Even in a one-person operation, build in a time-gap review — generate today, QA review tomorrow with fresh eyes.
In larger operations, the workflow should have distinct roles: image production (generates and edits), compliance QA (applies the 11-point pre-submission checklist independently), and listing upload (responsible for correct slot assignment and final submission). This separation of concerns is what prevents the “I’ll fix it after” rationalization that precedes most preventable suppression events.
Keeping Up With Policy Changes
Amazon’s image policies evolve. Category style guides are updated, enforcement priorities shift, and new AI-detection capabilities get deployed. Build a quarterly review of Amazon’s category-specific style guides into your operational calendar — specifically the style guide for your primary categories, the Amazon Seller Central image standards page, and the Brand Registry image policy documentation if you’re brand-registered. This takes 30 minutes per quarter and prevents surprises that take days to fix.
Compliance as a Competitive Moat, Not a Ceiling
The most important reframe in this entire discussion is treating image compliance as a competitive advantage rather than a constraint. In a marketplace where a meaningful portion of sellers are operating with suppression risk baked into their daily workflow, the seller who has built a system that produces compliant, high-quality images consistently — without incident and without rework — has a structural operational advantage that compounds over time.
The Compound Effect of Clean Operations
Every suppression event costs revenue, ranking momentum, and operational attention. A listing that goes dark for 3–5 days while a suppression resolves loses sales velocity, loses organic ranking signal, and may lose paid advertising learning data in algorithm-driven campaigns. For high-velocity ASINs, even a 48-hour suppression can cost more in lost ranking recovery than a year’s worth of image QA investment would have prevented it.
Conversely, a catalog that has never had an image suppression maintains cleaner account health metrics, builds a stronger relationship with Amazon’s systems, and faces less friction in Brand Registry reviews, A+ Content approval, and new product launch indexing. The seller who has built compliance into their production standard accumulates these small advantages invisibly — they never show up as a line item, but they compound into meaningful catalog-level performance over 12–24 months.
The AI Opportunity That Compliant Sellers Capture
Here is the final, practical point: the sellers who are most cautious about AI image rules are often those who haven’t built a production system clear enough to use AI safely. The sellers who embrace AI within a disciplined workflow — using it where it’s genuinely powerful (secondary images, A+ Content, advertising creatives), keeping it out of where it’s genuinely risky (main images without physical photography anchoring), and verifying output before submission — are not just staying compliant. They’re reducing production costs, increasing listing visual quality, running more creative tests, and improving conversion rates.
Amazon’s AI image rules, read correctly, are not a constraint on AI use. They’re a constraint on careless AI use. The distinction matters enormously in practice. Build the workflow that turns them into a standard your entire catalog runs on reliably, and the rules stop being something you manage against and start being the system that generates your competitive advantage.
Actionable Takeaways
- Tier your AI usage explicitly: Define which image slots in your workflow can use AI generation, which require physical photography, and which can use AI post-processing only. Write this down and enforce it as a production standard, not a guideline.
- Implement the 11-point QA checklist as a pre-submission requirement on every image. Build it into your workflow SOP so it happens consistently, not selectively.
- Default to Amazon’s own Creative Studio for advertising creative images and Sponsored Brands. The compliance pre-screening and documented performance data (+10.3% ROAS, up to 40% higher mobile CTR) make it the lowest-risk, reliable-return choice for that specific use case.
- Use AI aggressively in secondary images and A+ Content — this is where the creative upside lives, where enforcement is softer, and where production cost savings are most significant relative to traditional photography.
- Build a suppression recovery protocol before you need it. Decide now who will handle a flag, what the first three actions are, and what documentation you’ll need. Having this ready reduces revenue loss per incident by days.
- Review category style guides quarterly. Amazon’s enforcement priorities shift with minimal announcement. Staying current takes 30 minutes per quarter and prevents surprises that take days or weeks to fix.
- Treat compliance clean-rate as a catalog KPI. Track suppression events per quarter as a proportion of your total ASIN count. A trend in the wrong direction signals a workflow problem — the fix is process, not policy knowledge.
Leave a Reply